
Datasheet
Page 1
...g* • Maximum throughput maintained with Automatic and Dynamic Data Rate Switching • Windows-based wireless technology with a simple graphical user interface • Stream videos, download files... • Improves data transfer speeds with supercharged speed, range and reliability. Upgrade to TRENDnet's Wireless N Express Card and enjoy faster than wired speeds with your laptop wirelessly with...(WPS) to quickly and safely network your valuable data. wireless Wireless N Express card TEW-642EC(V1.0R) Wireless N Express Card* allows you to connect your wireless connection. Enjoy...
...g* • Maximum throughput maintained with Automatic and Dynamic Data Rate Switching • Windows-based wireless technology with a simple graphical user interface • Stream videos, download files... • Improves data transfer speeds with supercharged speed, range and reliability. Upgrade to TRENDnet's Wireless N Express Card and enjoy faster than wired speeds with your laptop wirelessly with...(WPS) to quickly and safely network your valuable data. wireless Wireless N Express card TEW-642EC(V1.0R) Wireless N Express Card* allows you to connect your wireless connection. Enjoy...

Datasheet
Page 2
...registered trademark. For the most recent product information please visit http://www.trendnet.com. Other Brands and product names are trademarks of their respective holders. Copyright © TRENDnet. Wireless N Express card TEW-642EC(V1.0R) SPECIFICATIONS Hardware Interface Standards LED Indicators Power Consumption Supported OS...; ExpressCard/34 • IEEE 802.11b, IEEE 802.11g and IEEE 802.11n (draft 2.0) • Power, Link • Max. 550mA @3.3V • Windows 2000, XP, Vista 32bit • 100x34x5mm (3.93x1.3x0.19in.) • 20g (8oz) • 0° to 40° C (32° ~ 104...
...registered trademark. For the most recent product information please visit http://www.trendnet.com. Other Brands and product names are trademarks of their respective holders. Copyright © TRENDnet. Wireless N Express card TEW-642EC(V1.0R) SPECIFICATIONS Hardware Interface Standards LED Indicators Power Consumption Supported OS...; ExpressCard/34 • IEEE 802.11b, IEEE 802.11g and IEEE 802.11n (draft 2.0) • Power, Link • Max. 550mA @3.3V • Windows 2000, XP, Vista 32bit • 100x34x5mm (3.93x1.3x0.19in.) • 20g (8oz) • 0° to 40° C (32° ~ 104...

User's Guide
Page 6
...for network security. Supports IEEE802.1x and WPA/WPA2 (Wi-Fi Protected Access). Multiple antennas design. Driver support for Windows XP/2000 and Vista. 2.2 Package Content The WLAN Card Installation and Manual CD Quick Start Guide Warranty/...Registration Card 2.3 System Requirement Pentium class notebook computers with at least one available Type II Express Card slot Microsoft Windows 2000, XP, or Vista CD-ROM drive 2.4 LED Definition The following table describes the LED on the Card Power LED ...
...for network security. Supports IEEE802.1x and WPA/WPA2 (Wi-Fi Protected Access). Multiple antennas design. Driver support for Windows XP/2000 and Vista. 2.2 Package Content The WLAN Card Installation and Manual CD Quick Start Guide Warranty/...Registration Card 2.3 System Requirement Pentium class notebook computers with at least one available Type II Express Card slot Microsoft Windows 2000, XP, or Vista CD-ROM drive 2.4 LED Definition The following table describes the LED on the Card Power LED ...

User's Guide
Page 9
STEP 8 Click Finish to your Laptop, after the following window pop up, click Next on the Fund New Hardware Wizard 9 STEP 9 At this moment please insert your Card to complete the client utility installation.
STEP 8 Click Finish to your Laptop, after the following window pop up, click Next on the Fund New Hardware Wizard 9 STEP 9 At this moment please insert your Card to complete the client utility installation.

User's Guide
Page 11
Step 2 Shut down the computer. Step 1 Insert the Utility & Driver CD-ROM into a notebook PC and then turn ON the computer and wait until instructed to. Step 3 Insert PC Card firmly into your computer's CD-ROM Drive and then click Install Driver & Utility. DO NOT install the PC Adapter in the computer until the Windows desktop appears. 11 2.6 Windows Vista installation Important!
Step 2 Shut down the computer. Step 1 Insert the Utility & Driver CD-ROM into a notebook PC and then turn ON the computer and wait until instructed to. Step 3 Insert PC Card firmly into your computer's CD-ROM Drive and then click Install Driver & Utility. DO NOT install the PC Adapter in the computer until the Windows desktop appears. 11 2.6 Windows Vista installation Important!

User's Guide
Page 14
Hold your mouse pointer over the icon, and double click the left mouse button to configure and use any of the management functions available in the lower right tray bar. After completing the installation procedure, a new icon as shown below will appear. The user can now use the Utility program. The Wireless Client Utility window as shown below will automatically appear in the IEEE 802.11 Wireless Client Utility. 14 2.6 Using the Utility to Configure Your Network The following are explanations on how to open the Wireless Client Utility.
Hold your mouse pointer over the icon, and double click the left mouse button to configure and use any of the management functions available in the lower right tray bar. After completing the installation procedure, a new icon as shown below will appear. The user can now use the Utility program. The Wireless Client Utility window as shown below will automatically appear in the IEEE 802.11 Wireless Client Utility. 14 2.6 Using the Utility to Configure Your Network The following are explanations on how to open the Wireless Client Utility.
User's Guide
Page 17
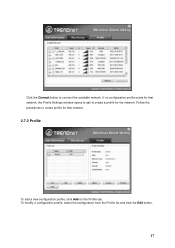
Click the Connect button to create a profile for that network. 2.7.3 Profile To add a new configuration profile, click Add on the Profile tab. Follow the procedures to create profile for the network. To modify a configuration profile, select the configuration from the Profile list and click the Edit button. 17 If no configuration profile exists for that network, the Profile Settings window opens to ask to connect the available network.
Click the Connect button to create a profile for that network. 2.7.3 Profile To add a new configuration profile, click Add on the Profile tab. Follow the procedures to create profile for the network. To modify a configuration profile, select the configuration from the Profile list and click the Edit button. 17 If no configuration profile exists for that network, the Profile Settings window opens to ask to connect the available network.

User's Guide
Page 22
Step 2 Choose a network from the list. 22 Using Windows Wireless Zero Configuration Step 1 Click on the balloon option "One or more wireless networks are in range of this computer".
Step 2 Choose a network from the list. 22 Using Windows Wireless Zero Configuration Step 1 Click on the balloon option "One or more wireless networks are in range of this computer".
User's Guide
Page 23
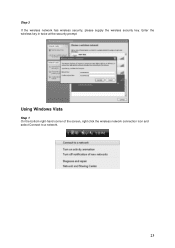
Enter the wireless key in twice at the security prompt. Using Windows Vista Step 1 On the bottom right-hand corner of the screen, right click the wireless network connection icon and select Connect to a network. 23 Step 3 If the wireless network has wireless security, please supply the wireless security key.
Enter the wireless key in twice at the security prompt. Using Windows Vista Step 1 On the bottom right-hand corner of the screen, right click the wireless network connection icon and select Connect to a network. 23 Step 3 If the wireless network has wireless security, please supply the wireless security key.

Quick Installation Guide
Page 3
Before You Start Package Contents ? TEW-642EC ? CPU: 300MHz or above/ 800MHz or above (Windows Vista) ? Memory: 256 MB RAM or above/ 512 MB RAM or above (Windows Vista) ? Windows Vista/XP/2000 Application 300Mbps Wireless N Express Card (TEW-642EC) DATA DATA HD 300Mbps, share multimedia throughout the house 1 English 1. Quick Installation Guide System Requirements ? CD-ROM Drive ? Express Card/34 or Express Card/ 54 slot ? Utility & Driver CD-ROM ?
Before You Start Package Contents ? TEW-642EC ? CPU: 300MHz or above/ 800MHz or above (Windows Vista) ? Memory: 256 MB RAM or above/ 512 MB RAM or above (Windows Vista) ? Windows Vista/XP/2000 Application 300Mbps Wireless N Express Card (TEW-642EC) DATA DATA HD 300Mbps, share multimedia throughout the house 1 English 1. Quick Installation Guide System Requirements ? CD-ROM Drive ? Express Card/34 or Express Card/ 54 slot ? Utility & Driver CD-ROM ?

Quick Installation Guide
Page 4
Insert Adapter firmly into your computer's CD-ROM Drive and then click Install Driver & Utility. 2. Click Locate and install driver software (recommended). 4. Windows Vista 1. Insert the Utility & Driver CD-ROM into free Express Card slot of notebook PC . 3. Click Next. 2 English How to do so. DO NOT install the Adapter in the computer until instructed to Install Important! 2.
Insert Adapter firmly into your computer's CD-ROM Drive and then click Install Driver & Utility. 2. Click Locate and install driver software (recommended). 4. Windows Vista 1. Insert the Utility & Driver CD-ROM into free Express Card slot of notebook PC . 3. Click Next. 2 English How to do so. DO NOT install the Adapter in the computer until instructed to Install Important! 2.
Quick Installation Guide
Page 5
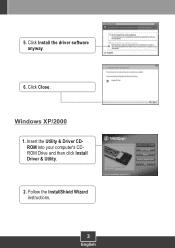
Insert the Utility & Driver CDROM into your computer's CDROM Drive and then click Install Driver & Utility. 2. Click Close. 5. Windows XP/2000 1. Click Install the driver software anyway. 6. Follow the InstallShield Wizard instructions. 3 English
Insert the Utility & Driver CDROM into your computer's CDROM Drive and then click Install Driver & Utility. 2. Click Close. 5. Windows XP/2000 1. Click Install the driver software anyway. 6. Follow the InstallShield Wizard instructions. 3 English

Quick Installation Guide
Page 6
Proceed to your computer's user manual regarding hardware installation. 5. Click Finish. Insert Adapter firmly into free Express Card slot of notebook PC . 4 English Note: Please refer to step 5. 4. Windows XP Windows 2000 3. Click Yes. Click Continue Anyway. 3.
Proceed to your computer's user manual regarding hardware installation. 5. Click Finish. Insert Adapter firmly into free Express Card slot of notebook PC . 4 English Note: Please refer to step 5. 4. Windows XP Windows 2000 3. Click Yes. Click Continue Anyway. 3.

Quick Installation Guide
Page 7
Select Install the software automatically (Recommended) and then click Next. 7. Driver installation is now complete. Continue on to section 3. 5 English Click Yes. Select No, not this time and then click Next. 6. Windows XP Windows 2000 6. The Found New Hardware Wizard appears. Drivers will install automatically. 7.
Select Install the software automatically (Recommended) and then click Next. 7. Driver installation is now complete. Continue on to section 3. 5 English Click Yes. Select No, not this time and then click Next. 6. Windows XP Windows 2000 6. The Found New Hardware Wizard appears. Drivers will install automatically. 7.
Quick Installation Guide
Page 8
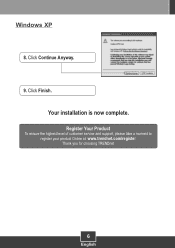
Click Continue Anyway. 9. Click Finish. Your installation is now complete. Windows XP 8. Register Your Product To ensure the highest level of customer service and support, please take a moment to register your product Online at: www.trendnet.com/register Thank you for choosing TRENDnet 6 English
Click Continue Anyway. 9. Click Finish. Your installation is now complete. Windows XP 8. Register Your Product To ensure the highest level of customer service and support, please take a moment to register your product Online at: www.trendnet.com/register Thank you for choosing TRENDnet 6 English

Quick Installation Guide
Page 9
On the bottom right-hand corner of the screen, right click the wireless network connection icon and select Connect to an Unsecured Wireless Connection 1. Select the desired network and then click Connect. 3. Click Connect Anyway. 4. Click Close. 7 English Using the Wireless Adapter Windows Vista Connecting to a network. 2. 3.
On the bottom right-hand corner of the screen, right click the wireless network connection icon and select Connect to an Unsecured Wireless Connection 1. Select the desired network and then click Connect. 3. Click Connect Anyway. 4. Click Close. 7 English Using the Wireless Adapter Windows Vista Connecting to a network. 2. 3.

Quick Installation Guide
Page 11
4. Windows XP/2000 1. Wireless configuration is now complete. Click Close. Click Site Survey. 3. Double-click the Wireless icon in your wireless access point and then click Connect. Click the SSID that matches your system tray. 2. For detailed information regarding the TEW-642PC configuration and advanced settings, please refer to the User's Guide included on the Utility & Driver CDROM or TRENDnet's website at www.trendnet.com. 9 English
4. Windows XP/2000 1. Wireless configuration is now complete. Click Close. Click Site Survey. 3. Double-click the Wireless icon in your wireless access point and then click Connect. Click the SSID that matches your system tray. 2. For detailed information regarding the TEW-642PC configuration and advanced settings, please refer to the User's Guide included on the Utility & Driver CDROM or TRENDnet's website at www.trendnet.com. 9 English

Quick Installation Guide
Page 12
... my computer's CD-ROM Drive and the installation menu does not appear automatically. A1: If the window does not appear automatically, click Start, click Run, and type D:\autorun where "D" in order to...to check and see a networking device with your network administrator for more information regarding the TEW-642PC, please refer to access a secured wireless access point or router. A3: Make...TCP/IP properties to a different Express card on the Utility & Driver CD-ROM or contact TRENDnet's Technical Support Department. 10 To access your wireless router or access point's Network Name (...
... my computer's CD-ROM Drive and the installation menu does not appear automatically. A1: If the window does not appear automatically, click Start, click Run, and type D:\autorun where "D" in order to...to check and see a networking device with your network administrator for more information regarding the TEW-642PC, please refer to access a secured wireless access point or router. A3: Make...TCP/IP properties to a different Express card on the Utility & Driver CD-ROM or contact TRENDnet's Technical Support Department. 10 To access your wireless router or access point's Network Name (...


