

Parts List
Page 4
... METERING DIAPHRAGM COMP. 1 40 307-224 MACHINE SCREW (W/WASHERS) M5 X 60 (BLACK) 2 41 669-8720 FUEL PIPE 1 42 AIR CLEANER HOUSING 1 43 668-5139 PRIMING PUMP COMP. 1 44 669-0347 CLEANER ELEMENT 1 45 CLEANER COVER 1 - 4 - *ALTERNATIVE PARTS 5 - 10 CODE NO. DESCRIPTION 1 TANAKA LABEL NO. USED 1 REMARKS TCG 22EAS * 2 669-6571 MUFFLER PROTECTOR 1 * 2 669-6555 MUFFLER PROTECTOR 1 FOR EUROPE (SLP, SP), USA (SLP...
... METERING DIAPHRAGM COMP. 1 40 307-224 MACHINE SCREW (W/WASHERS) M5 X 60 (BLACK) 2 41 669-8720 FUEL PIPE 1 42 AIR CLEANER HOUSING 1 43 668-5139 PRIMING PUMP COMP. 1 44 669-0347 CLEANER ELEMENT 1 45 CLEANER COVER 1 - 4 - *ALTERNATIVE PARTS 5 - 10 CODE NO. DESCRIPTION 1 TANAKA LABEL NO. USED 1 REMARKS TCG 22EAS * 2 669-6571 MUFFLER PROTECTOR 1 * 2 669-6555 MUFFLER PROTECTOR 1 FOR EUROPE (SLP, SP), USA (SLP...

Parts List
Page 5
... 668-4674 STARTER ROPE 3.5 X 860 1 70 668-4680 STARTER HANDLE 1 71 NAME PLATE 1 72 993-539 MACHINE SCREW (W/WASHERS) M4 X 16 2 73 RETAINING RING D5E 2 74 STARTER PULLEY 1 75 STARTER PAWL SPRING 2 76 STARTER PAWL 2 77 668-4681 STARTER PULLEY ASS'Y 1 INCLUD. 73-76 91 668-4667 HEX. WASHER) M5 X 20 2 93 669-8725 FAN CASE COMP 1 94 669-6541 CLUTCH SHAFT COMP 1 95...
... 668-4674 STARTER ROPE 3.5 X 860 1 70 668-4680 STARTER HANDLE 1 71 NAME PLATE 1 72 993-539 MACHINE SCREW (W/WASHERS) M4 X 16 2 73 RETAINING RING D5E 2 74 STARTER PULLEY 1 75 STARTER PAWL SPRING 2 76 STARTER PAWL 2 77 668-4681 STARTER PULLEY ASS'Y 1 INCLUD. 73-76 91 668-4667 HEX. WASHER) M5 X 20 2 93 669-8725 FAN CASE COMP 1 94 669-6541 CLUTCH SHAFT COMP 1 95...

Parts List
Page 6
...-6488 LEVER 1 121 669-6489 SPRING (A) 1 122 669-6940 STOP SWITCH 1 123 669-6491 STOP SWITCH CORD 2 124 669-6964 ANTI VIBE RUBBER (B) 1 125 669-6560 THROTTLE WIRE COMP 1 * 126 669-6941 HANDLE (A) 1 * 126 669-6486 HANDLE (A) 1 FOR EUROPE (SLP), AUS (SL), NZL (SL) * 127 669-6569 TANK 1 * 127 669-6552 TANK 1 FOR USA (SLP), CAN (SLP) 128 668-4620 PUMP FILTER BODY...
...-6488 LEVER 1 121 669-6489 SPRING (A) 1 122 669-6940 STOP SWITCH 1 123 669-6491 STOP SWITCH CORD 2 124 669-6964 ANTI VIBE RUBBER (B) 1 125 669-6560 THROTTLE WIRE COMP 1 * 126 669-6941 HANDLE (A) 1 * 126 669-6486 HANDLE (A) 1 FOR EUROPE (SLP), AUS (SL), NZL (SL) * 127 669-6569 TANK 1 * 127 669-6552 TANK 1 FOR USA (SLP), CAN (SLP) 128 668-4620 PUMP FILTER BODY...

Parts List
Page 7
... BOLT (BLACK) M6 1 170 GEAR CASE D24 1 171 BB. 626 1 172 GEAR 1 173 GEAR SHAFT D24 1 174 BB. 6000DDU 1 175 C-RING D26 1 176 669-6977 CUTTER HOLDER (A) 1 * 177 CUTTER HOLDER (B) 1 EXCEPT FOR USA (SLP), CAN (SLP) * 178 NUT COVER 1 EXCEPT FOR USA (SLP), CAN (SLP) * 179 LEFT HAND NYLON NUT M10 1 EXCEPT FOR USA (SLP), CAN (SLP) 180 SCREW W/SPRING...
... BOLT (BLACK) M6 1 170 GEAR CASE D24 1 171 BB. 626 1 172 GEAR 1 173 GEAR SHAFT D24 1 174 BB. 6000DDU 1 175 C-RING D26 1 176 669-6977 CUTTER HOLDER (A) 1 * 177 CUTTER HOLDER (B) 1 EXCEPT FOR USA (SLP), CAN (SLP) * 178 NUT COVER 1 EXCEPT FOR USA (SLP), CAN (SLP) * 179 LEFT HAND NYLON NUT M10 1 EXCEPT FOR USA (SLP), CAN (SLP) 180 SCREW W/SPRING...

Parts List
Page 8
...-6484 DRIVE SHAFT 1 * 197 669-6493 HANGER 1 EXCEPT FOR USA (SLP), CAN (SLP) 198 669-8794 COVER 1 199 NYLON CORD 1 200 669-8795 SET SCREW 1 201 669-8796 REEL 1 202 669-8797 RETURN SPRING SET SCREW 1 203 669-8798 BUTTON 1 204 669-8799 CORD GUIDE 2 205 669-8800 CASE 1 206 669-6454 NYLON HEAD ASS'Y 1 INCLUD. 198-205 * 207 669-6950 COVER GUARD 1 FOR...
...-6484 DRIVE SHAFT 1 * 197 669-6493 HANGER 1 EXCEPT FOR USA (SLP), CAN (SLP) 198 669-8794 COVER 1 199 NYLON CORD 1 200 669-8795 SET SCREW 1 201 669-8796 REEL 1 202 669-8797 RETURN SPRING SET SCREW 1 203 669-8798 BUTTON 1 204 669-8799 CORD GUIDE 2 205 669-8800 CASE 1 206 669-6454 NYLON HEAD ASS'Y 1 INCLUD. 198-205 * 207 669-6950 COVER GUARD 1 FOR...

Owner's Manual
Page 2
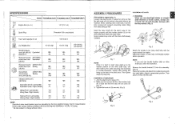
... 3 SPECIFICATIONS 6 WARNINGS AND SAFETY INSTRUCTIONS 4 ASSEMBLY PROCEDURES 7 WARRANTY 5 OPERATING PROCEDURES 11 2 MAINTENANCE 14 WHAT IS WHAT Since this sign is correctly assembled and adjusted. • Start the unit and check the carburetor adjustment. Starter handle 4. Harness 11.Throttle trigger lockout 12.Choke lever 13. See "MAINTENANCE". Max ,.._._, 9,900rpm Shows maximum shaft speed. C Gloves should be some difference between pictures and your unit. 1. Do not attach handle above this unit. Blade thrust is called blade thrust...
... 3 SPECIFICATIONS 6 WARNINGS AND SAFETY INSTRUCTIONS 4 ASSEMBLY PROCEDURES 7 WARRANTY 5 OPERATING PROCEDURES 11 2 MAINTENANCE 14 WHAT IS WHAT Since this sign is correctly assembled and adjusted. • Start the unit and check the carburetor adjustment. Starter handle 4. Harness 11.Throttle trigger lockout 12.Choke lever 13. See "MAINTENANCE". Max ,.._._, 9,900rpm Shows maximum shaft speed. C Gloves should be some difference between pictures and your unit. 1. Do not attach handle above this unit. Blade thrust is called blade thrust...

Owner's Manual
Page 3
... in this manual, take a break from the cutting attachment. If fuel is turned off when transporting or storing. O Always carry a first-aid kit when operating any material other than grass and brush. Check for which can be sure to their hands and fingers. Do not use common sense. O Make sure engine switch is provided to shut off engine. Remove objects which it is set down. O When...
... in this manual, take a break from the cutting attachment. If fuel is turned off when transporting or storing. O Always carry a first-aid kit when operating any material other than grass and brush. Check for which can be sure to their hands and fingers. Do not use common sense. O Make sure engine switch is provided to shut off engine. Remove objects which it is set down. O When...
Owner's Manual
Page 4
... use a barrier bar (6) and shoulder harness with the bolts. Then attach it . 2. Adjust the location to appropriate position. NOTE If your unit has handle location label on the drive shaft tube meets the clutch case. Tighten tube locking bolt lining up to be inserted. in place of attachment 1. Join the attachment in .) Model TCG22EAS (SLP) TCG22EAD (SLP) TCG22EAB (SLP) 1.27 (21.1 ml) y,lri Spark Plug El Fuel Tank Capacity (fl. SPECIFICATIONS r--- --o, , Engine Size (cu. oz) Champion CJ6...
... use a barrier bar (6) and shoulder harness with the bolts. Then attach it . 2. Adjust the location to appropriate position. NOTE If your unit has handle location label on the drive shaft tube meets the clutch case. Tighten tube locking bolt lining up to be inserted. in place of attachment 1. Join the attachment in .) Model TCG22EAS (SLP) TCG22EAD (SLP) TCG22EAB (SLP) 1.27 (21.1 ml) y,lri Spark Plug El Fuel Tank Capacity (fl. SPECIFICATIONS r--- --o, , Engine Size (cu. oz) Champion CJ6...

Owner's Manual
Page 5
... the air cleaner cover. (Fig. 6) 2; 14 13 Fig. 8 Installation of semi-auto cutting head 1. L, CAUTION Some blade guards are equipped with handling it will be removed from the blade guard, (if so installed). Be careful with sharp line limiters. Do not set apart from the handle or pipe. Install the blade guard on some models. O To remove the guard extension, refer to the gear case using the two guard mounting screws. When using a trimmer head with the parts installed. 12...
... the air cleaner cover. (Fig. 6) 2; 14 13 Fig. 8 Installation of semi-auto cutting head 1. L, CAUTION Some blade guards are equipped with handling it will be removed from the blade guard, (if so installed). Be careful with sharp line limiters. Do not set apart from the handle or pipe. Install the blade guard on some models. O To remove the guard extension, refer to the gear case using the two guard mounting screws. When using a trimmer head with the parts installed. 12...

Owner's Manual
Page 6
... fuel-mix thoroughly before operation. attaching screw Direction of oil. Contact your unit is of consumption. Fuel O Always use Tanaka nylon cutting line. O Never use wire or wire ropes. O Always mix fuel and oil in it for cracks or other materials that could become a dangerous projectile. Mix (shake) the fuel mixture. Add the remaining amount of Code No. O Check the cover, case and other components for when a metal blade is equipped with a two-stroke engine. Specifications Type of fuel. Installation...
... fuel-mix thoroughly before operation. attaching screw Direction of oil. Contact your unit is of consumption. Fuel O Always use Tanaka nylon cutting line. O Never use wire or wire ropes. O Always mix fuel and oil in it for cracks or other materials that could become a dangerous projectile. Mix (shake) the fuel mixture. Add the remaining amount of Code No. O Check the cover, case and other components for when a metal blade is equipped with a two-stroke engine. Specifications Type of fuel. Installation...

Owner's Manual
Page 7
... onlookers out of use at an idle for a few minutes, then turn off the engine before fueling. 25 39 O Fig. 23 2. Then pull recoil starter briskly again. The blade turns counter-clockwise, therefore, be cut. Set ignition switch (24) to CLOSED position (A). (Fig. 24) Starting ▪ CAUTION Before starting . O Blade thrust may wear out the clutch prematurely. Before fueling, clean the tank cap area carefully, to 5. 5. O Cut grass from the fueling area before subjecting it...
... onlookers out of use at an idle for a few minutes, then turn off the engine before fueling. 25 39 O Fig. 23 2. Then pull recoil starter briskly again. The blade turns counter-clockwise, therefore, be cut. Set ignition switch (24) to CLOSED position (A). (Fig. 24) Starting ▪ CAUTION Before starting . O Blade thrust may wear out the clutch prematurely. Before fueling, clean the tank cap area carefully, to 5. 5. O Cut grass from the fueling area before subjecting it...

Owner's Manual
Page 8
... the engine is stopped or power control is released. Open (counterclockwise) the screw until the cutting attachment stops. Re-adjust if necessary. To remove the flexible shaft, first remove screw (29), loosen bolt (30) and remove the gear case then pull the shaft out of lithium grease to rotate. Extended time of use same type of spark plug for some areas, local law requires using a resistor spark plug to suppress ignition signals. In the carburetor, fuel is mixed with...
... the engine is stopped or power control is released. Open (counterclockwise) the screw until the cutting attachment stops. Re-adjust if necessary. To remove the flexible shaft, first remove screw (29), loosen bolt (30) and remove the gear case then pull the shaft out of lithium grease to rotate. Extended time of use same type of spark plug for some areas, local law requires using a resistor spark plug to suppress ignition signals. In the carburetor, fuel is mixed with...

Owner's Manual
Page 9
... picture. O Use the correct blade for easier line release later. (6) Place the cover over the case so that the cutting attachment is more likely to 0.024" (0.6 mm), or change the spark plug. Adjust it and check the electrode gap. O Remove it to snag and thrust. Monthly maintenance O Rinse the fuel tank with a 25.4 mm (one recommended by removing the grease filler plug on the side of angle transmission. Wind both...
... picture. O Use the correct blade for easier line release later. (6) Place the cover over the case so that the cutting attachment is more likely to 0.024" (0.6 mm), or change the spark plug. Adjust it and check the electrode gap. O Remove it to snag and thrust. Monthly maintenance O Rinse the fuel tank with a 25.4 mm (one recommended by removing the grease filler plug on the side of angle transmission. Wind both...


