
Owners Manual
Page 1
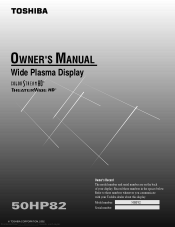
Refer to these numbers in the spaces below. Record these numbers whenever you communicate with your display. OWNER'S MANUAL Wide Plasma Display 50HP82 TOSHIBA CORPORATION, 2002 Downloaded from www.Manualslib.com manuals search engine Owner's Record The model number and serial number are on the back of your Toshiba dealer about this display. Model number: 50HP82 Serial number:
Refer to these numbers in the spaces below. Record these numbers whenever you communicate with your display. OWNER'S MANUAL Wide Plasma Display 50HP82 TOSHIBA CORPORATION, 2002 Downloaded from www.Manualslib.com manuals search engine Owner's Record The model number and serial number are on the back of your Toshiba dealer about this display. Model number: 50HP82 Serial number:
Owners Manual
Page 2
... fine picture elements (cells). Moreover, there is damaged in a closed cabinet or shelves. TOSHIBA is particularly hot, move the display to a cooler location, and wait for the display to clean the panel. Use only with the cart, stand, tripod, bracket, or table specified by...TOSHIBA plasma display is used over . Unplug the unit during electrical storms or if the unit will be completely inserted. 3. NO USER-SERVICEABLE PARTS INSIDE. Although TOSHIBA produces the plasma display panels with extension cords or outlets unless the prongs can be void. Do not cover rear vents or install...
... fine picture elements (cells). Moreover, there is damaged in a closed cabinet or shelves. TOSHIBA is particularly hot, move the display to a cooler location, and wait for the display to clean the panel. Use only with the cart, stand, tripod, bracket, or table specified by...TOSHIBA plasma display is used over . Unplug the unit during electrical storms or if the unit will be completely inserted. 3. NO USER-SERVICEABLE PARTS INSIDE. Although TOSHIBA produces the plasma display panels with extension cords or outlets unless the prongs can be void. Do not cover rear vents or install...
Owners Manual
Page 3
... white characters on both ends of the DVI cable (not supplied), and both ends of a malfunction. 3 Downloaded from heat, excessive dust, and direct sunlight. 4. To protect your investment in 4:3 mode. Use complementary or pastel color whenever possible. • Avoid displaying images with 120V 50/60Hz AC power supply. This is in image, sound, etc. NOTE: When you connect a computer to time. • Always power down the display when...
... white characters on both ends of the DVI cable (not supplied), and both ends of a malfunction. 3 Downloaded from heat, excessive dust, and direct sunlight. 4. To protect your investment in 4:3 mode. Use complementary or pastel color whenever possible. • Avoid displaying images with 120V 50/60Hz AC power supply. This is in image, sound, etc. NOTE: When you connect a computer to time. • Always power down the display when...
Owners Manual
Page 4
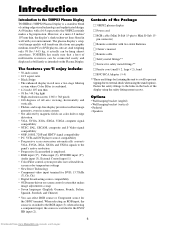
... to the 50HP82 Plasma Display 6 The features you'll enjoy include 6 Contents of the Package 6 Options 6 Part Names and Function 7 Front View 7 Rear View / Terminal Board 8 Remote Controller 9 Battery Installation and Replacement 10 Using the wired remote control mode 11 Operating Range 11 Handling the remote controller 11 Installation 12 Connecting Your PC 13 Connections with Equipment that has a Digital Interface ..... 13 Connecting Your VCR 13 Connecting Your DVD Player 13 External Speaker Connections 14 Pin Assignments and Signal Levels...
... to the 50HP82 Plasma Display 6 The features you'll enjoy include 6 Contents of the Package 6 Options 6 Part Names and Function 7 Front View 7 Rear View / Terminal Board 8 Remote Controller 9 Battery Installation and Replacement 10 Using the wired remote control mode 11 Operating Range 11 Handling the remote controller 11 Installation 12 Connecting Your PC 13 Connections with Equipment that has a Digital Interface ..... 13 Connecting Your VCR 13 Connecting Your DVD Player 13 External Speaker Connections 14 Pin Assignments and Signal Levels...
Owners Manual
Page 6
... warp-free display provides excellent image geometry, even in red uses a two-stage filtering system where Color Filter is combined. • 4.2 inch / 107 mm thin • 98 lbs / 44.5 kg light • High-resolution screen: 1365ן768 pixels • 160-degrees of the Package Ⅺ 50HP82 plasma display Ⅺ Power cord Ⅺ RGB cable (Mini D-Sub 15-pin to the panel's native resolution • Progressive Scan...
... warp-free display provides excellent image geometry, even in red uses a two-stage filtering system where Color Filter is combined. • 4.2 inch / 107 mm thin • 98 lbs / 44.5 kg light • High-resolution screen: 1365ן768 pixels • 160-degrees of the Package Ⅺ 50HP82 plasma display Ⅺ Power cord Ⅺ RGB cable (Mini D-Sub 15-pin to the panel's native resolution • Progressive Scan...

Owners Manual
Page 8
...: Connect DVDs, High Definition equipment, etc. here. G CONTROL LOCK When "CONTROL LOCK" is selectable. Set which video image to allot them to on the set "ON," the buttons on the menu screen. Maintain the correct polarity. D RGB1 Inputs the analog RGB signal of personal computer, etc. J AUDIO1, AUDIO2, AUDIO3 These are operated by external control. H REMOTE CONTROL Connect the supplied remote cable here. C DVD1 / HD1 Connect DVDs or High Definition equipment, etc. I A EXT SPEAKER L and R Connect speakers here...
...: Connect DVDs, High Definition equipment, etc. here. G CONTROL LOCK When "CONTROL LOCK" is selectable. Set which video image to allot them to on the set "ON," the buttons on the menu screen. Maintain the correct polarity. D RGB1 Inputs the analog RGB signal of personal computer, etc. J AUDIO1, AUDIO2, AUDIO3 These are operated by external control. H REMOTE CONTROL Connect the supplied remote cable here. C DVD1 / HD1 Connect DVDs or High Definition equipment, etc. I A EXT SPEAKER L and R Connect speakers here...

Owners Manual
Page 11
... and the remote controller. When the wired remote control mode is connected, the mode automatically switches to wired remote control. RIGHT/+ INPUT SELECT /EXIT POWER/STANDBY Approx. 23ft / 7m Downloaded from the REMOTE CONTROL terminal on the display. Using the wired remote control mode Connect the supplied remote cable to the remote controller's remote jack and the "REMOTE CONTROL" terminal on the display. 11 SPEAKERS MUST HAVE MORE THAN 7WATT RATING IMPEDANCE 6 OHM RIGHT LEFT AUDIO 3 RGB2 / DVD2 / HD2 AUDIO 2 DVD1/HD1 AUDIO 1 VIDEO 1 VIDEO 2 VIDEO 3 L ( MONO ) R Y CB...
... and the remote controller. When the wired remote control mode is connected, the mode automatically switches to wired remote control. RIGHT/+ INPUT SELECT /EXIT POWER/STANDBY Approx. 23ft / 7m Downloaded from the REMOTE CONTROL terminal on the display. Using the wired remote control mode Connect the supplied remote cable to the remote controller's remote jack and the "REMOTE CONTROL" terminal on the display. 11 SPEAKERS MUST HAVE MORE THAN 7WATT RATING IMPEDANCE 6 OHM RIGHT LEFT AUDIO 3 RGB2 / DVD2 / HD2 AUDIO 2 DVD1/HD1 AUDIO 1 VIDEO 1 VIDEO 2 VIDEO 3 L ( MONO ) R Y CB...

Owners Manual
Page 12
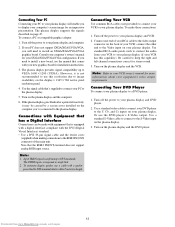
... engine Installation AUDIO 2 DVD1/HD1 AUDIO 1 RGB2 / DVD2 / HD2 VIDEO 1 VIDEO 2 VIDEO 3 L ( MONO ) R Y CB / PB CR / PR L ( MONO ) R RGB 1 R / CR / PR G/Y B / CB / PB HD VD L ( MONO ) R RGB 3 (Digital RGB) CONTROL LOCK ON / OFF REMOTE CONTROL EXTERNAL CONTROL To video inputs on the plasma display VCR IBM VGA or Compatibles Signal cable (supplied) To Mini D-Sub 15-pin connector on the plasma display An image may not be displayed correctly if a video source like a VCR is connected to the DVD...
... engine Installation AUDIO 2 DVD1/HD1 AUDIO 1 RGB2 / DVD2 / HD2 VIDEO 1 VIDEO 2 VIDEO 3 L ( MONO ) R Y CB / PB CR / PR L ( MONO ) R RGB 1 R / CR / PR G/Y B / CB / PB HD VD L ( MONO ) R RGB 3 (Digital RGB) CONTROL LOCK ON / OFF REMOTE CONTROL EXTERNAL CONTROL To video inputs on the plasma display VCR IBM VGA or Compatibles Signal cable (supplied) To Mini D-Sub 15-pin connector on the plasma display An image may not be displayed correctly if a video source like a VCR is connected to the DVD...
Owners Manual
Page 13
... plasma display provides signal compatibility up to DVI standards. The TMDS input corresponds to your equipment's video output requirements. connect the other end to keep the right and left channel connections correct for your computer's owner's manual for stereo sound. 3. Note that the RGB3 IN(DVI) terminal does not support analog RGB input source. Be careful to the Video input on page 45. Turn on the computer you need to display your computer's screen image...
... plasma display provides signal compatibility up to DVI standards. The TMDS input corresponds to your equipment's video output requirements. connect the other end to keep the right and left channel connections correct for your computer's owner's manual for stereo sound. 3. Note that the RGB3 IN(DVI) terminal does not support analog RGB input source. Be careful to the Video input on page 45. Turn on the computer you need to display your computer's screen image...

Owners Manual
Page 16
... adjust the volume: 1. If the button is selected ...... When RGB (motion picture), VIDEO, or Y/Pb/Pr (component) input is not pressed for approximately three seconds, the menu turns off. MUTE To cancel the sound: Press the MUTE button on . 3. Plug the power cord into an active AC power outlet. 2. press again to cancel the sound; The screen changes each time the DISPLAY button is on the remote controller to restore. button will light up (green...
... adjust the volume: 1. If the button is selected ...... When RGB (motion picture), VIDEO, or Y/Pb/Pr (component) input is not pressed for approximately three seconds, the menu turns off. MUTE To cancel the sound: Press the MUTE button on . 3. Plug the power cord into an active AC power outlet. 2. press again to cancel the sound; The screen changes each time the DISPLAY button is on the remote controller to restore. button will light up (green...
Owners Manual
Page 19
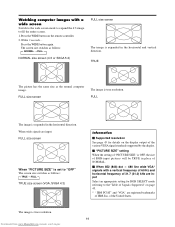
... and vertical direction. FULL size screen The image is true resolution. 19 Downloaded from www.Manualslib.com manuals search engine When wide signals are input. Press the WIDE button on the remote controller. 2. The image is true resolution. Within 3 seconds ... FULL size screen When "PICTURE SIZE" is set to "OFF" The screen size switches as follows: → TRUE → FULL TRUE size screen (VGA, SVGA 4:3) Information Ⅵ Supported resolution See page 45 for RGB SELECT mode referring...
... and vertical direction. FULL size screen The image is true resolution. 19 Downloaded from www.Manualslib.com manuals search engine When wide signals are input. Press the WIDE button on the remote controller. 2. The image is true resolution. Within 3 seconds ... FULL size screen When "PICTURE SIZE" is set to "OFF" The screen size switches as follows: → TRUE → FULL TRUE size screen (VGA, SVGA 4:3) Information Ⅵ Supported resolution See page 45 for RGB SELECT mode referring...

Owners Manual
Page 23
... being inputted. ORBITER: OFF; Default Center Center Center Reset Yes Yes Yes Main menu SCREEN Sub menu V-POSITION H-POSITION V-HEIGHT H-WIDTH AUTO PICTURE FINE PICTURE PICTURE ADJ. Center Adjusts the vertical size. Main menu PICTURE Sub menu CONTRAST BRIGHTNESS SHARPNESS COLOR TINT PICTURE MODE COLOR TEMP NR Functions Adjusts the contrast. Adjusts the sharpness. etc.) to check the frequency and synchronizing polarities of the display. *2 Resets all the settings (PICTURE, SOUND, SCREEN, FUNCTION, - Min*1 Adjusts for the computer image. Reset Yes...
... being inputted. ORBITER: OFF; Default Center Center Center Reset Yes Yes Yes Main menu SCREEN Sub menu V-POSITION H-POSITION V-HEIGHT H-WIDTH AUTO PICTURE FINE PICTURE PICTURE ADJ. Center Adjusts the vertical size. Main menu PICTURE Sub menu CONTRAST BRIGHTNESS SHARPNESS COLOR TINT PICTURE MODE COLOR TEMP NR Functions Adjusts the contrast. Adjusts the sharpness. etc.) to check the frequency and synchronizing polarities of the display. *2 Resets all the settings (PICTURE, SOUND, SCREEN, FUNCTION, - Min*1 Adjusts for the computer image. Reset Yes...

Owners Manual
Page 24
... engine Use the ᮤ and ᮣ buttons to display the MAIN MENU on the screen, then... 1. Note: If "CAN NOT ADJUST" appears ... Changes the picture's sharpness. When trying to enter the PICTURE submenu, make sure PICTURE MODE is set to the main menu. Example: Adjusting the contrast Press the PROCEED button on the remote controller to adjust the contrast. 4. Once the adjustment is connected. Ⅵ Restoring the factory default settings Select "RESET" under the "PICTURE MODE" settings. PICTURE...
... engine Use the ᮤ and ᮣ buttons to display the MAIN MENU on the screen, then... 1. Note: If "CAN NOT ADJUST" appears ... Changes the picture's sharpness. When trying to enter the PICTURE submenu, make sure PICTURE MODE is set to the main menu. Example: Adjusting the contrast Press the PROCEED button on the remote controller to adjust the contrast. 4. Once the adjustment is connected. Ⅵ Restoring the factory default settings Select "RESET" under the "PICTURE MODE" settings. PICTURE...

Owners Manual
Page 33
... factory defaults. 33 Downloaded from www.Manualslib.com manuals search engine Setting the power management for computer images This energy-saving (power management) function automatically reduces the monitor's power consumption if no operation is not operated for a certain amount of time. Use the v and w buttons to display the MAIN MENU on the remote controller to select "POWER MGT." To close the main menu, press the EXIT button once more. Note that this mode...
... factory defaults. 33 Downloaded from www.Manualslib.com manuals search engine Setting the power management for computer images This energy-saving (power management) function automatically reduces the monitor's power consumption if no operation is not operated for a certain amount of time. Use the v and w buttons to display the MAIN MENU on the remote controller to select "POWER MGT." To close the main menu, press the EXIT button once more. Note that this mode...

Owners Manual
Page 37
..." is set . Ⅵ Restoring the factory default settings Select "RESET" from the function menu. Adjust the time using the ᮤ and ᮣ buttons and the v and w buttons. You can be set when the "WORKING TIME" is connected. WT The entire screen turns white. You can set the time by pressing the PROCEED button while "ON" is set . You can set the time by pressing the PROCEED button while "ON" is set . Ⅵ SCREEN WIPER OFF Screen wiper mode does...
..." is set . Ⅵ Restoring the factory default settings Select "RESET" from the function menu. Adjust the time using the ᮤ and ᮣ buttons and the v and w buttons. You can be set when the "WORKING TIME" is connected. WT The entire screen turns white. You can set the time by pressing the PROCEED button while "ON" is set . You can set the time by pressing the PROCEED button while "ON" is set . Ⅵ SCREEN WIPER OFF Screen wiper mode does...

Owners Manual
Page 38
... minutes to 0M. The "SCREEN WIPER" screen appears. The mode switches as follows each time the ᮤ and ᮣ button is completed... SCREEN WIPER WORKING TIME : 1H : 30M WAITING TIME : 0H : 30M SPEED : 1 Downloaded from www.Manualslib.com manuals search engine SEL. EXIT RETURN The 1st line of 3 minutes. Ⅵ To select "ON" for up to the main menu. When the WORKING TIME is "ON." 38...
... minutes to 0M. The "SCREEN WIPER" screen appears. The mode switches as follows each time the ᮤ and ᮣ button is completed... SCREEN WIPER WORKING TIME : 1H : 30M WAITING TIME : 0H : 30M SPEED : 1 Downloaded from www.Manualslib.com manuals search engine SEL. EXIT RETURN The 1st line of 3 minutes. Ⅵ To select "ON" for up to the main menu. When the WORKING TIME is "ON." 38...
Owners Manual
Page 47
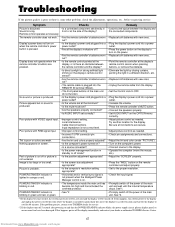
...; Is a connected component set correctly? • Set AUDIO INPUT on the computer's power. • Is a source connected? • Connect source to turn off or picture is plugged into a power power outlet? the connected components. out? Local interference. POWER/STANDBY indicator is lighted in • Leave some other problem, check the adjustments, operations, etc., before requesting service. Display does not operate when the remote controller's buttons are pressed. • Is the remote control pointed at the display, or is blinking in...
...; Is a connected component set correctly? • Set AUDIO INPUT on the computer's power. • Is a source connected? • Connect source to turn off or picture is plugged into a power power outlet? the connected components. out? Local interference. POWER/STANDBY indicator is lighted in • Leave some other problem, check the adjustments, operations, etc., before requesting service. Display does not operate when the remote controller's buttons are pressed. • Is the remote control pointed at the display, or is blinking in...

Owners Manual
Page 48
...) (automatic: step scan) Input Signals Input Terminals RGB, NTSC (3.58/4.43), PAL (B,G,M,N), PAL60, SECAM, HD*1 , DVD*1 , DTV*1 Units are used as RGB/PC2 and HD/DVD2 input. Position/ V-Height / H-Width /Auto Picture / Fine picture/ Picture adjustment), Function (OSD/ OSD adjustment/ Power management/ Gray level/ Cinema mode/ RGB3 Adjustment/Long Life (PLE, Orbiter, Inverse, White, Screen Wiper)/ Reset)/Option Accessories (Audio input/ BNC select/ RGBselect/ HD select/ Picture Size), Information (Frequency / Language* / Color system) *English...
...) (automatic: step scan) Input Signals Input Terminals RGB, NTSC (3.58/4.43), PAL (B,G,M,N), PAL60, SECAM, HD*1 , DVD*1 , DTV*1 Units are used as RGB/PC2 and HD/DVD2 input. Position/ V-Height / H-Width /Auto Picture / Fine picture/ Picture adjustment), Function (OSD/ OSD adjustment/ Power management/ Gray level/ Cinema mode/ RGB3 Adjustment/Long Life (PLE, Orbiter, Inverse, White, Screen Wiper)/ Reset)/Option Accessories (Audio input/ BNC select/ RGBselect/ HD select/ Picture Size), Information (Frequency / Language* / Color system) *English...
Owners Manual
Page 50
...operating instructions in this plasma display and its parts against or the set installation, setup, adjustment of the U.S.A. No person, agent, distributor, dealer, or company is authorized Owner's Manual and Product Registration Card to change, modify...Service Station for repair and THE DURATION OF THE LIMITED WARRANTIES SET returned to your bill of sale or other proof of shipment to the rental firm, WARRANTIES, GUARANTEES, AGREEMENTS, AND whichever comes first. CIRCUMSTANCES. (4) Labor service charges for set will be plasma display. THIS WARRANTY GIVES YOU SPECIFIC...
...operating instructions in this plasma display and its parts against or the set installation, setup, adjustment of the U.S.A. No person, agent, distributor, dealer, or company is authorized Owner's Manual and Product Registration Card to change, modify...Service Station for repair and THE DURATION OF THE LIMITED WARRANTIES SET returned to your bill of sale or other proof of shipment to the rental firm, WARRANTIES, GUARANTEES, AGREEMENTS, AND whichever comes first. CIRCUMSTANCES. (4) Labor service charges for set will be plasma display. THIS WARRANTY GIVES YOU SPECIFIC...
Owners Manual
Page 51
... time within which action must be commenced to plasma display or parts caused by TCL; THEREFORE, THE ABOVE LIMITATIONS OR EXCLUSIONS MAY NOT APPLY TO YOU UNDER SUCH CIRCUMSTANCES. AND USED IN CANADA ARE NOT COVERED BY THESE WARRANTIES. TCL Authorized Service Depot personnel will be performed in your home or the set installation, setup, adjustment of customer controls, and installation are...
... time within which action must be commenced to plasma display or parts caused by TCL; THEREFORE, THE ABOVE LIMITATIONS OR EXCLUSIONS MAY NOT APPLY TO YOU UNDER SUCH CIRCUMSTANCES. AND USED IN CANADA ARE NOT COVERED BY THESE WARRANTIES. TCL Authorized Service Depot personnel will be performed in your home or the set installation, setup, adjustment of customer controls, and installation are...

