User Guide
Page 18
... size partition 47 Creating recovery media 50 Restoring from recovery media 52 Erasing the Internal Storage Drive 54 Checking the internal storage drive operating status 56 Installing drivers and applications 56 Using the touch pad 57 Adjusting touch pad settings 60 Disabling or enabling the touch pad 61 Scrolling with the touch pad 61 Control buttons 61 Connecting an external device 62 Using external display devices 62 Selecting video cables 62 Connecting an HDMI™-compatible television or display device 63 Connecting an external monitor or projector.....63 Adjusting the...
... size partition 47 Creating recovery media 50 Restoring from recovery media 52 Erasing the Internal Storage Drive 54 Checking the internal storage drive operating status 56 Installing drivers and applications 56 Using the touch pad 57 Adjusting touch pad settings 60 Disabling or enabling the touch pad 61 Scrolling with the touch pad 61 Control buttons 61 Connecting an external device 62 Using external display devices 62 Selecting video cables 62 Connecting an HDMI™-compatible television or display device 63 Connecting an external monitor or projector.....63 Adjusting the...
User Guide
Page 20
... Memory card reader 93 Inserting memory media 93 Removing memory media 94 Chapter 5: Utilities 95 TOSHIBA Assist 96 Connect 97 Secure 98 Protect & Fix 99 Optimize 100 TOSHIBA Application Installer 101 Setting passwords 102 Using an instant password 102 Using a supervisor password 102 Using a user password 104 TOSHIBA Face Recognition Utility 106 TOSHIBA Security Assist 107 TOSHIBA PC Diagnostic Tool Utility 109 Mouse Utility 110 TOSHIBA Hardware Setup 111 TOSHIBA Sleep Utility 113 Starting the TOSHIBA Sleep Utility 113 USB Sleep and Charge 113 Enabling/Disabling USB Sleep...
... Memory card reader 93 Inserting memory media 93 Removing memory media 94 Chapter 5: Utilities 95 TOSHIBA Assist 96 Connect 97 Secure 98 Protect & Fix 99 Optimize 100 TOSHIBA Application Installer 101 Setting passwords 102 Using an instant password 102 Using a supervisor password 102 Using a user password 104 TOSHIBA Face Recognition Utility 106 TOSHIBA Security Assist 107 TOSHIBA PC Diagnostic Tool Utility 109 Mouse Utility 110 TOSHIBA Hardware Setup 111 TOSHIBA Sleep Utility 113 Starting the TOSHIBA Sleep Utility 113 USB Sleep and Charge 113 Enabling/Disabling USB Sleep...

User Guide
Page 25
... computer software or hardware options, visit Toshiba's Web site at support.toshiba.com. You can: ❖ Read the entire guide from beginning to end. ❖ Skim through and stop when a topic interests you. ❖ Use the table of the information provided herein, product specifications, configurations, prices, system/component/options availability are designed for a product Series. For more detailed information about your particular model...
... computer software or hardware options, visit Toshiba's Web site at support.toshiba.com. You can: ❖ Read the entire guide from beginning to end. ❖ Skim through and stop when a topic interests you. ❖ Use the table of the information provided herein, product specifications, configurations, prices, system/component/options availability are designed for a product Series. For more detailed information about your particular model...
User Guide
Page 41
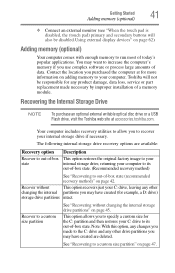
... software or process large amounts of data. The following internal storage drive recovery options are available: Recovery option Recover to out-of-box state Description This option restores the original factory image to your internal storage drive, returning your C: drive, leaving any other drive partitions you may have created are deleted. Getting Started 41 Adding memory (optional) ❖ Connect an external monitor (see "When the touch pad is disabled, the (touch pad) primary and secondary buttons will not be disabled.Using external display devices...
... software or process large amounts of data. The following internal storage drive recovery options are available: Recovery option Recover to out-of-box state Description This option restores the original factory image to your internal storage drive, returning your C: drive, leaving any other drive partitions you may have created are deleted. Getting Started 41 Adding memory (optional) ❖ Connect an external monitor (see "When the touch pad is disabled, the (touch pad) primary and secondary buttons will not be disabled.Using external display devices...
User Guide
Page 62
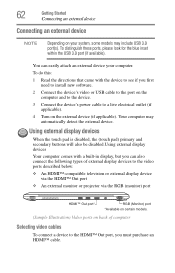
... also connect the following types of external display devices to the video ports described below: ❖ An HDMI™-compatible television or external display device via the HDMI™ Out port ❖ An external monitor or projector via the RGB (monitor) port HDMI™ Out port* RGB (Monitor) port *Available on certain models. (Sample Illustration) Video ports on back of computer Selecting video cables To connect a device to the HDMI™ Out port, you first need to install new software. 2 Connect the device's video or USB cable to the port...
... also connect the following types of external display devices to the video ports described below: ❖ An HDMI™-compatible television or external display device via the HDMI™ Out port ❖ An external monitor or projector via the RGB (monitor) port HDMI™ Out port* RGB (Monitor) port *Available on certain models. (Sample Illustration) Video ports on back of computer Selecting video cables To connect a device to the HDMI™ Out port, you first need to install new software. 2 Connect the device's video or USB cable to the port...
User Guide
Page 63
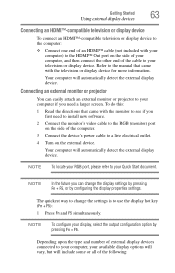
... the type and number of external display devices connected to your computer, your available display options will vary, but will automatically detect the external display device. Connecting an external monitor or projector You can easily attach an external monitor or projector to your computer if you can change the settings is to use the display hot key (Fn + F5): 1 Press Fn and F5 simultaneously. NOTE In the future you need to install new software. 2 Connect the monitor's video cable to...
... the type and number of external display devices connected to your computer, your available display options will vary, but will automatically detect the external display device. Connecting an external monitor or projector You can easily attach an external monitor or projector to your computer if you can change the settings is to use the display hot key (Fn + F5): 1 Press Fn and F5 simultaneously. NOTE In the future you need to install new software. 2 Connect the monitor's video cable to...
User Guide
Page 68
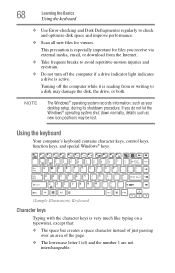
...) Keyboard Character keys Typing with the character keys is reading from the Internet. ❖ Take frequent breaks to check and optimize disk space and improve performance. ❖ Scan all new files for files you do not let the Windows® operating system shut down normally, details such as your desktop setup, during its shutdown procedure. Turning off the computer if a drive indicator light indicates a drive is active...
...) Keyboard Character keys Typing with the character keys is reading from the Internet. ❖ Take frequent breaks to check and optimize disk space and improve performance. ❖ Scan all new files for files you do not let the Windows® operating system shut down normally, details such as your desktop setup, during its shutdown procedure. Turning off the computer if a drive indicator light indicates a drive is active...

User Guide
Page 105
... a user password To cancel the power-on -screen instructions to a text file or external media of your selection. The TOSHIBA Assist window appears. 2 On the left side, click the Secure tab. 3 Click the User Password icon. 4 Click Delete. 5 Follow the on password function and delete the user password: 1 Click the Start button and, in the Search field, type TOSHIBA Assist. The TOSHIBA Password Utility window appears. 105 (Sample Image) TOSHIBA Password Utility window 4 Click Set. 5 Enter your password, and then enter...
... a user password To cancel the power-on -screen instructions to a text file or external media of your selection. The TOSHIBA Assist window appears. 2 On the left side, click the Secure tab. 3 Click the User Password icon. 4 Click Delete. 5 Follow the on password function and delete the user password: 1 Click the Start button and, in the Search field, type TOSHIBA Assist. The TOSHIBA Password Utility window appears. 105 (Sample Image) TOSHIBA Password Utility window 4 Click Set. 5 Enter your password, and then enter...
User Guide
Page 114
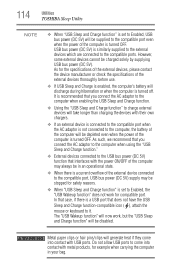
... take longer than charging the devices with USB ports. 114 Utilities TOSHIBA Sleep Utility NOTE ❖ When "USB Sleep and Charge function" is set to Enabled, the "USB Wakeup function" does not work , but the "USB Sleep and Charge function" will discharge during hibernation or when the computer is turned off. USB bus power (DC 5V) is a USB port that you connect the AC adaptor to the computer when enabling the USB Sleep and Charge function. ❖ Using the "USB Sleep and Charge function" to charge external devices will be...
... take longer than charging the devices with USB ports. 114 Utilities TOSHIBA Sleep Utility NOTE ❖ When "USB Sleep and Charge function" is set to Enabled, the "USB Wakeup function" does not work , but the "USB Sleep and Charge function" will discharge during hibernation or when the computer is turned off. USB bus power (DC 5V) is a USB port that you connect the AC adaptor to the computer when enabling the USB Sleep and Charge function. ❖ Using the "USB Sleep and Charge function" to charge external devices will be...

User Guide
Page 122
... device operation time and number of actuations or status changes (e.g.: number of power button and Fn key combination uses, and AC adaptor, battery, LCD, fan, HDD, sound volume, wireless communication switch, docking and USB information), date of the computer and related devices and logs service-relevant information on the computer's internal storage drive. It also tracks the usage of initial system use, and also computer It alerts users to install the updates if you keep your new...
... device operation time and number of actuations or status changes (e.g.: number of power button and Fn key combination uses, and AC adaptor, battery, LCD, fan, HDD, sound volume, wireless communication switch, docking and USB information), date of the computer and related devices and logs service-relevant information on the computer's internal storage drive. It also tracks the usage of initial system use, and also computer It alerts users to install the updates if you keep your new...
User Guide
Page 124
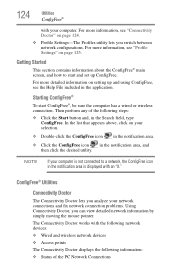
... computer has a wired or wireless connection. The Connectivity Doctor works with the following network devices: ❖ Wired and wireless network devices ❖ Access points The Connectivity Doctor displays the following steps: ❖ Click the Start button and, in the application. Then perform any of the following information: ❖ Status of the PC Network Connections In the list that appears above, click on setting up ConfigFree. For more information...
... computer has a wired or wireless connection. The Connectivity Doctor works with the following network devices: ❖ Wired and wireless network devices ❖ Access points The Connectivity Doctor displays the following steps: ❖ Click the Start button and, in the application. Then perform any of the following information: ❖ Status of the PC Network Connections In the list that appears above, click on setting up ConfigFree. For more information...
User Guide
Page 125
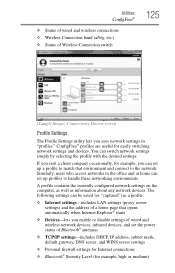
Similarly, users who access networks in the office and at home can set up a profile to match that opens automatically when Internet Explorer® starts ❖ Devices-lets you enable or disable settings of wired and wireless network devices, infrared devices, and set up profiles to the network. A profile contains the currently configured network settings on the computer, as well as information about any network devices. You can switch network settings simply by selecting the profile...
Similarly, users who access networks in the office and at home can set up a profile to match that opens automatically when Internet Explorer® starts ❖ Devices-lets you enable or disable settings of wired and wireless network devices, infrared devices, and set up profiles to the network. A profile contains the currently configured network settings on the computer, as well as information about any network devices. You can switch network settings simply by selecting the profile...
User Guide
Page 130
... options: ❖ Repair Your Computer ❖ Safe Mode The output specifications of the AC adaptor must match the input specifications of the computer. 3 If the specifications do not match, locate and use the options in some way such as installing a new program or adding a device. If you change your computer starts and before Windows® starts loading. For example: ❖ The operating system fails to start after the initial startup...
... options: ❖ Repair Your Computer ❖ Safe Mode The output specifications of the AC adaptor must match the input specifications of the computer. 3 If the specifications do not match, locate and use the options in some way such as installing a new program or adding a device. If you change your computer starts and before Windows® starts loading. For example: ❖ The operating system fails to start after the initial startup...
User Guide
Page 135
... adjusting the contrast and brightness controls on . ❖ Check that the monitor's power cord/cable is firmly plugged into effect. Press any key. If you are some typical display problems and their solutions: The screen is registered, press any key to update your keyboard driver. If you are using the built-in screen. The keyboard you have connected an external keyboard and the operating system displays one or more keyboard error messages. Try using an external monitor...
... adjusting the contrast and brightness controls on . ❖ Check that the monitor's power cord/cable is firmly plugged into effect. Press any key. If you are some typical display problems and their solutions: The screen is registered, press any key to update your keyboard driver. If you are using the built-in screen. The keyboard you have connected an external keyboard and the operating system displays one or more keyboard error messages. Try using an external monitor...

User Guide
Page 143
... entire computer with restore points" on page 141). Before installing anything goes wrong, you need any changes that accompany the hardware or software. It is connected first, it and/or inserting a blank optical disc in case you will then be very difficult to run an installation utility first - For more help ensure safe and easy installation of new hardware (printers, pointing devices, external hard drives, optical disc drive writers, scanners...
... entire computer with restore points" on page 141). Before installing anything goes wrong, you need any changes that accompany the hardware or software. It is connected first, it and/or inserting a blank optical disc in case you will then be very difficult to run an installation utility first - For more help ensure safe and easy installation of new hardware (printers, pointing devices, external hard drives, optical disc drive writers, scanners...
User Guide
Page 170
... other services. Interlaced monitors take two passes to transmit high quality audio and video signal via a single cable in combination with the Fn key can control another while using a pointing device such as the battery save mode. (2) A key or combination of computers that represents a function, file, or program. 170 Glossary HDMI (High-Definition Multimedia Interface)-An interface used to create a complete screen image. I icon-A small image displayed on...
... other services. Interlaced monitors take two passes to transmit high quality audio and video signal via a single cable in combination with the Fn key can control another while using a pointing device such as the battery save mode. (2) A key or combination of computers that represents a function, file, or program. 170 Glossary HDMI (High-Definition Multimedia Interface)-An interface used to create a complete screen image. I icon-A small image displayed on...

User Guide
Page 177
... power light 36 accessing network 91 adding memory (optional) 41 optional external devices 40 adequate ventilation cooling fan 35 adjusting touch pad settings 58 audio features 91 B backing up files 67, 71 battery battery life 74 care 84, 85 changing 84 charge indicator light 38 charging 39 charging the real-time clock (RTC) 76 conserving power 80 determine remaining power 78 disposal 85 indicator light 78 installation 84 low charge 79 maintaining 85 maximum capacity 74 monitoring power 38, 77 power management 75 power options...
... power light 36 accessing network 91 adding memory (optional) 41 optional external devices 40 adequate ventilation cooling fan 35 adjusting touch pad settings 58 audio features 91 B backing up files 67, 71 battery battery life 74 care 84, 85 changing 84 charge indicator light 38 charging 39 charging the real-time clock (RTC) 76 conserving power 80 determine remaining power 78 disposal 85 indicator light 78 installation 84 low charge 79 maintaining 85 maximum capacity 74 monitoring power 38, 77 power management 75 power options...

User Guide
Page 178
... computer to a network 91 HDMI™-compatible TV or display device 63 monitor 63 power cord/cable 38 power source 37 cooling fan adequate ventilation 35 customize computer settings 64 D data/entire system backup troubleshooting 142 desktop creating new icon 88 exploring the 87 icons 88 recycle bin 88 standard features 88 Windows® operating system 87 Device Manager fixing a problem 132 disabling touch pad 61, 159 display troubleshooting 136 display devices external 62 display output settings 63 display, external adjusting 64 disposal...
... computer to a network 91 HDMI™-compatible TV or display device 63 monitor 63 power cord/cable 38 power source 37 cooling fan adequate ventilation 35 customize computer settings 64 D data/entire system backup troubleshooting 142 desktop creating new icon 88 exploring the 87 icons 88 recycle bin 88 standard features 88 Windows® operating system 87 Device Manager fixing a problem 132 disabling touch pad 61, 159 display troubleshooting 136 display devices external 62 display output settings 63 display, external adjusting 64 disposal...
User Guide
Page 179
... disabling or enabling wireless devices 158 display brightness 157 Hibernation mode 155 increase speaker volume 160 keyboard backlight 151 keyboard overlays 160 Lock (Instant security) 152 Output (Display switch) 156 power plan 153 Sleep mode 154 using to set a power plan 82 volume mute 150 zoom 160 zoom in 160 zoom out 160 Hot Key Cards 148 Hot key functions 150 I icon desktop 88 moving to desktop 88 Index 179 recycle bin 88 safety 26 installing battery 84 memory modules...
... disabling or enabling wireless devices 158 display brightness 157 Hibernation mode 155 increase speaker volume 160 keyboard backlight 151 keyboard overlays 160 Lock (Instant security) 152 Output (Display switch) 156 power plan 153 Sleep mode 154 using to set a power plan 82 volume mute 150 zoom 160 zoom in 160 zoom out 160 Hot Key Cards 148 Hot key functions 150 I icon desktop 88 moving to desktop 88 Index 179 recycle bin 88 safety 26 installing battery 84 memory modules...
User Guide
Page 182
... USB Sleep and Charge cannot use 144 USB Wakeup function does not work 145 Windows® operating system not working 130 wireless networking 138 Trusted Platform Module (TPM) 118 U USB Sleep and Charge cannot use 144 USB Wakeup function does not work 145 user password, deleting 105 user password, setting 104 using a microphone 91 computer lock 66 hot key to set a power plan 82 Memory card reader 93 TOSHIBA eco power plan 83 touch pad 57 Web Camera 92 using the keyboard 68 Utilities 95 V video projector adjusting display 64 W warranty standard limited warranty 27 Web Camera using...
... USB Sleep and Charge cannot use 144 USB Wakeup function does not work 145 Windows® operating system not working 130 wireless networking 138 Trusted Platform Module (TPM) 118 U USB Sleep and Charge cannot use 144 USB Wakeup function does not work 145 user password, deleting 105 user password, setting 104 using a microphone 91 computer lock 66 hot key to set a power plan 82 Memory card reader 93 TOSHIBA eco power plan 83 touch pad 57 Web Camera 92 using the keyboard 68 Utilities 95 V video projector adjusting display 64 W warranty standard limited warranty 27 Web Camera using...


