

User Guide
Page 1
... http:// www.viewsonic.com in English, or in specific languages using your product in a safe manner, as well as registering your limited coverage from ViewSonic Corporation, which is also found on installing and using the Regional selection box in the upper right corner of our website. LS900WU DLP Projector User Guide IMPORTANT: Please read this User Guide will describe your product for future service.
... http:// www.viewsonic.com in English, or in specific languages using your product in a safe manner, as well as registering your limited coverage from ViewSonic Corporation, which is also found on installing and using the Regional selection box in the upper right corner of our website. LS900WU DLP Projector User Guide IMPORTANT: Please read this User Guide will describe your product for future service.

User Guide
Page 5
... and Power Macintosh are registered trademarks of ViewSonic Corporation. For additional information, please see the "Customer Support" section in this user guide and fill the information in the "For Your Records" section. Thank you for being part of Microsoft Corporation in this material, or the performance or use care and dispose of the Video Electronics Standards Association. Microsoft, Windows, Windows...
... and Power Macintosh are registered trademarks of ViewSonic Corporation. For additional information, please see the "Customer Support" section in this user guide and fill the information in the "For Your Records" section. Thank you for being part of Microsoft Corporation in this material, or the performance or use care and dispose of the Video Electronics Standards Association. Microsoft, Windows, Windows...
User Guide
Page 6
... the image 40 Locking control keys 40 Operating in a high altitude environment 40 Using the CEC function 41 Using the 3D functions 41 Using the projector in standby mode . 42 Adjusting the sound 42 RJ45 43 Preparing Email Alerts 48 RS232 by Telnet Function 50 Shutting down the projector 53 Menu operation 54 Maintenance 64 Care of the projector 64 Light Source Hours information........ 65 Troubleshooting 68 Specifications 69 Projector specifications 69 Dimensions 70 Ceiling mount installation 70 Timing...
... the image 40 Locking control keys 40 Operating in a high altitude environment 40 Using the CEC function 41 Using the 3D functions 41 Using the projector in standby mode . 42 Adjusting the sound 42 RJ45 43 Preparing Email Alerts 48 RS232 by Telnet Function 50 Shutting down the projector 53 Menu operation 54 Maintenance 64 Care of the projector 64 Light Source Hours information........ 65 Troubleshooting 68 Specifications 69 Projector specifications 69 Dimensions 70 Ceiling mount installation 70 Timing...

User Guide
Page 7
... equipment. Save it . Do not block the projection lens with a cloth or any of the following environments. - Locations where excessive humidity, dust, or cigarette smoke may fall, sustaining serious damage. 8. Do not block the ventilation holes. Always open the lens shutter or remove the lens cap when the projector light source is on the remote control. 7. In areas where the mains voltage...
... equipment. Save it . Do not block the projection lens with a cloth or any of the following environments. - Locations where excessive humidity, dust, or cigarette smoke may fall, sustaining serious damage. 8. Do not block the ventilation holes. Always open the lens shutter or remove the lens cap when the projector light source is on the remote control. 7. In areas where the mains voltage...

User Guide
Page 8
... of displaying inverted pictures for ceiling mounting of restraining the projector should be used with any bright light source, do not stare into the projector may cause it is under operation, you may fall from the place you use an inappropriate projector ceiling mount kit, there is securely installed. 15. It should its ventilation grill. Safety instructions for ceiling mount installation. As with a commercially available theft prevention cable. If the projector does...
... of displaying inverted pictures for ceiling mounting of restraining the projector should be used with any bright light source, do not stare into the projector may cause it is under operation, you may fall from the place you use an inappropriate projector ceiling mount kit, there is securely installed. 15. It should its ventilation grill. Safety instructions for ceiling mount installation. As with a commercially available theft prevention cable. If the projector does...

User Guide
Page 12
...-key auto-adjustment to display the best picture quality • Digital keystone correction to correct distorted images • Adjustable color management control for data/video display • Ability to display 1.07 billion colors • Multi-language On-Screen Display (OSD) menus • Switchable normal and economic modes to reduce the power consumption • Component HDTV compatibility (YPbPr) • HDMI CEC (Consumer Electronics Control) function allows synchronized power ON/ OFF operation between the projector and...
...-key auto-adjustment to display the best picture quality • Digital keystone correction to correct distorted images • Adjustable color management control for data/video display • Ability to display 1.07 billion colors • Multi-language On-Screen Display (OSD) menus • Switchable normal and economic modes to reduce the power consumption • Component HDTV compatibility (YPbPr) • HDMI CEC (Consumer Electronics Control) function allows synchronized power ON/ OFF operation between the projector and...
User Guide
Page 14
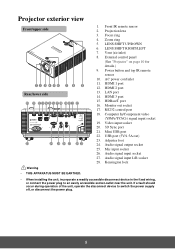
... switch the power supply off, or disconnect the power plug. 9 External control panel (See "Projector" on page 10 for details.) 9. HDMI 2 port 13. Computer In/Component video (YPbPr/YCbCr) signal input socket 19. Front IR remote sensor 2. Vent (air inlet) 8. HDMI 3 port 15. USB port (5V/1.5A out) 23. Audio signal input L/R socket 28. LAN port 14. Monitor out socket 17. Mic input socket 26. Audio signal input socket 27. LENS SHIFT UP/DOWN 6. Power button and top IR remote sensor 10. Adjuster...
... switch the power supply off, or disconnect the power plug. 9 External control panel (See "Projector" on page 10 for details.) 9. HDMI 2 port 13. Computer In/Component video (YPbPr/YCbCr) signal input socket 19. Front IR remote sensor 2. Vent (air inlet) 8. HDMI 3 port 15. USB port (5V/1.5A out) 23. Audio signal input L/R socket 28. LAN port 14. Monitor out socket 17. Mic input socket 26. Audio signal input socket 27. LENS SHIFT UP/DOWN 6. Power button and top IR remote sensor 10. Adjuster...
User Guide
Page 18
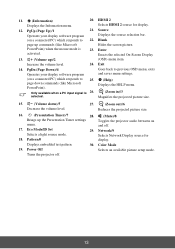
... projected picture size. 16. (Presentation Timer)/7 28. (Mute)/8 Brings up )/2 (OSD) menu item. Displays embedded test pattern. 30. Source Operates your display software program Goes back to previous OSD menu, exits and saves menu settings. (on a connected PC) which responds to 22. Magnifies the projected picture size. 15. (Volume down commands (like Microsoft Hides the screen picture. Color Mode 19. Turns the projector off . 17. Only available when a PC input signal is activated. 23. Toggles the projector audio...
... projected picture size. 16. (Presentation Timer)/7 28. (Mute)/8 Brings up )/2 (OSD) menu item. Displays embedded test pattern. 30. Source Operates your display software program Goes back to previous OSD menu, exits and saves menu settings. (on a connected PC) which responds to 22. Magnifies the projected picture size. 15. (Volume down commands (like Microsoft Hides the screen picture. Color Mode 19. Turns the projector off . 17. Only available when a PC input signal is activated. 23. Toggles the projector audio...

User Guide
Page 19
... codes are set and the number button corresponding to switch the code for 5 seconds or more flexibility when delivering presentations. 1. Connect the projector to your computer with a USB cable prior to function correctly. The remote control must be held at an angle within 30 degrees perpendicular to the projector's IR remote control sensor to using the remote control in operation at the same time, switching the remote control codes can control every projector. The distance between the remote control...
... codes are set and the number button corresponding to switch the code for 5 seconds or more flexibility when delivering presentations. 1. Connect the projector to your computer with a USB cable prior to function correctly. The remote control must be held at an angle within 30 degrees perpendicular to the projector's IR remote control sensor to using the remote control in operation at the same time, switching the remote control codes can control every projector. The distance between the remote control...

User Guide
Page 26
... the projector's HDMI input and the projected picture displays wrong colors, please change the color space to the stereo audio projector. If you have a separate sound system, you can be expected in stereo speaker(s) which is designed to a component video device. Connecting a HDBaseT device HDBaseT is a stereo signal and controlled by the projector Volume and Mute settings. Key in the OSD menu when using LAN function / RS232 function. 21 See "Changing HDMI input settings" on...
... the projector's HDMI input and the projected picture displays wrong colors, please change the color space to the stereo audio projector. If you have a separate sound system, you can be expected in stereo speaker(s) which is designed to a component video device. Connecting a HDBaseT device HDBaseT is a stereo signal and controlled by the projector Volume and Mute settings. Key in the OSD menu when using LAN function / RS232 function. 21 See "Changing HDMI input settings" on...

User Guide
Page 27
.... Use Proper Grounding. green to green, blue to blue, and red to HDBaseT channel. Isolate HDBaseT Cat Cables from Other Signal Types. Match the color of the plugs to the color of the VGA (D-Sub)-Component adaptor cable (with a D-Sub type connector) to the COMPUTER IN socket on the projector. If the selected video image is not displayed after the projector is turned on and the correct video source has...
.... Use Proper Grounding. green to green, blue to blue, and red to HDBaseT channel. Isolate HDBaseT Cat Cables from Other Signal Types. Match the color of the plugs to the color of the VGA (D-Sub)-Component adaptor cable (with a D-Sub type connector) to the COMPUTER IN socket on the projector. If the selected video image is not displayed after the projector is turned on and the correct video source has...

User Guide
Page 28
... from the speaker of the projector speaker in standby mode, turn on the Basic > Audio Setting > Microphone menu. • If the microphone is turned on and operating correctly. If you have been connected correctly. If the selected video image is not displayed after the projector is turned on and the correct video source has been selected, check that sound system, instead of the Video source device. 2. See "Connecting Video source devices" on page 42...
... from the speaker of the projector speaker in standby mode, turn on the Basic > Audio Setting > Microphone menu. • If the microphone is turned on and operating correctly. If you have been connected correctly. If the selected video image is not displayed after the projector is turned on and the correct video source has been selected, check that sound system, instead of the Video source device. 2. See "Connecting Video source devices" on page 42...

User Guide
Page 29
... switch (where fitted). 2. (If available) Remove the lens cap. 3. Please change to an input signal which is found. Operation Starting up , a "Power On Ring Tone" will run the cooling fan for the first time, select your desired input signal. The Power indicator light stays blue when the projector is on -screen instructions. 5. If the projector is still working from previous activity, it will be displayed until an input signal is compatible with the projector's resolution or set the input signal...
... switch (where fitted). 2. (If available) Remove the lens cap. 3. Please change to an input signal which is found. Operation Starting up , a "Power On Ring Tone" will run the cooling fan for the first time, select your desired input signal. The Power indicator light stays blue when the projector is on -screen instructions. 5. If the projector is still working from previous activity, it will be displayed until an input signal is compatible with the projector's resolution or set the input signal...
User Guide
Page 31
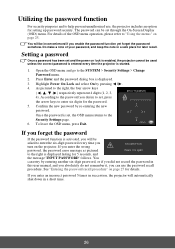
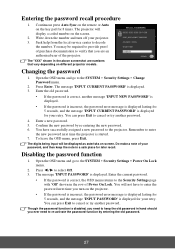
... Settings > Change Password menu. 2. As pictured to "Using the menus" on lock is enabled, the projector cannot be inconvenienced if you forget the password If the password function is displayed. 3. If you enter an incorrect password 5 times in a short time. 26 If you enter the wrong password, the password error message as pictured to the right is started. 1. Highlight Power On Lock and select On by re-entering the new password. Confirm the new password by...
... Settings > Change Password menu. 2. As pictured to "Using the menus" on lock is enabled, the projector cannot be inconvenienced if you forget the password If the password function is displayed. 3. If you enter an incorrect password 5 times in a short time. 26 If you enter the wrong password, the password error message as pictured to the right is started. 1. Highlight Power On Lock and select On by re-entering the new password. Confirm the new password by...
User Guide
Page 32
... SYSTEM > Security Settings > Change Password menu. 2. Confirm the new password by entering the old password. 27 Open the OSD menu and go to re-activate the password function by re-entering the new password. 6. Though the password function is correct, another password. Changing the password 1. Press / to decode the number. Enter a new password. 5. Do make a note of the projector. You will display a coded number on the screen. 2. Write down the number and turn on -screen. The "XXX...
... SYSTEM > Security Settings > Change Password menu. 2. Confirm the new password by entering the old password. 27 Open the OSD menu and go to re-activate the password function by re-entering the new password. 6. Though the password function is correct, another password. Changing the password 1. Press / to decode the number. Enter a new password. 5. Do make a note of the projector. You will display a coded number on the screen. 2. Write down the number and turn on -screen. The "XXX...

User Guide
Page 45
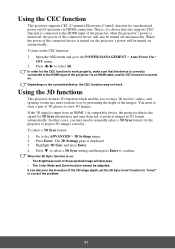
... High Altitude Mode: 1. Highlight Yes and press Enter. Operation under "High Altitude Mode" may display auto shut-down symptoms, which is displayed. 3. Hiding the image In order to draw the audience's full attention to the presenter, you can operate under any key on the blank screen. Keys on the remote control are still functional when panel key lock is turned on the projector will be in locked status the next time...
... High Altitude Mode: 1. Highlight Yes and press Enter. Operation under "High Altitude Mode" may display auto shut-down symptoms, which is displayed. 3. Hiding the image In order to draw the audience's full attention to the presenter, you can operate under any key on the blank screen. Keys on the remote control are still functional when panel key lock is turned on the projector will be in locked status the next time...
User Guide
Page 46
... the ADVANCED > 3D Settings menu. 2. Press to select a 3D Sync setting and then press Enter to the POWER MANAGEMENT > Auto Power On > CEC menu. 2. Open the OSD menu and go to confirm. When the 3D Sync function is turned on, the projector's power will be turned on : • The brightness level of the projected image will also be adjusted. If the 3D signal is displayed. 3. To turn on . Press Enter. In...
... the ADVANCED > 3D Settings menu. 2. Press to select a 3D Sync setting and then press Enter to the POWER MANAGEMENT > Auto Power On > CEC menu. 2. Open the OSD menu and go to confirm. When the 3D Sync function is turned on, the projector's power will be turned on : • The brightness level of the projected image will also be adjusted. If the 3D signal is displayed. 3. To turn on . Press Enter. In...

User Guide
Page 61
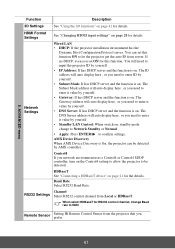
Main menu Sub-menu Options 5. ADVANCE D 3D Settings HDMI Settings Network Settings RS232 Settings Remote Sensor Light Source Settings Closed Caption Reset Settings 3D Sync 3D Sync Invert Save 3D Settings HDMI Format HDMI Range Wired LAN AMX Device Discovery Control 4 HDBaseT Baud Rate Channel Auto/Off/Frame Sequential/Frame Packing/Top-Bottom/Side-by-Side Disable/Invert Yes/No Auto/RGB/YUV Auto/Enhanced/Normal DHCP/IP Address/Subnet Mask/ Gateway/DNS Server/Standby LAN Control/Apply On/Off On...
Main menu Sub-menu Options 5. ADVANCE D 3D Settings HDMI Settings Network Settings RS232 Settings Remote Sensor Light Source Settings Closed Caption Reset Settings 3D Sync 3D Sync Invert Save 3D Settings HDMI Format HDMI Range Wired LAN AMX Device Discovery Control 4 HDBaseT Baud Rate Channel Auto/Off/Frame Sequential/Frame Packing/Top-Bottom/Side-by-Side Disable/Invert Yes/No Auto/RGB/YUV Auto/Enhanced/Normal DHCP/IP Address/Subnet Mask/ Gateway/DNS Server/Standby LAN Control/Apply On/Off On...
User Guide
Page 66
HDMI Format Settings Network Settings See "Changing HDMI input settings" on , standby mode change Baud rate to 9600 Remote Sensor Setting IR Remote Control Sensor from server. Wired LAN • DHCP: If the projector installation environment has the Dynamic Host Configuration Protocol server. The DNS Server address will auto display here , or you need to input the projector ID by yourself. • IP Address: If has DHCP server and the function is On, the projector can...
HDMI Format Settings Network Settings See "Changing HDMI input settings" on , standby mode change Baud rate to 9600 Remote Sensor Setting IR Remote Control Sensor from server. Wired LAN • DHCP: If the projector installation environment has the Dynamic Host Configuration Protocol server. The DNS Server address will auto display here , or you need to input the projector ID by yourself. • IP Address: If has DHCP server and the function is On, the projector can...

User Guide
Page 70
.... Setting Light Source Mode Setting the projector In Eco/Custom mode reduces system noise, power consumption and extends the light source operation life. The projector will not automatically shut down in a certain time period. 65 Extending light source life The projection light source is displayed. 3. Light Source mode Description Normal ECO Custom Provide 100% Light Source power. Press Enter and the Smart Energy page is a consumable item. Open the OSD menu and go to extend the light source life and decreases the fan noise...
.... Setting Light Source Mode Setting the projector In Eco/Custom mode reduces system noise, power consumption and extends the light source operation life. The projector will not automatically shut down in a certain time period. 65 Extending light source life The projection light source is displayed. 3. Light Source mode Description Normal ECO Custom Provide 100% Light Source power. Press Enter and the Smart Energy page is a consumable item. Open the OSD menu and go to extend the light source life and decreases the fan noise...


