User Guide
Page 2
... errors or omissions contained herein; No part of the Video Electronics Standards Association. FOR YOUR RECORDS The serial number of this product is registered trademark of this document may change product specifications without prior written permission from furnishing this product. ViewSonic, the three birds logo and OnView are registered trademarks of VESA. In the interest of theft or loss. Model Name: ViewSonic NEXTVISION N6 Model Number: VSVBX24402-1M Serial Number...
... errors or omissions contained herein; No part of the Video Electronics Standards Association. FOR YOUR RECORDS The serial number of this product is registered trademark of this document may change product specifications without prior written permission from furnishing this product. ViewSonic, the three birds logo and OnView are registered trademarks of VESA. In the interest of theft or loss. Model Name: ViewSonic NEXTVISION N6 Model Number: VSVBX24402-1M Serial Number...
User Guide
Page 3
... you operate this product follow its operating instructions. To ensure reliable operation of the product and to replace your NEXTVISION N6 BOX will prevent damage to the product due to moisture or high humidity. • Do not attempt repair yourself. Do not defeat the safety purpose of time, unplug and remove the batteries from the wall outlet and disconnect the antenna or cable system. Power Cord Protection Power supply cords should still...
... you operate this product follow its operating instructions. To ensure reliable operation of the product and to replace your NEXTVISION N6 BOX will prevent damage to the product due to moisture or high humidity. • Do not attempt repair yourself. Do not defeat the safety purpose of time, unplug and remove the batteries from the wall outlet and disconnect the antenna or cable system. Power Cord Protection Power supply cords should still...

User Guide
Page 4
..., VCR, DVD or play video games. Product Features 3 With NEXTVISION N6 video processor, you can use your purchase of ViewSonic NEXTVISION N6. The system set up is easy and there are no additional requirements for receiving terrestrial or cable TV. • Automatic channel scan to detect active TV/CATV channels. • Multiview: view up to 1280 x 1024. • Full screen, true color display. • Multiple video inputs: Antenna/Cable, Component (Y,Pb,Pr) Composite RCA, and S-Video. • Input video support: 480i...
..., VCR, DVD or play video games. Product Features 3 With NEXTVISION N6 video processor, you can use your purchase of ViewSonic NEXTVISION N6. The system set up is easy and there are no additional requirements for receiving terrestrial or cable TV. • Automatic channel scan to detect active TV/CATV channels. • Multiview: view up to 1280 x 1024. • Full screen, true color display. • Multiple video inputs: Antenna/Cable, Component (Y,Pb,Pr) Composite RCA, and S-Video. • Input video support: 480i...
User Guide
Page 5
... Contents 5 Chapter 2 Installation 2.1 Product Overview 6 2.1.1 Front view of NEXTVISION N6 6 2.1.2 Rear view of NEXTVISION N6 2.2 System Installation 8 2.2.1 Analog TV and A/V device connection 8 2.2.2 Connect to remote signal 9 2.2.3 Extended wiring 10 Chapter 3 Operation Instruction 3.1 Initial Setting 13 3.2 Remote Control 13 3.3 OSD Description 14 3.3.1 PICTURE settings 14 3.3.2 VIDEO tab 15 3.3.3 TV tab 16 3.3.4 AUDIO SETUP 17 3.3.5 Parental Control 18 3.3.6 OSD 19 Chapter 4 Troubleshooting Troubleshooting 20 Appendix A: Specifications 21 Appendix...
... Contents 5 Chapter 2 Installation 2.1 Product Overview 6 2.1.1 Front view of NEXTVISION N6 6 2.1.2 Rear view of NEXTVISION N6 2.2 System Installation 8 2.2.1 Analog TV and A/V device connection 8 2.2.2 Connect to remote signal 9 2.2.3 Extended wiring 10 Chapter 3 Operation Instruction 3.1 Initial Setting 13 3.2 Remote Control 13 3.3 OSD Description 14 3.3.1 PICTURE settings 14 3.3.2 VIDEO tab 15 3.3.3 TV tab 16 3.3.4 AUDIO SETUP 17 3.3.5 Parental Control 18 3.3.6 OSD 19 Chapter 4 Troubleshooting Troubleshooting 20 Appendix A: Specifications 21 Appendix...
User Guide
Page 6
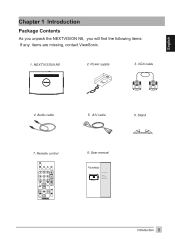
AN cable 6. NEXTVISION N6 2. Bapter 1 Introduction Package Contents As you unpack the NEXTVISION N6, you will find the following items: If any items are missing, contact ViewSonic. 1. VGA cable 4. User manual ViewSonie :7- e Introduction 5 Audio cable 5. Stand 7. Remote control 0 0000 2 9 7)' 000 O TT® 7 0 8 0 @ 0 0 O 0 O MewSoric 8. Power supply 3.
AN cable 6. NEXTVISION N6 2. Bapter 1 Introduction Package Contents As you unpack the NEXTVISION N6, you will find the following items: If any items are missing, contact ViewSonic. 1. VGA cable 4. User manual ViewSonie :7- e Introduction 5 Audio cable 5. Stand 7. Remote control 0 0000 2 9 7)' 000 O TT® 7 0 8 0 @ 0 0 O 0 O MewSoric 8. Power supply 3.
User Guide
Page 7
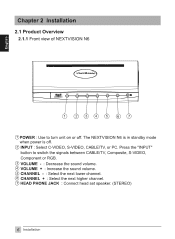
...VIDEO, S-VIDEO, CABLE/TV, or PC. CD VOLUME - : Decrease the sound volume. (D VOLUME + : Increase the sound volume. (D CHANNEL - : Select the next lower channel. The NEXTVISION N6 is in standby mode when power is off . CD CHANNEL + : Select the next higher channel. @ HEAD PHONE JACK : Connect head set speaker. (STEREO) 6 Installation Press the "INPUT" button to turn unit on or off . Chapter 2 Installation 2.1 Product Overview 2.1.1 Front view of NEXTVISION N6 C- ream,'Scow) 0 0 0 0 1 2 3 4 5 00 CD POWER : Use to switch the signals between CABLE/TV, Composite, S-VIDEO, Component...
...VIDEO, S-VIDEO, CABLE/TV, or PC. CD VOLUME - : Decrease the sound volume. (D VOLUME + : Increase the sound volume. (D CHANNEL - : Select the next lower channel. The NEXTVISION N6 is in standby mode when power is off . CD CHANNEL + : Select the next higher channel. @ HEAD PHONE JACK : Connect head set speaker. (STEREO) 6 Installation Press the "INPUT" button to turn unit on or off . Chapter 2 Installation 2.1 Product Overview 2.1.1 Front view of NEXTVISION N6 C- ream,'Scow) 0 0 0 0 1 2 3 4 5 00 CD POWER : Use to switch the signals between CABLE/TV, Composite, S-VIDEO, Component...

User Guide
Page 8
...; RGB INPUT Using the 15-pin VGA cable provided, connect one side to the VGA output on the NEXTVISION N6. 9 AUDIO OUT Connect this AUDIO OUT to your 15 pin monitor connector to this S-VIDEO INPUT port (S-Video typically provides a better quality video signal.) ▪ RF IN (VHF/UHF) Connect to antenna or cable TV signal. ® VIDEO IN Connect the external composite video such as from your sound card to this AUDIO IN port on your...
...; RGB INPUT Using the 15-pin VGA cable provided, connect one side to the VGA output on the NEXTVISION N6. 9 AUDIO OUT Connect this AUDIO OUT to your 15 pin monitor connector to this S-VIDEO INPUT port (S-Video typically provides a better quality video signal.) ▪ RF IN (VHF/UHF) Connect to antenna or cable TV signal. ® VIDEO IN Connect the external composite video such as from your sound card to this AUDIO IN port on your...

User Guide
Page 9
... connection: For audio connection, use an RCA video connector or an S-Video connector. 8 Installation PC connection not required. 0 Speake DC IN 0 0 0 P(LO7I ALDIOI 000 - - O O O O Adapter RCA A/V cable S-VIDEO cable O DVDNCR/LD/IRD 00000 Camera I 0-1V --- 2.2 System Installation Please refer to one of the following examples closest to your configuration. 2.2.1 Analog TV and A/V device connection 'a Viudio output from PC Cable HDTV receiver with component output Antenna DVD with component output RGB output from PC The NEXTVISION N6...
... connection: For audio connection, use an RCA video connector or an S-Video connector. 8 Installation PC connection not required. 0 Speake DC IN 0 0 0 P(LO7I ALDIOI 000 - - O O O O Adapter RCA A/V cable S-VIDEO cable O DVDNCR/LD/IRD 00000 Camera I 0-1V --- 2.2 System Installation Please refer to one of the following examples closest to your configuration. 2.2.1 Analog TV and A/V device connection 'a Viudio output from PC Cable HDTV receiver with component output Antenna DVD with component output RGB output from PC The NEXTVISION N6...

User Guide
Page 10
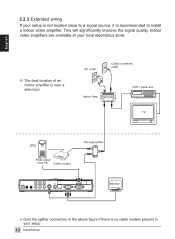
... remote signal Required when sharing a single antenna or cable outlet. For video connection, use RCA audio(L+R) connector. K< The NEXTVISION N6 must be located within 1.0M of your PC. Introduction 9 Video game WARNING: Turn off all devices before you begin. Audio/Video connection: For audio connection, use an RCA video connector or an S-Video connector. PC connection not required. Two way splitter Cable or antenna outlet VCR / Cable box 3 00000 TV flu ) HDTV receiver with component output I ) 00000 DVD with component output Audio output...
... remote signal Required when sharing a single antenna or cable outlet. For video connection, use RCA audio(L+R) connector. K< The NEXTVISION N6 must be located within 1.0M of your PC. Introduction 9 Video game WARNING: Turn off all devices before you begin. Audio/Video connection: For audio connection, use an RCA video connector or an S-Video connector. PC connection not required. Two way splitter Cable or antenna outlet VCR / Cable box 3 00000 TV flu ) HDTV receiver with component output I ) 00000 DVD with component output Audio output...
User Guide
Page 11
... figure if there is recommended to install a indoor video amplifier. Indoor video amplifiers are available at your setup. /0 Installation VCR / Cable box 1. 1. _ 000001 TV on ) (PC) RGB output from PC Cable modem Two way splitter 0 000 Lb- 9,9 0 Omit the splitter connection in your local electronics store. The best location of an indoor amplifier is near a television. This will significantly improve the signal quality.
... figure if there is recommended to install a indoor video amplifier. Indoor video amplifiers are available at your setup. /0 Installation VCR / Cable box 1. 1. _ 000001 TV on ) (PC) RGB output from PC Cable modem Two way splitter 0 000 Lb- 9,9 0 Omit the splitter connection in your local electronics store. The best location of an indoor amplifier is near a television. This will significantly improve the signal quality.
User Guide
Page 12
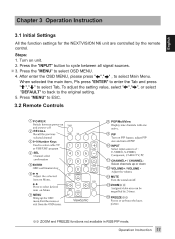
... power-on Menu. Turn on Menu. * Press to ESC. 3.2 Remote Controls POWER Switch between all signal sources. 3. Chapter 3 Operation Instruction 3.1 Initial Settings All the function settings for the NEXTVISION N6 unit are controlled by 2 times. 1 FREEZER X Freeze or unfreeze the latest picture. OO O 0 O0 O SEL MUTE VOLUME O on ZOOM EWER • FAME ViewSonic 8 POP/MultiView Display nine channels with one active. 9 PIP Turn on PIP feature, adjust PIP size and turn off PIP. 1 INPUT Select input sources of : C-VIDEO, S-VIDEO, Component, CABLE...
... power-on Menu. Turn on Menu. * Press to ESC. 3.2 Remote Controls POWER Switch between all signal sources. 3. Chapter 3 Operation Instruction 3.1 Initial Settings All the function settings for the NEXTVISION N6 unit are controlled by 2 times. 1 FREEZER X Freeze or unfreeze the latest picture. OO O 0 O0 O SEL MUTE VOLUME O on ZOOM EWER • FAME ViewSonic 8 POP/MultiView Display nine channels with one active. 9 PIP Turn on PIP feature, adjust PIP size and turn off PIP. 1 INPUT Select input sources of : C-VIDEO, S-VIDEO, Component, CABLE...

User Guide
Page 14
...: PICTURE tab The PICTURE tab allows adjustment of picture related items. PICTURIE VIDEO TV AUDIO OSD PARENTALCONTROL CONTRAST 77 k IGHTNESS 50 MATI0N 51 -3 I : Adjustable options on PICTURE tab SCBPHSOHIAORUPpATIENTtGiURRoTHnRPRATANACNTESKEISTIOSNSNSG Description Adjust foreground white level of screen image. Adjust the intensity of the screen image. Operation Instruction 13 In PIP mode to activate the OSD. CI Press " ♦ " or " 4 " to adjust the highlighted option. ® Press " MENU " to...
...: PICTURE tab The PICTURE tab allows adjustment of picture related items. PICTURIE VIDEO TV AUDIO OSD PARENTALCONTROL CONTRAST 77 k IGHTNESS 50 MATI0N 51 -3 I : Adjustable options on PICTURE tab SCBPHSOHIAORUPpATIENTtGiURRoTHnRPRATANACNTESKEISTIOSNSNSG Description Adjust foreground white level of screen image. Adjust the intensity of the screen image. Operation Instruction 13 In PIP mode to activate the OSD. CI Press " ♦ " or " 4 " to adjust the highlighted option. ® Press " MENU " to...
User Guide
Page 15
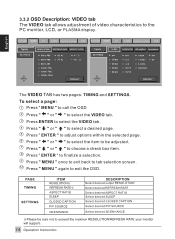
... selection screen. Press " ENTER " to the PC monitor, LCD, or PLASMA display. 3.3.2 OSD Description: VIDEO tab The VIDEO tab allows adjustment of video characteristics to adjust options within the selected page. Press " ENTER" to choose a check box item. CD Press " ♦ " or " f " to finalize a selection. PAGE TIMING SETTINGS ITEM RESOLUTIONX REFRESH RATE7E ASPECT RATIO SLEEP CLOSED CAPTION PIP SOURCE 3D ENHANCE DESCRIPTION Select desired output...
... selection screen. Press " ENTER " to the PC monitor, LCD, or PLASMA display. 3.3.2 OSD Description: VIDEO tab The VIDEO tab allows adjustment of video characteristics to adjust options within the selected page. Press " ENTER" to choose a check box item. CD Press " ♦ " or " f " to finalize a selection. PAGE TIMING SETTINGS ITEM RESOLUTIONX REFRESH RATE7E ASPECT RATIO SLEEP CLOSED CAPTION PIP SOURCE 3D ENHANCE DESCRIPTION Select desired output...
User Guide
Page 16
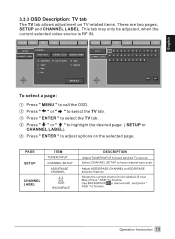
.../ERASE CHANNEL to have channel auto scan. AUDIO PARENTAL CONTROL OS. PAGE SETUP CHANNEL LABEL ITEM TUNER INPUT CHANNEL SETUP ADD/ERASE CHANNEL A-Z, 0-9_, ADD, BACKSPACE DESCRIPTION Adjust TUNER INPUT to ADD/ERASE desired channel. Operation Instruction 15 SETUP CHANNEL LABEL CHANNEL: TUNER INPUT CHANNEL SETUP AINNERASE CHANNEL • ANTENNA • AUTO SCAN O CAN O HRC O IRC • ADD 0 ERASE • elENIERI"› SETUP El CHANNEL LABEL N 0 X YZ ADO To select a page: CI Press " MENU " to have desired TV source. SETUP and CHANNEL LABEL. Select CHANNEL SETUP to...
.../ERASE CHANNEL to have channel auto scan. AUDIO PARENTAL CONTROL OS. PAGE SETUP CHANNEL LABEL ITEM TUNER INPUT CHANNEL SETUP ADD/ERASE CHANNEL A-Z, 0-9_, ADD, BACKSPACE DESCRIPTION Adjust TUNER INPUT to ADD/ERASE desired channel. Operation Instruction 15 SETUP CHANNEL LABEL CHANNEL: TUNER INPUT CHANNEL SETUP AINNERASE CHANNEL • ANTENNA • AUTO SCAN O CAN O HRC O IRC • ADD 0 ERASE • elENIERI"› SETUP El CHANNEL LABEL N 0 X YZ ADO To select a page: CI Press " MENU " to have desired TV source. SETUP and CHANNEL LABEL. Select CHANNEL SETUP to...
User Guide
Page 18
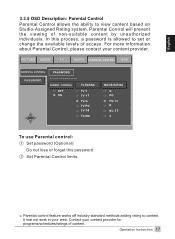
... non-suitable content by unauthorized individuals. ED Set Parental Control limits. Contact your content provider. It mat not work in your area. Parental control feature works off industry standard methods adding rating to content. Parental Control will prevent the viewing of content. Operation Instruction 17 PICTURE VIDEO TV AUDIO PARENTAL CONTROL OSD PASSWORD PARENTAL CONTROL PASSWORD OOFNF PARENT CONTROL OOO TTTTTTTVVVVVVV-------1RYYGPM4A7GATING•OOOOOMOPPNGXV-GGC--R11IEA37TING To use Parental control: 0 Set password (Optional) Do not lose or forget...
... non-suitable content by unauthorized individuals. ED Set Parental Control limits. Contact your content provider. It mat not work in your area. Parental control feature works off industry standard methods adding rating to content. Parental Control will prevent the viewing of content. Operation Instruction 17 PICTURE VIDEO TV AUDIO PARENTAL CONTROL OSD PASSWORD PARENTAL CONTROL PASSWORD OOFNF PARENT CONTROL OOO TTTTTTTVVVVVVV-------1RYYGPM4A7GATING•OOOOOMOPPNGXV-GGC--R11IEA37TING To use Parental control: 0 Set password (Optional) Do not lose or forget...
User Guide
Page 19
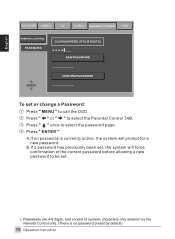
.... ED Press " ♦ " or " ♦ " to be set. Ci Press " 4, " once to call the OSD. B.If a password has previously been set, the system will prompt for a new password. PICTURE VIDEO TV AUDIO PARENTAL CONTROL OSD PARENTAL CONTROL PASSWORD OLD PASSWORD (4 TO 8 DIGITS) ****I___ NEW PASSWORD • 4ENTER V CONFIRM PASSWORD To set or change a Password: 0 Press " MENU " to select the password page. ,CD Press " ENTER" A.If no password is no password preset by default) 18 Operation Instruction
.... ED Press " ♦ " or " ♦ " to be set. Ci Press " 4, " once to call the OSD. B.If a password has previously been set, the system will prompt for a new password. PICTURE VIDEO TV AUDIO PARENTAL CONTROL OSD PARENTAL CONTROL PASSWORD OLD PASSWORD (4 TO 8 DIGITS) ****I___ NEW PASSWORD • 4ENTER V CONFIRM PASSWORD To set or change a Password: 0 Press " MENU " to select the password page. ,CD Press " ENTER" A.If no password is no password preset by default) 18 Operation Instruction

User Guide
Page 20
... set or change PARENTAL CONTROL limits: 0 Press " MENU " to call the OSD. ® Press " ♦ " or " ♦ " to tab select screen. Be sure to press " ENTER " to be entered before proceeding further. Ci Press " ENTER" to turn PARENTAL CONTROL on , use " ♦ "and " ♦ " then "♦ "and " ♦ " to exit the OSD. Parental Control availability varies.Compatibility and availability may vary by region,channel,or program...
... set or change PARENTAL CONTROL limits: 0 Press " MENU " to call the OSD. ® Press " ♦ " or " ♦ " to tab select screen. Be sure to press " ENTER " to be entered before proceeding further. Ci Press " ENTER" to turn PARENTAL CONTROL on , use " ♦ "and " ♦ " then "♦ "and " ♦ " to exit the OSD. Parental Control availability varies.Compatibility and availability may vary by region,channel,or program...
User Guide
Page 22
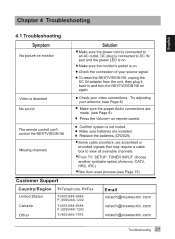
... proper Audio connections are installed. • Replace the batteries.(CR2025) • Some cable providers use scrambled or encoded signals that may require a cable box to DC IN port and the power LED is on. • Make sure the monitor's power is on. • Check the connection of your source signal. • To reset the NEXTVISION N6, unplug the DC IN adapter from the unit, then plug it back in and turn the NEXTVISION N6 on remote control. Video...
... proper Audio connections are installed. • Replace the batteries.(CR2025) • Some cable providers use scrambled or encoded signals that may require a cable box to DC IN port and the power LED is on. • Make sure the monitor's power is on. • Check the connection of your source signal. • To reset the NEXTVISION N6, unplug the DC IN adapter from the unit, then plug it back in and turn the NEXTVISION N6 on remote control. Video...

User Guide
Page 24
.... For information about receiving service under warranty, you may also have other acts of the product. Appendix B 23 e. Use of the product. Removal, installation, and set-up service charges. and Canada, contact ViewSonic or your address, (d) a description of the problem, and (e) the serial number of the product. 3. leippendix Limited Warranty What the warranty covers: ViewSonic® warrants its sole option, repair or replace the product with business relationships, or...
.... For information about receiving service under warranty, you may also have other acts of the product. Appendix B 23 e. Use of the product. Removal, installation, and set-up service charges. and Canada, contact ViewSonic or your address, (d) a description of the problem, and (e) the serial number of the product. 3. leippendix Limited Warranty What the warranty covers: ViewSonic® warrants its sole option, repair or replace the product with business relationships, or...

User Guide
Page 25
... radio frequency energy, and if not installed and used , use grounded power supply cord and the provided shielded video interface cable with bonded ferrite cores. FCC Warning To assure continued FCC compliance, the user must use only a shielded BNC(5) cable. These limits are designed to provide reasonable protection against harmful interference in accordance with the instruction, may cause harmful interference to radio...
... radio frequency energy, and if not installed and used , use grounded power supply cord and the provided shielded video interface cable with bonded ferrite cores. FCC Warning To assure continued FCC compliance, the user must use only a shielded BNC(5) cable. These limits are designed to provide reasonable protection against harmful interference in accordance with the instruction, may cause harmful interference to radio...


