

User Guide
Page 1
... our web site at http://www.viewsonic.com in English, or in specific languages using your product for future service. "Antes de operar su equipo lea cu idadosamente las instrucciones en este manual" Model No. VA1655 Display User Guide IMPORTANT: Please read this User Guide will describe your limited coverage from ViewSonic® Corporation, which is also found on installing and using the Regional selection box in...
... our web site at http://www.viewsonic.com in English, or in specific languages using your product for future service. "Antes de operar su equipo lea cu idadosamente las instrucciones en este manual" Model No. VA1655 Display User Guide IMPORTANT: Please read this User Guide will describe your limited coverage from ViewSonic® Corporation, which is also found on installing and using the Regional selection box in...

User Guide
Page 3
...that may collect on the screen if you start using the device. • Keep this manual. • Avoid touching the screen, as oil may increase the temperature of the device to dangerous levels. • Use a soft, dry cloth to clean the external housing. Safety Precautions...sources of sustained heat. • Do not install near any heavy objects on an uneven or unstable surface. The device may fall over resulting in a well-ventilated area. Do not place anything . • Do not place the device on the device or connection cables. • Always use cabinets, stands, or installation...
...that may collect on the screen if you start using the device. • Keep this manual. • Avoid touching the screen, as oil may increase the temperature of the device to dangerous levels. • Use a soft, dry cloth to clean the external housing. Safety Precautions...sources of sustained heat. • Do not install near any heavy objects on an uneven or unstable surface. The device may fall over resulting in a well-ventilated area. Do not place anything . • Do not place the device on the device or connection cables. • Always use cabinets, stands, or installation...

User Guide
Page 4
... wide blade and the third prong are never removed. • Always route and manage cords and cables connected to your dealer or ViewSonic®. It is used for your outlet, obtain an adapter and do not attempt to force the plug into the outlet. • When connecting to qualified service personnel. Service will be tripped over, pulled, or grabbed. • Protect the power cord...
... wide blade and the third prong are never removed. • Always route and manage cords and cables connected to your dealer or ViewSonic®. It is used for your outlet, obtain an adapter and do not attempt to force the plug into the outlet. • When connecting to qualified service personnel. Service will be tripped over, pulled, or grabbed. • Protect the power cord...
User Guide
Page 5
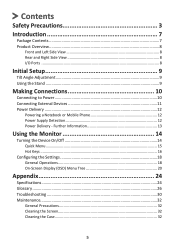
... Quick Menu...15 Hot Keys...16 Configuring the Settings 18 General Operations 18 On-Screen Display (OSD) Menu Tree 20 Appendix 24 Specifications...24 Glossary...26 Troubleshooting...30 Maintenance...32 General Precautions 32 Cleaning the Screen 32 Cleaning the Case 32 5 Contents Safety Precautions 3 Introduction 7 Package Contents...7 Product Overview...8 Front and Left Side View 8 Rear and Right Side View 8 I/O Ports ...8 Initial Setup 9 Tilt Angle Adjustment 9 Using the Stand...9 Making Connections 10 Connecting to Power 10 Connecting...
... Quick Menu...15 Hot Keys...16 Configuring the Settings 18 General Operations 18 On-Screen Display (OSD) Menu Tree 20 Appendix 24 Specifications...24 Glossary...26 Troubleshooting...30 Maintenance...32 General Precautions 32 Cleaning the Screen 32 Cleaning the Case 32 5 Contents Safety Precautions 3 Introduction 7 Package Contents...7 Product Overview...8 Front and Left Side View 8 Rear and Right Side View 8 I/O Ports ...8 Initial Setup 9 Tilt Angle Adjustment 9 Using the Stand...9 Making Connections 10 Connecting to Power 10 Connecting...
User Guide
Page 11
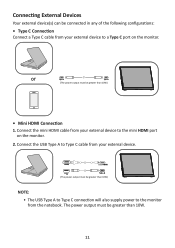
... a Type C port on the monitor. 2. Connect the mini HDMI cable from your external device. Connect the USB Type A to the mini HDMI port on the monitor. The power output must be greater than 10W) • Mini HDMI Connection 1. or (The power output must be greater than 10W. 11 mini (The power output must be greater than 10W) NOTE: • The USB Type A to Type C connection will also supply power to the monitor from your...
... a Type C port on the monitor. 2. Connect the mini HDMI cable from your external device. Connect the USB Type A to the mini HDMI port on the monitor. The power output must be greater than 10W) • Mini HDMI Connection 1. or (The power output must be greater than 10W. 11 mini (The power output must be greater than 10W) NOTE: • The USB Type A to Type C connection will also supply power to the monitor from your...

User Guide
Page 13
... VA1655. • Do not connect the other one of the Type C ports is not greater than 10W, please use our power adapter to connect to the VA1655's design please note: • The first connected device will NOT display the input signal. • Only when one deliver two-way power. Power Delivery - NOTE: If you want to display the mobile phone's screen, you must unplug the Type C cable connected...
... VA1655. • Do not connect the other one of the Type C ports is not greater than 10W, please use our power adapter to connect to the VA1655's design please note: • The first connected device will NOT display the input signal. • Only when one deliver two-way power. Power Delivery - NOTE: If you want to display the mobile phone's screen, you must unplug the Type C cable connected...

User Guide
Page 14
... Middle (l) button again. NOTE: The monitor will still consume some power as long as the power cord is not being used for a long period of the available configurations. For more information, see page 10. 2. Press the Middle (l) button to the power outlet. Using the Monitor Turning the Device On/Off 1. Connect to access the Quick Menu, activate Hot Keys, navigate the On-Screen Display (OSD) Menu, and change the settings.
... Middle (l) button again. NOTE: The monitor will still consume some power as long as the power cord is not being used for a long period of the available configurations. For more information, see page 10. 2. Press the Middle (l) button to the power outlet. Using the Monitor Turning the Device On/Off 1. Connect to access the Quick Menu, activate Hot Keys, navigate the On-Screen Display (OSD) Menu, and change the settings.

User Guide
Page 15
Input Select Select the input source. Main Menu Enter the On-Screen Display (OSD) Menu. Menu Description ViewMode Select one of the preset color settings. Contrast/Brightness Adjust the contrast or brightness level. Exit Exit the Quick Menu. 15 ViewMode Contrast/Brightness Input Select Main Menu Exit NOTE: Follow the key guide that appears on the screen to activate the Quick Menu. Quick Menu Press the key to select the option or make adjustments.
Input Select Select the input source. Main Menu Enter the On-Screen Display (OSD) Menu. Menu Description ViewMode Select one of the preset color settings. Contrast/Brightness Adjust the contrast or brightness level. Exit Exit the Quick Menu. 15 ViewMode Contrast/Brightness Input Select Main Menu Exit NOTE: Follow the key guide that appears on the screen to activate the Quick Menu. Quick Menu Press the key to select the option or make adjustments.

User Guide
Page 17
Power Lock/Unlock Locking Power Button 3 Press and hold for 10s to lock power If the Power button is turned on 17 Boot Up Screen On/Off Off Press to display/hide the boot up screen when the device is locked, the below message will appear on the screen: Power Lock/Unlock Power Button Locked p Press and hold the key for 5 seconds to lock/unlock the Power button. When the menu appears on the screen, continue holding the key for 5 seconds to turn on . Key Description u Press and hold the key to lock/unlock the Power button.
Power Lock/Unlock Locking Power Button 3 Press and hold for 10s to lock power If the Power button is turned on 17 Boot Up Screen On/Off Off Press to display/hide the boot up screen when the device is locked, the below message will appear on the screen: Power Lock/Unlock Power Button Locked p Press and hold the key for 5 seconds to lock/unlock the Power button. When the menu appears on the screen, continue holding the key for 5 seconds to turn on . Key Description u Press and hold the key to lock/unlock the Power button.
User Guide
Page 18
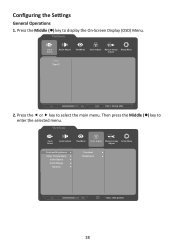
Then press the Middle (l) key to select the main menu. Configuring the Settings General Operations 1. Press the ƒ or „ key to enter the selected menu. Input Select Audio Adjust ViewMode Color Adjust Manual Image Setup Menu Adjust Contrast/Brightness Color Temperature Color Space Color Range Gamma Contrast Brightness 75% 1920 x 1080 @ 60Hz 18 Press the Middle (l) key to display the On-Screen Display (OSD) Menu. Input Select Audio Adjust ViewMode Color Adjust Manual Image Setup Menu Adjust HDMI Type C 75% 1920 x 1080 @ 60Hz 2.
Then press the Middle (l) key to select the main menu. Configuring the Settings General Operations 1. Press the ƒ or „ key to enter the selected menu. Input Select Audio Adjust ViewMode Color Adjust Manual Image Setup Menu Adjust Contrast/Brightness Color Temperature Color Space Color Range Gamma Contrast Brightness 75% 1920 x 1080 @ 60Hz 18 Press the Middle (l) key to display the On-Screen Display (OSD) Menu. Input Select Audio Adjust ViewMode Color Adjust Manual Image Setup Menu Adjust HDMI Type C 75% 1920 x 1080 @ 60Hz 2.
User Guide
Page 19
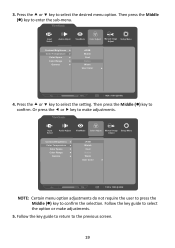
... the key guide to make adjustments. 5. Input Select Audio Adjust ViewMode Color Adjust Manual Image Setup Menu Adjust Contrast/Brightness Color Temperature Color Space Color Range Gamma sRGB Bluish Cool Native Warm User Color 75% 1920 x 1080 @ 60Hz 4. 3. Then press the Middle (l) key to confirm the selection. Or press the ƒ or „ key to select the option or make adjustments. Input Select Audio Adjust ViewMode Color Adjust Manual Image Setup Menu Adjust Contrast/Brightness Color Temperature Color Space Color Range Gamma sRGB Bluish Cool Native Warm User Color 75...
... the key guide to make adjustments. 5. Input Select Audio Adjust ViewMode Color Adjust Manual Image Setup Menu Adjust Contrast/Brightness Color Temperature Color Space Color Range Gamma sRGB Bluish Cool Native Warm User Color 75% 1920 x 1080 @ 60Hz 4. 3. Then press the Middle (l) key to confirm the selection. Or press the ƒ or „ key to select the option or make adjustments. Input Select Audio Adjust ViewMode Color Adjust Manual Image Setup Menu Adjust Contrast/Brightness Color Temperature Color Space Color Range Gamma sRGB Bluish Cool Native Warm User Color 75...
User Guide
Page 24
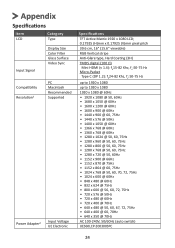
Appendix Specifications Item LCD Category Type Input Signal Display Size Color Filter Glass Surface Video Sync Compatibility Resolution1 PC Macintosh Recommended Supported Power Adapter2 Input Voltage UE Electronic Specifications TFT Active Matrix 1920 x 1080 LCD; 0.17925 (H)mm x 0.17925 (V)mm pixel pitch 39.6 cm, 16" (15.6" viewable) RGB Vertical stripe Anti-Glare type, Hard Coating (3H) TMDS digital (100 Ω) Mini HDMI (v 1.4): fh15-82 Khz, fv:50...@ 50, 60, 67, 72, 75Hz • 640 x 400 @ 60, 70Hz • 640 x 350 @ 70Hz AC 100-240V, 50/60Hz (auto switch) UES60LCP-200300SPC 24
Appendix Specifications Item LCD Category Type Input Signal Display Size Color Filter Glass Surface Video Sync Compatibility Resolution1 PC Macintosh Recommended Supported Power Adapter2 Input Voltage UE Electronic Specifications TFT Active Matrix 1920 x 1080 LCD; 0.17925 (H)mm x 0.17925 (V)mm pixel pitch 39.6 cm, 16" (15.6" viewable) RGB Vertical stripe Anti-Glare type, Hard Coating (3H) TMDS digital (100 Ω) Mini HDMI (v 1.4): fh15-82 Khz, fv:50...@ 50, 60, 67, 72, 75Hz • 640 x 400 @ 60, 70Hz • 640 x 350 @ 70Hz AC 100-240V, 50/60Hz (auto switch) UES60LCP-200300SPC 24

User Guide
Page 26
... LCD display models. Audio Adjust Adjusts the volume, mutes the sound, or toggles between inputs if you have more comfortable viewing experience. B Blue Light Filter Adjusts the filter that blocks high-energy blue light for a more than one source. A Advanced DCR Advanced DCR technology automatically detects the image signal and intelligently controls the backlight brightness and color to improve on some models, is disabled by default. Glossary This section describes the standard glossary of the screen image...
... LCD display models. Audio Adjust Adjusts the volume, mutes the sound, or toggles between inputs if you have more comfortable viewing experience. B Blue Light Filter Adjusts the filter that blocks high-energy blue light for a more than one source. A Advanced DCR Advanced DCR technology automatically detects the image signal and intelligently controls the backlight brightness and color to improve on some models, is disabled by default. Glossary This section describes the standard glossary of the screen image...
User Guide
Page 27
Bluish Cool Native Warm Set the color temperature to 5000K. Set the color temperature to 9300K. I Information Displays the timing mode (video signal input) coming from the graphics card in the computer, the LCD model number, the serial number, and the ViewSonic® website URL. C Color Adjust Provides several color adjustment modes, to help adjust the color settings to 7500K. Recommended for general use for monitor color output (RGB, YUV). NOTE: VESA 1024 x 768 @ 60Hz, for instructions on changing the resolution and refresh rate (vertical frequency). Color Space Allows users to...
Bluish Cool Native Warm Set the color temperature to 5000K. Set the color temperature to 9300K. I Information Displays the timing mode (video signal input) coming from the graphics card in the computer, the LCD model number, the serial number, and the ViewSonic® website URL. C Color Adjust Provides several color adjustment modes, to help adjust the color settings to 7500K. Recommended for general use for monitor color output (RGB, YUV). NOTE: VESA 1024 x 768 @ 60Hz, for instructions on changing the resolution and refresh rate (vertical frequency). Color Space Allows users to...

User Guide
Page 28
M Manual Image Adjust Displays the "Manual Image Adjust" menu. Memory Recall Returns the adjustments back to factory settings if the display is operating in a factory preset timing mode listed in the "Specifications" of power-saving guidelines issued by the U.S. ENERGY STAR® is a joint program of the film. 28 Any changes to a cropped image on movie content, so that you cannot see the outermost edges of the U.S. ENERGY STAR®...
M Manual Image Adjust Displays the "Manual Image Adjust" menu. Memory Recall Returns the adjustments back to factory settings if the display is operating in a factory preset timing mode listed in the "Specifications" of power-saving guidelines issued by the U.S. ENERGY STAR® is a joint program of the film. 28 Any changes to a cropped image on movie content, so that you cannot see the outermost edges of the U.S. ENERGY STAR®...
User Guide
Page 29
... the display settings window when setting up the display resolution. S Setup Menu Adjusts On-Screen Display (OSD) Menu settings. These presets are specifically designed to reopen the menu. Sharpness Adjusts the picture quality of these settings can activate on-screen display notifications so users do not have to deliver an optimized viewing experience for the most graphicintense gaming, and provides amazing visual quality while watching sports or action movies. R Recall Resets the ViewMode monitor settings. V ViewMode ViewSonic's unique...
... the display settings window when setting up the display resolution. S Setup Menu Adjusts On-Screen Display (OSD) Menu settings. These presets are specifically designed to reopen the menu. Sharpness Adjusts the picture quality of these settings can activate on-screen display notifications so users do not have to deliver an optimized viewing experience for the most graphicintense gaming, and provides amazing visual quality while watching sports or action movies. R Recall Resets the ViewMode monitor settings. V ViewMode ViewSonic's unique...
User Guide
Page 30
... supplying power. • Make sure the video cable connecting the monitor to the computer is properly and securely connected. • Adjust the brightness and contrast settings. • Make sure the correct input source is selected. • If any colors (red, green, or blue) are missing, check the video cable to make sure it is properly and securely connected. • Adjust the resolution to the correct Aspect Ratio. • Reset the monitor to factory settings. • Adjust the horizontal and vertical controls via the OSD Menu. • Check...
... supplying power. • Make sure the video cable connecting the monitor to the computer is properly and securely connected. • Adjust the brightness and contrast settings. • Make sure the correct input source is selected. • If any colors (red, green, or blue) are missing, check the video cable to make sure it is properly and securely connected. • Adjust the resolution to the correct Aspect Ratio. • Reset the monitor to factory settings. • Adjust the horizontal and vertical controls via the OSD Menu. • Check...
User Guide
Page 31
...; Make sure the "Blue Light Filter" is not muted, nor set to 0. • Check the Audio Input setting. The monitor will not adjust • Make sure there are inaccessible • Check whether the OSD Menu is locked. • Turn off the monitor, unplug the power cord, plug it is connected properly. • Try changing to factory settings. The external device is adequate spacing. • For more information, see "Adjusting the Viewing Angle". Control panel keys do not work •...
...; Make sure the "Blue Light Filter" is not muted, nor set to 0. • Check the Audio Input setting. The monitor will not adjust • Make sure there are inaccessible • Check whether the OSD Menu is locked. • Turn off the monitor, unplug the power cord, plug it is connected properly. • Try changing to factory settings. The external device is adequate spacing. • For more information, see "Adjusting the Viewing Angle". Control panel keys do not work •...
User Guide
Page 39
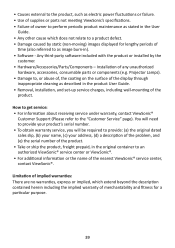
... authorized ViewSonic® service center or ViewSonic®. • For additional information or the name of time (also referred to as image burn-in). • Software - • Causes external to the product, such as electric power fluctuations or failure. • Use of supplies or parts not meeting ViewSonic's specifications. • Failure of owner to perform periodic product maintenance as stated in the User Guide...
... authorized ViewSonic® service center or ViewSonic®. • For additional information or the name of time (also referred to as image burn-in). • Software - • Causes external to the product, such as electric power fluctuations or failure. • Use of supplies or parts not meeting ViewSonic's specifications. • Failure of owner to perform periodic product maintenance as stated in the User Guide...

User Guide
Page 41
...as electrical power fluctuations or failure. ͫ Use of supplies or parts not meeting ViewSonic®'s specifications. ͫ Normal wear and tear. ͫ Any other acts of time. • Removal, installation, insurance, and set-up service charges. 41 Who the warranty protects: This warranty is displayed on your...first consumer purchase. Mexico Limited Warranty ViewSonic® Display What the warranty covers: ViewSonic® warrants its sole option, repair or replace the product with the product. ͫ Causes external to the product, such as "image burn-in" which does not ...
...as electrical power fluctuations or failure. ͫ Use of supplies or parts not meeting ViewSonic®'s specifications. ͫ Normal wear and tear. ͫ Any other acts of time. • Removal, installation, insurance, and set-up service charges. 41 Who the warranty protects: This warranty is displayed on your...first consumer purchase. Mexico Limited Warranty ViewSonic® Display What the warranty covers: ViewSonic® warrants its sole option, repair or replace the product with the product. ͫ Causes external to the product, such as "image burn-in" which does not ...


