
User Guide
Page 1
... in the upper right corner of our website. VS18636 / VS18637 / VS18638 P/N: VX2267-MHD / VX2467-MHD / VX2767-MHD Warranty information contained in this User Guide to obtain important information on our web site at http://www.viewsonic.com in English, or in specific languages using your product for future service. "Antes de operar su equipo lea cu idadosamente las instrucciones en este manual" Model No.
... in the upper right corner of our website. VS18636 / VS18637 / VS18638 P/N: VX2267-MHD / VX2467-MHD / VX2767-MHD Warranty information contained in this User Guide to obtain important information on our web site at http://www.viewsonic.com in English, or in specific languages using your product for future service. "Antes de operar su equipo lea cu idadosamente las instrucciones en este manual" Model No.
User Guide
Page 3
...8226; Do not place the monitor where children are likely to clean the external housing. The device may fall over resulting in an injury or a malfunction. • Do not place any heat sources such as it . • Do not touch the screen surface with sharp or hard ...that prevents heat dissipation. • Do not use the device near any heavy objects on the device or connection cables. • Always use cabinets, stands, or installation methods recommended by the manufacturer of the device set. • Always use furniture that can safely support the device. • Always ensure the ...
...8226; Do not place the monitor where children are likely to clean the external housing. The device may fall over resulting in an injury or a malfunction. • Do not place any heat sources such as it . • Do not touch the screen surface with sharp or hard ...that prevents heat dissipation. • Do not use the device near any heavy objects on the device or connection cables. • Always use cabinets, stands, or installation methods recommended by the manufacturer of the device set. • Always use furniture that can safely support the device. • Always ensure the ...

User Guide
Page 4
The wide blade and the third prong are never removed. • Always route and manage cords and cables connected to circumvent the safety provisions of the polarized or grounding-type plug. The system should provide a circuit breaker rated at the point where it is exposed to rain or ...use attachments/accessories, such as toys and remote controls, on the top of time. • Please confirm the distribution system installed in any way, such as: ͫ if the power-supply cord or plug is damaged. ͫ if liquid is spilled onto or objects fall into the outlet. • When connecting ...
The wide blade and the third prong are never removed. • Always route and manage cords and cables connected to circumvent the safety provisions of the polarized or grounding-type plug. The system should provide a circuit breaker rated at the point where it is exposed to rain or ...use attachments/accessories, such as toys and remote controls, on the top of time. • Please confirm the distribution system installed in any way, such as: ͫ if the power-supply cord or plug is damaged. ͫ if liquid is spilled onto or objects fall into the outlet. • When connecting ...

User Guide
Page 5
... x 115 x 2.6 mm Pad Hole Screw Specification & Quantity Ø 5 mm M4 x 10 mm 4 pieces or VESA wall mounƟng hole NOTE: • Restraining device/cordage should be able to prevent the display from falling over. • Fastening the display to a wall or fixed object using cordage or other restraining devices can help support the weight of the display in order to withstand...
... x 115 x 2.6 mm Pad Hole Screw Specification & Quantity Ø 5 mm M4 x 10 mm 4 pieces or VESA wall mounƟng hole NOTE: • Restraining device/cordage should be able to prevent the display from falling over. • Fastening the display to a wall or fixed object using cordage or other restraining devices can help support the weight of the display in order to withstand...

User Guide
Page 6
... and Rear View 9 I/O Ports ...9 Initial Setup 10 Installing the Stand 10 Wall Mounting...11 Using the Security Slot 13 Making Connections 14 Connecting to Power 14 Connecting External Devices 15 Using the Monitor 16 Adjusting the Viewing Angle 16 Tilt Angle Adjustment 16 Turning the Device On/Off 17 Quick Menu...18 Hot Keys...19 Configuring the Settings 21 General Operations 21 On-Screen Display (OSD) Menu Tree 23 Appendix 27 Specifications...27 Glossary...29 Troubleshooting...33 Maintenance...35...
... and Rear View 9 I/O Ports ...9 Initial Setup 10 Installing the Stand 10 Wall Mounting...11 Using the Security Slot 13 Making Connections 14 Connecting to Power 14 Connecting External Devices 15 Using the Monitor 16 Adjusting the Viewing Angle 16 Tilt Angle Adjustment 16 Turning the Device On/Off 17 Quick Menu...18 Hot Keys...19 Configuring the Settings 21 General Operations 21 On-Screen Display (OSD) Menu Tree 23 Appendix 27 Specifications...27 Glossary...29 Troubleshooting...33 Maintenance...35...

User Guide
Page 11
... (W x H x D) Pad Hole Screw Specification & Quantity 14 kg 100 x 100 mm 115 x 115 x 2.6 mm Ø 5 mm M4 x 10 mm 4 pieces NOTE: Wall mount kits are sold separately. To obtain a wall mounting kit, contact ViewSonic® or your local dealer. 1. Remove the monitor stand. 11 Place the device on a flat, stable surface with the screen facing down. 3. Wall Mounting NOTE: Only use UL Certified wall mount kits. 100 mm...
... (W x H x D) Pad Hole Screw Specification & Quantity 14 kg 100 x 100 mm 115 x 115 x 2.6 mm Ø 5 mm M4 x 10 mm 4 pieces NOTE: Wall mount kits are sold separately. To obtain a wall mounting kit, contact ViewSonic® or your local dealer. 1. Remove the monitor stand. 11 Place the device on a flat, stable surface with the screen facing down. 3. Wall Mounting NOTE: Only use UL Certified wall mount kits. 100 mm...

User Guide
Page 17
... power as long as the power cord is not being used for a long period of time, please disconnect the power plug from the power outlet. If the monitor is connected to turn the monitor off, press the Power button again. Press the Power button to the power outlet. Using the Control Panel Keys Use the control panel keys to access the Quick Menu, activate Hot Keys, navigate the On-Screen Display (OSD) Menu, and change the settings. 1(«) 2 3 4 5(Power Key) 17 Turning...
... power as long as the power cord is not being used for a long period of time, please disconnect the power plug from the power outlet. If the monitor is connected to turn the monitor off, press the Power button again. Press the Power button to the power outlet. Using the Control Panel Keys Use the control panel keys to access the Quick Menu, activate Hot Keys, navigate the On-Screen Display (OSD) Menu, and change the settings. 1(«) 2 3 4 5(Power Key) 17 Turning...

User Guide
Page 18
Volume Adjust the level, or mute the volume. Input Select Select the input source. Contrast/Brightness Adjust the contrast or brightness level. Exit Exit the Quick Menu. 18 Menu Description ViewMode Select one of the preset color settings. Quick Menu Press the Shortcut key to select the option or make adjustments. View Mode Standard FPS Game RTS Game MOBA Game Movie Web Text MAC Mono NOTE: Follow the key guide that appears on the screen to activate the Quick Menu.
Volume Adjust the level, or mute the volume. Input Select Select the input source. Contrast/Brightness Adjust the contrast or brightness level. Exit Exit the Quick Menu. 18 Menu Description ViewMode Select one of the preset color settings. Quick Menu Press the Shortcut key to select the option or make adjustments. View Mode Standard FPS Game RTS Game MOBA Game Movie Web Text MAC Mono NOTE: Follow the key guide that appears on the screen to activate the Quick Menu.

User Guide
Page 20
When the menu appears on . Power Lock/Unlock Locking Power Button 3 Press and hold for 10s to lock power If the Power button is locked, the below message will appear on the screen: Power Lock/Unlock Power Button Locked 2 + 3 Press and hold the keys. Key 1 + 2 Description Press and hold the keys to display/hide the boot up screen when the device is turned on the screen, continue holding both keys for 10 seconds to turn on 20 Boot Up Screen On/Off Off Press to lock/unlock the Power button.
When the menu appears on . Power Lock/Unlock Locking Power Button 3 Press and hold for 10s to lock power If the Power button is locked, the below message will appear on the screen: Power Lock/Unlock Power Button Locked 2 + 3 Press and hold the keys. Key 1 + 2 Description Press and hold the keys to display/hide the boot up screen when the device is turned on the screen, continue holding both keys for 10 seconds to turn on 20 Boot Up Screen On/Off Off Press to lock/unlock the Power button.
User Guide
Page 21
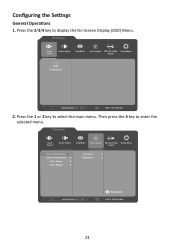
Then press the 3 key to select the main menu. Input Select Audio Adjust ViewMode Color Adjust Manual Image Setup Menu Adjust Contrast/Brightness Color Temperature Color Space Color Range Contrast Brightness Standard 75% 1920 x 1080 @ 60Hz 21 Press the 1 or 2 key to enter the selected menu. Press the 2/3/4 key to display the On-Screen Display (OSD) Menu. Input Select Audio Adjust ViewMode Color Adjust Manual Image Setup Menu Adjust D-SUB HDMI DisplayPort 75% 1920 x 1080 @ 60Hz 2. Configuring the Settings General Operations 1.
Then press the 3 key to select the main menu. Input Select Audio Adjust ViewMode Color Adjust Manual Image Setup Menu Adjust Contrast/Brightness Color Temperature Color Space Color Range Contrast Brightness Standard 75% 1920 x 1080 @ 60Hz 21 Press the 1 or 2 key to enter the selected menu. Press the 2/3/4 key to display the On-Screen Display (OSD) Menu. Input Select Audio Adjust ViewMode Color Adjust Manual Image Setup Menu Adjust D-SUB HDMI DisplayPort 75% 1920 x 1080 @ 60Hz 2. Configuring the Settings General Operations 1.
User Guide
Page 22
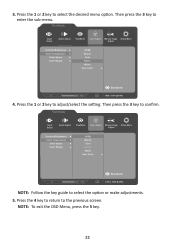
... 3 key to the previous screen. Press the 1 or 2 key to enter the sub-menu. Then press the 3 key to select the desired menu option. Input Select Audio Adjust ViewMode Color Adjust Manual Image Setup Menu Adjust Contrast/Brightness Color Temperature Color Space Color Range sRGB Bluish Cool Native Warm User Color Standard 75% 1920 x 1080 @ 60Hz NOTE: Follow the key guide to adjust/select the setting. Press the 1 or 2 key to select the option or make adjustments. 5.
... 3 key to the previous screen. Press the 1 or 2 key to enter the sub-menu. Then press the 3 key to select the desired menu option. Input Select Audio Adjust ViewMode Color Adjust Manual Image Setup Menu Adjust Contrast/Brightness Color Temperature Color Space Color Range sRGB Bluish Cool Native Warm User Color Standard 75% 1920 x 1080 @ 60Hz NOTE: Follow the key guide to adjust/select the setting. Press the 1 or 2 key to select the option or make adjustments. 5.
User Guide
Page 27
Appendix Specifications Item Category LCD Type Input Signal Compatibility Resolution1 Display Size Color Filter Glass Surface Video Sync PC Macintosh Recommended Supported Power Adapter2 Input Voltage Specifications VX2267-mhd VX2467-mhd VX2767-mhd a-SI, TFT Active Matrix 1920 x 1080 LCD; 0.2493 (H)mm x 0.241 (V)mm pixel pitch 55.88 cm, 22" a-SI, TFT Active Matrix 1920 x 1080 LCD; 0.2745 (H)mm x 0.2745 (V)mm pixel pitch 60.96 cm, 24" a-SI, TFT Active Matrix 1920 x 1080 LCD; 0.3108 (H)mm x 0.3108...
Appendix Specifications Item Category LCD Type Input Signal Compatibility Resolution1 Display Size Color Filter Glass Surface Video Sync PC Macintosh Recommended Supported Power Adapter2 Input Voltage Specifications VX2267-mhd VX2467-mhd VX2767-mhd a-SI, TFT Active Matrix 1920 x 1080 LCD; 0.2493 (H)mm x 0.241 (V)mm pixel pitch 55.88 cm, 22" a-SI, TFT Active Matrix 1920 x 1080 LCD; 0.2745 (H)mm x 0.2745 (V)mm pixel pitch 60.96 cm, 24" a-SI, TFT Active Matrix 1920 x 1080 LCD; 0.3108 (H)mm x 0.3108...

User Guide
Page 29
... switch to your monitor. Brightness Adjusts background black levels of terms used in alphabetical order. B Blue Light Filter Adjusts the filter that blocks high-energy blue light for a more than one source. Auto Image Adjust Automatically sizes, centers, and fine tunes the video signal to make the black blacker in a dark scene, and make the white whiter in a bright environment. Glossary This section describes the standard glossary of the screen image. 29 Audio Adjust Adjusts the volume, mutes the sound...
... switch to your monitor. Brightness Adjusts background black levels of terms used in alphabetical order. B Blue Light Filter Adjusts the filter that blocks high-energy blue light for a more than one source. Auto Image Adjust Automatically sizes, centers, and fine tunes the video signal to make the black blacker in a dark scene, and make the white whiter in a bright environment. Glossary This section describes the standard glossary of the screen image. 29 Audio Adjust Adjusts the volume, mutes the sound...

User Guide
Page 30
... used for instructions on changing the resolution and refresh rate (vertical frequency). Default color temperature. Color Space Allows users to choose which color space they would like to fit the user's needs. Set the color temperature to 5000K. NOTE: VESA 1024 x 768 @ 60Hz, for example, means that are available for monitor color output (RGB, YUV). Set the color temperature to 7500K. I Information Displays the timing mode (video signal input) coming from the graphics card in the computer, the LCD model number, the serial number...
... used for instructions on changing the resolution and refresh rate (vertical frequency). Default color temperature. Color Space Allows users to choose which color space they would like to fit the user's needs. Set the color temperature to 5000K. NOTE: VESA 1024 x 768 @ 60Hz, for example, means that are available for monitor color output (RGB, YUV). Set the color temperature to 7500K. I Information Displays the timing mode (video signal input) coming from the graphics card in the computer, the LCD model number, the serial number...
User Guide
Page 31
...M Manual Image Adjust Displays the "Manual Image Adjust" menu. Response Time Adjusts the response time, creating smooth images without streaking, blurring, or ghosting. S Setup Menu Adjusts On-Screen Display (OSD) Menu settings. This notice will appear in the "Language Select" or "Power Lock" setting. R Recall Resets the ViewMode monitor settings. NOTE: (Exception) This control does not affect changes made in the display settings window when setting up the display resolution. Memory Recall Returns the adjustments back to a cropped image on -screen display notifications so users do...
...M Manual Image Adjust Displays the "Manual Image Adjust" menu. Response Time Adjusts the response time, creating smooth images without streaking, blurring, or ghosting. S Setup Menu Adjusts On-Screen Display (OSD) Menu settings. This notice will appear in the "Language Select" or "Power Lock" setting. R Recall Resets the ViewMode monitor settings. NOTE: (Exception) This control does not affect changes made in the display settings window when setting up the display resolution. Memory Recall Returns the adjustments back to a cropped image on -screen display notifications so users do...
User Guide
Page 32
... out and disabled: Brightness, Advanced DCR, Eco Mode, sRGB, Response Time, DDC/CI Brightness adjustment. 4. The IC controls Moving Picture Response Time, so the overall Brightness will disable each other. 5. default setting is >100Hz to activate Moving Picture Response Time (MPRT); Make sure Input Timing detection is Off. These presets are specifically designed to deliver an optimized viewing experience for different screen applications. 1 1ms mode Choose whether to turn on...
... out and disabled: Brightness, Advanced DCR, Eco Mode, sRGB, Response Time, DDC/CI Brightness adjustment. 4. The IC controls Moving Picture Response Time, so the overall Brightness will disable each other. 5. default setting is >100Hz to activate Moving Picture Response Time (MPRT); Make sure Input Timing detection is Off. These presets are specifically designed to deliver an optimized viewing experience for different screen applications. 1 1ms mode Choose whether to turn on...
User Guide
Page 33
... supplying power. • Make sure the video cable connecting the monitor to the computer is properly and securely connected. • Adjust the brightness and contrast settings. • Make sure the correct input source is selected. • If any colors (red, green, or blue) are missing, check the video cable to make sure it is properly and securely connected. • Adjust the resolution to the correct Aspect Ratio. • Reset the monitor to factory settings. • Adjust the horizontal and vertical controls via the OSD Menu. • Check...
... supplying power. • Make sure the video cable connecting the monitor to the computer is properly and securely connected. • Adjust the brightness and contrast settings. • Make sure the correct input source is selected. • If any colors (red, green, or blue) are missing, check the video cable to make sure it is properly and securely connected. • Adjust the resolution to the correct Aspect Ratio. • Reset the monitor to factory settings. • Adjust the horizontal and vertical controls via the OSD Menu. • Check...

User Guide
Page 34
... input source. connect the device directly to factory settings. Loose or broken pins in the OSD • Reset the monitor to the computer. Control panel keys do not work • Restart the computer. USB devices connected to another USB port (if applicable). • Some USB devices require a higher electric current; No audio output • If using ear-/headphones, ensure the mini stereo jack is connected. • Make sure the volume is locked...
... input source. connect the device directly to factory settings. Loose or broken pins in the OSD • Reset the monitor to the computer. Control panel keys do not work • Restart the computer. USB devices connected to another USB port (if applicable). • Some USB devices require a higher electric current; No audio output • If using ear-/headphones, ensure the mini stereo jack is connected. • Make sure the volume is locked...
User Guide
Page 42
...; service center, contact ViewSonic®. How to get service: • For information about receiving service under warranty, contact ViewSonic® Customer Support (Please refer to , or abuse of, the coating on the surface of the display through inappropriate cleaning as described in the product User Guide. • Removal, installation, and set-up service charges, including wall-mounting of the product. You will need to provide your product's serial number...
...; service center, contact ViewSonic®. How to get service: • For information about receiving service under warranty, contact ViewSonic® Customer Support (Please refer to , or abuse of, the coating on the surface of the display through inappropriate cleaning as described in the product User Guide. • Removal, installation, and set-up service charges, including wall-mounting of the product. You will need to provide your product's serial number...
User Guide
Page 44
... to follow instructions supplied with a like product. How long the warranty is effective: ViewSonic® LCD displays are warranted for between 1 and 3 years, depending on which the serial number has been defaced, modified or removed. • Damage, deterioration, or malfunction resulting from the date of time. • Removal, installation, insurance, and set-up service charges. 44 If a product proves to be free from...
... to follow instructions supplied with a like product. How long the warranty is effective: ViewSonic® LCD displays are warranted for between 1 and 3 years, depending on which the serial number has been defaced, modified or removed. • Damage, deterioration, or malfunction resulting from the date of time. • Removal, installation, insurance, and set-up service charges. 44 If a product proves to be free from...


