
User Guide
Page 1
... as registering your product in the upper right corner of our website. VS17425 P/N: VX3211-4K-MHD "Antes de operar su equipo lea cu idadosamente las instrucciones en este manual" Model No. Warranty information contained in this User Guide to obtain important information on our web site at http://www.viewsonic.com in English, or in specific languages using your product for future service.
... as registering your product in the upper right corner of our website. VS17425 P/N: VX3211-4K-MHD "Antes de operar su equipo lea cu idadosamente las instrucciones en este manual" Model No. Warranty information contained in this User Guide to obtain important information on our web site at http://www.viewsonic.com in English, or in specific languages using your product for future service.

User Guide
Page 5
... Contents...7 Product Overview...8 Initial Setup 9 Wall Mounting...9 Using the Security Slot...9 Making Connections 10 Connecting to Power...10 Connecting External Devices 11 HDMI Connection 11 DisplayPort Connection 12 Audio Connection 13 Using the Monitor 14 Adjusting the Viewing Angle 14 Tilt Angle Adjustment 14 Turning the Device On/Off 15 Using the Control Panel Keys 16 Quick Menu...16 Hot Keys...18 Configuring the Settings 20 General Operations 20 On-Screen Display (OSD) Menu Tree 23 Menu Options...28 Advanced Features and...
... Contents...7 Product Overview...8 Initial Setup 9 Wall Mounting...9 Using the Security Slot...9 Making Connections 10 Connecting to Power...10 Connecting External Devices 11 HDMI Connection 11 DisplayPort Connection 12 Audio Connection 13 Using the Monitor 14 Adjusting the Viewing Angle 14 Tilt Angle Adjustment 14 Turning the Device On/Off 15 Using the Control Panel Keys 16 Quick Menu...16 Hot Keys...18 Configuring the Settings 20 General Operations 20 On-Screen Display (OSD) Menu Tree 23 Menu Options...28 Advanced Features and...
User Guide
Page 9
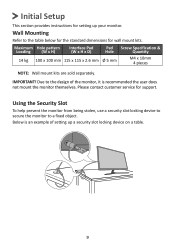
... the user does not mount the monitor themselves. Wall Mounting Refer to the table below for the standard dimensions for support. Please contact customer service for wall mount kits. IMPORTANT! Using the Security Slot To help prevent the monitor from being stolen, use a security slot locking device to secure the monitor to the design of setting up your monitor. Due to a fixed object. Initial Setup This section provides instructions for setting...
... the user does not mount the monitor themselves. Wall Mounting Refer to the table below for the standard dimensions for support. Please contact customer service for wall mount kits. IMPORTANT! Using the Security Slot To help prevent the monitor from being stolen, use a security slot locking device to secure the monitor to the design of setting up your monitor. Due to a fixed object. Initial Setup This section provides instructions for setting...
User Guide
Page 17
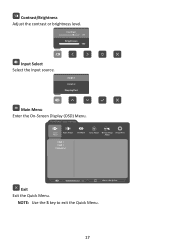
HDMI 1 s HDMI 2 DisplayPort Main Menu Enter the On-Screen Display (OSD) Menu. NOTE: Use the 5 key to exit the Quick Menu. 17 mode ast/Brightness Select Menu Contrast 70 Brightness 100 Input Select Select the input source. Main Menu Exit Contrast/Brightness Adjust the contrast or brightness level. VX3211-4K-mhd Input Select Audio Adjust ViewMode Color Adjust Manual Image Setup Menu Adjust HDMI 1 HDMI 2 DisplayPort 75% 3840 x 2160 @ 60Hz Exit Exit the Quick Menu.
HDMI 1 s HDMI 2 DisplayPort Main Menu Enter the On-Screen Display (OSD) Menu. NOTE: Use the 5 key to exit the Quick Menu. 17 mode ast/Brightness Select Menu Contrast 70 Brightness 100 Input Select Select the input source. Main Menu Exit Contrast/Brightness Adjust the contrast or brightness level. VX3211-4K-mhd Input Select Audio Adjust ViewMode Color Adjust Manual Image Setup Menu Adjust HDMI 1 HDMI 2 DisplayPort 75% 3840 x 2160 @ 60Hz Exit Exit the Quick Menu.
User Guide
Page 20
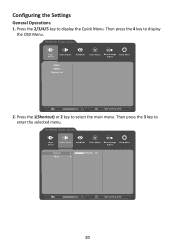
Then press the 3 key to display the OSD Menu. VX3211-4K-mhd Input Select Audio Adjust ViewMode Color Adjust Manual Image Setup Menu Adjust Volume 50 Mute 75% 3840 x 2160 @ 60Hz 20 Then press the 4 key to enter the selected menu. Press the 1(Shortcut) or 2 key to display the Quick Menu. Configuring the Settings General Operations 1. VX3211-4K-mhd Input Select Audio Adjust ViewMode Color Adjust Manual Image Setup Menu Adjust HDMI 1 HDMI 2 DisplayPort 75% 3840 x 2160 @ 60Hz 2. Press the 2/3/4/5 key to select the main menu.
Then press the 3 key to display the OSD Menu. VX3211-4K-mhd Input Select Audio Adjust ViewMode Color Adjust Manual Image Setup Menu Adjust Volume 50 Mute 75% 3840 x 2160 @ 60Hz 20 Then press the 4 key to enter the selected menu. Press the 1(Shortcut) or 2 key to display the Quick Menu. Configuring the Settings General Operations 1. VX3211-4K-mhd Input Select Audio Adjust ViewMode Color Adjust Manual Image Setup Menu Adjust HDMI 1 HDMI 2 DisplayPort 75% 3840 x 2160 @ 60Hz 2. Press the 2/3/4/5 key to select the main menu.
User Guide
Page 21
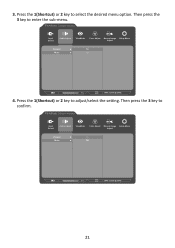
Then press the 3 key to adjust/select the setting. Press the 1(Shortcut) or 2 key to confirm. Then press the 3 key to select the desired menu option. VX3211-4K-mhd Input Select Audio Adjust ViewMode Color Adjust Manual Image Setup Menu Adjust Volume On Mute Off 75% 3840 x 2160 @ 60Hz 4. VX3211-4K-mhd Input Select Audio Adjust ViewMode Color Adjust Manual Image Setup Menu Adjust Volume On Mute Off 75% 3840 x 2160 @ 60Hz 21 3. Press the 1(Shortcut) or 2 key to enter the sub-menu.
Then press the 3 key to adjust/select the setting. Press the 1(Shortcut) or 2 key to confirm. Then press the 3 key to select the desired menu option. VX3211-4K-mhd Input Select Audio Adjust ViewMode Color Adjust Manual Image Setup Menu Adjust Volume On Mute Off 75% 3840 x 2160 @ 60Hz 4. VX3211-4K-mhd Input Select Audio Adjust ViewMode Color Adjust Manual Image Setup Menu Adjust Volume On Mute Off 75% 3840 x 2160 @ 60Hz 21 3. Press the 1(Shortcut) or 2 key to enter the sub-menu.
User Guide
Page 28
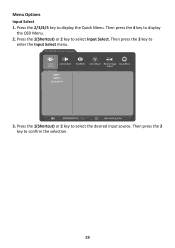
Then press the 3 key to display the Quick Menu. Press the 2/3/4/5 key to enter the Input Select menu. VX3211-4K-mhd Input Select Audio Adjust ViewMode Color Adjust Manual Image Setup Menu Adjust HDMI 1 HDMI 2 DisplayPort 75% 3840 x 2160 @ 60Hz 3. Press the 1(Shortcut) or 2 key to confirm the selection. 28 Then press the 3 key to select the desired input source. Then press the 4 key to select Input Select. Press the 1(Shortcut) or 2 key to display the OSD Menu. 2. Menu Options Input Select 1.
Then press the 3 key to display the Quick Menu. Press the 2/3/4/5 key to enter the Input Select menu. VX3211-4K-mhd Input Select Audio Adjust ViewMode Color Adjust Manual Image Setup Menu Adjust HDMI 1 HDMI 2 DisplayPort 75% 3840 x 2160 @ 60Hz 3. Press the 1(Shortcut) or 2 key to confirm the selection. 28 Then press the 3 key to select the desired input source. Then press the 4 key to select Input Select. Press the 1(Shortcut) or 2 key to display the OSD Menu. 2. Menu Options Input Select 1.
User Guide
Page 29
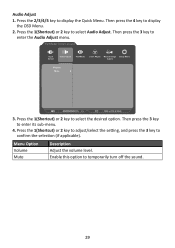
... to display the OSD Menu. 2. Then press the 4 key to display the Quick Menu. VX3211-4K-mhd Input Select Audio Adjust ViewMode Color Adjust Manual Image Setup Menu Adjust Volume Mute 75% 3840 x 2160 @ 60Hz 3. Press the 1(Shortcut) or 2 key to adjust/select the setting, and press the 3 key to select the desired option. Press the 1(Shortcut) or 2 key to confirm the selection (if applicable). Then press the 3 key to select Audio Adjust. Press...
... to display the OSD Menu. 2. Then press the 4 key to display the Quick Menu. VX3211-4K-mhd Input Select Audio Adjust ViewMode Color Adjust Manual Image Setup Menu Adjust Volume Mute 75% 3840 x 2160 @ 60Hz 3. Press the 1(Shortcut) or 2 key to adjust/select the setting, and press the 3 key to select the desired option. Press the 1(Shortcut) or 2 key to confirm the selection (if applicable). Then press the 3 key to select Audio Adjust. Press...
User Guide
Page 30
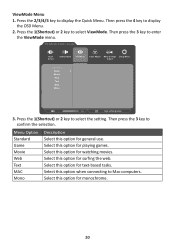
... for monochrome. 30 VX3211-4K-mhd Input Select Audio Adjust ViewMode Color Adjust Manual Image Setup Menu Adjust Standard Game Movie Web Text MAC Mono 75% 3840 x 2160 @ 60Hz 3. Select this option for playing games. Then press the 3 key to Mac computers. Select this option for watching movies. ViewMode Menu 1. Select this option when connecting to enter the ViewMode menu. Select this option for text-based tasks. Press the...
... for monochrome. 30 VX3211-4K-mhd Input Select Audio Adjust ViewMode Color Adjust Manual Image Setup Menu Adjust Standard Game Movie Web Text MAC Mono 75% 3840 x 2160 @ 60Hz 3. Select this option for playing games. Then press the 3 key to Mac computers. Select this option for watching movies. ViewMode Menu 1. Select this option when connecting to enter the ViewMode menu. Select this option for text-based tasks. Press the...
User Guide
Page 31
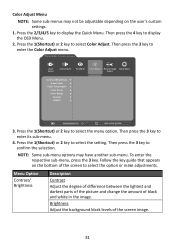
... select Color Adjust. Then press the 3 key to display the Quick Menu. Menu Option Contrast/ Brightness Description Contrast Adjust the degree of difference between the lightest and darkest parts of the picture and change the amount of the screen image. 31 VX3211-4K-mhd Input Select Audio Adjust ViewMode Color Adjust Manual Image Setup Menu Adjust Contrast/Brightness 6-axis Color Color Temperature Color Space Color Range Gamma HDR10 75% 3840 x 2160 @ 60Hz 3. Press the 2/3/4/5 key to confirm the selection. Brightness Adjust the background black levels of black and white...
... select Color Adjust. Then press the 3 key to display the Quick Menu. Menu Option Contrast/ Brightness Description Contrast Adjust the degree of difference between the lightest and darkest parts of the picture and change the amount of the screen image. 31 VX3211-4K-mhd Input Select Audio Adjust ViewMode Color Adjust Manual Image Setup Menu Adjust Contrast/Brightness 6-axis Color Color Temperature Color Space Color Range Gamma HDR10 75% 3840 x 2160 @ 60Hz 3. Press the 2/3/4/5 key to confirm the selection. Brightness Adjust the background black levels of black and white...
User Guide
Page 33
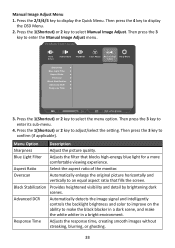
... to adjust/select the setting. VX3211-4K-mhd Input Select Audio Adjust ViewMode Color Adjust Manual Image Setup Menu Adjust Sharpness Blue Light Filter Aspect Ratio Overscan Black Stabilization Advanced DCR Response Time 75% 3840 x 2160 @ 60Hz 3. Press the 1(Shortcut) or 2 key to select Manual Image Adjust. Press the 2/3/4/5 key to select the menu option. Press the 1(Shortcut) or 2 key to display the Quick Menu. Then press the 3 key to display the OSD Menu. 2. Response Time Adjusts the response...
... to adjust/select the setting. VX3211-4K-mhd Input Select Audio Adjust ViewMode Color Adjust Manual Image Setup Menu Adjust Sharpness Blue Light Filter Aspect Ratio Overscan Black Stabilization Advanced DCR Response Time 75% 3840 x 2160 @ 60Hz 3. Press the 1(Shortcut) or 2 key to select Manual Image Adjust. Press the 2/3/4/5 key to select the menu option. Press the 1(Shortcut) or 2 key to display the Quick Menu. Then press the 3 key to display the OSD Menu. 2. Response Time Adjusts the response...
User Guide
Page 34
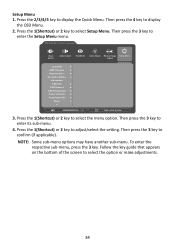
... to enter its sub-menu. 4. Press the 1(Shortcut) or 2 key to enter the Setup Menu menu. Then press the 3 key to adjust/select the setting. Follow the key guide that appears on the bottom of the screen to select the option or make adjustments. 34 VX3211-4K-mhd Input Select Audio Adjust ViewMode Color Adjust Manual Image Setup Menu Adjust Language AMD Freesync Shortcut Key 1 Resolution Notice Information OSD Size OSD Timeout OSD Background Power Indicator Auto Power Off Sleep 75% 3840 x 2160...
... to enter its sub-menu. 4. Press the 1(Shortcut) or 2 key to enter the Setup Menu menu. Then press the 3 key to adjust/select the setting. Follow the key guide that appears on the bottom of the screen to select the option or make adjustments. 34 VX3211-4K-mhd Input Select Audio Adjust ViewMode Color Adjust Manual Image Setup Menu Adjust Language AMD Freesync Shortcut Key 1 Resolution Notice Information OSD Size OSD Timeout OSD Background Power Indicator Auto Power Off Sleep 75% 3840 x 2160...
User Guide
Page 38
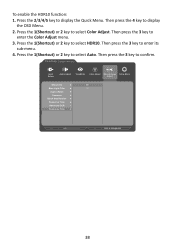
Then press the 4 key to enter its sub-menu. 4. Then press the 3 key to display the OSD Menu. 2. Press the 1(Shortcut) or 2 key to enter the Color Adjust menu. 3. Then press the 3 key to select Auto. Press the 1(Shortcut) or 2 key to confirm. VX3211-4K-mhd Input Select Audio Adjust ViewMode Color Adjust Manual Image Setup Menu Adjust Sharpness On Blue Light Filter Off Aspect Ratio Overscan Black Stabilization Response Time Advanced DCR Response Time...
Then press the 4 key to enter its sub-menu. 4. Then press the 3 key to display the OSD Menu. 2. Press the 1(Shortcut) or 2 key to enter the Color Adjust menu. 3. Then press the 3 key to select Auto. Press the 1(Shortcut) or 2 key to confirm. VX3211-4K-mhd Input Select Audio Adjust ViewMode Color Adjust Manual Image Setup Menu Adjust Sharpness On Blue Light Filter Off Aspect Ratio Overscan Black Stabilization Response Time Advanced DCR Response Time...
User Guide
Page 39
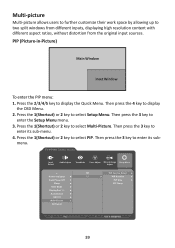
... 1(Shortcut) or 2 key to display the OSD Menu. 2. menu. Press the 1(Shortcut) or 2 key to select PIP. Press the 1(Shortcut) or 2 key to select Setup Menu. Then press the 3 key to enter its sub- VX3211-4K-mhd Input Select Audio Adjust ViewMode Color Adjust Manual Image Setup Menu Adjust Power Indicator Auto Power Off Sleep ECO Mode DisplayPort 1.1 Auto Detect DDC/CI Multi-Picture All Recall Off PIP Source Select PIP PIP Position PIP Size PIP Swap 1920 X 1080...
... 1(Shortcut) or 2 key to display the OSD Menu. 2. menu. Press the 1(Shortcut) or 2 key to select PIP. Press the 1(Shortcut) or 2 key to select Setup Menu. Then press the 3 key to enter its sub- VX3211-4K-mhd Input Select Audio Adjust ViewMode Color Adjust Manual Image Setup Menu Adjust Power Indicator Auto Power Off Sleep ECO Mode DisplayPort 1.1 Auto Detect DDC/CI Multi-Picture All Recall Off PIP Source Select PIP PIP Position PIP Size PIP Swap 1920 X 1080...

User Guide
Page 44
... the image signal and intelligently controls the backlight brightness and color to improve on some models, is disabled by brightening dark scenes. This function, on the ability to your monitor. Brightness Adjusts background black levels of terms used in all LCD display models. Glossary This section describes the standard glossary of the screen image. 44 Audio Adjust Adjusts the volume, mutes the sound, or toggles between inputs if you have more comfortable viewing experience. Blue Light Filter Adjusts...
... the image signal and intelligently controls the backlight brightness and color to improve on some models, is disabled by brightening dark scenes. This function, on the ability to your monitor. Brightness Adjusts background black levels of terms used in all LCD display models. Glossary This section describes the standard glossary of the screen image. 44 Audio Adjust Adjusts the volume, mutes the sound, or toggles between inputs if you have more comfortable viewing experience. Blue Light Filter Adjusts...

User Guide
Page 45
Native Default color temperature. You can detect the input signal color range automatically. Panel Default Panel Original Status sRGB Standard color space used for general use for monitor color output (RGB, YUV). Recommended for the Windows system. Warm Set the color temperature to use . Color Space Allows users to choose which color space they would like to 5000K. Contrast Adjusts the difference between the image background (black level) and the foreground (white level). 45 Options Description Auto The monitor automatically recognizes...
Native Default color temperature. You can detect the input signal color range automatically. Panel Default Panel Original Status sRGB Standard color space used for general use for monitor color output (RGB, YUV). Recommended for the Windows system. Warm Set the color temperature to use . Color Space Allows users to choose which color space they would like to 5000K. Contrast Adjusts the difference between the image background (black level) and the foreground (white level). 45 Options Description Auto The monitor automatically recognizes...
User Guide
Page 46
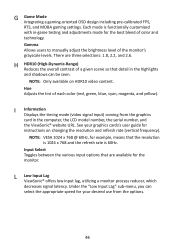
... your graphics cards's user guide for the monitor. G Game Mode Integrating a gaming-oriented OSD design including pre-calibrated FPS, RTS, and MOBA gaming settings. There are available for instructions on HDR10 video content. Under the "Low Input Lag" sub-menu, you can be seen. Each mode is 60Hz. NOTE: Only available on changing the resolution and refersh rate (vertical frequency). Gamma Allows users to manually adjust the brightness level of each color (red, green, blue, cyan...
... your graphics cards's user guide for the monitor. G Game Mode Integrating a gaming-oriented OSD design including pre-calibrated FPS, RTS, and MOBA gaming settings. There are available for instructions on HDR10 video content. Under the "Low Input Lag" sub-menu, you can be seen. Each mode is 60Hz. NOTE: Only available on changing the resolution and refersh rate (vertical frequency). Gamma Allows users to manually adjust the brightness level of each color (red, green, blue, cyan...

User Guide
Page 47
... your monitor's screen. A setting on movie content, so that the current viewing resolution is perfect for each screen. PIP Swap This exchanges the main-picture source with the sub-picture source. O Overscan Refers to factory settings if the display is operating in a factory preset timing mode listed in the display settings window when setting up the display resolution. P PIP (Picture-in the "Language Select" or "Power Lock Setting". This notice will appear in the "Specifications" of image quality adjustments...
... your monitor's screen. A setting on movie content, so that the current viewing resolution is perfect for each screen. PIP Swap This exchanges the main-picture source with the sub-picture source. O Overscan Refers to factory settings if the display is operating in a factory preset timing mode listed in the display settings window when setting up the display resolution. P PIP (Picture-in the "Language Select" or "Power Lock Setting". This notice will appear in the "Specifications" of image quality adjustments...

User Guide
Page 49
... the cable connector could cause an improper connection. • Connect the monitor to another electrical device into the power outlet to verify that you have turned on screen Wrong or abnormal colors • Make sure the video cable connecting the monitor to the computer is properly and securely connected. • Adjust the brightness and contrast settings. • Make sure the correct input source is selected. • If any colors (red, green, or blue) are missing, check the video cable...
... the cable connector could cause an improper connection. • Connect the monitor to another electrical device into the power outlet to verify that you have turned on screen Wrong or abnormal colors • Make sure the video cable connecting the monitor to the computer is properly and securely connected. • Adjust the brightness and contrast settings. • Make sure the correct input source is selected. • If any colors (red, green, or blue) are missing, check the video cable...

User Guide
Page 50
... the OSD Menu is locked. connect the device directly to factory settings. Problem or Issue Possible Solutions The OSD Menu does not appear on the monitor. • Reset the monitor to factory settings. Control panel keys do not work • Restart the computer. If yes, press and hold the 2 and 3 key for 10 seconds. • Turn off the monitor, unplug the power cord, plug it is not muted, nor set to 0. • Check the Audio Input setting.
... the OSD Menu is locked. connect the device directly to factory settings. Problem or Issue Possible Solutions The OSD Menu does not appear on the monitor. • Reset the monitor to factory settings. Control panel keys do not work • Restart the computer. If yes, press and hold the 2 and 3 key for 10 seconds. • Turn off the monitor, unplug the power cord, plug it is not muted, nor set to 0. • Check the Audio Input setting.


