User Guide
Page 1
... your product for future service. VS17612 P/N: X10-4K Warranty information contained in this User Guide to obtain important information on our web site at http://www.viewsonic.com in English, or in specific languages using your product in the upper right corner of our website. "Antes de operar su equipo lea cu idadosamente las instrucciones en este manual" Model No.
... your product for future service. VS17612 P/N: X10-4K Warranty information contained in this User Guide to obtain important information on our web site at http://www.viewsonic.com in English, or in specific languages using your product in the upper right corner of our website. "Antes de operar su equipo lea cu idadosamente las instrucciones en este manual" Model No.
User Guide
Page 3
... use of the projector to disassemble the projector. The intense light beam may cause death if you start using the projector. • Keep this could cause them to break on rare occasions. • Never replace the lamp assembly or any heavy objects on the projector or connection cables. • Do not stand the projector on anything on . • Do not block the projection lens with live parts...
... use of the projector to disassemble the projector. The intense light beam may cause death if you start using the projector. • Keep this could cause them to break on rare occasions. • Never replace the lamp assembly or any heavy objects on the projector or connection cables. • Do not stand the projector on anything on . • Do not block the projection lens with live parts...
User Guide
Page 6
... 17 Projection Dimensions 18 Mounting the Projector 19 Making Connections 20 Connecting to Power 20 vRemote App...21 Connecting to External Devices 22 HDMI Connection 22 USB-C Connection 22 Wireless Screen Mirroring 23 Connecting to Bluetooth 24 Bluetooth Speaker 24 Bluetooth Out...26 Voice Control...27 Connecting to Networks 31 Wi-Fi Connection...31 Custom SSID...33 Wired LAN Connection 35 6 Replacing the Batteries 16 Initial Setup 17 Choosing a Location - Controls and Functions 15 Remote Control - Ceiling Mounting...
... 17 Projection Dimensions 18 Mounting the Projector 19 Making Connections 20 Connecting to Power 20 vRemote App...21 Connecting to External Devices 22 HDMI Connection 22 USB-C Connection 22 Wireless Screen Mirroring 23 Connecting to Bluetooth 24 Bluetooth Speaker 24 Bluetooth Out...26 Voice Control...27 Connecting to Networks 31 Wi-Fi Connection...31 Custom SSID...33 Wired LAN Connection 35 6 Replacing the Batteries 16 Initial Setup 17 Choosing a Location - Controls and Functions 15 Remote Control - Ceiling Mounting...

User Guide
Page 7
... Network Settings...37 Source Input...38 Selecting an Input Source 40 Adjusting the Projected Image 41 Adjusting the Projector's Height and Projection Angle 41 Shutting Down the Projector 42 Input Source Selected - On-Screen Display (OSD) Menu Tree 57 Menu Operations 61 Aptoide...61 Apps Center...63 File Management 65 Setting...69 Appendix 87 Specifications...87 Projector Dimensions 89 Timing Chart...89 HDMI/USB-C Video Timing 89 IR Control Table...91 Glossary...92 Troubleshooting...94 LED Indicators...95 Maintenance...96 General Precautions 96 Cleaning...
... Network Settings...37 Source Input...38 Selecting an Input Source 40 Adjusting the Projected Image 41 Adjusting the Projector's Height and Projection Angle 41 Shutting Down the Projector 42 Input Source Selected - On-Screen Display (OSD) Menu Tree 57 Menu Operations 61 Aptoide...61 Apps Center...63 File Management 65 Setting...69 Appendix 87 Specifications...87 Projector Dimensions 89 Timing Chart...89 HDMI/USB-C Video Timing 89 IR Control Table...91 Glossary...92 Troubleshooting...94 LED Indicators...95 Maintenance...96 General Precautions 96 Cleaning...
User Guide
Page 9
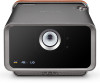
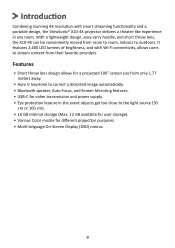
... projection purposes. • Multi-language On-Screen Display (OSD) menus. 9 Introduction Combining stunning 4K resolution with Wi-Fi connectivity, allows users to stream content from their favorite providers. It features 2,400 LED lumens of brightness, and with smart streaming functionality and a portable design, the ViewSonic® X10-4K projector delivers a theater-like experience in the event objects get too close to the light source...
... projection purposes. • Multi-language On-Screen Display (OSD) menus. 9 Introduction Combining stunning 4K resolution with Wi-Fi connectivity, allows users to stream content from their favorite providers. It features 2,400 LED lumens of brightness, and with smart streaming functionality and a portable design, the ViewSonic® X10-4K projector delivers a theater-like experience in the event objects get too close to the light source...

User Guide
Page 10
Package Contents Item [1] [2] [3] [4] [5] [6] [7] [8] Description X10-4K Projector Remote Control Quick Start Guide Power Cord USB-C Cable HDMI Cable Wi-Fi Dongle Batteries NOTE: The power cord and video cables included in your package may vary depending on your local reseller for more information. 10 Please contact your country.
Package Contents Item [1] [2] [3] [4] [5] [6] [7] [8] Description X10-4K Projector Remote Control Quick Start Guide Power Cord USB-C Cable HDMI Cable Wi-Fi Dongle Batteries NOTE: The power cord and video cables included in your package may vary depending on your local reseller for more information. 10 Please contact your country.
User Guide
Page 13
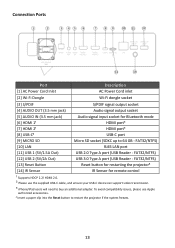
...] LAN RJ45 LAN port [11] USB 1 (5V/1.5A Out) USB 2.0 Type A port (USB Reader - Connection Ports Port Description [1] AC Power Cord Inlet AC Power Cord inlet [2] Wi-Fi Dongle Wi-Fi dongle socket [3] S/PDIF S/PDIF signal output socket [4] AUDIO OUT (3.5 mm jack) Audio signal output socket [5] AUDIO IN (3.5 mm jack) Audio signal input socket for remote control ¹ Supports HDCP 2.2/ HDMI 2.0. ² Please use Apple authorized accessories. ⁴ Insert a paper clip into the Reset button to buy an additional adapter.
...] LAN RJ45 LAN port [11] USB 1 (5V/1.5A Out) USB 2.0 Type A port (USB Reader - Connection Ports Port Description [1] AC Power Cord Inlet AC Power Cord inlet [2] Wi-Fi Dongle Wi-Fi dongle socket [3] S/PDIF S/PDIF signal output socket [4] AUDIO OUT (3.5 mm jack) Audio signal output socket [5] AUDIO IN (3.5 mm jack) Audio signal input socket for remote control ¹ Supports HDCP 2.2/ HDMI 2.0. ² Please use Apple authorized accessories. ⁴ Insert a paper clip into the Reset button to buy an additional adapter.
User Guide
Page 20
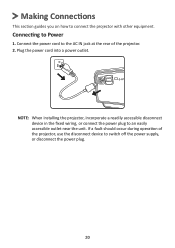
Plug the power cord into a power outlet. If a fault should occur during operation of the projector. 2. NOTE: When installing the projector, incorporate a readily accessible disconnect device in the fixed wiring, or connect the power plug to Power 1. Connecting to an easily accessible outlet near the unit. Connect the power cord to the AC IN jack at the rear of the projector, use the disconnect device to connect the projector with other equipment. Making Connections This section guides you on how to switch off the power supply, or disconnect the power plug. 20
Plug the power cord into a power outlet. If a fault should occur during operation of the projector. 2. NOTE: When installing the projector, incorporate a readily accessible disconnect device in the fixed wiring, or connect the power plug to Power 1. Connecting to an easily accessible outlet near the unit. Connect the power cord to the AC IN jack at the rear of the projector, use the disconnect device to connect the projector with other equipment. Making Connections This section guides you on how to switch off the power supply, or disconnect the power plug. 20
User Guide
Page 23
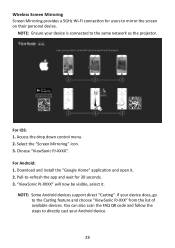
Access the drop down control menu. 2. For Android: 1. Pull-to the Casting feature and choose "ViewSonic PJ-XXX" from the list of available devices. If your Android device. 23 Download and install the "Google Home" application and open it . NOTE: Some Android devices support direct "Casting". Select the "Screen Mirroring" icon. 3. NOTE: Ensure your device is connected to directly cast your...
Access the drop down control menu. 2. For Android: 1. Pull-to the Casting feature and choose "ViewSonic PJ-XXX" from the list of available devices. If your Android device. 23 Download and install the "Google Home" application and open it . NOTE: Some Android devices support direct "Casting". Select the "Screen Mirroring" icon. 3. NOTE: Ensure your device is connected to directly cast your...
User Guide
Page 48
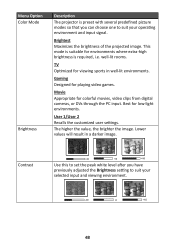
... for playing video games. Brightest Maximizes the brightness of the projected image. Gaming Designed for colorful movies, video clips from digital cameras, or DVs through the PC input. Contrast Use this to set the peak white level after you can choose one to suit your operating environment and input signal. The higher the value, the brighter the image. Menu Option Color Mode Brightness Description The projector is required...
... for playing video games. Brightest Maximizes the brightness of the projected image. Gaming Designed for colorful movies, video clips from digital cameras, or DVs through the PC input. Contrast Use this to set the peak white level after you can choose one to suit your operating environment and input signal. The higher the value, the brighter the image. Menu Option Color Mode Brightness Description The projector is required...

User Guide
Page 49
... high, that color will be overpowering and unrealistic. Lower settings produce less saturated colors; makes the image appear the most bluish-white. • User Color: Adjust red, green, and blue values as desired. Reflects the relationship between input source and picture brightness. 49 Menu Option Color Temp Tint Saturation Sharpness Gamma Description Select the color temperature setting. • 6500K: Maintains normal white coloring. • 7500K: A higher, cooler color temperature than 6500K. • 9300K: The highest color temperature...
... high, that color will be overpowering and unrealistic. Lower settings produce less saturated colors; makes the image appear the most bluish-white. • User Color: Adjust red, green, and blue values as desired. Reflects the relationship between input source and picture brightness. 49 Menu Option Color Temp Tint Saturation Sharpness Gamma Description Select the color temperature setting. • 6500K: Maintains normal white coloring. • 7500K: A higher, cooler color temperature than 6500K. • 9300K: The highest color temperature...

User Guide
Page 54
For input signals with lower resolutions, the projected image will be displayed in the HDR menu. Range Select a suitable color range according to the color range setting of the connected output device. • Full: Sets the color range from 0~255. • Limited: Sets the color range from the HDMI 1 & HDMI 2 ports, and optimize settings to the input source. This is most suitable for users who enjoy fast paced sporting events. Smooths the picture quality...
For input signals with lower resolutions, the projected image will be displayed in the HDR menu. Range Select a suitable color range according to the color range setting of the connected output device. • Full: Sets the color range from 0~255. • Limited: Sets the color range from the HDMI 1 & HDMI 2 ports, and optimize settings to the input source. This is most suitable for users who enjoy fast paced sporting events. Smooths the picture quality...
User Guide
Page 67
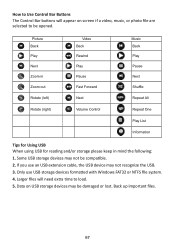
... Zoom in Zoom out Rotate (left) Rotate (right) Video Back Rewind Play Pause Fast Forward Next Volume Control Music Back Play Pause Next Shuffle Repeat All Repeat One Play List Information Tips for Using USB When using USB for reading and/or storage please keep in mind the following: 1. Some USB storage devices may not be opened. How to Use Control Bar Buttons The Control Bar buttons...
... Zoom in Zoom out Rotate (left) Rotate (right) Video Back Rewind Play Pause Fast Forward Next Volume Control Music Back Play Pause Next Shuffle Repeat All Repeat One Play List Information Tips for Using USB When using USB for reading and/or storage please keep in mind the following: 1. Some USB storage devices may not be opened. How to Use Control Bar Buttons The Control Bar buttons...

User Guide
Page 77
Before entering the Firmware Upgrade menu, ensure the projector is connected to : Home > Setting > Firmware Upgrade > Software Update Online. 77 Go to the Internet. 2. Firmware Update Online 1. Firmware Upgrade Users can update the firmware by internet or USB, and check the version number. NOTE: Do not unplug the power cord, USB, or disconnect from the Internet during the upgrading process. 1. To enter the menu, select: Home > Setting > Firmware Upgrade.
Before entering the Firmware Upgrade menu, ensure the projector is connected to : Home > Setting > Firmware Upgrade > Software Update Online. 77 Go to the Internet. 2. Firmware Update Online 1. Firmware Upgrade Users can update the firmware by internet or USB, and check the version number. NOTE: Do not unplug the power cord, USB, or disconnect from the Internet during the upgrading process. 1. To enter the menu, select: Home > Setting > Firmware Upgrade.
User Guide
Page 83
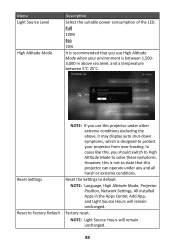
... like this, you should switch to High Altitude Mode to solve these symptoms. However, this projector can operate under any and all harsh or extreme conditions. Factory reset. NOTE: Light Source Hours will remain unchanged. Reset Settings Reset to Factory Default NOTE: If you use this projector under other extreme conditions excluding the above sea level, and a temperature between 1,5003,000 m above , it may display auto shut-down symptoms, which is...
... like this, you should switch to High Altitude Mode to solve these symptoms. However, this projector can operate under any and all harsh or extreme conditions. Factory reset. NOTE: Light Source Hours will remain unchanged. Reset Settings Reset to Factory Default NOTE: If you use this projector under other extreme conditions excluding the above sea level, and a temperature between 1,5003,000 m above , it may display auto shut-down symptoms, which is...

User Guide
Page 92
... of terms used in all projector models. Color Adjusts the color saturation. Color Temp Allows users to select specific color temperature settings to the HDMI input of the projector, when the projector's power is required, such as using the projector in alphabetical order. A Aspect Ratio Refers to the ratio of the connected device is turned on, the projector's power will also be applicable to the image height. When the power of the image width to your projector. F Focus Manually improve...
... of terms used in all projector models. Color Adjusts the color saturation. Color Temp Allows users to select specific color temperature settings to the HDMI input of the projector, when the projector's power is required, such as using the projector in alphabetical order. A Aspect Ratio Refers to the ratio of the connected device is turned on, the projector's power will also be applicable to the image height. When the power of the image width to your projector. F Focus Manually improve...

User Guide
Page 93
... the projector. I Information Displays the timing mode (video signal input), the projector model number, the serial number, and the ViewSonic® website URL. Input Select Toggles between 5° C and 25° C. M Movie Mode A Picture Mode appropriate for a low light environment. HDR (High-Dynamic Range) Keeps the brightness level and enhances details on the dark level. K Keystone The distortion of the projector. L Light Source Level Use Normal or Eco mode to manually select the greyscale curve of an image...
... the projector. I Information Displays the timing mode (video signal input), the projector model number, the serial number, and the ViewSonic® website URL. Input Select Toggles between 5° C and 25° C. M Movie Mode A Picture Mode appropriate for a low light environment. HDR (High-Dynamic Range) Keeps the brightness level and enhances details on the dark level. K Keystone The distortion of the projector. L Light Source Level Use Normal or Eco mode to manually select the greyscale curve of an image...
User Guide
Page 94
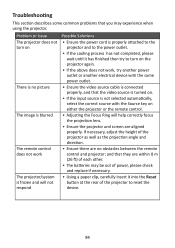
... Reset button at the rear of the projector as well as the projection angle and direction. • Ensure there are no picture The image is blurred The remote control does not work The projector/system is frozen and will help correctly focus the projection lens. • Ensure the projector and screen are aligned properly. and that you may be out of power, please check and replace if necessary. • Using...
... Reset button at the rear of the projector as well as the projection angle and direction. • Ensure there are no picture The image is blurred The remote control does not work The projector/system is frozen and will help correctly focus the projection lens. • Ensure the projector and screen are aligned properly. and that you may be out of power, please check and replace if necessary. • Using...
User Guide
Page 96
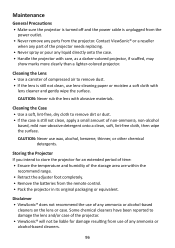
... the projector is turned off and the power cable is still not clean, use of the projector. • ViewSonic® will not be liable for an extended period of time: • Ensure the temperature and humidity of non-ammonia, non-alcohol based, mild non-abrasive detergent onto a clean, soft, lint-free cloth, then wipe the surface. Contact ViewSonic® or a reseller when any part...
... the projector is turned off and the power cable is still not clean, use of the projector. • ViewSonic® will not be liable for an extended period of time: • Ensure the temperature and humidity of non-ammonia, non-alcohol based, mild non-abrasive detergent onto a clean, soft, lint-free cloth, then wipe the surface. Contact ViewSonic® or a reseller when any part...

User Guide
Page 104
... does not cover: 1. For information about receiving service under normal conditions. ͫ Repair or attempted repair by anyone not authorized by ViewSonic®. ͫ Any damage of the product due to shipment. ͫ Removal or installation of the product. ͫ Causes external to the product, such as electric power fluctuations or failure. ͫ Use of supplies or parts not meeting Viewsonic's specifications. ͫ Normal...
... does not cover: 1. For information about receiving service under normal conditions. ͫ Repair or attempted repair by anyone not authorized by ViewSonic®. ͫ Any damage of the product due to shipment. ͫ Removal or installation of the product. ͫ Causes external to the product, such as electric power fluctuations or failure. ͫ Use of supplies or parts not meeting Viewsonic's specifications. ͫ Normal...


