
Virtuoso Product Line
Page 1
... detailed product information, model numbers, or to our offices and factory floors. ALL RIGHTS RESERVED. transitionally designed appliances that deliver professional results at home while providing versatility and modern style to building Viking products in the heart of our employees and the products they build here in the USA. The Viking range was born here, and our decision to set...
... detailed product information, model numbers, or to our offices and factory floors. ALL RIGHTS RESERVED. transitionally designed appliances that deliver professional results at home while providing versatility and modern style to building Viking products in the heart of our employees and the products they build here in the USA. The Viking range was born here, and our decision to set...
Virtuoso Product Line
Page 2
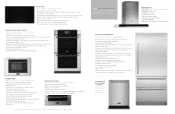
... heat reflector xxFull-Extension TruGlide™ rack and five porcelain coated rack positions make moving heavy bakeware easy xxDigital clock/oven functions: 100 minute timer, Set cooking time for up to 12 hours, Delay timed cooking feature, Meat probe (upper oven of superior power for faster boiling xxSimmer setting is perfect for gentle melting or keeping cooked food warm xxEasy to use touch controls xxElement lights indicate hot surfaces and active elements xxSensor turns...
... heat reflector xxFull-Extension TruGlide™ rack and five porcelain coated rack positions make moving heavy bakeware easy xxDigital clock/oven functions: 100 minute timer, Set cooking time for up to 12 hours, Delay timed cooking feature, Meat probe (upper oven of superior power for faster boiling xxSimmer setting is perfect for gentle melting or keeping cooked food warm xxEasy to use touch controls xxElement lights indicate hot surfaces and active elements xxSensor turns...

Installation Instructions
Page 2
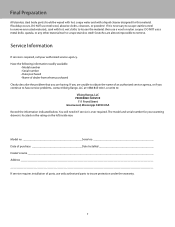
... Instructions 2 Dimensions 3 Specifications 4 Cutout Dimensions 4 Electrical Requirements 5 General Information 5 Installation 6 Final Preparation 7 Service & Registration 7 Important Safety Instructions- Check with your protection against shock hazard and should retain for future reference. All safety messages will withstand temperatures up to persons, installation work and electrical wiring must be used if the product is equipped with a 3-prong power cord with the unit. Heat resistant adhesive must be observed. WARNING If the information in this manual...
... Instructions 2 Dimensions 3 Specifications 4 Cutout Dimensions 4 Electrical Requirements 5 General Information 5 Installation 6 Final Preparation 7 Service & Registration 7 Important Safety Instructions- Check with your protection against shock hazard and should retain for future reference. All safety messages will withstand temperatures up to persons, installation work and electrical wiring must be used if the product is equipped with a 3-prong power cord with the unit. Heat resistant adhesive must be observed. WARNING If the information in this manual...

Installation Instructions
Page 3
Dimensions MVWD630 10-3/4" (27.3 cm) (752.69-c3m/4)" Side View MVWD630 (652.45-c3m/4)" MVWD630BG 10-3/4" (27.3 cm) 2(514-1.0/4c"m) 2(527-1.1/2c"m) 2(654-1.1/4c"m) 1" (2.5 ...cm) 21-1/4" (54.0 cm) 27-3/4" (70.5 cm) 22-1/16" (56.0 cm) 21-1/4" (54.0 cm) 3" (7.6 cm) 2-1/4" (5.7 cm) 220-230 VAC Electrical Connection 9" (22.9 cm) WARNING ELECTRICAL SHOCK HAZARD This appliance is equipped with a 3-prong power cord with the unit. 3 Only use power cord supplied with a grounding plug for your protection against shock hazard and should be plugged directly into a properly grounded receptacle.
Dimensions MVWD630 10-3/4" (27.3 cm) (752.69-c3m/4)" Side View MVWD630 (652.45-c3m/4)" MVWD630BG 10-3/4" (27.3 cm) 2(514-1.0/4c"m) 2(527-1.1/2c"m) 2(654-1.1/4c"m) 1" (2.5 ...cm) 21-1/4" (54.0 cm) 27-3/4" (70.5 cm) 22-1/16" (56.0 cm) 21-1/4" (54.0 cm) 3" (7.6 cm) 2-1/4" (5.7 cm) 220-230 VAC Electrical Connection 9" (22.9 cm) WARNING ELECTRICAL SHOCK HAZARD This appliance is equipped with a 3-prong power cord with the unit. 3 Only use power cord supplied with a grounding plug for your protection against shock hazard and should be plugged directly into a properly grounded receptacle.

Installation Instructions
Page 4
... handle With drawer fully extended Interior width Interior height Interior depth Electrical requirement Max Amp Usage Approx. MVWD630 MVWD630BG 29-3/4" (75.6 cm) 10-3/4" (27.3 cm) 25-1/4" (64.1 cm) 44-3/4" (113.7 cm) 24-3/16" (61.4 cm) 44-1/3" (112.5 cm) 22-1/8" (56.1 cm) 5-1/2" (14.0 cm) 20-1/4" (51.4 cm) 120V/15 amp power cord included with the unit 4.0 Amps 90 lb. (40.5 kg.) Cutout Dimensions Spacers can be located...
... handle With drawer fully extended Interior width Interior height Interior depth Electrical requirement Max Amp Usage Approx. MVWD630 MVWD630BG 29-3/4" (75.6 cm) 10-3/4" (27.3 cm) 25-1/4" (64.1 cm) 44-3/4" (113.7 cm) 24-3/16" (61.4 cm) 44-1/3" (112.5 cm) 22-1/8" (56.1 cm) 5-1/2" (14.0 cm) 20-1/4" (51.4 cm) 120V/15 amp power cord included with the unit 4.0 Amps 90 lb. (40.5 kg.) Cutout Dimensions Spacers can be located...

Installation Instructions
Page 5
...;When installing this unit. -Use 120V/15 amp power cord included with a grounding plug for outdoor models) or plug/ receptacle of the installer to remove film residues and any dust or debris before being used, then rinsed and wiped dry. latest edition. •Line disconnect switch, circuit breaker, GFI (for your national and local codes regarding this unit directly below other units, only install with Viking Range, LLC built-in...
...;When installing this unit. -Use 120V/15 amp power cord included with a grounding plug for outdoor models) or plug/ receptacle of the installer to remove film residues and any dust or debris before being used, then rinsed and wiped dry. latest edition. •Line disconnect switch, circuit breaker, GFI (for your national and local codes regarding this unit directly below other units, only install with Viking Range, LLC built-in...

Installation Instructions
Page 6
... in cutout. Installation 1 Pull out warming drawer pan until fully extended 3 2 2 1 Slide finger along right and left side latch and push down on the right side latch at the same time. Replace warming drawer pan assembly. 6 Pull up on on the left side until you only use the cord provided with the unit. 5 x4 Secure the warming drawer to the back of the control panel and plug into the cabinet opening.
... in cutout. Installation 1 Pull out warming drawer pan until fully extended 3 2 2 1 Slide finger along right and left side latch and push down on the right side latch at the same time. Replace warming drawer pan assembly. 6 Pull up on on the left side until you only use the cord provided with the unit. 5 x4 Secure the warming drawer to the back of the control panel and plug into the cabinet opening.
Installation Instructions
Page 7
... NOT use only authorized parts to insure protection under the warranty. 7 The model and serial number for this material. Model no Serial no Date of purchase Date Installed Dealer's name Address If service requires installation of dealer from whom purchased Clearly describe the problem that you are almost impossible to scrape stainless steel! You will need it is located on the rating on the left inside rear...
... NOT use only authorized parts to insure protection under the warranty. 7 The model and serial number for this material. Model no Serial no Date of purchase Date Installed Dealer's name Address If service requires installation of dealer from whom purchased Clearly describe the problem that you are almost impossible to scrape stainless steel! You will need it is located on the rating on the left inside rear...
Use and Care Manual
Page 2
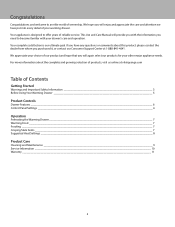
... is our ultimate goal. We hope you purchased it, or contact our Consumer Support Center at vikingrange.com Table of Contents Getting Started Warnings and Important Safety Information 3 Before Using Your Warming Drawer 5 Product Controls Drawer Features 6 Control Panel Settings 6 Operation Preheating the Warming Drawer 7 Warming Food 7 Proofing 7 Crisping Stale Items 7 Suggested Heat Settings 8 Product Care Cleaning and Maintenance 9 Service Information 10 Warranty 11 2 Congratulations Congratulations and welcome to offer years of reliable...
... is our ultimate goal. We hope you purchased it, or contact our Consumer Support Center at vikingrange.com Table of Contents Getting Started Warnings and Important Safety Information 3 Before Using Your Warming Drawer 5 Product Controls Drawer Features 6 Control Panel Settings 6 Operation Preheating the Warming Drawer 7 Warming Food 7 Proofing 7 Crisping Stale Items 7 Suggested Heat Settings 8 Product Care Cleaning and Maintenance 9 Service Information 10 Warranty 11 2 Congratulations Congratulations and welcome to offer years of reliable...
Use and Care Manual
Page 3
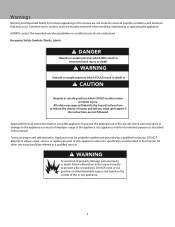
... if the instructions are not meant to cover all instructions before using this appliance to prevent the potential risk of fire, electric shock, personal injury or damage to the appliance as described in this manual. All safety messages will identify the hazard, tell you how to prevent a fire or explosion. DO NOT attempt to adjust, repair, service, or replace any...
... if the instructions are not meant to cover all instructions before using this appliance to prevent the potential risk of fire, electric shock, personal injury or damage to the appliance as described in this manual. All safety messages will identify the hazard, tell you how to prevent a fire or explosion. DO NOT attempt to adjust, repair, service, or replace any...

Use and Care Manual
Page 4
... poisoning and overheating of fire, electric shock, or injury to persons, installation work and electrical wiring must be used if the product is rated for heating. Wiring the warming drawer with chlorine or chlorine compounds on stainless steel finish. CAUTION DO NOT use a flexible power-supply cord with your builder or cabinet supplier to make sure that the materials meet these requirements. 4 Aluminum foil linings may cause...
... poisoning and overheating of fire, electric shock, or injury to persons, installation work and electrical wiring must be used if the product is rated for heating. Wiring the warming drawer with chlorine or chlorine compounds on stainless steel finish. CAUTION DO NOT use a flexible power-supply cord with your builder or cabinet supplier to make sure that the materials meet these requirements. 4 Aluminum foil linings may cause...
Use and Care Manual
Page 5
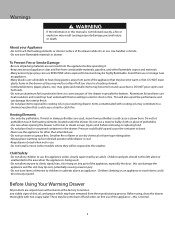
... hang on any part of the appliance, especially the door. Let hot air or steam escape (open vent) before operating it is in use. Smother fire or flame or use dry chemical or foam-type extinguisher. •Always place warming racks in desired position while drawer is cool. •Keep drawer closed when not in use. •Do not install or store indoor models where they...
... hang on any part of the appliance, especially the door. Let hot air or steam escape (open vent) before operating it is in use. Smother fire or flame or use dry chemical or foam-type extinguisher. •Always place warming racks in desired position while drawer is cool. •Keep drawer closed when not in use. •Do not install or store indoor models where they...
Use and Care Manual
Page 6
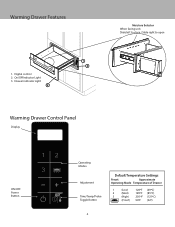
Digital control 2. On/Off Indicator Light 3. Warming Drawer Features 1 2 1. Drawer indicator Light 3 Moisture Selector When facing unit: Slide left to close / Slide right to open Warming Drawer Control Panel Display ON/OFF Power Button 12 3 Operating Modes Adjustment Time/Temp/Probe Toggle Button Default Temperature Settings Preset Approximate Operating Mode Temperature of Drawer 1 (Low) 120ºF (49ºC) 2 (Med) 185ºF (85ºC) 3 (High) 250 ºF (121ºC) (Proof ) 90ºF (32º) 6
Digital control 2. On/Off Indicator Light 3. Warming Drawer Features 1 2 1. Drawer indicator Light 3 Moisture Selector When facing unit: Slide left to close / Slide right to open Warming Drawer Control Panel Display ON/OFF Power Button 12 3 Operating Modes Adjustment Time/Temp/Probe Toggle Button Default Temperature Settings Preset Approximate Operating Mode Temperature of Drawer 1 (Low) 120ºF (49ºC) 2 (Med) 185ºF (85ºC) 3 (High) 250 ºF (121ºC) (Proof ) 90ºF (32º) 6

Use and Care Manual
Page 7
... operating mode was selected and you want to adjust the temperature, press the "+" or "-" button to completely exit the menu. NOTE: Use heat-safe dishes only. To change or power loss, the unit will immediately enter the preheat phase until "unt" appears in the display. -Press "Time/Temp/Probe " and either F or C will appear in display. Setting the Timer -The timer can only be canceled by pressing the power button...
... operating mode was selected and you want to adjust the temperature, press the "+" or "-" button to completely exit the menu. NOTE: Use heat-safe dishes only. To change or power loss, the unit will immediately enter the preheat phase until "unt" appears in the display. -Press "Time/Temp/Probe " and either F or C will appear in display. Setting the Timer -The timer can only be canceled by pressing the power button...
Use and Care Manual
Page 8
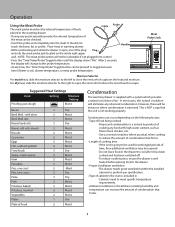
..., there will change to the probe temperature. -At any time, the "Time/Temp/Probe" toggle button can be pressed to close the vents which captures the heat and moisture. NOTE: The meat probe option will eliminate any observed condensation. Operation Using the Meat Probe Cable Probe The meat probe monitors the internal temperature of foods placed in the warming drawer -During any preset operating mode, the internal temperature of the meat can be required. -Do not leave...
..., there will change to the probe temperature. -At any time, the "Time/Temp/Probe" toggle button can be pressed to close the vents which captures the heat and moisture. NOTE: The meat probe option will eliminate any observed condensation. Operation Using the Meat Probe Cable Probe The meat probe monitors the internal temperature of foods placed in the warming drawer -During any preset operating mode, the internal temperature of the meat can be required. -Do not leave...

Use and Care Manual
Page 9
... on the right latch at the same time and pull out the drawer pan. Failure to ensure that the drawer mounted rail(s) are lined up on on the left side rail until you reach hand latches (located at the same time and pull out the drawer pan. 9 Allow warming drawer to assure smooth drawer operation. 3. Removing / Replacing the Drawer WARNING To prevent burns, do not remove drawer while hot. It...
... on the right latch at the same time and pull out the drawer pan. Failure to ensure that the drawer mounted rail(s) are lined up on on the left side rail until you reach hand latches (located at the same time and pull out the drawer pan. 9 Allow warming drawer to assure smooth drawer operation. 3. Removing / Replacing the Drawer WARNING To prevent burns, do not remove drawer while hot. It...

Use and Care Manual
Page 10
... the information indicated below. Cleaning Chart Material Drawer interior (stainless steel) Recommendations Use dish detergent. Painted Surfaces Drawer exterior (stainless steel) Control Panel Glass Surfaces Heat Discoloration / Corrosion: Clean with a sponge or cloth, rinse, and dry. Apply to insure protection under the warranty. 10 Wash, rinse well and dry. The model and serial number for your warming drawer is required, call your authorized service agency. Rinse and dry...
... the information indicated below. Cleaning Chart Material Drawer interior (stainless steel) Recommendations Use dish detergent. Painted Surfaces Drawer exterior (stainless steel) Control Panel Glass Surfaces Heat Discoloration / Corrosion: Clean with a sponge or cloth, rinse, and dry. Apply to insure protection under the warranty. 10 Wash, rinse well and dry. The model and serial number for your warming drawer is required, call your authorized service agency. Rinse and dry...
Use and Care Manual
Page 11
... only be repaired or replaced free of the product in the United States and Canada. You should, however, return the owner registration card so Viking Range LLC can contact you . Specifications subject to national and local codes. Any defects must be covered by a Viking Range LLC authorized service agency or representative. *90 Day Residential Plus: Viking products are not intended for proper installation, providing normal care and...
... only be repaired or replaced free of the product in the United States and Canada. You should, however, return the owner registration card so Viking Range LLC can contact you . Specifications subject to national and local codes. Any defects must be covered by a Viking Range LLC authorized service agency or representative. *90 Day Residential Plus: Viking products are not intended for proper installation, providing normal care and...
Two-Page Specifications Sheet
Page 1
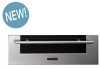
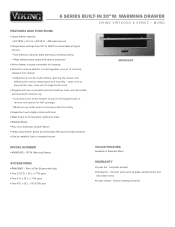
... watt element §§Temperature settings from drawer §§Adjustments can be installed flush or standard mount MVWD630 MODEL NUMBER §§MVWD630 - 30"W. x 12"L. pans §§One 4"D. cosmetic parts such as glass, painted items and decorative items §§5-year limited - Pan Lid Set (5 pans with two removable stainless steel low racks and removable stainless steel moisture cup §§Low racks cover entire bottom of pan for...
... watt element §§Temperature settings from drawer §§Adjustments can be installed flush or standard mount MVWD630 MODEL NUMBER §§MVWD630 - 30"W. x 12"L. pans §§One 4"D. cosmetic parts such as glass, painted items and decorative items §§5-year limited - Pan Lid Set (5 pans with two removable stainless steel low racks and removable stainless steel moisture cup §§Low racks cover entire bottom of pan for...
Two-Page Specifications Sheet
Page 2
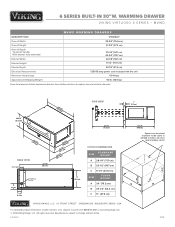
... © 2018 Viking Range, LLC All rights reserved. C A B 0318 F60402 1" (2.5 cm) 21-1/4" (54.0 cm) Spacers can be placed anywhere inside cutout as needed to make sure unit is level and does not tilt. MVWD MVWD WARMING DRAWERS DESCRIPTION Overall Width Overall Height Overall Depth To end of handle With drawer fully extended Interior Width Interior Height Interior Depth Electrical Requirements Maximum Amp Usage Approximate Shipping Weight VWD527 29...
... © 2018 Viking Range, LLC All rights reserved. C A B 0318 F60402 1" (2.5 cm) 21-1/4" (54.0 cm) Spacers can be placed anywhere inside cutout as needed to make sure unit is level and does not tilt. MVWD MVWD WARMING DRAWERS DESCRIPTION Overall Width Overall Height Overall Depth To end of handle With drawer fully extended Interior Width Interior Height Interior Depth Electrical Requirements Maximum Amp Usage Approximate Shipping Weight VWD527 29...


