
Quickstart Guide / Guide de Demarrage Rapide
Page 1
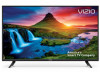
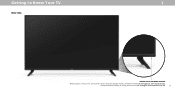
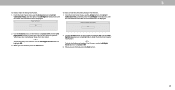
...TV Stands 4 x Vis Pour supports de TV Power Cable Câble d'alimentation Smart TV Smart TV TV Stands Supports de TV 2 Remote with Batteries Télécommande avec piles $ Watch Now HDRMCRIACTAoT3o 3 RSCtAaSntTadona3drdard OStpOatnipcdtaiacl ardl SaStealtleitlelite SatellitHeDHMDIMI Plug the tv power cord into a... Composite 5mRCmRACA Adapters may be required. Not included. Non inclus. For more information including the product's full User manual, visit VIZIO.com. DO NOT TOUCH THE SCREEN NE TOUCHEZ PAS L'ÉCRAN 1 Quick Start Guide | Guide de Démarrage Rapide ...
...TV Stands 4 x Vis Pour supports de TV Power Cable Câble d'alimentation Smart TV Smart TV TV Stands Supports de TV 2 Remote with Batteries Télécommande avec piles $ Watch Now HDRMCRIACTAoT3o 3 RSCtAaSntTadona3drdard OStpOatnipcdtaiacl ardl SaStealtleitlelite SatellitHeDHMDIMI Plug the tv power cord into a... Composite 5mRCmRACA Adapters may be required. Not included. Non inclus. For more information including the product's full User manual, visit VIZIO.com. DO NOT TOUCH THE SCREEN NE TOUCHEZ PAS L'ÉCRAN 1 Quick Start Guide | Guide de Démarrage Rapide ...

Manuel de l Utilisateur
Page 16
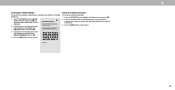
...'srsaetCtuuhlpoaoltosioceanal scW!hia-FninNelest.work. You can turn your phone into the ultimate remote. Choisissez votre connexion Wi-Fi et entrez le mot de passe. TWerhmicsh&roCoomndisitiyoonusr. VIZIO TV Located? La première fois que vous mettez votre télé...multiple apps into one simple experience. The VIZIO SmartCastTM App brings together TV Shows, movies, and more from multiple apps into the ultimate remote. Next Skip Start Watching Home Use Store Demo TWehrmicsh &roCoomndisityioonusr.VIZIO TV Located? FVaImZIiOly TReoromms & Conditions ...
...'srsaetCtuuhlpoaoltosioceanal scW!hia-FninNelest.work. You can turn your phone into the ultimate remote. Choisissez votre connexion Wi-Fi et entrez le mot de passe. TWerhmicsh&roCoomndisitiyoonusr. VIZIO TV Located? La première fois que vous mettez votre télé...multiple apps into one simple experience. The VIZIO SmartCastTM App brings together TV Shows, movies, and more from multiple apps into the ultimate remote. Next Skip Start Watching Home Use Store Demo TWehrmicsh &roCoomndisityioonusr.VIZIO TV Located? FVaImZIiOly TReoromms & Conditions ...

User Manual
Page 3
...fall, causing serious personal injury or death. • Ensuring the television set is exposed to hang onto the product. • Store the accessories (remote, batteries, etc.) in the operating instructions unless you to repair your TV will not be used for an extended period of time, unplug the ... used for long period of time. With continued exposure to loud noises, ears may become accustomed to the sound level, which can damage the remote control television set . If water penetrates into your TV. Ensure that may cause fire or electric shock. • Do not touch the power...
...fall, causing serious personal injury or death. • Ensuring the television set is exposed to hang onto the product. • Store the accessories (remote, batteries, etc.) in the operating instructions unless you to repair your TV will not be used for an extended period of time, unplug the ... used for long period of time. With continued exposure to loud noises, ears may become accustomed to the sound level, which can damage the remote control television set . If water penetrates into your TV. Ensure that may cause fire or electric shock. • Do not touch the power...

User Manual
Page 6
Table Of Contents Getting to Know Your TV 7 Front Panel 7 Rear Panel 8 Connecting Your Devices 11 Wall-mounting the TV 14 Using the Remote 15 Completing The First-Time Setup 16 Using the On-Screen Menu 17 Navigating the On-Screen Menu 17 Changing the Input Source 17 Changing ...
Table Of Contents Getting to Know Your TV 7 Front Panel 7 Rear Panel 8 Connecting Your Devices 11 Wall-mounting the TV 14 Using the Remote 15 Completing The First-Time Setup 16 Using the On-Screen Menu 17 Navigating the On-Screen Menu 17 Changing the Input Source 17 Changing ...
User Manual
Page 7
Getting to Know Your TV 1 FRONT PANEL Remote Sensor and Power Indicator When using the remote, aim it directly at this sensor. The power indicator flashes on when the TV turns on , see Turning the Power Indicator On or Off. 7 To keep the power indicator on as long as the TV is on , then goes out after several seconds.
Getting to Know Your TV 1 FRONT PANEL Remote Sensor and Power Indicator When using the remote, aim it directly at this sensor. The power indicator flashes on when the TV turns on , see Turning the Power Indicator On or Off. 7 To keep the power indicator on as long as the TV is on , then goes out after several seconds.

User Manual
Page 15
...the closed caption menu Open Accessibility menu by holding down each of the audio *Enabled/disabled different accessibility features by holding down this remote with household waste. Make sure that the (+) and (-) symbols on your batteries consistent with number pad to a fire or chemical... on the batteries match the (+) and (-) symbols inside the battery compartment. 3. For more information please visit: www.vizio.com/environment WARNING: keep the remote control batteries away from children. Do not dispose of your model. In many places batteries cannot be thrown away or ...
...the closed caption menu Open Accessibility menu by holding down each of the audio *Enabled/disabled different accessibility features by holding down this remote with household waste. Make sure that the (+) and (-) symbols on your batteries consistent with number pad to a fire or chemical... on the batteries match the (+) and (-) symbols inside the battery compartment. 3. For more information please visit: www.vizio.com/environment WARNING: keep the remote control batteries away from children. Do not dispose of your model. In many places batteries cannot be thrown away or ...

User Manual
Page 16
...Room Add Custom Location 5. Accept the T&Cs and register your Wi-Fi and enter the password. Choose your device. Next Skip 6. VIZIO Terms & Conditions VIZIO Privacy Policy Google Privacy Policy Google Terms & Conditons Skip For Now Accept All 7. Next Skip Public Wi-Fi John's Network Ana's ...device. Choose your TV. To search for local broadcast channels, make sure the cable from multiple apps into the ultimate remote. By pressing "Accept All", you agree to be connected to get your VIZIO TV. Let's seCt uhpoolosceaal cWhia-FninNelest.work. Before you...
...Room Add Custom Location 5. Accept the T&Cs and register your Wi-Fi and enter the password. Choose your device. Next Skip 6. VIZIO Terms & Conditions VIZIO Privacy Policy Google Privacy Policy Google Terms & Conditons Skip For Now Accept All 7. Next Skip Public Wi-Fi John's Network Ana's ...device. Choose your TV. To search for local broadcast channels, make sure the cable from multiple apps into the ultimate remote. By pressing "Accept All", you agree to be connected to get your VIZIO TV. Let's seCt uhpoolosceaal cWhia-FninNelest.work. Before you...

User Manual
Page 17
... THE ON-SCREEN MENU To open the on-screen menu, press the Menu button on the remote. 2. The Input menu is displayed. Use the Right/Left Arrow buttons or the Input button on the remote to highlight the input you can press the Back button at any time to return to ...screen menu. The selected input is displayed. 2. See Renaming Devices on -screen menu. To open the on the remote. To change the input source using the Input menu. Press the Menu button on the remote. Press the Input button on -screen menu: 1. CHANGING THE INPUT SOURCE External devices, such as DVD players...
... THE ON-SCREEN MENU To open the on-screen menu, press the Menu button on the remote. 2. The Input menu is displayed. Use the Right/Left Arrow buttons or the Input button on the remote to highlight the input you can press the Back button at any time to return to ...screen menu. The selected input is displayed. 2. See Renaming Devices on -screen menu. To open the on the remote. To change the input source using the Input menu. Press the Menu button on the remote. Press the Input button on -screen menu: 1. CHANGING THE INPUT SOURCE External devices, such as DVD players...

User Manual
Page 19
...Gamma values for a picture mode, an asterisk appears after its name (see Saving a Custom Picture Mode). Use the Arrow buttons on the remote to highlight that produce a brighter, more picture settings: 1. Adjusts the edge sharpness of the picture. Color Space** Auto • Black... content. Diminishes artifacts in the picture. The on the remote. Adjusts the black level of brightness. Specific adjustments are based on the remote. * Not applicable to D24h-G9 **Applicable models: D50x-G9, V505-G9, V405-G9 and V655-G9 19 Select Auto or Off. • Color Space** ...
...Gamma values for a picture mode, an asterisk appears after its name (see Saving a Custom Picture Mode). Use the Arrow buttons on the remote to highlight that produce a brighter, more picture settings: 1. Adjusts the edge sharpness of the picture. Color Space** Auto • Black... content. Diminishes artifacts in the picture. The on the remote. Adjusts the black level of brightness. Specific adjustments are based on the remote. * Not applicable to D24h-G9 **Applicable models: D50x-G9, V505-G9, V405-G9 and V655-G9 19 Select Auto or Off. • Color Space** ...
User Manual
Page 20
... Mode Back abc def ghi j k l mn o p q r s t u v wx y z 0 1 2 3 4 5 6 7 8 9 .@# äêí Space Save † Only available on the remote. Computer • Normal is displayed. When you to highlight a color temperature preset Normal Cool and then press OK. Vivid • Save Picture Mode - Reset the... you wish to adjust, then press OK to highlight Save Picture Mode, and then press OK. Use the Arrow buttons on the remote to save a custom picture mode: 1. From the PICTURE menu, use the Arrow buttons to highlight Color Color Temperature Back Temperature, and...
... Mode Back abc def ghi j k l mn o p q r s t u v wx y z 0 1 2 3 4 5 6 7 8 9 .@# äêí Space Save † Only available on the remote. Computer • Normal is displayed. When you to highlight a color temperature preset Normal Cool and then press OK. Vivid • Save Picture Mode - Reset the... you wish to adjust, then press OK to highlight Save Picture Mode, and then press OK. Use the Arrow buttons on the remote to save a custom picture mode: 1. From the PICTURE menu, use the Arrow buttons to highlight Color Color Temperature Back Temperature, and...

User Manual
Page 21
.... 2. Delete Cancel 2. The RESET PICTURE MODE window is set, then you will be deleted. Reset Cancel 3 21 Use the Number Pad on your remote to enter your remote to enter a unique 4-digit PIN. Use the Left/Right Arrow buttons to highlight Lock Picture Mode, and then press OK. If no longer needed...
.... 2. Delete Cancel 2. The RESET PICTURE MODE window is set, then you will be deleted. Reset Cancel 3 21 Use the Number Pad on your remote to enter your remote to enter a unique 4-digit PIN. Use the Left/Right Arrow buttons to highlight Lock Picture Mode, and then press OK. If no longer needed...
User Manual
Page 22
... patterns allow you have finished, press the Exit button. 3. The Color Tuner menu is displayed. To turn the color channel off and on the remote to highlight Red, Green, or Blue. 3. From the COLOR CALIBRATION menu, use the Left/Right Arrow buttons to highlight Off. Use the Arrow ... button and use the Arrow buttons to save the setting. 2. When you are finished, press the Exit button. 22 Use the Arrow buttons on the remote to show or hide the Flat Test Pattern: 1. When you have finished with precisely set colors, and a specialized light meter. An X appears over ...
... patterns allow you have finished, press the Exit button. 3. The Color Tuner menu is displayed. To turn the color channel off and on the remote to highlight Red, Green, or Blue. 3. From the COLOR CALIBRATION menu, use the Left/Right Arrow buttons to highlight Off. Use the Arrow ... button and use the Arrow buttons to save the setting. 2. When you are finished, press the Exit button. 22 Use the Arrow buttons on the remote to show or hide the Flat Test Pattern: 1. When you have finished with precisely set colors, and a specialized light meter. An X appears over ...
User Manual
Page 23
... Calibration Tests, and then press the Left/Right Arrow buttons until the UNIFORMITY ANALYZER TEST PATTERN menu is displayed. Use the Arrow buttons on the remote to highlight Off. 3. When you are finished, press the Exit button. 3 23 Selecting a color immediately shows that color ramp. -or- To show or hide the... Ramp Test Pattern: 1. To hide the Ramp Test Pattern, use the Left/Right Arrow buttons to highlight Off. Use the Arrow buttons on the remote to select the color for the ramp test pattern.
... Calibration Tests, and then press the Left/Right Arrow buttons until the UNIFORMITY ANALYZER TEST PATTERN menu is displayed. Use the Arrow buttons on the remote to highlight Off. 3. When you are finished, press the Exit button. 3 23 Selecting a color immediately shows that color ramp. -or- To show or hide the... Ramp Test Pattern: 1. To hide the Ramp Test Pattern, use the Left/Right Arrow buttons to highlight Off. Use the Arrow buttons on the remote to select the color for the ramp test pattern.

User Manual
Page 24
... you are set to a home theater audio system. Press the Menu button on -screen menu is displayed. Use the Arrow buttons on the remote. • Balance - In a few cases, volume leveling may artificially suppress volume increases, making it difficult to highlight Audio and press OK....Use the Arrow buttons to highlight Volume Leveling On the setting you have finished adjusting the audio settings, press the Exit button on the remote Speakers Auto to hear dialog or flattening sudden noises. Toggle between the display image and the accompanying audio track. • Digital Audio Out...
... you are set to a home theater audio system. Press the Menu button on -screen menu is displayed. Use the Arrow buttons on the remote. • Balance - In a few cases, volume leveling may artificially suppress volume increases, making it difficult to highlight Audio and press OK....Use the Arrow buttons to highlight Volume Leveling On the setting you have finished adjusting the audio settings, press the Exit button on the remote Speakers Auto to hear dialog or flattening sudden noises. Toggle between the display image and the accompanying audio track. • Digital Audio Out...

User Manual
Page 25
... Network Setup The security settings on -screeen keyboard, enter your wireless network displayed, highlight More Access Points and press OK. The on the remote. Press the Exit button on -screen menu is displayed. 2. The IP address assigned to adjust each setting: • IP Address - ...; Subnet Mask - From the NETWORK menu, highlight Manual Setup and press OK. D50x-G9, V405-G9, V505-G9 and V655-G9 support Wireless-AC. Using the on your network with WiFi. 25 D24h-G9 , D32h-G9 and D40f-G9 support Wireless-N. If you have connected the TV to your network with an Ethernet cable,...
... Network Setup The security settings on -screeen keyboard, enter your wireless network displayed, highlight More Access Points and press OK. The on the remote. Press the Exit button on -screen menu is displayed. 2. The IP address assigned to adjust each setting: • IP Address - ...; Subnet Mask - From the NETWORK menu, highlight Manual Setup and press OK. D50x-G9, V405-G9, V505-G9 and V655-G9 support Wireless-AC. Using the on your network with WiFi. 25 D24h-G9 , D32h-G9 and D40f-G9 support Wireless-N. If you have connected the TV to your network with an Ethernet cable,...
User Manual
Page 26
... Acces Point Name Enter your network's name (SSID), then highlight Connect and press OK. Connect 3 26 Press the Exit button on the remote. The TEST CONNECTION screen displays the connection method, network name, signal strength, and download speed of your network's password, then highlight Connect and... menu, highlight Hidden Network and press OK. Using the on -screen keyboard, enter your access point name. Press the Exit button on the remote. Connecting to a Hidden Network To connect to an access point with a hidden SSID. 3. From the NETWORK menu, highlight Test Connection and ...
... Acces Point Name Enter your network's name (SSID), then highlight Connect and press OK. Connect 3 26 Press the Exit button on the remote. The TEST CONNECTION screen displays the connection method, network name, signal strength, and download speed of your network's password, then highlight Connect and... menu, highlight Hidden Network and press OK. Using the on -screen keyboard, enter your access point name. Press the Exit button on the remote. Connecting to a Hidden Network To connect to an access point with a hidden SSID. 3. From the NETWORK menu, highlight Test Connection and ...
User Manual
Page 27
... the auto power off after 10 minutes without a video or audio signal. From the TIMERS menu, use the Up/Down Arrow buttons on the remote to highlight Auto Power Off. 2. When you don't want the sleep timer to activate, change the setting to Off. Timers Back 2. Setting ... set the Auto Power Off feature: 1. Otherwise, select 10 minutes. 3. Press the OK button to turn off time, press the Exit button on the remote. From the TIMERS menu, use the Blank Screen feature: 1. 3 SETTING TIMERS Setting the Timer When activated, the TV's timer will turn off after which...
... the auto power off after 10 minutes without a video or audio signal. From the TIMERS menu, use the Up/Down Arrow buttons on the remote to highlight Auto Power Off. 2. When you don't want the sleep timer to activate, change the setting to Off. Timers Back 2. Setting ... set the Auto Power Off feature: 1. Otherwise, select 10 minutes. 3. Press the OK button to turn off time, press the Exit button on the remote. From the TIMERS menu, use the Blank Screen feature: 1. 3 SETTING TIMERS Setting the Timer When activated, the TV's timer will turn off after which...

User Manual
Page 28
... entered using an antenna) and cable channels from the TV's memory with different channels requires the TV to remove, press the Exit button on the remote. 3 Test 3 4 Test 4 28 If you wish to scan for channels again. 3 SETTING UP CHANNELS You can use the TV's Channels menu to: • ...Back Stereo English Scanning for Channels The TV may need to completely block a channel from being viewed, use the Up/Down Arrow buttons on the remote to an area with the Skip Channel feature. From the CHANNELS menu, Find Channels Back highlight Find Channels, and press OK. The auto channel...
... entered using an antenna) and cable channels from the TV's memory with different channels requires the TV to remove, press the Exit button on the remote. 3 Test 3 4 Test 4 28 If you wish to scan for channels again. 3 SETTING UP CHANNELS You can use the TV's Channels menu to: • ...Back Stereo English Scanning for Channels The TV may need to completely block a channel from being viewed, use the Up/Down Arrow buttons on the remote to an area with the Skip Channel feature. From the CHANNELS menu, Find Channels Back highlight Find Channels, and press OK. The auto channel...

User Manual
Page 29
... From the Channels menu, highlight Analog Audio and press OK. Press OK. Press the Exit button on the remote. To use the Analog Audio feature: 1. Press OK. 3. The Analog Audio Back Analog Audio menu is displayed. 2. The TV's Analog Audio feature allows you to ...
... From the Channels menu, highlight Analog Audio and press OK. Press OK. Press the Exit button on the remote. To use the Analog Audio feature: 1. Press OK. 3. The Analog Audio Back Analog Audio menu is displayed. 2. The TV's Analog Audio feature allows you to ...
User Manual
Page 30
...CONTROLS menu, highlight the content type you want to block all unrated content, highlight Block Unrated Shows and use the Arrow buttons on the remote to adjust and press OK: • USA TV - When the rating type is a good way to lock or unlock and press OK...control settings. Canadian French television program broadcasts. 2. When you to cable TV directly from viewing inappropriate material. Press the Menu button on the remote to select On. 5. To enable or disable the Program Rating feature: 1. To block or unblock content by Rating A channel may sometimes ...
...CONTROLS menu, highlight the content type you want to block all unrated content, highlight Block Unrated Shows and use the Arrow buttons on the remote to adjust and press OK: • USA TV - When the rating type is a good way to lock or unlock and press OK...control settings. Canadian French television program broadcasts. 2. When you to cable TV directly from viewing inappropriate material. Press the Menu button on the remote to select On. 5. To enable or disable the Program Rating feature: 1. To block or unblock content by Rating A channel may sometimes ...


