
E320-A0 User Manual
Page 1
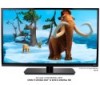
USER GUIDE MMOODDEELLS // E3D320VX // E3ED43220V0X -A0 // E3D470VX Installing your new tv CONTROLS & CONNECTIONS connecting your devices using the on-screen menu using the usb media player TROUBLESHOOTING & SUPPORT Help, SPECs, warranty & LEGAL
USER GUIDE MMOODDEELLS // E3D320VX // E3ED43220V0X -A0 // E3D470VX Installing your new tv CONTROLS & CONNECTIONS connecting your devices using the on-screen menu using the usb media player TROUBLESHOOTING & SUPPORT Help, SPECs, warranty & LEGAL
E320-A0 User Manual
Page 5
... with instructions. Continuous use your TV, hold the AC/DC power adapter, not the cord. Your TV is intended to alert the user to the presence of your TV may cause fire or electric shock. • Do not install your TV changes substantially....flash with arrowhead symbol within an equilateral triangle is exposed to rain or other hazards. Opening or removing the back cover may expose you are qualified to do so. If any other than that may result in the operating instructions unless you to leak which can damage the remote control or injure the operator. Operating...
... with instructions. Continuous use your TV, hold the AC/DC power adapter, not the cord. Your TV is intended to alert the user to the presence of your TV may cause fire or electric shock. • Do not install your TV changes substantially....flash with arrowhead symbol within an equilateral triangle is exposed to rain or other hazards. Opening or removing the back cover may expose you are qualified to do so. If any other than that may result in the operating instructions unless you to leak which can damage the remote control or injure the operator. Operating...

E320-A0 User Manual
Page 6
... the mast and supporting structure, grounding of the lead-in the building installation. Power Lines Do not locate the antenna near overhead light or power circuits, or where it is left unattended or unused for long periods of time, unplug the TV from the wall outlet and disconnect the antenna or cable system. Television Antenna Connection Protection If an outside antenna/satellite dish or...
... the mast and supporting structure, grounding of the lead-in the building installation. Power Lines Do not locate the antenna near overhead light or power circuits, or where it is left unattended or unused for long periods of time, unplug the TV from the wall outlet and disconnect the antenna or cable system. Television Antenna Connection Protection If an outside antenna/satellite dish or...
E320-A0 User Manual
Page 7
...3 Installing the TV Stand 3 Installing the TV on a Wall 5 Controls and Connections 6 Rear Panel 6 Front Panel 7 Remote Control 8 Replacing the Batteries 9 Connecting Your Devices 10 Connecting A Device 10 Connecting an audio device 11 Completing the First-Time Setup 12 Using the On-Screen Menu 13 Navigating the On-Screen Menu 13 Changing the Input Source 14 Changing the Screen Aspect Ratio 14 Setting Up Closed Captioning 15 Changing the Appearance of Digital Closed Captions.. 15 Activating the Sleep Timer 16 Setting the Auto Power Off Feature 16 Adjusting the Picture Settings...
...3 Installing the TV Stand 3 Installing the TV on a Wall 5 Controls and Connections 6 Rear Panel 6 Front Panel 7 Remote Control 8 Replacing the Batteries 9 Connecting Your Devices 10 Connecting A Device 10 Connecting an audio device 11 Completing the First-Time Setup 12 Using the On-Screen Menu 13 Navigating the On-Screen Menu 13 Changing the Input Source 14 Changing the Screen Aspect Ratio 14 Setting Up Closed Captioning 15 Changing the Appearance of Digital Closed Captions.. 15 Activating the Sleep Timer 16 Setting the Auto Power Off Feature 16 Adjusting the Picture Settings...
E320-A0 User Manual
Page 11
... the TV, ask someone to your TV. 2. Use only with your mount. 1 Installing the TV on a Wall To mount your TV on a wall requires lifting. Attach your TV and wall mount to find the appropriate mount for the weight of the TV. Remove the base by loosening and removing the screws. 4. Screw Size: Screw Length: Screw Pitch: Hole Pattern: E320-A0 M4 12mm 0.7mm 100mm (V) x 100mm (H) Be sure the mount you will need a wall mount.
... the TV, ask someone to your TV. 2. Use only with your mount. 1 Installing the TV on a Wall To mount your TV on a wall requires lifting. Attach your TV and wall mount to find the appropriate mount for the weight of the TV. Remove the base by loosening and removing the screws. 4. Screw Size: Screw Length: Screw Pitch: Hole Pattern: E320-A0 M4 12mm 0.7mm 100mm (V) x 100mm (H) Be sure the mount you will need a wall mount.

E320-A0 User Manual
Page 12
USB - Optical Audio Out - Connect coaxial cable from cable, satellite, or antenna. Connect component and composite devices. Connect USB thumb drive to audio device. Stereo Audio Out - Connect HDMI device. Component/Composite - Controls and Connections 2 Rear Panel HDMI - Coaxial - Rear Panel 6 Connect optical/SPDIF audio device, such as home audio receiver. HDMI - Connect HDMI device. Connect 3.5mm audio cable to view photo SIDE slideshow.
USB - Optical Audio Out - Connect coaxial cable from cable, satellite, or antenna. Connect component and composite devices. Connect USB thumb drive to audio device. Stereo Audio Out - Connect HDMI device. Component/Composite - Controls and Connections 2 Rear Panel HDMI - Coaxial - Rear Panel 6 Connect optical/SPDIF audio device, such as home audio receiver. HDMI - Connect HDMI device. Connect 3.5mm audio cable to view photo SIDE slideshow.

E320-A0 User Manual
Page 16
... used (HDMI-1, HDM1-2, etc). Turn the TV and your device on the TV (HDMI, Component, etc). 2. Set the TV's input to match the connection you used to the TV and the device. 4. SIDE 3 Cable/Satellite Box DVD/Blu-ray Player Game Console AV CABLE GOOD • ANALOG • VIDEO (480i)* • STEREO AUDIO COMPONENT CABLE • ANALOG BETTER • HD VIDEO (1080i)* • STEREO AUDIO HDMI CABLE BEST * Maximum Resolution 10 • DIGITAL • HD VIDEO (1080p)* • HD AUDIO CONNECTING...
... used (HDMI-1, HDM1-2, etc). Turn the TV and your device on the TV (HDMI, Component, etc). 2. Set the TV's input to match the connection you used to the TV and the device. 4. SIDE 3 Cable/Satellite Box DVD/Blu-ray Player Game Console AV CABLE GOOD • ANALOG • VIDEO (480i)* • STEREO AUDIO COMPONENT CABLE • ANALOG BETTER • HD VIDEO (1080i)* • STEREO AUDIO HDMI CABLE BEST * Maximum Resolution 10 • DIGITAL • HD VIDEO (1080p)* • HD AUDIO CONNECTING...

E320-A0 User Manual
Page 23
... digitizing of the picture to compensate for watching film. This option is not available unless Ambient Light Sensor is too high, the picture may be used to change each of brightness. Adjusts the intensity of the picture. When this setting is set to distinguish details. Adjusts the white level of the picture colors. Adjusts the hue of the picture. From the Picture Settings menu, use the Arrow buttons on page 17. Adjusts the black...
... digitizing of the picture to compensate for watching film. This option is not available unless Ambient Light Sensor is too high, the picture may be used to change each of brightness. Adjusts the intensity of the picture. When this setting is set to distinguish details. Adjusts the white level of the picture colors. Adjusts the hue of the picture. From the Picture Settings menu, use the Arrow buttons on page 17. Adjusts the black...

E320-A0 User Manual
Page 25
.../Right Arrow to change the setting: • Auto Adjust - Press the EXIT button on the remote to highlight Size & Position, then press OK. Use the Arrow buttons to highlight the setting you want to RESET Picture Settings to the factory default settings: 1. Position - The Size & Position menu is displayed. 3. The on the remote to highlight Reset Picture Mode, then press OK. Use the Arrow buttons on -screen menu is set to optimal size and position. (RGB input only.) • Horiz...
.../Right Arrow to change the setting: • Auto Adjust - Press the EXIT button on the remote to highlight Size & Position, then press OK. Use the Arrow buttons to highlight the setting you want to RESET Picture Settings to the factory default settings: 1. Position - The Size & Position menu is displayed. 3. The on the remote to highlight Reset Picture Mode, then press OK. Use the Arrow buttons on -screen menu is set to optimal size and position. (RGB input only.) • Horiz...

E320-A0 User Manual
Page 26
... advanced audio settings: 1. From the Audio Settings Menu, use the Arrow buttons to television commercials or channel changes. Select Variable to control the external speakers' volume from the TV's volume controls, or select Fixed to a home theater audio system. When you wish to adjust, then press Left/Right Arrow to change the setting: • Digital Audio Out Changes the type of processing for the analog RCA (red/white) connectors when connected to the factory defaults. The Advanced Audio menu is a feature-rich surround sound...
... advanced audio settings: 1. From the Audio Settings Menu, use the Arrow buttons to television commercials or channel changes. Select Variable to control the external speakers' volume from the TV's volume controls, or select Fixed to a home theater audio system. When you wish to adjust, then press Left/Right Arrow to change the setting: • Digital Audio Out Changes the type of processing for the analog RCA (red/white) connectors when connected to the factory defaults. The Advanced Audio menu is a feature-rich surround sound...

E320-A0 User Manual
Page 28
... free-to the RF input, such as an external antenna or cable TV connection, you must scan for Channels Before the TV can do this by using a device that is connected to -air broadcast television channels are adding: Analog/Digital, Analog, or Digital. 3. Highlight Start and press OK. Use the Arrow buttons on the remote to enter the channel.) 4. From the Tuner Settings menu, highlight Auto Channel Scan. The auto channel scan begins. 2. Highlight Done and press OK. 3. Highlight Scan Mode...
... free-to the RF input, such as an external antenna or cable TV connection, you must scan for Channels Before the TV can do this by using a device that is connected to -air broadcast television channels are adding: Analog/Digital, Analog, or Digital. 3. Highlight Start and press OK. Use the Arrow buttons on the remote to enter the channel.) 4. From the Tuner Settings menu, highlight Auto Channel Scan. The auto channel scan begins. 2. Highlight Done and press OK. 3. Highlight Scan Mode...
E320-A0 User Manual
Page 34
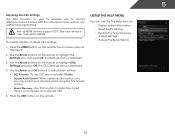
...; Reset the TV settings • Restore the TV to control HDMI-connected devices with the included remote without any additional programming. Using the Help Menu You can control your device's audio using the TV's remote control. • Device Discovery - Use the Arrow and OK buttons to highlight CEC Settings and press OK. Not all HDMI devices support CEC. When system audio control is on, you can use CEC, you to its factory default settings • Access the Setup...
...; Reset the TV settings • Restore the TV to control HDMI-connected devices with the included remote without any additional programming. Using the Help Menu You can control your device's audio using the TV's remote control. • Device Discovery - Use the Arrow and OK buttons to highlight CEC Settings and press OK. Not all HDMI devices support CEC. When system audio control is on, you can use CEC, you to its factory default settings • Access the Setup...
E320-A0 User Manual
Page 41
... Resetting the Picture Settings on page 19 • Press the INPUT button on page 19 • Check all devices are connected correctly. Ensure your device's user manual for the best signal. A The TV displays "No Signal." • Press the INPUT button on the remote control to select a different input source. • If you are using cable TV, satellite, or antenna connected directly to the TV, scan for Channels on page 22 There is no power...
... Resetting the Picture Settings on page 19 • Press the INPUT button on page 19 • Check all devices are connected correctly. Ensure your device's user manual for the best signal. A The TV displays "No Signal." • Press the INPUT button on the remote control to select a different input source. • If you are using cable TV, satellite, or antenna connected directly to the TV, scan for Channels on page 22 There is no power...

E320-A0 User Manual
Page 42
... input, press the WIDE button on the remote to change input source, the display image changes size. • The TV remembers the viewing mode on page 14. 36 When I see "noise" or static on the screen. • When your antenna is not good. • For the best image quality, view high-definition programs using an extremely high level of the channel may be noticable. • Use the Volume Up/Down buttons...
... input, press the WIDE button on the remote to change input source, the display image changes size. • The TV remembers the viewing mode on page 14. 36 When I see "noise" or static on the screen. • When your antenna is not good. • For the best image quality, view high-definition programs using an extremely high level of the channel may be noticable. • Use the Volume Up/Down buttons...
E320-A0 User Manual
Page 43
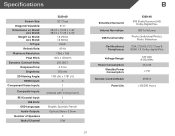
Specifications Screen Size: Diagonal Viewable: Dimensions w/ Stand: w/o Stand: Weight w/ Stand: w/o Stand: TV Type: Refresh Rate: Maximum Resolution: Pixel Pitch: Dynamic Contrast Ratio: Response Time: Brightness: 2D Viewing Angle: HDMI Inputs: Component Video Inputs: Composite Inputs: RF/Coaxial Input: USB Ports: OSD Language: Audio Outputs: Number of Speakers Watts/Channel E320-A0 32" Class 31.5" 28.74 x 19.25 x 7.46" 28.74 x 17.25 x 3.34" 13.49 lbs 12.50 lbs DLED 60 Hz 1366 x 768 .510 x ....
Specifications Screen Size: Diagonal Viewable: Dimensions w/ Stand: w/o Stand: Weight w/ Stand: w/o Stand: TV Type: Refresh Rate: Maximum Resolution: Pixel Pitch: Dynamic Contrast Ratio: Response Time: Brightness: 2D Viewing Angle: HDMI Inputs: Component Video Inputs: Composite Inputs: RF/Coaxial Input: USB Ports: OSD Language: Audio Outputs: Number of Speakers Watts/Channel E320-A0 32" Class 31.5" 28.74 x 19.25 x 7.46" 28.74 x 17.25 x 3.34" 13.49 lbs 12.50 lbs DLED 60 Hz 1366 x 768 .510 x ....
E320-A0 User Manual
Page 44
... degree of protection.VIZIO Technical Support will cover return shipping to the VIZIO service center. Limited Warranty C ON PARTS AND LABOR Covers units purchased as installation and set-up issues or any type of customer misuse, modifications or adjustments, as well as new in United States and Puerto Rico Only. If this Limited Warranty. VIZIO provides a warranty to your personal information,VIZIO recommends that a Product...
... degree of protection.VIZIO Technical Support will cover return shipping to the VIZIO service center. Limited Warranty C ON PARTS AND LABOR Covers units purchased as installation and set-up issues or any type of customer misuse, modifications or adjustments, as well as new in United States and Puerto Rico Only. If this Limited Warranty. VIZIO provides a warranty to your personal information,VIZIO recommends that a Product...

E320-A0 Quick Start Guide
Page 2
... the power cord may compromise the integrity of electric shock or component damage, switch off the power before connecting other components to your TV. • Read these instructions. • Keep these instructions. • Heed all warnings. • Follow all instructions. • Do not use attachments/accessories specified by the manufacturer. • Use only with the cart, stand, tripod, bracket, or table specified by qualified service personnel...
... the power cord may compromise the integrity of electric shock or component damage, switch off the power before connecting other components to your TV. • Read these instructions. • Keep these instructions. • Heed all warnings. • Follow all instructions. • Do not use attachments/accessories specified by the manufacturer. • Use only with the cart, stand, tripod, bracket, or table specified by qualified service personnel...

E320-A0 Quick Start Guide
Page 4
DOWNLOAD THE FULL USER MANUAL AT VIZIO.COM/SUPPORT PACKAGE CONTENTS VIZIO LED HDTV with Stand Power Cord Hex Wrench Remote Control with Batteries This Quick Start Guide 4 x Hex Screws HELP VIZIO REDUCE PAPER WASTE.
DOWNLOAD THE FULL USER MANUAL AT VIZIO.COM/SUPPORT PACKAGE CONTENTS VIZIO LED HDTV with Stand Power Cord Hex Wrench Remote Control with Batteries This Quick Start Guide 4 x Hex Screws HELP VIZIO REDUCE PAPER WASTE.

E320-A0 Quick Start Guide
Page 14
... cords listed below for any interference received, including interference that some TV channels add black bars to which can radiate radio frequency energy, and if not installed and used in a residential installation. There are black bars on the remote and select the input to the picture. These limits are turned on. • Press the INPUT button on the top/bottom/sides of the FCC Rules. Operation...
... cords listed below for any interference received, including interference that some TV channels add black bars to which can radiate radio frequency energy, and if not installed and used in a residential installation. There are black bars on the remote and select the input to the picture. These limits are turned on. • Press the INPUT button on the top/bottom/sides of the FCC Rules. Operation...
E320-A0 Quick Start Guide
Page 15
... tear, improper operation, improper voltage supply or power surges, signal issues, damages from warranty service or replacement, whichever is greater. ANY IMPLIED WARRANTIES, INCLUDING ANY IMPLIED WARRANTY OF MERCHANTABILITY AND FITNESS FOR A PARTICULAR PURPOSE, SHALL BE LIMITED IN DURATION TO THE PERIOD OF TIME SET FORTH ABOVE. In order to protect your product will be sent to a VIZIO service center to obtain warranty service. PRE-AUTHORIZATION...
... tear, improper operation, improper voltage supply or power surges, signal issues, damages from warranty service or replacement, whichever is greater. ANY IMPLIED WARRANTIES, INCLUDING ANY IMPLIED WARRANTY OF MERCHANTABILITY AND FITNESS FOR A PARTICULAR PURPOSE, SHALL BE LIMITED IN DURATION TO THE PERIOD OF TIME SET FORTH ABOVE. In order to protect your product will be sent to a VIZIO service center to obtain warranty service. PRE-AUTHORIZATION...


