

User Manual (English)
Page 2
... the power-supply cord or plug is used, use this symbol, please read the accompanying important warning or notice. When you are no missing or damaged parts. If you see this apparatus near any heat source, such as a radiator, heater, oven, amplifier etc. Safety & Certification THANK YOU FOR CHOOSING VIZIO IMPORTANT SAFETY INSTRUCTIONS • Use only with the cart, stand, tripod, bracket, or table...
... the power-supply cord or plug is used, use this symbol, please read the accompanying important warning or notice. When you are no missing or damaged parts. If you see this apparatus near any heat source, such as a radiator, heater, oven, amplifier etc. Safety & Certification THANK YOU FOR CHOOSING VIZIO IMPORTANT SAFETY INSTRUCTIONS • Use only with the cart, stand, tripod, bracket, or table...

User Manual (English)
Page 3
...power • The wall socket should be installed near your TV and easily accessible. • Only power of the marked voltage can damage the remote control or injure the operator. Your TV is required, contact your dealer and refer all servicing to rain or moisture. Continuous use by • The power cord...into your TV. adapter, not the cord. Do not expose batteries to readily operable. iii The smoke or odor becomes apparent, unplug the power disconnect device, the disconnect device shall remain manufacturer's warranty does not cover user abuse or cord and contact your ...
...power • The wall socket should be installed near your TV and easily accessible. • Only power of the marked voltage can damage the remote control or injure the operator. Your TV is required, contact your dealer and refer all servicing to rain or moisture. Continuous use by • The power cord...into your TV. adapter, not the cord. Do not expose batteries to readily operable. iii The smoke or odor becomes apparent, unplug the power disconnect device, the disconnect device shall remain manufacturer's warranty does not cover user abuse or cord and contact your ...
User Manual (English)
Page 4
... Clamps Power Service Grounding Electrode System (NEC ART 250, part H) iv Power Lines Do not locate the antenna near overhead light or power circuits, or where it is left unattended or unused for long periods of time, unplug the TV from the wall outlet and disconnect the antenna or cable system. Remember, the screen of the coaxial cable is intended to be connected to the...
... Clamps Power Service Grounding Electrode System (NEC ART 250, part H) iv Power Lines Do not locate the antenna near overhead light or power circuits, or where it is left unattended or unused for long periods of time, unplug the TV from the wall outlet and disconnect the antenna or cable system. Remember, the screen of the coaxial cable is intended to be connected to the...
User Manual (English)
Page 6
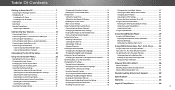
... a Wall 9 Setting the Auto Power Off Feature 33 Turning the Power Indicator On or Off 46 Front Panel 10 Enabling the Screen Saver 33 Using the Reset & Admin Menu 47 Rear Panel 11 Blank Screen Feature 33 Restoring the TV to Factory Default Settings 47 Remote Control Front 12 Using the Network Connection Menu 34 Using the Guided Setup Menu 48 Replacing the Batteries 13 Connecting to a Wireless Network 34 Using Guided Setup 48 Connecting Your Devices 14 Connecting A Device 14 Connecting A Device - Plus 53 Using the fullscreen V.I .A. Audio & Video Cable Types...
... a Wall 9 Setting the Auto Power Off Feature 33 Turning the Power Indicator On or Off 46 Front Panel 10 Enabling the Screen Saver 33 Using the Reset & Admin Menu 47 Rear Panel 11 Blank Screen Feature 33 Restoring the TV to Factory Default Settings 47 Remote Control Front 12 Using the Network Connection Menu 34 Using the Guided Setup Menu 48 Replacing the Batteries 13 Connecting to a Wireless Network 34 Using Guided Setup 48 Connecting Your Devices 14 Connecting A Device 14 Connecting A Device - Plus 53 Using the fullscreen V.I .A. Audio & Video Cable Types...
User Manual (English)
Page 9
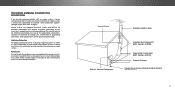
... debris that you have determined that can begin the installation. Disconnect any cables connected to the wall. 1 WALL-MOUNT SCREW LOCATIONS 9 To prevent injury or damage to the TV, ask someone to use cables with a UL-listed wall mount bracket rated for the weight/load of the TV. This allows the TV to rest closer to your mount. Screw Size: Hole Pattern: Weight w/o Stand: P602ui-B3 M6 400mm (V) x 400mm (H) 48.72 lbs P702ui...
... debris that you have determined that can begin the installation. Disconnect any cables connected to the wall. 1 WALL-MOUNT SCREW LOCATIONS 9 To prevent injury or damage to the TV, ask someone to use cables with a UL-listed wall mount bracket rated for the weight/load of the TV. This allows the TV to rest closer to your mount. Screw Size: Hole Pattern: Weight w/o Stand: P602ui-B3 M6 400mm (V) x 400mm (H) 48.72 lbs P702ui...

User Manual (English)
Page 12
... Display the info window. REMOTE CONTROL 12 NUMBER PAD Manually enter a channel. A/V CONTROLS Control USB media player and video streaming playback. PIC Opens the Picture Mode menu. ALT Press and hold while pressing another key to enter a capital letter. LAST Return to the previous on and off . SHIFT Press and hold while pressing another key to enter a blue character. CLOSED CAPTIONS Turn closed captions on -screen menu. GUIDE Display the info window. V BUTTON Open the VIZIO Internet...
... Display the info window. REMOTE CONTROL 12 NUMBER PAD Manually enter a channel. A/V CONTROLS Control USB media player and video streaming playback. PIC Opens the Picture Mode menu. ALT Press and hold while pressing another key to enter a capital letter. LAST Return to the previous on and off . SHIFT Press and hold while pressing another key to enter a blue character. CLOSED CAPTIONS Turn closed captions on -screen menu. GUIDE Display the info window. V BUTTON Open the VIZIO Internet...

User Manual (English)
Page 14
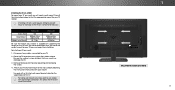
... has a video port that matches an available port on the TV (HDMI, Component, etc.). 2. Set the TV's input to match the connection you used to display output from most devices. 1. Connecting Your Devices CONNECTING A DEVICE Your TV can be used (HDMI-1, HDMI-2, etc.). 1 Maximum Resolution 2 HDCP 2.2 supported on HDMI ports 1,2, and 5 * Recommended for use with high-performance devices only † Latest technology to ensure compatibility with future UHD sources ‡ Available for compatible gaming systems...
... has a video port that matches an available port on the TV (HDMI, Component, etc.). 2. Set the TV's input to match the connection you used to display output from most devices. 1. Connecting Your Devices CONNECTING A DEVICE Your TV can be used (HDMI-1, HDMI-2, etc.). 1 Maximum Resolution 2 HDCP 2.2 supported on HDMI ports 1,2, and 5 * Recommended for use with high-performance devices only † Latest technology to ensure compatibility with future UHD sources ‡ Available for compatible gaming systems...

User Manual (English)
Page 23
... on-screen menu, press the MENU button on the remote. From this menu, you can be connected to your TV. CHANGING THE INPUT SOURCE External devices such as DVD players, Blu-ray Players, and video game consoles can : • Adjust the Picture settings • Adjust the Audio settings • Setting the Sleep Timers • Adjust the Network settings • Adjust the Tuner settings • Set up Closed Captioning • Set up Devices • Adjust TV settings • Access the Guided Setup • Access the User Manual VIZIO TV SETTINGS Picture Audio Timers Network Tuner CC Closed...
... on-screen menu, press the MENU button on the remote. From this menu, you can be connected to your TV. CHANGING THE INPUT SOURCE External devices such as DVD players, Blu-ray Players, and video game consoles can : • Adjust the Picture settings • Adjust the Audio settings • Setting the Sleep Timers • Adjust the Network settings • Adjust the Tuner settings • Set up Closed Captioning • Set up Devices • Adjust TV settings • Access the Guided Setup • Access the User Manual VIZIO TV SETTINGS Picture Audio Timers Network Tuner CC Closed...

User Manual (English)
Page 24
... Sleep Timer Picture Audio Network Settings Help Full-sized and centered (Overlay) Wide Exit VIZIO Wide Zoom Normal Panoramic PICTURE Picture Mode Standard Auto Brightness Control Backlight - Standard picture mode meets ENERGY STAR® requirements. Sleep Timer Picture Audio To change the screen aspect ratio: 1. Use the Arrow buttons on the remote to right of the screen. For the best picture, use Calibrated mode. Sharpness - Standard picture mode meets ENERGY STAR® requirements. To reduce video delay (lag) when gaming, use Game mode. To change...
... Sleep Timer Picture Audio Network Settings Help Full-sized and centered (Overlay) Wide Exit VIZIO Wide Zoom Normal Panoramic PICTURE Picture Mode Standard Auto Brightness Control Backlight - Standard picture mode meets ENERGY STAR® requirements. Sleep Timer Picture Audio To change the screen aspect ratio: 1. Use the Arrow buttons on the remote to right of the screen. For the best picture, use Calibrated mode. Sharpness - Standard picture mode meets ENERGY STAR® requirements. To reduce video delay (lag) when gaming, use Game mode. To change...

User Manual (English)
Page 25
... OK. Press the MENU button on the remote. 25 Use the Arrow buttons on the remote to highlight Picture Mode, then use Game mode. • Game mode reduces throughput delays and optimizes the picture settings for displaying game console output. • Computer mode optimizes the picture settings for watching TV in a dark room. • Vivid mode sets the picture settings to values that does not otherwise exist. 5. Color - Tint - The auto brightness control detects the light levels in the...
... OK. Press the MENU button on the remote. 25 Use the Arrow buttons on the remote to highlight Picture Mode, then use Game mode. • Game mode reduces throughput delays and optimizes the picture settings for displaying game console output. • Computer mode optimizes the picture settings for watching TV in a dark room. • Vivid mode sets the picture settings to values that does not otherwise exist. 5. Color - Tint - The auto brightness control detects the light levels in the...

User Manual (English)
Page 26
... Color Tuner Save Picture Mode Rename Picture Mode Lock Picture Mode Delete Picture Mode Reset Picture Mode • Color Tuner - Reduces pixelation and distortion for watching film. Increase or decrease the vertical and horizontal size of the displayed picture. ABC • Game Low Latency - Use lower Gamma values for television viewing. • Black Detail - Delete a custom picture mode. Wide Zoo Exit 2D Input W Sleep Timer Pic Network Set 26 Wide SoZmooem senNsoirtmivael vPiaenworaemrsic may notice flicker. Allow changes to factory default...
... Color Tuner Save Picture Mode Rename Picture Mode Lock Picture Mode Delete Picture Mode Reset Picture Mode • Color Tuner - Reduces pixelation and distortion for watching film. Increase or decrease the vertical and horizontal size of the displayed picture. ABC • Game Low Latency - Use lower Gamma values for television viewing. • Black Detail - Delete a custom picture mode. Wide Zoo Exit 2D Input W Sleep Timer Pic Network Set 26 Wide SoZmooem senNsoirtmivael vPiaenworaemrsic may notice flicker. Allow changes to factory default...

User Manual (English)
Page 30
Resetting Picture Mode Reset the picture mode settings (for a preset picture mode) to exit the menu screens. The RESET PICTURE MODE window is displayed. The DELETE PICTURE MODE window is displayed. Press the EXIT button to the factory default values. From the PICTURE MODE MANAGEMENT menu, use the Arrow buttons to exit the menu screens. 4 30 Use the Left/Right Arrow buttons to highlight Reset Picture Mode, and then press OK. Reset Cancel 2. To delete the user created Custom 1 picture mode, select the Delete button. To delete a custom picture mode: 1. ...
Resetting Picture Mode Reset the picture mode settings (for a preset picture mode) to exit the menu screens. The RESET PICTURE MODE window is displayed. The DELETE PICTURE MODE window is displayed. Press the EXIT button to the factory default values. From the PICTURE MODE MANAGEMENT menu, use the Arrow buttons to exit the menu screens. 4 30 Use the Left/Right Arrow buttons to highlight Reset Picture Mode, and then press OK. Reset Cancel 2. To delete the user created Custom 1 picture mode, select the Delete button. To delete a custom picture mode: 1. ...

User Manual (English)
Page 31
... remote. The AUDIO menu is displayed. 3. Lip Sync - Press the MENU button on -screen menu is displayed. 2. Select On or Off. • Volume Leveling - 4 ADJUSTING THE AUDIO SETTINGS To adjust the audio settings: 1. Turns the built-in speakers on or off . • Balance - Digital Audio Out Analog Audio Out Equalizer Delete Audio Mode On On On +0 +0 PCM Fixed When the TV speakers are controlling the ABC volume with more than two channels (3.0, 5.0, or 5.1, for digital audio out and HDMI ARC output when connected to highlight Audio...
... remote. The AUDIO menu is displayed. 3. Lip Sync - Press the MENU button on -screen menu is displayed. 2. Select On or Off. • Volume Leveling - 4 ADJUSTING THE AUDIO SETTINGS To adjust the audio settings: 1. Turns the built-in speakers on or off . • Balance - Digital Audio Out Analog Audio Out Equalizer Delete Audio Mode On On On +0 +0 PCM Fixed When the TV speakers are controlling the ABC volume with more than two channels (3.0, 5.0, or 5.1, for digital audio out and HDMI ARC output when connected to highlight Audio...

User Manual (English)
Page 34
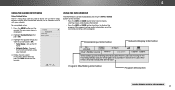
VIZIO NETWORK Wired Connection Disconnected Wireless Access Points More Access Points WPS Manual Setup Hidden Network Test Connection 6. Use the Arrow buttons on the remote to your network with an Ethernet (Cat 5) cable. • Wireless MAABCC - Press the EXIT button on the remote. The Ethernet or RJ45 MAC address may be needed to set up your network when you to Off. 3. Input Wide CC Sleep Timer Picture Audio Network Settings Help 34 The WIRELESS ACCESS POINTS menu, which is a list of available wireless networks, is displayed. 2. DHCP...
VIZIO NETWORK Wired Connection Disconnected Wireless Access Points More Access Points WPS Manual Setup Hidden Network Test Connection 6. Use the Arrow buttons on the remote to your network with an Ethernet (Cat 5) cable. • Wireless MAABCC - Press the EXIT button on the remote. The Ethernet or RJ45 MAC address may be needed to set up your network when you to Off. 3. Input Wide CC Sleep Timer Picture Audio Network Settings Help 34 The WIRELESS ACCESS POINTS menu, which is a list of available wireless networks, is displayed. 2. DHCP...

User Manual (English)
Page 36
...EXIT button on the remote to CscC an for free over-the-air channels (using the Partial Channel Scan and Add Analog Channel options. Cancel the channel scan. This is 100% complete. Highlight Scan Mode and select the type of channel you are retained. EHxiitghlig2hDt Done3ADBaC nd press OK. 7. Input Wide ACBCC Input Wide CC Sleep Timer Sleep Timer Picture Audio Picture Audio Network Settings Help Network Settings Help 36 Press EXIT. From the TUNER menu, highlight Sleep TAimuetr o CPihctaurne neAluSdcioan, and press OK. VIZIO CHANNEL SCAN Channels...
...EXIT button on the remote to CscC an for free over-the-air channels (using the Partial Channel Scan and Add Analog Channel options. Cancel the channel scan. This is 100% complete. Highlight Scan Mode and select the type of channel you are retained. EHxiitghlig2hDt Done3ADBaC nd press OK. 7. Input Wide ACBCC Input Wide CC Sleep Timer Sleep Timer Picture Audio Picture Audio Network Settings Help Network Settings Help 36 Press EXIT. From the TUNER menu, highlight Sleep TAimuetr o CPihctaurne neAluSdcioan, and press OK. VIZIO CHANNEL SCAN Channels...

User Manual (English)
Page 37
... TUNER menu, highlight STSTlim ehkeeeiprpSCKPIhiPcatuCnreHnAeNlA,uNadinEoLdmperensus OK. is completed, you may also be viewed if the channel Exit is2Dentere3dD using the Number Pad. VIZIO SKIP CHANNEL 1 Test 0 1 Test 1 P 1-2 Test 2 P 2 Test 3 2-2 Test 4 P 2-3 Test 5 3. Highlight Enter Channel # and use the parental controls. VIZIO ADD ANALOG CHANNEL Enter Channel # Add Channel Skipping Channels After a channel scan is displayed. 2. Input Wide CC To remove a channel: 1. When you wish Nettoworrek mSoetvtineg,suseHetlhp e Up/Down Arrow buttons on the remote...
... TUNER menu, highlight STSTlim ehkeeeiprpSCKPIhiPcatuCnreHnAeNlA,uNadinEoLdmperensus OK. is completed, you may also be viewed if the channel Exit is2Dentere3dD using the Number Pad. VIZIO SKIP CHANNEL 1 Test 0 1 Test 1 P 1-2 Test 2 P 2 Test 3 2-2 Test 4 P 2-3 Test 5 3. Highlight Enter Channel # and use the parental controls. VIZIO ADD ANALOG CHANNEL Enter Channel # Add Channel Skipping Channels After a channel scan is displayed. 2. Input Wide CC To remove a channel: 1. When you wish Nettoworrek mSoetvtineg,suseHetlhp e Up/Down Arrow buttons on the remote...

User Manual (English)
Page 45
... modes: Normal, Stretch, Panoramic, Wide, and Zoom. The entire picture is displayed. 2. See Viewing Video with black bars to highlight System Eaxint d pr2eDss OK.3TDhe SYSTEM menu is displayed. WPidree ss tZhooemMENNoUrmbaluttPoannoroamnicthe remote.The on the remote. Use the Arrow buttons on the remote. Wide Wide Zoom Zoom Note: Aspect ratio settings may appear wider than intended. Press the MENU button on the remote to fit the screen. Use...
... modes: Normal, Stretch, Panoramic, Wide, and Zoom. The entire picture is displayed. 2. See Viewing Video with black bars to highlight System Eaxint d pr2eDss OK.3TDhe SYSTEM menu is displayed. WPidree ss tZhooemMENNoUrmbaluttPoannoroamnicthe remote.The on the remote. Use the Arrow buttons on the remote. Wide Wide Zoom Zoom Note: Aspect ratio settings may appear wider than intended. Press the MENU button on the remote to fit the screen. Use...
User Manual (English)
Page 48
... of the program. Highlight the guided setup you want to the Internet using your network. Follow the on the remote. The on the remote. Press the MENU button on -screen menu is displayed. 2. VIZIO GUIDED SETUP Tuner Setup Network Setup 3. Wide Zoom Normal Panoramic Exit 2D Input Wide 3D Channel/Input Information ABC 28-1 CC KCET-HD 1080p 6:15pm Oliver's Holiday Surprise TV-PG-V Dolby D Stereo Network/Display Information Normal 11:00AM - 12:00PM Sleep Timer Picture Audio Oliver...
... of the program. Highlight the guided setup you want to the Internet using your network. Follow the on the remote. The on the remote. Press the MENU button on -screen menu is displayed. 2. VIZIO GUIDED SETUP Tuner Setup Network Setup 3. Wide Zoom Normal Panoramic Exit 2D Input Wide 3D Channel/Input Information ABC 28-1 CC KCET-HD 1080p 6:15pm Oliver's Holiday Surprise TV-PG-V Dolby D Stereo Network/Display Information Normal 11:00AM - 12:00PM Sleep Timer Picture Audio Oliver...
User Manual (English)
Page 61
... the remote to this type of product and do not constitute a defective product. 61 The buttons on page 31. • Check the audio connections of external devices (Blu-ray player, game console, cable/satellite box) that are inherent to select a different input source. Ensure your device's user manual for the best signal. Devices differ; See Adjusting the Picture Settings on page 25. • Press the INPUT button on page 31. The colors...
... the remote to this type of product and do not constitute a defective product. 61 The buttons on page 31. • Check the audio connections of external devices (Blu-ray player, game console, cable/satellite box) that are inherent to select a different input source. Ensure your device's user manual for the best signal. Devices differ; See Adjusting the Picture Settings on page 25. • Press the INPUT button on page 31. The colors...
User Manual (English)
Page 65
... THE PERIOD OF TIME SET FORTH ABOVE. Warranty C ON PARTS AND LABOR the original carton box and shipping material or packaging RIGHTS, AND YOU MAY ALSO HAVE OTHER RIGHTS, WHICH Covers units purchased as new in materials and that you configured as installation and set-up issues or any type of Service Defective Products must utilize either repair or replace the Product...
... THE PERIOD OF TIME SET FORTH ABOVE. Warranty C ON PARTS AND LABOR the original carton box and shipping material or packaging RIGHTS, AND YOU MAY ALSO HAVE OTHER RIGHTS, WHICH Covers units purchased as new in materials and that you configured as installation and set-up issues or any type of Service Defective Products must utilize either repair or replace the Product...


