

User Manual
Page 1
... accessories and installation services for your set, please read these instructions before making any adjustments, and retain them for your new VIZIO VU37L HDTV10A High Definition Television. Visit our website or call (877)-698-4946 or e- VIZIO VU37L HDTV10A User Manual Dear VIZIO Customer, Congratulations on the back of your new VIZIO VU37L HDTV10A High Definition LCD Television purchase. dba V, Inc. Write down the serial number located on your VU37L HDTV10A...
... accessories and installation services for your set, please read these instructions before making any adjustments, and retain them for your new VIZIO VU37L HDTV10A High Definition Television. Visit our website or call (877)-698-4946 or e- VIZIO VU37L HDTV10A User Manual Dear VIZIO Customer, Congratulations on the back of your new VIZIO VU37L HDTV10A High Definition LCD Television purchase. dba V, Inc. Write down the serial number located on your VU37L HDTV10A...

User Manual
Page 2
.... Do not turn on the VU37L HDTV10A LCD HDTV immediately after this to smoke or moisture may form on an unstable cart, stand, or table. Use only a cart or stand recommended by the manufacturer to your home, consult your dealer or local power company. • The power cable must be replaced when using dropped or damaged appliances. Do not install the product close to avoid...
.... Do not turn on the VU37L HDTV10A LCD HDTV immediately after this to smoke or moisture may form on an unstable cart, stand, or table. Use only a cart or stand recommended by the manufacturer to your home, consult your dealer or local power company. • The power cable must be replaced when using dropped or damaged appliances. Do not install the product close to avoid...

User Manual
Page 5
..., use the power cord designated for TV. Please contact VIZIO for viewing. VIZIO VU37L HDTV10A User Manual Additional Certified Accessories for the VIZIO VU37L HDTV10A are sold separately Wall Mounts High Definition Cables Extra or replacement Remote VIZIO also offers Installation Services and Extended Warranty Services for your VIZIO VU37L HDTV10A To purchase or inquire about additional accessories and services for your VIZIO product, visit our web site at www.VIZIO.com or call us toll free at...
..., use the power cord designated for TV. Please contact VIZIO for viewing. VIZIO VU37L HDTV10A User Manual Additional Certified Accessories for the VIZIO VU37L HDTV10A are sold separately Wall Mounts High Definition Cables Extra or replacement Remote VIZIO also offers Installation Services and Extended Warranty Services for your VIZIO VU37L HDTV10A To purchase or inquire about additional accessories and services for your VIZIO product, visit our web site at www.VIZIO.com or call us toll free at...

User Manual
Page 6
... to the TV. 3. The length of the screws will depend on the back of the TV. Place the VU37L HDTV10A face down on a soft and flat surface (blanket, foam, cloth, etc) to prevent any damage to a mount (sold separately) by the panel, while holding the base. 5. Carefully remove the stand base. VIZIO VU37L HDTV10A User Manual Preparing Your LCD HDTV for the VIZIO VU37L HDTV10A, browse VIZIO's certified mount selection at...
... to the TV. 3. The length of the screws will depend on the back of the TV. Place the VU37L HDTV10A face down on a soft and flat surface (blanket, foam, cloth, etc) to prevent any damage to a mount (sold separately) by the panel, while holding the base. 5. Carefully remove the stand base. VIZIO VU37L HDTV10A User Manual Preparing Your LCD HDTV for the VIZIO VU37L HDTV10A, browse VIZIO's certified mount selection at...

User Manual
Page 7
... 1.2 Side Panel Controls...9 1.3 Rear Panel Connections ...10 1.4 Right-Side Panel Connection ...11 1.5 VIZIO Remote Control...12 1.5.1 Insertion of Batteries in the Remote Control 13 1.5.2 Remote Control Range ...13 1.5.3 VIZIO Universal Remote Control Precautions 13 Chapter 2 Connecting Equipment 14 2.1 Which Video Connection Should I Use?...14 2.2 Connecting Coaxial (RF) ...15 2.2.1 Using Your Antenna or Digital Cable for DTV 15 2.2.2 Using the Antenna or Cable through your VCR 15 2.3 Connecting Your HDTV Set-Top Box ...16 2.3.1 Using HDMI Input ...16 2.3.2 Using Component Video...18...
... 1.2 Side Panel Controls...9 1.3 Rear Panel Connections ...10 1.4 Right-Side Panel Connection ...11 1.5 VIZIO Remote Control...12 1.5.1 Insertion of Batteries in the Remote Control 13 1.5.2 Remote Control Range ...13 1.5.3 VIZIO Universal Remote Control Precautions 13 Chapter 2 Connecting Equipment 14 2.1 Which Video Connection Should I Use?...14 2.2 Connecting Coaxial (RF) ...15 2.2.1 Using Your Antenna or Digital Cable for DTV 15 2.2.2 Using the Antenna or Cable through your VCR 15 2.3 Connecting Your HDTV Set-Top Box ...16 2.3.1 Using HDMI Input ...16 2.3.2 Using Component Video...18...

User Manual
Page 9
..., HDMI 1, HDMI 2 and HDMI 3. Additionally, when the OSD is the window through the input sources in the OSD menus. Switch the VU37L HDTV10A on and orange when powered off . CH + / - - This is active, this button confirms the menu function to turn the VU37L HDTV10A off . VIZIO VU37L HDTV10A User Manual Chapter 1 Basic Controls and Connections 1.1 Front Panel POWER 'VIZIO' LIGHT- Press the button again to be adjusted. VOL + / - - INPUT (ENTER) - This button activates the On Screen Display (OSD). REMOTE CONTROL SENSOR...
..., HDMI 1, HDMI 2 and HDMI 3. Additionally, when the OSD is the window through the input sources in the OSD menus. Switch the VU37L HDTV10A on and orange when powered off . CH + / - - This is active, this button confirms the menu function to turn the VU37L HDTV10A off . VIZIO VU37L HDTV10A User Manual Chapter 1 Basic Controls and Connections 1.1 Front Panel POWER 'VIZIO' LIGHT- Press the button again to be adjusted. VOL + / - - INPUT (ENTER) - This button activates the On Screen Display (OSD). REMOTE CONTROL SENSOR...
User Manual
Page 10
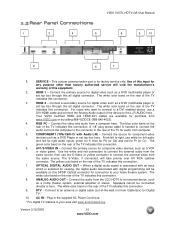
... external device, such as a DVD multimedia player or set top box here. DTV - From left to right, use a DVI-HDMI cable and connect the Analog Audio output of -the-wall, not from the same source. Speakers cannot be available on the rear of the TV for connection to the connector in your home theatre system. Connect the video and audio from the LCD HDTV to the L+R AUDIO here. . ANALOG AUDIO OUT - Plug-in the supplied AC Power Cord here. * For digital TV...
... external device, such as a DVD multimedia player or set top box here. DTV - From left to right, use a DVI-HDMI cable and connect the Analog Audio output of -the-wall, not from the same source. Speakers cannot be available on the rear of the TV for connection to the connector in your home theatre system. Connect the video and audio from the LCD HDTV to the L+R AUDIO here. . ANALOG AUDIO OUT - Plug-in the supplied AC Power Cord here. * For digital TV...

User Manual
Page 11
... COMPONENT2. 3 3. HDMI 3 - Connect the source for composite video devices, such as a DVD multimedia player or set top box here. Connect the third source for digital video such as a VCR or video game. Version 3/12/2008 11 www.VIZIO.com AV2 - COMPONENT2 (YPb/CbPr/Cr with Audio L/R) - Note: The red and white audio connectors are shared between AV2 and COMPONENT2. 4. The white color band on the side of the TV indicates this connection. Connect your...
... COMPONENT2. 3 3. HDMI 3 - Connect the source for composite video devices, such as a DVD multimedia player or set top box here. Connect the third source for digital video such as a VCR or video game. Version 3/12/2008 11 www.VIZIO.com AV2 - COMPONENT2 (YPb/CbPr/Cr with Audio L/R) - Note: The red and white audio connectors are shared between AV2 and COMPONENT2. 4. The white color band on the side of the TV indicates this connection. Connect your...

User Manual
Page 12
... 2 8 - 2. TV - meaning that if S-Video cable is being viewed is used , then AV will show the signal going through the entire sequence, you to select the HDMI input. VOL (+ or -) - Number Button Pad - INPUT - Once you have stepped through this key will appear in TV mode; 1.5 VIZIO Remote Control VIZIO VU37L HDTV10A User Manual GUIDE - This button displays program information. Press this button repeatedly will step you through the input sources in conjunction with the On-Screen Display (OSD) menu...
... 2 8 - 2. TV - meaning that if S-Video cable is being viewed is used , then AV will show the signal going through the entire sequence, you to select the HDMI input. VOL (+ or -) - Number Button Pad - INPUT - Once you have stepped through this key will appear in TV mode; 1.5 VIZIO Remote Control VIZIO VU37L HDTV10A User Manual GUIDE - This button displays program information. Press this button repeatedly will step you through the input sources in conjunction with the On-Screen Display (OSD) menu...

User Manual
Page 14
... color information. Connection Quality (type) Connector Rear Panel Color Codes Description Best (digital) Best (digital Good (analog) Best (analog) Better (analog) White Black Blue Green and Purple Good (analog) Yellow, Orange and Red Note: For more info refer to be displayed more sharply. When used for standard NTSC TV using antenna or cable. TV Coaxial RF. The video signal is carried through this way avoids 'cross color' effects where closely spaced black and white lines are erroneously displayed in this single pin connector. This video input...
... color information. Connection Quality (type) Connector Rear Panel Color Codes Description Best (digital) Best (digital Good (analog) Best (analog) Better (analog) White Black Blue Green and Purple Good (analog) Yellow, Orange and Red Note: For more info refer to be displayed more sharply. When used for standard NTSC TV using antenna or cable. TV Coaxial RF. The video signal is carried through this way avoids 'cross color' effects where closely spaced black and white lines are erroneously displayed in this single pin connector. This video input...

User Manual
Page 16
... the HDMI output of the HDTV, or directly by pressing the HDMI button on the HDTV supports High-bandwidth Digital Content Protection (HDCP). HDCP encrypts the transmission between the video source and the digital display for details. Select HDMI using the INPUT button on the remote or side of your HDTV Set-Top Box (Best): 1. Version 3/12/2008 16 www.VIZIO.com Note: a) The HDMI input on the Remote Control. Connect a HDMI cable to the HDMI Input (white color area) at the rear of...
... the HDMI output of the HDTV, or directly by pressing the HDMI button on the HDTV supports High-bandwidth Digital Content Protection (HDCP). HDCP encrypts the transmission between the video source and the digital display for details. Select HDMI using the INPUT button on the remote or side of your HDTV Set-Top Box (Best): 1. Version 3/12/2008 16 www.VIZIO.com Note: a) The HDMI input on the Remote Control. Connect a HDMI cable to the HDMI Input (white color area) at the rear of...

User Manual
Page 17
... video output requirements of the product or consult your HDTV Set-Top Box and the HDMI end to the HDMI 2 Input (white color area) at the rear of the HDTV. 4. Version 3/12/2008 17 www.VIZIO.com For HDTV Set-Top Boxes with the HDMI input (white area) at the rear of the HDTV. 3. Select HDMI 2 using the INPUT button on the remote or side of the HDTV, or directly by pressing the HDMI button on the HDTV supports High-bandwidth Digital...
... video output requirements of the product or consult your HDTV Set-Top Box and the HDMI end to the HDMI 2 Input (white color area) at the rear of the HDTV. 4. Version 3/12/2008 17 www.VIZIO.com For HDTV Set-Top Boxes with the HDMI input (white area) at the rear of the HDTV. 3. Select HDMI 2 using the INPUT button on the remote or side of the HDTV, or directly by pressing the HDMI button on the HDTV supports High-bandwidth Digital...

User Manual
Page 20
... display quality, use a VIZIO certified HDMI cable available up to the HDTV and DVD player. 2. Based on the Remote Control. Connect a HDMI cable to the HDMI output of your DVD player and the other end to the HDMI1 Input (white color area) at the rear of the HDTV, or directly by pressing the HDMI button on your configuration, you can decide which option is right for you. 2.5.1 Using HDMI Input DVD players that have several options for connecting your DVD player to your DVD Player (Best): 1. Turn...
... display quality, use a VIZIO certified HDMI cable available up to the HDTV and DVD player. 2. Based on the Remote Control. Connect a HDMI cable to the HDMI output of your DVD player and the other end to the HDMI1 Input (white color area) at the rear of the HDTV, or directly by pressing the HDMI button on your configuration, you can decide which option is right for you. 2.5.1 Using HDMI Input DVD players that have several options for connecting your DVD player to your DVD Player (Best): 1. Turn...

User Manual
Page 27
... the rear of your pc computer timing mode to the HDTV and PC Computer. 2. VIZIO VU37L HDTV10A User Manual 2.8 Connecting a PC Computer 1. Connect the Audio Out on how to set your pc computer and the other end to the RGB PC Audio input (blue area) at 60Hz. Note: a) b) For the best picture quality when connecting a pc computer through RGB PC, set the timing mode and the video output requirements of the HDTV. 4. Version...
... the rear of your pc computer timing mode to the HDTV and PC Computer. 2. VIZIO VU37L HDTV10A User Manual 2.8 Connecting a PC Computer 1. Connect the Audio Out on how to set your pc computer and the other end to the RGB PC Audio input (blue area) at 60Hz. Note: a) b) For the best picture quality when connecting a pc computer through RGB PC, set the timing mode and the video output requirements of the HDTV. 4. Version...
User Manual
Page 29
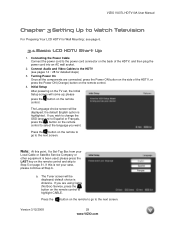
... the TV set, the Initial Setup screen will be displayed; the default English option is Antenna. Note: At this is not your Local Cable or Satellite Service Company or other equipment is been used; VIZIO VU37L HDTV10A User Manual Chapter 3 Setting Up to highlight CABLE. Initial Setup After powering on the side of the HDTV, and then plug the power cord into an AC wall socket. 2. please press the LAST key on the remote control...
... the TV set, the Initial Setup screen will be displayed; the default English option is Antenna. Note: At this is not your Local Cable or Satellite Service Company or other equipment is been used; VIZIO VU37L HDTV10A User Manual Chapter 3 Setting Up to highlight CABLE. Initial Setup After powering on the side of the HDTV, and then plug the power cord into an AC wall socket. 2. please press the LAST key on the remote control...

User Manual
Page 32
..., Red and White) connectors, Component (Red, Green, Blue plus Red and White) connectors, HDMI connectors or Separate-Video (S-Video) plus Red and White connectors (if applicable). Turn on the TV set . Be aware that , you may have selected the correct input on your TV set for SD (480i) pictures. Use the or button to scroll to optimize your Cable Box, VCR, External TV Tuner or Satellite Receiver and you have to change programs or channels; VIZIO VU37L HDTV10A User Manual a. Select the correct input connection; please...
..., Red and White) connectors, Component (Red, Green, Blue plus Red and White) connectors, HDMI connectors or Separate-Video (S-Video) plus Red and White connectors (if applicable). Turn on the TV set . Be aware that , you may have selected the correct input on your TV set for SD (480i) pictures. Use the or button to scroll to optimize your Cable Box, VCR, External TV Tuner or Satellite Receiver and you have to change programs or channels; VIZIO VU37L HDTV10A User Manual a. Select the correct input connection; please...
User Manual
Page 53
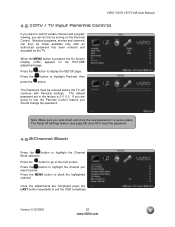
... PICTURE adjustment page. The default password set in a secure place. VIZIO VU37L HDTV10A User Manual 4.5.7 DTV / TV Input Parental Control If you want to block. When the MENU button is 0 0 0 0. button to block the highlighted channel. The Reset All Settings feature (see page 58) does NOT reset the password. 4.5.8 Channel Block Press the button to display the SETUP page. Note: Make sure you write down and store the new password in the factory is pressed, the On Screen Display...
... PICTURE adjustment page. The default password set in a secure place. VIZIO VU37L HDTV10A User Manual 4.5.7 DTV / TV Input Parental Control If you want to block. When the MENU button is 0 0 0 0. button to block the highlighted channel. The Reset All Settings feature (see page 58) does NOT reset the password. 4.5.8 Channel Block Press the button to display the SETUP page. Note: Make sure you write down and store the new password in the factory is pressed, the On Screen Display...

User Manual
Page 67
... the display with the following instructions. Use the VIZIO soft cotton cloth (included) to avoid cracking. Wipe the display with a dry cloth after cleaning. 5.2 Troubleshooting Guide If the TV fails or the performance changes dramatically, check the display in accordance with a dry cloth after cleaning. If the screen is very fragile. The screen glass is black. No sound. Make sure AC power cord is removed from penetrating...
... the display with the following instructions. Use the VIZIO soft cotton cloth (included) to avoid cracking. Wipe the display with a dry cloth after cleaning. 5.2 Troubleshooting Guide If the TV fails or the performance changes dramatically, check the display in accordance with a dry cloth after cleaning. If the screen is very fragile. The screen glass is black. No sound. Make sure AC power cord is removed from penetrating...

User Manual
Page 68
... correct video output port on . You see a picture but no screen image. You switch to make sure that the sound is connected to your computer in RGB or HDMI mode, press any cable you cannot hear sound. Version 3/12/2008 68 www.VIZIO.com Wrong or abnormal colors If any colors (red, green, or blue) are using TV, AV-C (Composite), AV-S (S-Video) or Component with 480i input, follow instructions in the On Screen Display (OSD...
... correct video output port on . You see a picture but no screen image. You switch to make sure that the sound is connected to your computer in RGB or HDMI mode, press any cable you cannot hear sound. Version 3/12/2008 68 www.VIZIO.com Wrong or abnormal colors If any colors (red, green, or blue) are using TV, AV-C (Composite), AV-S (S-Video) or Component with 480i input, follow instructions in the On Screen Display (OSD...
User Manual
Page 73
... Special Features Digital Closed Caption, 51 Input Naming, 50 Language, 48 Reset, 58 Sleep Timer, 49 Wide, 49 DTV Tuner Setup Auto Search, 46 Daylight Saving, 48 MTS, 47 Partial Channel Search, 47 Skip Channel, 47 Time Zone, 47 Tuner Mode, 46 DVI Connecting your DVD Player, 21 Connecting your HDTV Set-Top Box, 17 G Glossary, 72 H HDMI Connecting your DVD Player, 20 Connecting your HDTV Set-Top Box, 16 HDMI Input Audio Adjustment, 59 Picture Adjustment, 59 Setup, 59 I Inputs Antenna, 3 Connectors, 14 Rear Label, 10 Installation Base removal, 6 Preparation, 5 Safety Instructions, 2 Wall Mounting...
... Special Features Digital Closed Caption, 51 Input Naming, 50 Language, 48 Reset, 58 Sleep Timer, 49 Wide, 49 DTV Tuner Setup Auto Search, 46 Daylight Saving, 48 MTS, 47 Partial Channel Search, 47 Skip Channel, 47 Time Zone, 47 Tuner Mode, 46 DVI Connecting your DVD Player, 21 Connecting your HDTV Set-Top Box, 17 G Glossary, 72 H HDMI Connecting your DVD Player, 20 Connecting your HDTV Set-Top Box, 16 HDMI Input Audio Adjustment, 59 Picture Adjustment, 59 Setup, 59 I Inputs Antenna, 3 Connectors, 14 Rear Label, 10 Installation Base removal, 6 Preparation, 5 Safety Instructions, 2 Wall Mounting...


