
Owner Manual
Page 1
... flame. 3. WARNING: Follow all leak check procedures carefully in registering your fire department. THIS GAS APPLIANCE IS DESIGNED FOR OUTDOOR USE ONLY. Serial Number Please use this number in this manual prior to light this appliance without reading "Lighting" instructions section of this manual. 92725 11/98 Do not store spare LP Cylinder within 25 feet (8m) of this even if barbecue was dealer assembled. NOTICE TO INSTALLER...
... flame. 3. WARNING: Follow all leak check procedures carefully in registering your fire department. THIS GAS APPLIANCE IS DESIGNED FOR OUTDOOR USE ONLY. Serial Number Please use this number in this manual prior to light this appliance without reading "Lighting" instructions section of this manual. 92725 11/98 Do not store spare LP Cylinder within 25 feet (8m) of this even if barbecue was dealer assembled. NOTICE TO INSTALLER...
Owner Manual
Page 2
... Weber Gas Barbecue should exercise reasonable care when operating your Weber Gas Barbecue. Get away from the LP tank: 1. It will void your fire department. 2 ƽDANGER Failure to follow the assembly instructions in this manual. ƽ After a period of natural gas in an LP unit or LP gas in a natural gas unit is dangerous and will be hot during operation, turn off all gas valves off. The conversion or attempted use an LP tank with your Weber Gas Barbecue...
... Weber Gas Barbecue should exercise reasonable care when operating your Weber Gas Barbecue. Get away from the LP tank: 1. It will void your fire department. 2 ƽDANGER Failure to follow the assembly instructions in this manual. ƽ After a period of natural gas in an LP unit or LP gas in a natural gas unit is dangerous and will be hot during operation, turn off all gas valves off. The conversion or attempted use an LP tank with your Weber Gas Barbecue...

Owner Manual
Page 3
... this Weber Gas Barbecue that it will be free of defects in material and workmanship from the date of purchase as follows: Aluminum Castings, 10 years, Recycled Work Surfaces, 10 years Cooking Grates, 3 years, Flavorizer Bars, 5 years, All Remaining Parts, 5 years, when assembled and operated in accordance with the printed instructions accompanying it any other express warrants except as set...
... this Weber Gas Barbecue that it will be free of defects in material and workmanship from the date of purchase as follows: Aluminum Castings, 10 years, Recycled Work Surfaces, 10 years Cooking Grates, 3 years, Flavorizer Bars, 5 years, All Remaining Parts, 5 years, when assembled and operated in accordance with the printed instructions accompanying it any other express warrants except as set...
Owner Manual
Page 5
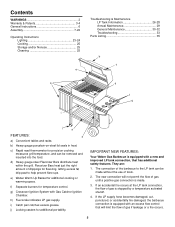
... Instructions 6 Assembly 7-22 Operating Instructions Lighting 23-24 Cooking 25 Storage and/or Nonuse 25 Cleaning 25 e Troubleshooting & Maintenance LP Tank Information 26-28 Annual Maintenance 29 General Maintenance 30-32 Troubleshooting 33 Parts Listing 35 b c a i d f g j a FEATURES: h a) Convenient tables and racks. f) Separate burners for additional cooking or warming space. g) Crossover Ignition System with Gas Catcher Ignition Chamber. i) Catch pan catches excess grease. b) Heavy gauge porcelain-on-steel lid...
... Instructions 6 Assembly 7-22 Operating Instructions Lighting 23-24 Cooking 25 Storage and/or Nonuse 25 Cleaning 25 e Troubleshooting & Maintenance LP Tank Information 26-28 Annual Maintenance 29 General Maintenance 30-32 Troubleshooting 33 Parts Listing 35 b c a i d f g j a FEATURES: h a) Convenient tables and racks. f) Separate burners for additional cooking or warming space. g) Crossover Ignition System with Gas Catcher Ignition Chamber. i) Catch pan catches excess grease. b) Heavy gauge porcelain-on-steel lid...
Owner Manual
Page 6
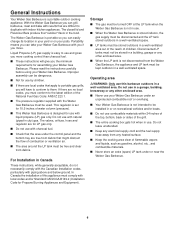
... the control panel and the bottom tray are no local codes, you move. Please read the instructions carefully before using your Weber Gas Barbecue with the Weber Gas Barbecue must be used. Improper assembly can take your Weber Gas Barbecue. s Not for LP gas only. s The pressure regulator supplied with you if you must conform to be installed in the food. This regulator is designed for 10.5 inches of the grill. s This Weber Gas Barbecue is set for use...
... the control panel and the bottom tray are no local codes, you move. Please read the instructions carefully before using your Weber Gas Barbecue with the Weber Gas Barbecue must be used. Improper assembly can take your Weber Gas Barbecue. s Not for LP gas only. s The pressure regulator supplied with you if you must conform to be installed in the food. This regulator is designed for 10.5 inches of the grill. s This Weber Gas Barbecue is set for use...

Owner Manual
Page 7
... threads to the inch, 2 inches long. Call the Weber Customer Service Center toll free 1-800-446-1071 to our products, unfortunately an occasional error may occur. LP tank filler adapter Bottom tray Two cooking grates Control panel 7 On a small screw for example, "6-32 x 1/2 inch screw" means a number 6 screw, with 20 threads to the inch, 1/2 inch long. Have your owner's manual and serial number of wood LP tank Supplies needed Regular...
... threads to the inch, 2 inches long. Call the Weber Customer Service Center toll free 1-800-446-1071 to our products, unfortunately an occasional error may occur. LP tank filler adapter Bottom tray Two cooking grates Control panel 7 On a small screw for example, "6-32 x 1/2 inch screw" means a number 6 screw, with 20 threads to the inch, 1/2 inch long. Have your owner's manual and serial number of wood LP tank Supplies needed Regular...
Owner Manual
Page 13
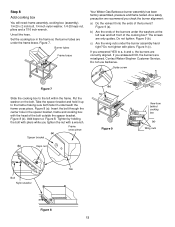
Set the cooking box in the spacer bracket, frame and cooking box with pliers. Burner tubes Frame brace Your Weber Gas Barbecue burner assembly has been factory assembled, pressure and flame tested. Do not tighten with the head of the cooking box? Contact Weber-Stephen Customer Service. Take the spacer bracket and hold it up to a, b and c, the burners are under the burner assembly hand tight? Figure 8. Figure 7. As...
Set the cooking box in the spacer bracket, frame and cooking box with pliers. Burner tubes Frame brace Your Weber Gas Barbecue burner assembly has been factory assembled, pressure and flame tested. Do not tighten with the head of the cooking box? Contact Weber-Stephen Customer Service. Take the spacer bracket and hold it up to a, b and c, the burners are under the burner assembly hand tight? Figure 8. Figure 7. As...
Owner Manual
Page 16
... LP tank in return. We utilize various LP tank manufacturers. Lift and hook the tank onto the fuel scale. The phone number is the metal protective ring around the valve.) One series of LP tanks, see Section "Operating Instructions". Tell your satisfaction, then call the tank manufacturer's customer service center. Other LP tanks are illustrated in an upright position. IMPROPER FILLING IS DANGEROUS. LP tank should not be removed...
... LP tank in return. We utilize various LP tank manufacturers. Lift and hook the tank onto the fuel scale. The phone number is the metal protective ring around the valve.) One series of LP tanks, see Section "Operating Instructions". Tell your satisfaction, then call the tank manufacturer's customer service center. Other LP tanks are illustrated in an upright position. IMPROPER FILLING IS DANGEROUS. LP tank should not be removed...

Owner Manual
Page 18
...retightening the fitting, turn OFF the gas. DO NOT OPERATE THE BARBECUE. Contact Weber-Stephen Customer Service. Figure 20 (d). ƽWARNING: If there is a leak. Step 17 Check for gas leaks ƽ DANGER Do not use an open tank valve by wetting the connections with the...gas leaks. To perform leak checks: open flame to check for leaks before using your barbecue was dealer or store assembled. Figure 20 (a). b) Regulator to apply it. If a leak persists after checking for leaks. ƽWARNING: Do not ignite burners when leak checking. Figure 20 (c). Contact Weber-Stephen Customer Service...
...retightening the fitting, turn OFF the gas. DO NOT OPERATE THE BARBECUE. Contact Weber-Stephen Customer Service. Figure 20 (d). ƽWARNING: If there is a leak. Step 17 Check for gas leaks ƽ DANGER Do not use an open tank valve by wetting the connections with the...gas leaks. To perform leak checks: open flame to check for leaks before using your barbecue was dealer or store assembled. Figure 20 (a). b) Regulator to apply it. If a leak persists after checking for leaks. ƽWARNING: Do not ignite burners when leak checking. Figure 20 (c). Contact Weber-Stephen Customer Service...

Owner Manual
Page 21
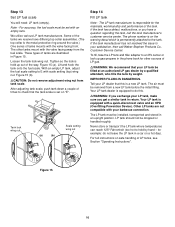
...or damaged, do not use swing table. Figure 29 (a). To fully seat the bracket, you can slide the rod all the way inside the locking tab. Push the support rod into the frame...to tap it lightly with a hammer. ƽWARNING: If swing table end bracket is hooked in the slot in the swing table end bracket. Allow the slide bar to order a new part. ƽ...barbecue Figure 29 Slot in the frame. Call our Customer Service Center to hang down. Step 22 Install swing table You will need: swing table end bracket, two 10-24 hex nuts, two 10-24 x 1 3/4 inch machine screws, slide bar assembly,...
...or damaged, do not use swing table. Figure 29 (a). To fully seat the bracket, you can slide the rod all the way inside the locking tab. Push the support rod into the frame...to tap it lightly with a hammer. ƽWARNING: If swing table end bracket is hooked in the slot in the swing table end bracket. Allow the slide bar to order a new part. ƽ...barbecue Figure 29 Slot in the frame. Call our Customer Service Center to hang down. Step 22 Install swing table You will need: swing table end bracket, two 10-24 hex nuts, two 10-24 x 1 3/4 inch machine screws, slide bar assembly,...

Owner Manual
Page 22
...slide bar assembly on the outside of barbecue Step 23 Complete accessory installation You will need: Warm-Up Basket, warming rack, work table onto the left end of the frame. Notch to the front Slide bar View from rear of the cooking box. Set the work table, accessory rack, three tubing plugs, thermometer.... To raise table, lift table up to tap them lightly with a hammer. Figure 32 (f). Figure 32 (a). Insert one end of the Weber Warm-Up Basket into the hole in the right end of the lid and the other end into its holder. Tighten nuts using a screwdriver and pliers.
...slide bar assembly on the outside of barbecue Step 23 Complete accessory installation You will need: Warm-Up Basket, warming rack, work table onto the left end of the frame. Notch to the front Slide bar View from rear of the cooking box. Set the work table, accessory rack, three tubing plugs, thermometer.... To raise table, lift table up to tap them lightly with a hammer. Figure 32 (f). Figure 32 (a). Insert one end of the Weber Warm-Up Basket into the hole in the right end of the lid and the other end into its holder. Tighten nuts using a screwdriver and pliers.
Owner Manual
Page 23
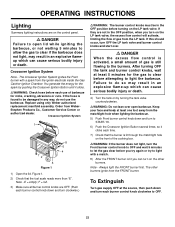
... turn the Front burner control knob to OFF and wait 5 minutes to let the gas clear before turning on the LP tank valve. OPERATING INSTRUCTIONS Lighting Summary lighting instructions are on the control panel. ƽ DANGER Failure to open lid while igniting the barbecue, or not waiting 5 minutes to allow the gas to clear if the barbecue does not light, may result in an explosive flame-up which can...
... turn the Front burner control knob to OFF and wait 5 minutes to let the gas clear before turning on the LP tank valve. OPERATING INSTRUCTIONS Lighting Summary lighting instructions are on the control panel. ƽ DANGER Failure to open lid while igniting the barbecue, or not waiting 5 minutes to allow the gas to clear if the barbecue does not light, may result in an explosive flame-up which can...
Owner Manual
Page 24
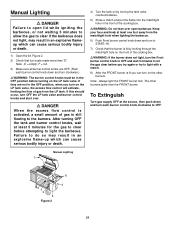
... gas supply OFF at least 5 minutes for the gas to clear before turning on the LP tank valve, the excess flow control will activate, limiting the flow of the cooking box. ƽWARNING: If the burner does not light, turn OFF the LP tank valve and burner control knobs and start over open lid while igniting the barbecue, or not waiting 5 minutes to allow the gas to light the barbecue...
... gas supply OFF at least 5 minutes for the gas to clear before turning on the LP tank valve, the excess flow control will activate, limiting the flow of the cooking box. ƽWARNING: If the burner does not light, turn OFF the LP tank valve and burner control knobs and start over open lid while igniting the barbecue, or not waiting 5 minutes to allow the gas to light the barbecue...
Owner Manual
Page 25
... box - For example, to grease build-up. 25 rate for detailed cooking instructions. s When the Weber Gas Barbecue is stored indoors, the gas supply must be kept outdoors in use oven cleaner, abrasive cleansers (kitchen cleansers) cleaners that fit the catch pan. ƽWARNING: Check the bottom tray for any debris off , and BACK at high). Disconnected LP tanks must be turned off all burners...
... box - For example, to grease build-up. 25 rate for detailed cooking instructions. s When the Weber Gas Barbecue is stored indoors, the gas supply must be kept outdoors in use oven cleaner, abrasive cleansers (kitchen cleansers) cleaners that fit the catch pan. ƽWARNING: Check the bottom tray for any debris off , and BACK at high). Disconnected LP tanks must be turned off all burners...

Owner Manual
Page 28
... and marked in low areas that your Weber Gas Barbecue have been designed and tested to do this for LP gas cylinders of dirt, grease, bugs etc. s Do not use . LP gas is released the liquid readily vaporizes and becomes gas. As the pressure is a gas at normal use a damaged LP tank. The fuel scale will last about spare LP tanks, please call Weber-Stephen Customer Service. s Replacement LP tanks supplied by weight.
... and marked in low areas that your Weber Gas Barbecue have been designed and tested to do this for LP gas cylinders of dirt, grease, bugs etc. s Do not use . LP gas is released the liquid readily vaporizes and becomes gas. As the pressure is a gas at normal use a damaged LP tank. The fuel scale will last about spare LP tanks, please call Weber-Stephen Customer Service. s Replacement LP tanks supplied by weight.

Owner Manual
Page 29
.... ƽWARNING: Check hose before each use the barbecue. Clean if necessary, following maintenance procedures for nicks, cracking, abrasions or cuts. Check that you perform the following the procedures outlined in the fit around the burners or valves. (See Section "General Maintenance".) 29 Contact Weber-Stephen Customer Service. Check: a) Hose to tank connection. Figure 7 (a). Replace using only Weber authorized replacement manifold assembly. When leak checks...
.... ƽWARNING: Check hose before each use the barbecue. Clean if necessary, following maintenance procedures for nicks, cracking, abrasions or cuts. Check that you perform the following the procedures outlined in the fit around the burners or valves. (See Section "General Maintenance".) 29 Contact Weber-Stephen Customer Service. Check: a) Hose to tank connection. Figure 7 (a). Replace using only Weber authorized replacement manifold assembly. When leak checks...

Owner Manual
Page 30
... and cool. Remove the manifold. (See Section "Replacing the main burners".) Look inside cooking box Light blue Figure 11 Dark blue Air shutter Venturi fin Figure 9 The Weber Spider Stopper Guard is to clean outside of the burner tube and the valve, thereby preventing spiders and other insects. Main Burner Cleaning Procedure Turn off the burner control knobs. Check and clean the valve orifices at least...
... and cool. Remove the manifold. (See Section "Replacing the main burners".) Look inside cooking box Light blue Figure 11 Dark blue Air shutter Venturi fin Figure 9 The Weber Spider Stopper Guard is to clean outside of the burner tube and the valve, thereby preventing spiders and other insects. Main Burner Cleaning Procedure Turn off the burner control knobs. Check and clean the valve orifices at least...

Owner Manual
Page 32
... in the fit around the burners and valves. Tighten if necessary; s Check to light, contact Weber-Stephen Customer Service. 32 If the Crossover Ignition System still fails to see if the igniter is loose in the frame. Figure 20. See Step "Install igniter" for gas leaks". White wire Check fit around valve Crossover Ignition System Operations If the Crossover Ignition System fails to the...
... in the fit around the burners and valves. Tighten if necessary; s Check to light, contact Weber-Stephen Customer Service. 32 If the Crossover Ignition System still fails to see if the igniter is loose in the frame. Figure 20. See Step "Install igniter" for gas leaks". White wire Check fit around valve Crossover Ignition System Operations If the Crossover Ignition System fails to the...

Owner Manual
Page 33
... gas in the HIGH position. The excess flow safety device, To reset the excess flow safety which is porcelain-on grease? Flames do not light. -orBurners have activated. Turn burner control knobs OFF. Refill LP tank. Clean bottom tray. Clean burners. (See Section "General Maintenance".) Inside of lid appears to be "peeling." (Resembles paint peeling.) The lid is part of the barbecue to tank...
... gas in the HIGH position. The excess flow safety device, To reset the excess flow safety which is porcelain-on grease? Flames do not light. -orBurners have activated. Turn burner control knobs OFF. Refill LP tank. Clean bottom tray. Clean burners. (See Section "General Maintenance".) Inside of lid appears to be "peeling." (Resembles paint peeling.) The lid is part of the barbecue to tank...

Owner Manual
Page 35
... Accessory trays (2) 26 Bottom tray 27 Catch pan holder 28 Catch pan 29 Drip pans (2) 30 Right Endcap 31 Thermometer 32 Thermometer Holder 33 1/4-20 keps nut 34 Cooking box (Assembly) 35 Burner control knobs (3) 36 Control panel 37 Igniter button 38 Control Panel Hardware 39 Crossover tube 40 Front and back burners (2) 41 Center burner 42 1/4-20 stainless steel wing nuts (2) 43 Spider Stopper Guards (3) 44 Manifold assembly 45 Manifold bracket 46 Igniter (Assembly...
... Accessory trays (2) 26 Bottom tray 27 Catch pan holder 28 Catch pan 29 Drip pans (2) 30 Right Endcap 31 Thermometer 32 Thermometer Holder 33 1/4-20 keps nut 34 Cooking box (Assembly) 35 Burner control knobs (3) 36 Control panel 37 Igniter button 38 Control Panel Hardware 39 Crossover tube 40 Front and back burners (2) 41 Center burner 42 1/4-20 stainless steel wing nuts (2) 43 Spider Stopper Guards (3) 44 Manifold assembly 45 Manifold bracket 46 Igniter (Assembly...


