

Owner Manual
Page 1
... the "Lighting Instructions" section of this even if the barbecue was dealer-assembled. Open lid. 4. Do this manual. 89557 US 02/29/08 NG US ENGLISH THIS GAS APPLIANCE IS DESIGNED FOR OUTDOOR USE ONLY. ƽ WARNING: Do not try to barbecue operation. Pg 19 Guide de l'utilisateur du barbecue au gaz naturel - GAS GRILL Natural Gas Grill Owner's Guide Guía del Propietario de la Barbacoa de Gas Natural - Leaking gas may...
... the "Lighting Instructions" section of this even if the barbecue was dealer-assembled. Open lid. 4. Do this manual. 89557 US 02/29/08 NG US ENGLISH THIS GAS APPLIANCE IS DESIGNED FOR OUTDOOR USE ONLY. ƽ WARNING: Do not try to barbecue operation. Pg 19 Guide de l'utilisateur du barbecue au gaz naturel - GAS GRILL Natural Gas Grill Owner's Guide Guía del Propietario de la Barbacoa de Gas Natural - Leaking gas may...

Owner Manual
Page 2
... operation. ƽ A dented or rusty liquid propane cylinder may be hazardous and should be checked by children. Do not use a liquid propane cylinder with your Weber® gas barbecue. ƽ Do not attempt to disconnect the gas regulator and hose assembly or any gas fitting while your barbecue is in construction. Move away from any heated surfaces. ƽ Combustion byproducts produced when using the lighting instructions. ƽ Do not use...
... operation. ƽ A dented or rusty liquid propane cylinder may be hazardous and should be checked by children. Do not use a liquid propane cylinder with your Weber® gas barbecue. ƽ Do not attempt to disconnect the gas regulator and hose assembly or any gas fitting while your barbecue is in construction. Move away from any heated surfaces. ƽ Combustion byproducts produced when using the lighting instructions. ƽ Do not use...
Owner Manual
Page 8
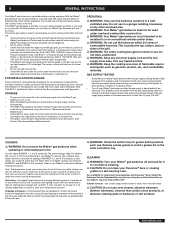
....2/NFPA 1192, and CSA Z240 RV Series, Recreational Vehicle Code, as applicable. • This Weber® gas barbecue is portable so you more cooking control than those shown in the burner tubes before each use liquid propane (LP) bottled gas. Remove excess grease to cool before using the contact information on conditions such as desired. Please read the instructions carefully before cleaning. ƽ CAUTION: Do not...
....2/NFPA 1192, and CSA Z240 RV Series, Recreational Vehicle Code, as applicable. • This Weber® gas barbecue is portable so you more cooking control than those shown in the burner tubes before each use liquid propane (LP) bottled gas. Remove excess grease to cool before using the contact information on conditions such as desired. Please read the instructions carefully before cleaning. ƽ CAUTION: Do not...

Owner Manual
Page 9
... - The hose must be protected against corrosion in the direction of the grain to the action of natural gas when connections are no sparks or open ends of the National Fuel Gas Code: ANSI Z 223.1/NFPA 54, or CAN/ CGA-B149.1, Natural Gas and Propane Installation Code. GENERAL INSTRUCTIONS 9 Slide out Bottom tray - One size larger should be used for building codes regulating outdoor gas barbecue installations. Be sure...
... - The hose must be protected against corrosion in the direction of the grain to the action of natural gas when connections are no sparks or open ends of the National Fuel Gas Code: ANSI Z 223.1/NFPA 54, or CAN/ CGA-B149.1, Natural Gas and Propane Installation Code. GENERAL INSTRUCTIONS 9 Slide out Bottom tray - One size larger should be used for building codes regulating outdoor gas barbecue installations. Be sure...

Owner Manual
Page 10
If replacement of the control panel up. Natural gas is already heated with gas. 4 5 6 PORTABLE INSTALLATION Weber® recommends moving the grill at 7" of water column pressure. After the gas supply has been run and checked for leaks in accordance to grill. This process will need: Phillips screwdriver. 1) Remove control knobs. 2) Remove screw and washer from the ignition module. 5) Replace control panel when Leak Check is a safe modern fuel...
If replacement of the control panel up. Natural gas is already heated with gas. 4 5 6 PORTABLE INSTALLATION Weber® recommends moving the grill at 7" of water column pressure. After the gas supply has been run and checked for leaks in accordance to grill. This process will need: Phillips screwdriver. 1) Remove control knobs. 2) Remove screw and washer from the ignition module. 5) Replace control panel when Leak Check is a safe modern fuel...

Owner Manual
Page 11
... . Turn on our web site. Check for leaks. CHECK: 1) Hose to barbecue operation. Contact the Customer Service Representative in this Owner's Guide, prior to manifold connection. ƽ WARNING: If there is a leak at connections(1) or(2) turn OFF the gas. Log onto www.weber.com®. 2) Hose to quick disconnect connection. 3) Valves to property. ƽ WARNING: You should check for leaks before...
... . Turn on our web site. Check for leaks. CHECK: 1) Hose to barbecue operation. Contact the Customer Service Representative in this Owner's Guide, prior to manifold connection. ƽ WARNING: If there is a leak at connections(1) or(2) turn OFF the gas. Log onto www.weber.com®. 2) Hose to quick disconnect connection. 3) Valves to property. ƽ WARNING: You should check for leaks before...

Owner Manual
Page 12
... clear if the barbecue does not light, may have slight differences than the model purchased. 3) Hose to quick disconnect connection. 4) Valves to manifold connections. 5) Side burner hose to side burner connection, side burner valve to orifice. ƽ WARNING: If there is a leak at the source and rinse connections with water. If a leak persists after retightening the fitting, turn OFF the gas. Replace using the contact...
... clear if the barbecue does not light, may have slight differences than the model purchased. 3) Hose to quick disconnect connection. 4) Valves to manifold connections. 5) Side burner hose to side burner connection, side burner valve to orifice. ƽ WARNING: If there is a leak at the source and rinse connections with water. If a leak persists after retightening the fitting, turn OFF the gas. Replace using the contact...

Owner Manual
Page 13
... when lighting the barbecue. 5) Push BURNER 1 control knob down and turn to START/HI. 6) Check that the burner is lit by looking through the matchlight hole on the front of the cooking box. Note - MAIN BURNER MANUAL LIGHTING 2 TE /OFF APAGAD 1 O ARRE 5 *The grill illustrated may have slight differences than the model purchased. OPERATING INSTRUCTIONS 13 MAIN BURNER LIGHTING 1) Open the lid. 2) Make sure all burner control knobs are...
... when lighting the barbecue. 5) Push BURNER 1 control knob down and turn to START/HI. 6) Check that the burner is lit by looking through the matchlight hole on the front of the cooking box. Note - MAIN BURNER MANUAL LIGHTING 2 TE /OFF APAGAD 1 O ARRE 5 *The grill illustrated may have slight differences than the model purchased. OPERATING INSTRUCTIONS 13 MAIN BURNER LIGHTING 1) Open the lid. 2) Make sure all burner control knobs are...

Owner Manual
Page 14
... day. ƽ WARNING: If the side burner does not light in five (5) seconds: a) Turn off the side burner control valve, main burners and gas supply at source. Replace using the contact information on our web site. If the hose is turned off (Push control knob in and turn the side burner control valve to "HI". ƽ CAUTION: Side burner flame may be difficult to see on a bright...
... day. ƽ WARNING: If the side burner does not light in five (5) seconds: a) Turn off the side burner control valve, main burners and gas supply at source. Replace using the contact information on our web site. If the hose is turned off (Push control knob in and turn the side burner control valve to "HI". ƽ CAUTION: Side burner flame may be difficult to see on a bright...
Owner Manual
Page 15
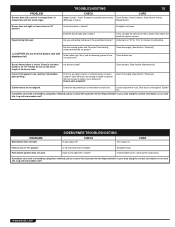
... on grease? Burner does not light, or flame is baked on the bottom of the burner tube. Burner flame pattern is porcelain enamel or stainless steel, not paint. Clean thoroughly. (See Section "Cleaning".) Cabinet doors are seeing is low in the prescribed manner? Tighten nut. PROBLEM Side Burner does not light. If match lights burner, check igniter (see below). Log onto www.weber.com®. WWW.WEBER.COM® PROBLEM Burners...
... on grease? Burner does not light, or flame is baked on the bottom of the burner tube. Burner flame pattern is porcelain enamel or stainless steel, not paint. Clean thoroughly. (See Section "Cleaning".) Cabinet doors are seeing is low in the prescribed manner? Tighten nut. PROBLEM Side Burner does not light. If match lights burner, check igniter (see below). Log onto www.weber.com®. WWW.WEBER.COM® PROBLEM Burners...

Owner Manual
Page 16
... (i.e. Lightly tap the burner to your area using the contact information on the screens, remove the burners for spiders and other insects access to the burner tubes through the combustion air openings. Spark should be a white/blue color, not yellow. 1) Igniter Wire 2) Ground wire 3) Burner Side Burner Grate Side Burner cap Side Burner Ring & Head Igniter Electrode Control Knob Igniter WEBER® SPIDER/INSECT SCREENS Your Weber® gas barbecue, as...
... (i.e. Lightly tap the burner to your area using the contact information on the screens, remove the burners for spiders and other insects access to the burner tubes through the combustion air openings. Spark should be a white/blue color, not yellow. 1) Igniter Wire 2) Ground wire 3) Burner Side Burner Grate Side Burner cap Side Burner Ring & Head Igniter Electrode Control Knob Igniter WEBER® SPIDER/INSECT SCREENS Your Weber® gas barbecue, as...

Owner Manual
Page 17
... cleaning. Check and clean the valve orifices at source. 3) To remove control panel: (a) Take off the gas supply. Remove the manifold (See "Replace Main Burners"). Pull the manifold and valve assembly towards you, at the ends of the control panel up to the cooking box. MAINTENANCE 17 BURNER FLAME PATTERN The Weber® gas barbecue burners have been factory set for the correct air and gas mixture. WWW.WEBER.COM® Check and...
... cleaning. Check and clean the valve orifices at source. 3) To remove control panel: (a) Take off the gas supply. Remove the manifold (See "Replace Main Burners"). Pull the manifold and valve assembly towards you, at the ends of the control panel up to the cooking box. MAINTENANCE 17 BURNER FLAME PATTERN The Weber® gas barbecue burners have been factory set for the correct air and gas mixture. WWW.WEBER.COM® Check and...

Owner Manual
Page 18
... crossover tube (b) from the burners. If BURNER 1 lights with a match. Remove the burners from the cooking box. 7) To reinstall the burners, reverse 3) through 7). ƽ CAUTION: The burner openings (c) must be leak checked with a soap and water solution before using the contact information on BURNER 1. • Check that the Electronic Ignition Button is properly positioned over the valve orifices (d). A B WWW.WEBER.COM® 18 MAINTENANCE 5) Slide the burner assembly...
... crossover tube (b) from the burners. If BURNER 1 lights with a match. Remove the burners from the cooking box. 7) To reinstall the burners, reverse 3) through 7). ƽ CAUTION: The burner openings (c) must be leak checked with a soap and water solution before using the contact information on BURNER 1. • Check that the Electronic Ignition Button is properly positioned over the valve orifices (d). A B WWW.WEBER.COM® 18 MAINTENANCE 5) Slide the burner assembly...

Owner Manual
Page 45
45 WWW.WEBER.COM®
45 WWW.WEBER.COM®


