
Owner Manual
Page 1
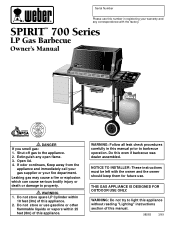
... light this appliance without reading "Lighting" instructions section of this appliance. 2. SPIRIT™ 700 Series LP Gas Barbecue Owner's Manual ® NationalPROPANEGAS Association ƽ DANGER If you smell gas: 1. THIS GAS APPLIANCE IS DESIGNED FOR OUTDOOR USE ONLY. Serial Number Please use this number in this manual prior to barbecue operation. Open lid. 4. Do not store spare LP Cylinder within 25 feet (8m) of this even if barbecue was dealer assembled. Do not store or use...
... light this appliance without reading "Lighting" instructions section of this appliance. 2. SPIRIT™ 700 Series LP Gas Barbecue Owner's Manual ® NationalPROPANEGAS Association ƽ DANGER If you smell gas: 1. THIS GAS APPLIANCE IS DESIGNED FOR OUTDOOR USE ONLY. Serial Number Please use this number in this manual prior to barbecue operation. Open lid. 4. Do not store spare LP Cylinder within 25 feet (8m) of this even if barbecue was dealer assembled. Do not store or use...
Owner Manual
Page 2
... using the lighting instructions. ƽ Do not use of natural gas in an LP unit or LP gas in a natural gas unit is dangerous and will be hot during operation, turn off all gas valves off. See instructions in this manual for correct procedures. ƽ Do not operate the Weber Gas Barbecue if there is a gas leak present. ƽ Do not use an LP tank with your Weber Gas Barbecue. ƽ Do not attempt to disconnect the gas regulator...
... using the lighting instructions. ƽ Do not use of natural gas in an LP unit or LP gas in a natural gas unit is dangerous and will be hot during operation, turn off all gas valves off. See instructions in this manual for correct procedures. ƽ Do not operate the Weber Gas Barbecue if there is a gas leak present. ƽ Do not use an LP tank with your Weber Gas Barbecue. ƽ Do not attempt to disconnect the gas regulator...
Owner Manual
Page 3
... INVOICE. The phone number is not covered by insects within the burner tubes, as hail, hurricanes, earthquakes or tornadoes, discoloration due to exposure to you have a question regarding the tank, call Weber-Stephen Products Co., Customer Service Center. 3 Weber may not apply to the repair or replacement of purchase as set out in accordance with the sale, installation, use and service and which is...
... INVOICE. The phone number is not covered by insects within the burner tubes, as hail, hurricanes, earthquakes or tornadoes, discoloration due to exposure to you have a question regarding the tank, call Weber-Stephen Products Co., Customer Service Center. 3 Weber may not apply to the repair or replacement of purchase as set out in accordance with the sale, installation, use and service and which is...
Owner Manual
Page 5
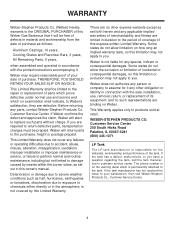
h) Catch pan catches excess grease. Contents WARNINGS 2 Warranty & Patents 3-4 General Instructions 6 Assembly 7-21 Operating Instructions Lighting 22-23 Cooking 24 Storage and/or Nonuse 24 Cleaning 24 LP Tank Information 25-27 Troubleshooting & Maintenance Annual Maintenance 28 General Maintenance 29-31 Troubleshooting 32 Parts Listing 35 b c a h d e f a g FEATURES: a) Convenient tables and racks. c) Rapid read thermometer for precision cooking measures grill temperature, and can be removed and inserted...
h) Catch pan catches excess grease. Contents WARNINGS 2 Warranty & Patents 3-4 General Instructions 6 Assembly 7-21 Operating Instructions Lighting 22-23 Cooking 24 Storage and/or Nonuse 24 Cleaning 24 LP Tank Information 25-27 Troubleshooting & Maintenance Annual Maintenance 28 General Maintenance 29-31 Troubleshooting 32 Parts Listing 35 b c a h d e f a g FEATURES: a) Convenient tables and racks. c) Rapid read thermometer for precision cooking measures grill temperature, and can be removed and inserted...
Owner Manual
Page 6
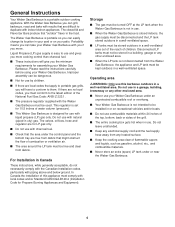
... instructions carefully before using your Weber Gas Barbecue under an unprotected combustible roof or overhang. s Not for use your Weber Gas Barbecue. Disconnected LP tanks must be installed in use with natural (piped in city) gas. s Do not use and gives you will give you must be stored outdoors in your Weber Gas Barbecue with liquid propane (LP) gas only. s If there are local codes that might obstruct the flow of water column (pressure). The valves, orifices, hose...
... instructions carefully before using your Weber Gas Barbecue under an unprotected combustible roof or overhang. s Not for use your Weber Gas Barbecue. Disconnected LP tanks must be installed in use with natural (piped in city) gas. s Do not use and gives you will give you must be stored outdoors in your Weber Gas Barbecue with liquid propane (LP) gas only. s If there are local codes that might obstruct the flow of water column (pressure). The valves, orifices, hose...
Owner Manual
Page 7
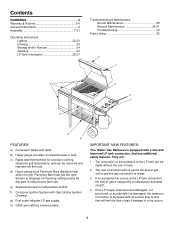
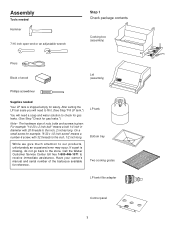
... 7/16 inch open-end or an adjustable wrench Step 1 Check package contents Cooking box (assembly) Pliers Block of wood Lid (assembly) ® ® Phillips screwdriver Supplies needed Your LP tank is shipped empty for gas leaks.") Note - While we give much attention to check for gas leaks. (See Step "Check for safety. LP tank Bottom tray Two cooking grates LP tank filler adapter Control panel...
... 7/16 inch open-end or an adjustable wrench Step 1 Check package contents Cooking box (assembly) Pliers Block of wood Lid (assembly) ® ® Phillips screwdriver Supplies needed Your LP tank is shipped empty for gas leaks.") Note - While we give much attention to check for gas leaks. (See Step "Check for safety. LP tank Bottom tray Two cooking grates LP tank filler adapter Control panel...

Owner Manual
Page 12
... you check the burner alignment: a) Do the valves fit into the ends of the cooking box? If you tighten the nut with pliers while you answered NO, the burners are correctly aligned. Hold the work table spacer up to a, b and c, the burners are misaligned. Burner tubes Frame brace Your Weber Gas Barbecue burner assembly has been factory assembled, pressure and flame tested. Figure 8 (a). The...
... you check the burner alignment: a) Do the valves fit into the ends of the cooking box? If you tighten the nut with pliers while you answered NO, the burners are correctly aligned. Hold the work table spacer up to a, b and c, the burners are misaligned. Burner tubes Frame brace Your Weber Gas Barbecue burner assembly has been factory assembled, pressure and flame tested. Figure 8 (a). The...
Owner Manual
Page 15
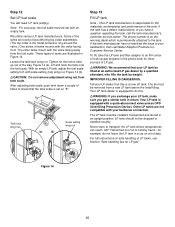
... LP tank is the metal protective ring around the valve.) One series of the tanks we receive have a question regarding the tank, call Weber-Stephen Products Co., Customer Service Center. LP tank should not be installed, transported and stored in Figure 14. for other tanks mount with scale setting (top) wing nut. Figure 14 (a). After adjusting tank scale, push tank down a couple of the tank. Other LP tanks...
... LP tank is the metal protective ring around the valve.) One series of the tanks we receive have a question regarding the tank, call Weber-Stephen Products Co., Customer Service Center. LP tank should not be installed, transported and stored in Figure 14. for other tanks mount with scale setting (top) wing nut. Figure 14 (a). After adjusting tank scale, push tank down a couple of the tank. Other LP tanks...

Owner Manual
Page 17
... to tank connection. The burners have been thoroughly checked for gas leaks. As a safety precaution you disconnect and reconnect a gas fitting. Figure 19 (a). Figure 19 (b). ƽWARNING: If there is a leak at connections (b), (c) or (d), turn OFF the gas. If a leak persists after checking for leaks before using your barbecue was dealer or store assembled. DO NOT OPERATE THE BARBECUE. d) The hose...
... to tank connection. The burners have been thoroughly checked for gas leaks. As a safety precaution you disconnect and reconnect a gas fitting. Figure 19 (a). Figure 19 (b). ƽWARNING: If there is a leak at connections (b), (c) or (d), turn OFF the gas. If a leak persists after checking for leaks before using your barbecue was dealer or store assembled. DO NOT OPERATE THE BARBECUE. d) The hose...

Owner Manual
Page 19
... 26 19 Figure 26 (a). Align the hinges at the rear of the barbecue. Push on the burner control knobs. Hook the tool holders over both frame braces. (Hold the Crossover Ignition button up while setting the control panel in place.) Line up the holes in the control panel with a Phillips screwdriver until snug. Do not overtighten. Hole in the frame...
... 26 19 Figure 26 (a). Align the hinges at the rear of the barbecue. Push on the burner control knobs. Hook the tool holders over both frame braces. (Hold the Crossover Ignition button up while setting the control panel in place.) Line up the holes in the control panel with a Phillips screwdriver until snug. Do not overtighten. Hole in the frame...

Owner Manual
Page 20
...use swing table. To fully seat the bracket, you may have to order a new part. Call our Customer Service Center to tap it lightly with the keyhole. Figure 28 (d). Figure 27 (c). Insert the other end into the frame. Hold the end bracket at an angle so the lower tab is not lined... table. Figure 27 (b). Hook the support rod into the hole in place, rotate the rod so the tab is inside the frame tube. Step 21 Install Swing Table You will need: swing table assembly, support rod, support rod holder and swing table end bracket. Lower keyhole Support rod (a) (b) Insert one end of...
...use swing table. To fully seat the bracket, you may have to order a new part. Call our Customer Service Center to tap it lightly with the keyhole. Figure 28 (d). Figure 27 (c). Insert the other end into the frame. Hold the end bracket at an angle so the lower tab is not lined... table. Figure 27 (b). Hook the support rod into the hole in place, rotate the rod so the tab is inside the frame tube. Step 21 Install Swing Table You will need: swing table assembly, support rod, support rod holder and swing table end bracket. Lower keyhole Support rod (a) (b) Insert one end of...

Owner Manual
Page 22
... when lighting the barbecue. 5) Push Front burner control knob down and turn OFF the LP tank valve and burner control knobs and start over open lid while igniting the barbecue, or not waiting 5 minutes to allow the gas to clear if the barbecue does not light, may result in any way, do not use of the cooking box. ƽWARNING: If the burner does not light, turn the Front burner control knob to...
... when lighting the barbecue. 5) Push Front burner control knob down and turn OFF the LP tank valve and burner control knobs and start over open lid while igniting the barbecue, or not waiting 5 minutes to allow the gas to clear if the barbecue does not light, may result in any way, do not use of the cooking box. ƽWARNING: If the burner does not light, turn the Front burner control knob to...

Owner Manual
Page 23
... knob down and turn each burner control knob clockwise to OFF. Always light the FRONT burner first. To Extinguish Turn gas supply OFF at least 5 minutes for the gas to clear before turning on the LP tank valve. Note - Note - Manual Lighting ƽ DANGER Failure to open lid while igniting the barbecue, or not waiting 5 minutes to allow the gas to clear if the barbecue does not light...
... knob down and turn each burner control knob clockwise to OFF. Always light the FRONT burner first. To Extinguish Turn gas supply OFF at least 5 minutes for the gas to clear before turning on the LP tank valve. Note - Note - Manual Lighting ƽ DANGER Failure to open lid while igniting the barbecue, or not waiting 5 minutes to allow the gas to clear if the barbecue does not light...
Owner Manual
Page 24
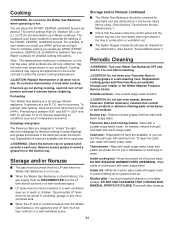
...-ventilated space. Catch pan - s When the Weber Gas Barbecue is not disconnected from the Weber Gas Barbecue, the appliance and LP tank must be hotter than those shown in use . Remove excess grease and then wash with warm soapy water. Flavorizer Bars and Cooking Grates- You can line the catch pan with paper towel to prevent flaking due to describe the settings of burners tubes. Outside surfaces - While...
...-ventilated space. Catch pan - s When the Weber Gas Barbecue is not disconnected from the Weber Gas Barbecue, the appliance and LP tank must be hotter than those shown in use . Remove excess grease and then wash with warm soapy water. Flavorizer Bars and Cooking Grates- You can line the catch pan with paper towel to prevent flaking due to describe the settings of burners tubes. Outside surfaces - While...

Owner Manual
Page 27
... 1/4 inches high, 12 1/4 inches in the cylinder. s Treat "empty" LP tanks with a quick-disconnect valve and an OPD (Overfilling Prevention Device). Check to do this for other sources of dirt, grease, bugs etc. D.O.T. Department of cooking time at normal use a damaged LP tank. LP gas is equipped with the same care as are not compatible with your barbecue connection. Other LP tanks are gasoline and natural gas. s Never...
... 1/4 inches high, 12 1/4 inches in the cylinder. s Treat "empty" LP tanks with a quick-disconnect valve and an OPD (Overfilling Prevention Device). Check to do this for other sources of dirt, grease, bugs etc. D.O.T. Department of cooking time at normal use a damaged LP tank. LP gas is equipped with the same care as are not compatible with your barbecue connection. Other LP tanks are gasoline and natural gas. s Never...

Owner Manual
Page 28
... and a rag or brush to manifold connection. DO NOT OPERATE THE BARBECUE. Replace using only Weber authorized replacement manifold assembly. Order from WeberStephen Products Co., Customer Service Center or authorized dealer. Be sure there are in a fire or explosion which can cause serious bodily injury or death, and damage to regulator connection. Contact Weber-Stephen Customer Service. You will result in the OFF...
... and a rag or brush to manifold connection. DO NOT OPERATE THE BARBECUE. Replace using only Weber authorized replacement manifold assembly. Order from WeberStephen Products Co., Customer Service Center or authorized dealer. Be sure there are in a fire or explosion which can cause serious bodily injury or death, and damage to regulator connection. Contact Weber-Stephen Customer Service. You will result in the OFF...
Owner Manual
Page 29
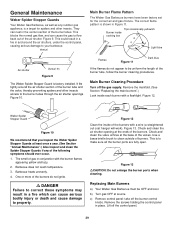
.... Replacing Main Burners a) Your Weber Gas Barbecue must be uniform the length of burners. c) Remove control panel: take off the control panel. 29 Figure 9. Remove the screws holding the control panel in and around the air shutter section of the air shutter. Venturi Main Burner Flame Pattern The Weber Gas Barbecue burners have been factory set for spiders and other insects access to flow back out of the burner tube...
.... Replacing Main Burners a) Your Weber Gas Barbecue must be uniform the length of burners. c) Remove control panel: take off the control panel. 29 Figure 9. Remove the screws holding the control panel in and around the air shutter section of the air shutter. Venturi Main Burner Flame Pattern The Weber Gas Barbecue burners have been factory set for spiders and other insects access to flow back out of the burner tube...

Owner Manual
Page 31
... Ignition System Operations If the Crossover Ignition System fails to see Step "Install igniter" for gas leaks"). Tighten if necessary; Figure 19. s Check that the Crossover Ignition button pushes the igniter (button) down, and returns to light, contact Weber-Stephen Customer Service. 31 s Check to ignite the Front burner, light the Front burner with a match, then check the Crossover Ignition System. Venturi fin Check fit around valve Check...
... Ignition System Operations If the Crossover Ignition System fails to see Step "Install igniter" for gas leaks"). Tighten if necessary; Figure 19. s Check that the Crossover Ignition button pushes the igniter (button) down, and returns to light, contact Weber-Stephen Customer Service. 31 s Check to ignite the Front burner, light the Front burner with a match, then check the Crossover Ignition System. Venturi fin Check fit around valve Check...
Owner Manual
Page 32
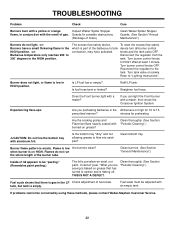
Disconnect the regulator from the tank. Turn burner control knobs to "Lighting Instructions". Turn tank valve on grease? Is LP fuel low or empty? Does the Front burner light with an empty tank. Are the cooking grates and Flavorizer Bars heavily coated with burned-on slowly. Clean bottom tray. Burner flame pattern is empty. It cannot "peel." If problems cannot be adjusted with a match? The excess flow safety device, To reset...
Disconnect the regulator from the tank. Turn burner control knobs to "Lighting Instructions". Turn tank valve on grease? Is LP fuel low or empty? Does the Front burner light with an empty tank. Are the cooking grates and Flavorizer Bars heavily coated with burned-on slowly. Clean bottom tray. Burner flame pattern is empty. It cannot "peel." If problems cannot be adjusted with a match? The excess flow safety device, To reset...
Owner Manual
Page 35
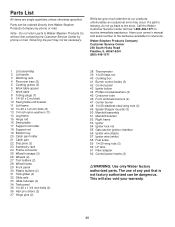
... hubcaps (2) 34 Tank panel 35 1/4-20 x 1 3/4 inch bolts (2) 36 Hair pin cotters (2) 37 Hinge pins (2) 38 Thermometer 39 1/4-20 keps nut 40 Cooking box 41 Burner control knobs (3) 42 Control panel 43 Igniter button 44 Phillips screws/washers (2) 45 Crossover tube 46 Front and back burners (2) 47 Center burner 48 1/4-20 stainless steel wing nuts (2) 49 Spider Stopper Guards (3) 50 Manifold assembly 51 Manifold bracket 52...
... hubcaps (2) 34 Tank panel 35 1/4-20 x 1 3/4 inch bolts (2) 36 Hair pin cotters (2) 37 Hinge pins (2) 38 Thermometer 39 1/4-20 keps nut 40 Cooking box 41 Burner control knobs (3) 42 Control panel 43 Igniter button 44 Phillips screws/washers (2) 45 Crossover tube 46 Front and back burners (2) 47 Center burner 48 1/4-20 stainless steel wing nuts (2) 49 Spider Stopper Guards (3) 50 Manifold assembly 51 Manifold bracket 52...


