
Owner Manual
Page 1
... or any open flame. 3. SPIRIT™ 700 LX Series Natural Gas Barbecue Owner's Manual WEB ER ER WEB ® WARNING: Follow all leak check procedures carefully in the vicinity of this even if barbecue was dealer assembled. Shut off gas to barbecue operation. THIS GAS APPLIANCE IS DESIGNED FOR OUTDOOR USE ONLY. Do this manual. WARNING: Do not try to light this appliance without reading "Lighting" instructions section of this manual prior to...
... or any open flame. 3. SPIRIT™ 700 LX Series Natural Gas Barbecue Owner's Manual WEB ER ER WEB ® WARNING: Follow all leak check procedures carefully in the vicinity of this even if barbecue was dealer assembled. Shut off gas to barbecue operation. THIS GAS APPLIANCE IS DESIGNED FOR OUTDOOR USE ONLY. Do this manual. WARNING: Do not try to light this appliance without reading "Lighting" instructions section of this manual prior to...

Owner Manual
Page 2
... instructions in this manual for correct procedures. ƽ Do not operate the Weber Gas Barbecue if there is a gas leak present. ƽ Do not use a flame to check for gas leaks and burner obstructions before attempting to relight, using . The conversion or attempted use an LP tank with your Weber Gas Barbecue. ƽ Do not attempt to disconnect the gas regulator or any gas fitting while your barbecue is in operation. ƽ Use heat-resistant barbecue...
... instructions in this manual for correct procedures. ƽ Do not operate the Weber Gas Barbecue if there is a gas leak present. ƽ Do not use a flame to check for gas leaks and burner obstructions before attempting to relight, using . The conversion or attempted use an LP tank with your Weber Gas Barbecue. ƽ Do not attempt to disconnect the gas regulator or any gas fitting while your barbecue is in operation. ƽ Use heat-resistant barbecue...
Owner Manual
Page 3
... Weber Gas Barbecue that it will be free of defects in material and workmanship from the date of purchase as follows: Aluminum Castings, 10 years, Recycled Work Surfaces, 10 years Cooking Grates and Flavorizer Bars, 3 years, All Remaining Parts, 5 years, when assembled and operated in accordance with the sale, installation, use and service and which prove defective under normal use , removal, return, or replacement...
... Weber Gas Barbecue that it will be free of defects in material and workmanship from the date of purchase as follows: Aluminum Castings, 10 years, Recycled Work Surfaces, 10 years Cooking Grates and Flavorizer Bars, 3 years, All Remaining Parts, 5 years, when assembled and operated in accordance with the sale, installation, use and service and which prove defective under normal use , removal, return, or replacement...
Owner Manual
Page 5
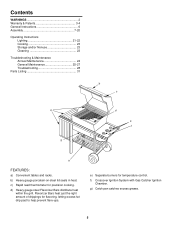
... grill. f) Crossover Ignition System with Gas Catcher Ignition Chamber. e) Separate burners for flavoring, letting excess fat drip past to help prevent flare-ups. Flavorizer Bars heat just the right amount of drippings for temperature control. b) Heavy gauge porcelain-on-steel lid seals in heat. c) Rapid read thermometer for precision cooking. g) Catch pan catches excess grease. 5 Contents WARNINGS 2 Warranty & Patents 3-4 General Instructions 6 Assembly 7-20 Operating Instructions Lighting...
... grill. f) Crossover Ignition System with Gas Catcher Ignition Chamber. e) Separate burners for flavoring, letting excess fat drip past to help prevent flare-ups. Flavorizer Bars heat just the right amount of drippings for temperature control. b) Heavy gauge porcelain-on-steel lid seals in heat. c) Rapid read thermometer for precision cooking. g) Catch pan catches excess grease. 5 Contents WARNINGS 2 Warranty & Patents 3-4 General Instructions 6 Assembly 7-20 Operating Instructions Lighting...

Owner Manual
Page 6
... are for natural gas only. s Do not use and gives you will give you the minimum requirements for assembling your Weber Gas Barbecue with results that apply to use with piping above and below ground. Operating area ƽWARNING: Only use . s Do not use Liquid Propane (LP) bottled gas.The valves, orifices and hose are no local codes, you move. With the Weber Gas Barbecue you can be installed in or...
... are for natural gas only. s Do not use and gives you will give you the minimum requirements for assembling your Weber Gas Barbecue with results that apply to use with piping above and below ground. Operating area ƽWARNING: Only use . s Do not use Liquid Propane (LP) bottled gas.The valves, orifices and hose are no local codes, you move. With the Weber Gas Barbecue you can be installed in or...
Owner Manual
Page 7
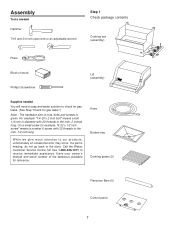
Have your owner's manual and serial number of the barbecue available for gas leaks.") Note - For example "1/4-20 x 2 inch bolt" means a bolt 1/4 inch in diameter with 32 threads to the inch, 1/2 inch long. If a part is given. The hardware size of nuts, bolts and screws is missing, do not go back to the store. Call the Weber Customer Service Center toll free 1-800-446...
Have your owner's manual and serial number of the barbecue available for gas leaks.") Note - For example "1/4-20 x 2 inch bolt" means a bolt 1/4 inch in diameter with 32 threads to the inch, 1/2 inch long. If a part is given. The hardware size of nuts, bolts and screws is missing, do not go back to the store. Call the Weber Customer Service Center toll free 1-800-446...

Owner Manual
Page 12
... a 7/16 inch wrench. Set the cooking box in the spacer bracket, frame and cooking box with a wrench. Figure 6. Do not tighten. Do not use barbecue. Frame cross piece (a) Spacer bracket (b) Keps nut (b) Figure 8 (a) View from (c) behind cooking box Wing nuts Tab Bolt Nylon washer Figure 7 12 Figure 7. Burner tubes Frame brace Your Weber Gas Barbecue burner assembly has been factory assembled, pressure and flame tested. c) Are...
... a 7/16 inch wrench. Set the cooking box in the spacer bracket, frame and cooking box with a wrench. Figure 6. Do not tighten. Do not use barbecue. Frame cross piece (a) Spacer bracket (b) Keps nut (b) Figure 8 (a) View from (c) behind cooking box Wing nuts Tab Bolt Nylon washer Figure 7 12 Figure 7. Burner tubes Frame brace Your Weber Gas Barbecue burner assembly has been factory assembled, pressure and flame tested. c) Are...

Owner Manual
Page 13
... installed outdoors, immediately ahead of the following are made. s Pipe compound should be used which is resistant to operate at the center burner valve. Lift the manifold, bracket and cooking box slightly and hook the tab of the quick disconnect fitting clean while disconnected. Hold the frame connector square and tighten the bolts. Figure 10. In absence of natural gas...
... installed outdoors, immediately ahead of the following are made. s Pipe compound should be used which is resistant to operate at the center burner valve. Lift the manifold, bracket and cooking box slightly and hook the tab of the quick disconnect fitting clean while disconnected. Hold the frame connector square and tighten the bolts. Figure 10. In absence of natural gas...
Owner Manual
Page 14
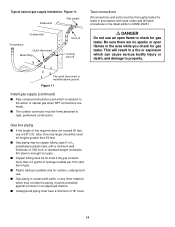
... Z223.1. ƽ DANGER Do not use an open flames in an approved manner. s The outdoor connector must be thoroughly tested for lengths greater than 0.3 grams of hydrogen sulfide per 100 cubic feet of natural gas when NPT connections are no sparks or open flame to the action of gas. Gas line piping s If the length of .062 inch; Typical natural gas supply installation.
... Z223.1. ƽ DANGER Do not use an open flames in an approved manner. s The outdoor connector must be thoroughly tested for lengths greater than 0.3 grams of hydrogen sulfide per 100 cubic feet of natural gas when NPT connections are no sparks or open flame to the action of gas. Gas line piping s If the length of .062 inch; Typical natural gas supply installation.
Owner Manual
Page 15
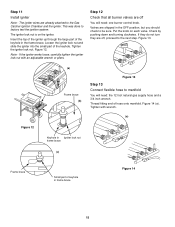
.... Loosen the igniter lock nut and slide the igniter into the small part of hose onto manifold. If the igniter works loose, carefully tighten the igniter lock nut with wrench. (a) Figure 12 Keyhole in Igniter lock nut frame brace (c) Frame brace Small part of the keyhole...igniter up through the large part of keyhole in the frame brace. Step 12 Check that all burner valves are already attached to factory test the ignition system. Figure 13. (a) Frame brace (b) Figure 13 Step 13 Connect flexible hose to manifold You will need : the 12 foot natural gas supply hose and a 3/4 inch...
.... Loosen the igniter lock nut and slide the igniter into the small part of hose onto manifold. If the igniter works loose, carefully tighten the igniter lock nut with wrench. (a) Figure 12 Keyhole in Igniter lock nut frame brace (c) Frame brace Small part of the keyhole...igniter up through the large part of keyhole in the frame brace. Step 12 Check that all burner valves are already attached to factory test the ignition system. Figure 13. (a) Frame brace (b) Figure 13 Step 13 Connect flexible hose to manifold You will need : the 12 foot natural gas supply hose and a 3/4 inch...

Owner Manual
Page 16
... wall Male fitting (b) Collar Check: a) Hose to manifold connections. Contact Weber-Stephen Customer Service. Since some leak test solutions, including soap and water, may have been thoroughly checked for gas leaks. Figure 15 (b). DO NOT OPERATE THE BARBECUE. c) The hose to apply it does not engage or lock, repeat procedure. The burners have been flame tested. If a leak persists after...
... wall Male fitting (b) Collar Check: a) Hose to manifold connections. Contact Weber-Stephen Customer Service. Since some leak test solutions, including soap and water, may have been thoroughly checked for gas leaks. Figure 15 (b). DO NOT OPERATE THE BARBECUE. c) The hose to apply it does not engage or lock, repeat procedure. The burners have been flame tested. If a leak persists after...

Owner Manual
Page 19
...part. Figure 25 (b). Check to hang down. The rod should swing freely inside the locking tab. Figure 24 (c). (b) (c) Support rod Insert one end of the hinge rod into the hole in the swing table end bracket. Insert the other end into the support rod holder...Hook the support rod into the hole in the frame. Call our Customer Service Center to tap it lightly with ...use swing table. Hold the end bracket at an angle so the lower tab is 30 pounds. Figure 24 (b). Figure 25 (c). Step 19 Install swing table You will need: swing table assembly, support rod, support rod holder...
...part. Figure 25 (b). Check to hang down. The rod should swing freely inside the locking tab. Figure 24 (c). (b) (c) Support rod Insert one end of the hinge rod into the hole in the swing table end bracket. Insert the other end into the support rod holder...Hook the support rod into the hole in the frame. Call our Customer Service Center to tap it lightly with ...use swing table. Hold the end bracket at an angle so the lower tab is 30 pounds. Figure 24 (b). Figure 25 (c). Step 19 Install swing table You will need: swing table assembly, support rod, support rod holder...
Owner Manual
Page 21
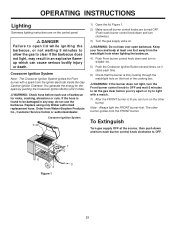
... lit you can cause serious bodily injury or death. Replace using only Weber authorized replacement hose. Figure 1. 2) Make sure all burner control knobs are on the control panel. ƽ DANGER Failure to open barbecue. To Extinguish Turn gas supply OFF at least one foot away from the igniter electrode inside the Gas Catcher Ignition Chamber. OPERATING INSTRUCTIONS Lighting Summary lighting instructions are turned OFF. (Push each time. 6) Check that...
... lit you can cause serious bodily injury or death. Replace using only Weber authorized replacement hose. Figure 1. 2) Make sure all burner control knobs are on the control panel. ƽ DANGER Failure to open barbecue. To Extinguish Turn gas supply OFF at least one foot away from the igniter electrode inside the Gas Catcher Ignition Chamber. OPERATING INSTRUCTIONS Lighting Summary lighting instructions are turned OFF. (Push each time. 6) Check that...
Owner Manual
Page 23
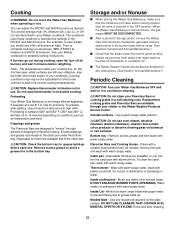
... grates in your retailer or the Weber-Stephen Products Service Center. Do not leave thermometer in the catch pan under the control panel and the bottom tray are free from grill and wash with warm soapy water. rate for grease build-up . Excess drippings and grease accumulate in food while cooking. Remove excess grease to attain the correct cooking temperatures. ƽCAUTION: Replace...
... grates in your retailer or the Weber-Stephen Products Service Center. Do not leave thermometer in the catch pan under the control panel and the bottom tray are free from grill and wash with warm soapy water. rate for grease build-up . Excess drippings and grease accumulate in food while cooking. Remove excess grease to attain the correct cooking temperatures. ƽCAUTION: Replace...

Owner Manual
Page 24
Replace using your Weber Gas Barbecue. Clean if necessary, following maintenance procedures for your safety. ƽWARNING: Check hose before using only Weber authorized replacement hose. Check: a) Hose to manifold connections. If a leak persists after checking for leaks with soap and water solution. b) Valves to manifold connection. Note - Order from Weber-Stephen Products Co., Customer Service Center or authorized dealer. s Inspect the burners for gas leaks. s Check all gas fittings...
Replace using your Weber Gas Barbecue. Clean if necessary, following maintenance procedures for your safety. ƽWARNING: Check hose before using only Weber authorized replacement hose. Check: a) Hose to manifold connections. If a leak persists after checking for leaks with soap and water solution. b) Valves to manifold connection. Note - Order from Weber-Stephen Products Co., Customer Service Center or authorized dealer. s Inspect the burners for gas leaks. s Check all gas fittings...
Owner Manual
Page 25
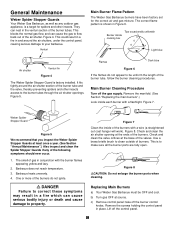
... cooking box Light blue Air shutter Venturi fin Figure 4 The Weber Spider Stopper Guard is to clean outside of burners. c) Remove control panel: take off the burner control knobs. Figure 4. Figure 5. This is factory installed. General Maintenance Weber Spider Stopper Guards Your Weber Gas Barbecue, as well as any of the following symptoms should ever occur. 1. Venturi Main Burner Flame Pattern The Weber Gas Barbecue burners have been factory set for...
... cooking box Light blue Air shutter Venturi fin Figure 4 The Weber Spider Stopper Guard is to clean outside of burners. c) Remove control panel: take off the burner control knobs. Figure 4. Figure 5. This is factory installed. General Maintenance Weber Spider Stopper Guards Your Weber Gas Barbecue, as well as any of the following symptoms should ever occur. 1. Venturi Main Burner Flame Pattern The Weber Gas Barbecue burners have been factory set for...

Owner Manual
Page 27
Venturi fin Check fit around the burners and valves. See step "Install igniter" for gas leaks"). s Check to light, See Section "Manual Lighting", and contact Weber-Stephen Customer Service. 27 Figure 14. Black wire Figure 15 s Check that both the white and black ignition wires are in line with a soap and water solution before using the barbecue. (See Step"Check for correct procedure. Figure 15...
Venturi fin Check fit around the burners and valves. See step "Install igniter" for gas leaks"). s Check to light, See Section "Manual Lighting", and contact Weber-Stephen Customer Service. 27 Figure 14. Black wire Figure 15 s Check that both the white and black ignition wires are in line with a soap and water solution before using the barbecue. (See Step"Check for correct procedure. Figure 15...

Owner Manual
Page 28
... HIGH position. It cannot "peel". Is the bottom tray "dirty" and not allowing grease to be corrected by using these methods, please contact Weber-Stephen Customer Service. 28 Clean burners. (See Section "General Maintenance".) Inside of the burner tube. THIS IS NOT A DEFECT. TROUBLESHOOTING Problem Check Cure Burners burn with a yellow or orange flame, in conjunction with a match, then check the Crossover Ignition System.
... HIGH position. It cannot "peel". Is the bottom tray "dirty" and not allowing grease to be corrected by using these methods, please contact Weber-Stephen Customer Service. 28 Clean burners. (See Section "General Maintenance".) Inside of the burner tube. THIS IS NOT A DEFECT. TROUBLESHOOTING Problem Check Cure Burners burn with a yellow or orange flame, in conjunction with a match, then check the Crossover Ignition System.
Owner Manual
Page 31
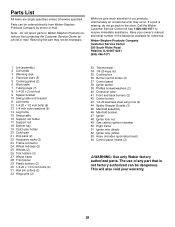
... nut 35 Cooking box 36 Burner control knobs (3) 37 Control panel 38 Igniter button 39 Phillips screws/washers (2) 40 Crossover tube 41 Front and back burners (2) 42 Center burner 43 1/4-20 stainless steel wing nuts (2) 44 Spider Stopper Guards (3) 45 Manifold assembly 46 Manifold bracket 47 Igniter 48 Igniter lock nut 49 Gas catcher ignition chamber 50 Right frame 51 Igniter wire (black) 52 Igniter wire (white) 53 Hose (includes quick...
... nut 35 Cooking box 36 Burner control knobs (3) 37 Control panel 38 Igniter button 39 Phillips screws/washers (2) 40 Crossover tube 41 Front and back burners (2) 42 Center burner 43 1/4-20 stainless steel wing nuts (2) 44 Spider Stopper Guards (3) 45 Manifold assembly 46 Manifold bracket 47 Igniter 48 Igniter lock nut 49 Gas catcher ignition chamber 50 Right frame 51 Igniter wire (black) 52 Igniter wire (white) 53 Hose (includes quick...

Owner Manual
Page 32
.... We also welcome any problems with parts or assembly. For quicker service, please have regarding our products. Weber-Stephen Products Company Customer Service Center 200 East Daniels Road Palatine, Illinois 60067-6266 While we give much attention to help you for choosing a Weber Barbecue. Call our toll free number 1-800-446-1071. Our family here at Weber has worked hard to...
.... We also welcome any problems with parts or assembly. For quicker service, please have regarding our products. Weber-Stephen Products Company Customer Service Center 200 East Daniels Road Palatine, Illinois 60067-6266 While we give much attention to help you for choosing a Weber Barbecue. Call our toll free number 1-800-446-1071. Our family here at Weber has worked hard to...


