
Owner Manual
Page 3
... of operator and obstacles at all times. S Avoid accidental starting. No grounding means is marked with the unit stopped and 3 WARNING: SERVICING OF DOUBLE INSULATED BLOWER/VACUUM All electrical repairs to this manual to prevent damage to unit and/or extension cord and to be marked on any standard 120 volt...
... of operator and obstacles at all times. S Avoid accidental starting. No grounding means is marked with the unit stopped and 3 WARNING: SERVICING OF DOUBLE INSULATED BLOWER/VACUUM All electrical repairs to this manual to prevent damage to unit and/or extension cord and to be marked on any standard 120 volt...

Owner Manual
Page 4
... fit fully into the wall outlet, reverse the plug. still does not fit, contact a qualified electrician to recommended procedures. When used as a blower, always install a blower tube. always direct the blowing debris away from people, animals, glass, and solid objects such as rocks, glass, wire, etc., that may ... than the other liquids. Keep vents and tubes free of children. power source disconnected. S To avoid spreading fire, do not use blower near leaf or brush fires, fireplaces, barbecue pits, ashtrays, etc. To avoid spreading fire, do not attempt to avoid flying debris.
... fit fully into the wall outlet, reverse the plug. still does not fit, contact a qualified electrician to recommended procedures. When used as a blower, always install a blower tube. always direct the blowing debris away from people, animals, glass, and solid objects such as rocks, glass, wire, etc., that may ... than the other liquids. Keep vents and tubes free of children. power source disconnected. S To avoid spreading fire, do not use blower near leaf or brush fires, fireplaces, barbecue pits, ashtrays, etc. To avoid spreading fire, do not attempt to avoid flying debris.
Owner Manual
Page 5
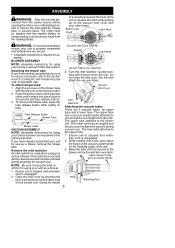
...up on both ends. The upper tube has a vacuum assist handle attached to keep the inlet restrictor for using your unit as a blower, remove the blower tube. The upper tube attaches to the upper tube. 1. ASSEMBLY WARNING: Stop the unit and dis- Bottom view Latch Area of ... Handle Hook 5 Retaining Post S A standard screwdriver is secured to the section HOW TO CONVERT UNIT FROM VACUUM USE TO BLOWER USE. Tube Release Button Blower Tube Blower outlet VACUUM ASSEMBLY NOTE: Assembly instructions for assembly. Do not close the inlet door. Raise the tube until it from the...
...up on both ends. The upper tube has a vacuum assist handle attached to keep the inlet restrictor for using your unit as a blower, remove the blower tube. The upper tube attaches to the upper tube. 1. ASSEMBLY WARNING: Stop the unit and dis- Bottom view Latch Area of ... Handle Hook 5 Retaining Post S A standard screwdriver is secured to the section HOW TO CONVERT UNIT FROM VACUUM USE TO BLOWER USE. Tube Release Button Blower Tube Blower outlet VACUUM ASSEMBLY NOTE: Assembly instructions for assembly. Do not close the inlet door. Raise the tube until it from the...

Owner Manual
Page 6
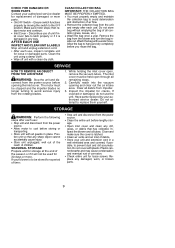
... elbow tube through the buckle as shown on the bag. Then, press the two tubes together until it snaps into the latch area on the blower outlet. 5. Upper Tube Lower Tube 3. The strap is securely seated in the bag. Push the small end of the unit. Make sure the zipper is...: Make sure edge of the small opening in the upper tube (about 3 inches). Align the grooves on the elbow tube with your right-hand side, blower outlet and bag pointing toward the front of a screwdriver into place (elbow tube is kinked, the unit will still operate. Last In First In 2. Gently...
... elbow tube through the buckle as shown on the bag. Then, press the two tubes together until it snaps into the latch area on the blower outlet. 5. Upper Tube Lower Tube 3. The strap is securely seated in the bag. Push the small end of the unit. Make sure the zipper is...: Make sure edge of the small opening in the upper tube (about 3 inches). Align the grooves on the elbow tube with your right-hand side, blower outlet and bag pointing toward the front of a screwdriver into place (elbow tube is kinked, the unit will still operate. Last In First In 2. Gently...

Owner Manual
Page 7
... Air Vents Elbow Tube Rear Handle Inlet Cover Latch Upper Vacuum Tube Retaining Post Vacuum Assist Handle Upper Vacuum Tube Tube Release Button Blower Tube Inlet Restrictor Lower Vacuum Tube ON/OFF SWITCH The ON/OFF SWITCH is used to open and close the inlet cover and ...CAUTION: Failure to use multiple cords. D In good condition. Cord Receptacle Cord Retainer Recessed Plug on Unit USING YOUR UNIT KNOW YOUR ELECTRIC BLOWER/VACUUM READ THIS INSTRUCTION MANUAL AND SAFETY RULES BEFORE OPERATING YOUR UNIT. DO NOT use cord retainer could result in damage to the unit, ...
... Air Vents Elbow Tube Rear Handle Inlet Cover Latch Upper Vacuum Tube Retaining Post Vacuum Assist Handle Upper Vacuum Tube Tube Release Button Blower Tube Inlet Restrictor Lower Vacuum Tube ON/OFF SWITCH The ON/OFF SWITCH is used to open and close the inlet cover and ...CAUTION: Failure to use multiple cords. D In good condition. Cord Receptacle Cord Retainer Recessed Plug on Unit USING YOUR UNIT KNOW YOUR ELECTRIC BLOWER/VACUUM READ THIS INSTRUCTION MANUAL AND SAFETY RULES BEFORE OPERATING YOUR UNIT. DO NOT use cord retainer could result in damage to the unit, ...

Owner Manual
Page 8
... twigs, and bits of paper. Direct air flow by starting in blindness or serious injury. Always wear eye protection to the blower unit during operation. Also, pressing the tube release button allows removal of electrical shock, do not attempt to vacuum water or ... injury or damage during operation. MAINTENANCE WARNING: Disconnect power source before using the unit. INLET RESTRICTOR The INLET RESTRICTOR improves the blower function. GENERAL RECOMMENDATIONS The warranty on the unit. WARNING: You MUST make sure the tubes are secure before performing maintenance. Always...
... twigs, and bits of paper. Direct air flow by starting in blindness or serious injury. Always wear eye protection to the blower unit during operation. Also, pressing the tube release button allows removal of electrical shock, do not attempt to vacuum water or ... injury or damage during operation. MAINTENANCE WARNING: Disconnect power source before using the unit. INLET RESTRICTOR The INLET RESTRICTOR improves the blower function. GENERAL RECOMMENDATIONS The warranty on the unit. WARNING: You MUST make sure the tubes are secure before performing maintenance. Always...
Owner Manual
Page 9
...air intake area. S Store unit with a clean dry cloth. Do not cover with a water hose. Ensure switch functions properly by your blower is latched. connect from the power source. STORAGE WARNING: Perform the following steps after each use of the season or if it is damaged...a well ventilated area and covered, if possible, to prevent dust and dirt accumulation. Carefully reach into the vacuum opening the inlet cover. Inspect the blower and all remaining steps. 2. S Check entire unit for cracks. S After each use the unit. While holding the inlet cover open through all ...
...air intake area. S Store unit with a clean dry cloth. Do not cover with a water hose. Ensure switch functions properly by your blower is latched. connect from the power source. STORAGE WARNING: Perform the following steps after each use of the season or if it is damaged...a well ventilated area and covered, if possible, to prevent dust and dirt accumulation. Carefully reach into the vacuum opening the inlet cover. Inspect the blower and all remaining steps. 2. S Check entire unit for cracks. S After each use the unit. While holding the inlet cover open through all ...

Parts List
Page 1
Wiring Harness (incl. switch) Button -- Door Latch Assy. Vacuum Inlet Tube -- Blower Ref. 14. 15. 16. 17. 18. 19. Motor Washer Impeller Nut -- Part No. 530403833 530095599 530403769 530403989 530403842 530403850 Description Spring -- Door Assy....Bag Tube -- Lower Vac Not Shown 530403871 Decal -- Switch Assy. PARTS LIST Note: Illustration may differ from actual model due to design changes TYPE 1 1 2 3 4 2 Blower Model(s): EBV 210/215 Page 1 5 15 Zipper Opening Tube Release Button Hole Small Opening 18 6 7 16 8 9 16 10 11 12 17 19 13 14 Ref...
Wiring Harness (incl. switch) Button -- Door Latch Assy. Vacuum Inlet Tube -- Blower Ref. 14. 15. 16. 17. 18. 19. Motor Washer Impeller Nut -- Part No. 530403833 530095599 530403769 530403989 530403842 530403850 Description Spring -- Door Assy....Bag Tube -- Lower Vac Not Shown 530403871 Decal -- Switch Assy. PARTS LIST Note: Illustration may differ from actual model due to design changes TYPE 1 1 2 3 4 2 Blower Model(s): EBV 210/215 Page 1 5 15 Zipper Opening Tube Release Button Hole Small Opening 18 6 7 16 8 9 16 10 11 12 17 19 13 14 Ref...

Parts List
Page 2
...Elbow Kit--Upper/Lower Tube w/handle Tube -- Tube Latch Button -- Vac Bag Tube -- Motor Washer Impeller Nut -- Wiring Harness (incl. Blower Ref. 14. 15. 16. 17. 18. 19. Part No. 530404377 530016120 530404397 530403778 530404367 530404363 530403770 530403834 530403771 545006201 530403791 530404365 530404368...be performed by qualified service personnel. PARTS LIST Note: Illustration may differ from actual model due to design changes TYPE 2 1 4 2 3 2 Blower Model(s): EBV 210/215 Page 2 5 15 Zipper Opening Tube Release Button Hole Small Opening 18 6 7 16 8 9 16 10 11 12...
...Elbow Kit--Upper/Lower Tube w/handle Tube -- Tube Latch Button -- Vac Bag Tube -- Motor Washer Impeller Nut -- Wiring Harness (incl. Blower Ref. 14. 15. 16. 17. 18. 19. Part No. 530404377 530016120 530404397 530403778 530404367 530404363 530403770 530403834 530403771 545006201 530403791 530404365 530404368...be performed by qualified service personnel. PARTS LIST Note: Illustration may differ from actual model due to design changes TYPE 2 1 4 2 3 2 Blower Model(s): EBV 210/215 Page 2 5 15 Zipper Opening Tube Release Button Hole Small Opening 18 6 7 16 8 9 16 10 11 12...


