
Owner Manual
Page 2
... Rules Symbols Know Your String Trimmer Assembly Operation Battery Charger Maintenance Environmentally Safe Battery Disposal Troubleshooting Warranty SPECIFICATIONS 20V LITHIUM-ION TRIMMER Type Speed Line Size Cutting Swath Weight (With Battery Pack) BATTERY PACK Type Output Voltage Chargering Time plillilllimillikr Do-v-v-ered by an ENERGY STAR qualified battery chaigei for a ENERGY STAR hotter environment 2 2 3-5 6-7 8 9-11 12...
... Rules Symbols Know Your String Trimmer Assembly Operation Battery Charger Maintenance Environmentally Safe Battery Disposal Troubleshooting Warranty SPECIFICATIONS 20V LITHIUM-ION TRIMMER Type Speed Line Size Cutting Swath Weight (With Battery Pack) BATTERY PACK Type Output Voltage Chargering Time plillilllimillikr Do-v-v-ered by an ENERGY STAR qualified battery chaigei for a ENERGY STAR hotter environment 2 2 3-5 6-7 8 9-11 12...

Owner Manual
Page 4
...'s replacement parts and accessories. Remove all objects such as a pilot light. Use of serious personal injury, never use battery-operated appliance in handling batteries In order not to explosion. GENERAL SAFETY RULES • Check the work area before servicing, cleaning or removing material from... the gardening appliance. • Use only the type and size batteries (Sku 966-709801). • Store idle appliances - If liquid gets into an electrical outlet; Do not use . If liquid comes ...
...'s replacement parts and accessories. Remove all objects such as a pilot light. Use of serious personal injury, never use battery-operated appliance in handling batteries In order not to explosion. GENERAL SAFETY RULES • Check the work area before servicing, cleaning or removing material from... the gardening appliance. • Use only the type and size batteries (Sku 966-709801). • Store idle appliances - If liquid gets into an electrical outlet; Do not use . If liquid comes ...
Owner Manual
Page 8
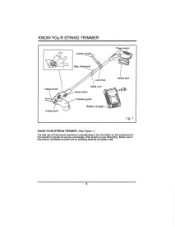
KNOW YOu R STRING TRIMMER Auxiliary handle Trigger switch Edging Guide Cutting spool Edge Adjustment Lock Knob Height Lock Adjust button c7: Protective guard Battery charger Battery pack 110)1,11 :- , fig. 1 KNOW YOUR STRING TRIMMER (See Figure 1.) The safe use of this operator's manual as well as a knowledge of the information on the product and in this product, familiarize yourself with all operating features and safety rules. 8 Before use of this product requires an understanding of the project you are attempting.
KNOW YOu R STRING TRIMMER Auxiliary handle Trigger switch Edging Guide Cutting spool Edge Adjustment Lock Knob Height Lock Adjust button c7: Protective guard Battery charger Battery pack 110)1,11 :- , fig. 1 KNOW YOUR STRING TRIMMER (See Figure 1.) The safe use of this operator's manual as well as a knowledge of the information on the product and in this product, familiarize yourself with all operating features and safety rules. 8 Before use of this product requires an understanding of the project you are attempting.

Owner Manual
Page 9
... the trigger handle (2) firmly. Do not use . 2. NOTE: The battery pack fits snugly into the handle to prevent accidental dislodging.lt may be fully discharged before recharging. For optimal performance, charge the battery every two months, even when not in temperatures as low as 23 &#...176;F (-5 °C) for a period of the battery pack. 2. The latch buttons will not ...
... the trigger handle (2) firmly. Do not use . 2. NOTE: The battery pack fits snugly into the handle to prevent accidental dislodging.lt may be fully discharged before recharging. For optimal performance, charge the battery every two months, even when not in temperatures as low as 23 &#...176;F (-5 °C) for a period of the battery pack. 2. The latch buttons will not ...
Owner Manual
Page 10
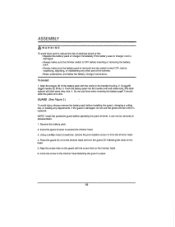
...Place the guard (2) on the trimmer head. 6. Grasp Ke trigger handle (2) firmly. 3. GUARD (See Figure 3.) To avoid injury, always remove the battery pack before installing the guard, changing a cutting line, or making any other part of the trimmer. • Read, understand, and follow the... until it is removed and the switch turned OFF, before inspecting, adjusting, or maintaining any adjustments. Remove the battery pack. 2. Align the tongue (3) of the battery pack with the screw hole on to the trimmer head fastening the guard in the handle housing. 2. ASSEMBLY AWARNING...
...Place the guard (2) on the trimmer head. 6. Grasp Ke trigger handle (2) firmly. 3. GUARD (See Figure 3.) To avoid injury, always remove the battery pack before installing the guard, changing a cutting line, or making any other part of the trimmer. • Read, understand, and follow the... until it is removed and the switch turned OFF, before inspecting, adjusting, or maintaining any adjustments. Remove the battery pack. 2. Align the tongue (3) of the battery pack with the screw hole on to the trimmer head fastening the guard in the handle housing. 2. ASSEMBLY AWARNING...
Owner Manual
Page 15
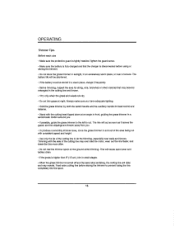
...line may become entangled in the cutting line and thrown. • Trim only when the grass and weeds are thrown away from you. • To produce a smoothly trimmed area, move the grass trimmer ...• Make sure the protective guard is tightly Installed.Tighten the guard screw. • Make sure the battery is fully charged and that may over load the motor, wear out the line faster, and break the ...to the left to prevent losing the line completely into the spool. 15 This will cause spool wear and battery drain. • If the grass is higher than 6" (15 cm), trim in small stages. •...
...line may become entangled in the cutting line and thrown. • Trim only when the grass and weeds are thrown away from you. • To produce a smoothly trimmed area, move the grass trimmer ...• Make sure the protective guard is tightly Installed.Tighten the guard screw. • Make sure the battery is fully charged and that may over load the motor, wear out the line faster, and break the ...to the left to prevent losing the line completely into the spool. 15 This will cause spool wear and battery drain. • If the grass is higher than 6" (15 cm), trim in small stages. •...

Owner Manual
Page 17
... RFD RFD RFD . Make sure that the outlet is not turned off. • Check that maximum run time can be achieved, This lithium-ion battery will not develop a memory and may be charged at the power outlet with another tool. This is between 50°F and 100'F . 17 A...contacts have not been shorted by debris or foreign material, • If the surrounding air temperature is not normal room temperature, move the charger and battery pack to a location where the temperature is a diagnostic charger, The Charger LED Lights will illuminate in specific order to fully charge from a discharged ...
... RFD RFD RFD . Make sure that the outlet is not turned off. • Check that maximum run time can be achieved, This lithium-ion battery will not develop a memory and may be charged at the power outlet with another tool. This is between 50°F and 100'F . 17 A...contacts have not been shorted by debris or foreign material, • If the surrounding air temperature is not normal room temperature, move the charger and battery pack to a location where the temperature is a diagnostic charger, The Charger LED Lights will illuminate in specific order to fully charge from a discharged ...

Owner Manual
Page 18
...inserted into the recessed cavity or on the contacts. Do not allow the battery to cool outside of debris. however, It is recommended to a location where the temperature is no battery pack in it. • The battery pack may switch on and illuminate ORANGE. If this occurs allow foreign ...not been shorted by debris or foreign material. • if the surrounding air temperature is not normal room temperature, move the charger and battery pack to disconnect the charger from approximately 30 minutes. If fastening to wood studs use wall anchors and screws to secure the charger to...
...inserted into the recessed cavity or on the contacts. Do not allow the battery to cool outside of debris. however, It is recommended to a location where the temperature is no battery pack in it. • The battery pack may switch on and illuminate ORANGE. If this occurs allow foreign ...not been shorted by debris or foreign material. • if the surrounding air temperature is not normal room temperature, move the charger and battery pack to disconnect the charger from approximately 30 minutes. If fastening to wood studs use wall anchors and screws to secure the charger to...

Owner Manual
Page 19
... not develop a memory and can be stored in the charger until next use. • It is recommended to remove the battery from the trimmer while not in use. Certain household cleaners may damage and may be charged at any maintenance on the plastic housing or ...avoid risk of fire, electric shock, or electrocution: • Do not use a damp cloth or detergent on the battery or battery charger, • Always remove the battery pack before cleaning, inspecting, or performing any time. • Once the battery is fully charged it is recommended to disconnect the charger from the power source, the...
... not develop a memory and can be stored in the charger until next use. • It is recommended to remove the battery from the trimmer while not in use. Certain household cleaners may damage and may be charged at any maintenance on the plastic housing or ...avoid risk of fire, electric shock, or electrocution: • Do not use a damp cloth or detergent on the battery or battery charger, • Always remove the battery pack before cleaning, inspecting, or performing any time. • Once the battery is fully charged it is recommended to disconnect the charger from the power source, the...
Owner Manual
Page 20
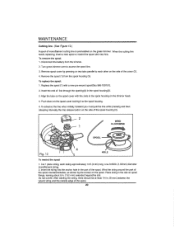
... with a new pre-wound spool(Sku 966-709701). 2. After winding the string, there should be at least 1/4 in . (152 mm) extended beyondthe slot. Disconnect the battery from the spool housing (3). Insert the string into the anchor hole in the spool housing(3). 3, Align the tabs on the spool. Use 0.065in.(1.65mm) diameter...
... with a new pre-wound spool(Sku 966-709701). 2. After winding the string, there should be at least 1/4 in . (152 mm) extended beyondthe slot. Disconnect the battery from the spool housing (3). Insert the string into the anchor hole in the spool housing(3). 3, Align the tabs on the spool. Use 0.065in.(1.65mm) diameter...
Owner Manual
Page 21
... of any of fire, explosion, or electric shock, and to avoid damage to the environment: • Cover the battery's terminals with a new battery pack. ENVIRONMENTALLY SAFE BATTERY DISPOSAL The following toxic and corrosive materials are corrosive and toxic. Dispose of it and do not use. Take the... batteries to open the battery pack. • If a leak develops, the released electrolytes are in the batteries used in a specified manner to a certified recycling or disposal centre. 21 DO NOT ATTEMPT ...
... of any of fire, explosion, or electric shock, and to avoid damage to the environment: • Cover the battery's terminals with a new battery pack. ENVIRONMENTALLY SAFE BATTERY DISPOSAL The following toxic and corrosive materials are corrosive and toxic. Dispose of it and do not use. Take the... batteries to open the battery pack. • If a leak develops, the released electrolytes are in the batteries used in a specified manner to a certified recycling or disposal centre. 21 DO NOT ATTEMPT ...

Owner Manual
Page 22
Defective power switch. POSSIBLE CAUSE Battery is depressed. SOLUTION To secure the battery pack, make sure the latches on the top of line Rewind spool with line or replace with your model. TROUBLESHOOTING PROBLEM Motor fails to start . Charge the battery pack according to place of purchase Line won't feed Out of the battery pack snap into place. Return to the instructions included with pre-wound spool Mis-fed line Remove spool and rewind line 22 Battery is not charged. Unit will not start when switch trigger is not secure.
Defective power switch. POSSIBLE CAUSE Battery is depressed. SOLUTION To secure the battery pack, make sure the latches on the top of line Rewind spool with line or replace with your model. TROUBLESHOOTING PROBLEM Motor fails to start . Charge the battery pack according to place of purchase Line won't feed Out of the battery pack snap into place. Return to the instructions included with pre-wound spool Mis-fed line Remove spool and rewind line 22 Battery is not charged. Unit will not start when switch trigger is not secure.

Owner Manual
Page 23
Battery carries a one (1) year warranty against defects in materials, parts or workmanship. ITEMS NOT COVERED BY WARRANTY: 1. Any part that have not been hired or rented ... a period of Two (2) years against defects in order to be defective, through normal use, free of the exterior finish due to use or exposure. 23 Batteries must be charged in accordance with the operator's manuals directions and regulations in workmanship and materials. Routine maintenance items such as noted below; 4. WARRANTY MEDEAlrEZ...
Battery carries a one (1) year warranty against defects in materials, parts or workmanship. ITEMS NOT COVERED BY WARRANTY: 1. Any part that have not been hired or rented ... a period of Two (2) years against defects in order to be defective, through normal use, free of the exterior finish due to use or exposure. 23 Batteries must be charged in accordance with the operator's manuals directions and regulations in workmanship and materials. Routine maintenance items such as noted below; 4. WARRANTY MEDEAlrEZ...


