
Canadian English Manual
Page 1
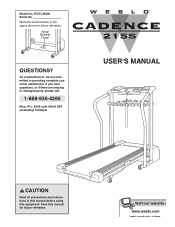
If you have questions, or if there are committed to providing complete customer satisfaction. Serial Number Decal QUESTIONS? WCTL49300 Serial No. As a manufacturer, we are missing or damaged parts, please call: 1-888-936-4266 Mon.-Fri., 8h00 until 18h30 EST (excluding holidays) ® USER'S MANUAL CAUTION Read all precautions and instructions in the space above for future reference. Visit our website at www.weslo.com new products, prizes, f Save this equipment. Model No. Write the serial number in this manual before using this manual for future reference.
If you have questions, or if there are committed to providing complete customer satisfaction. Serial Number Decal QUESTIONS? WCTL49300 Serial No. As a manufacturer, we are missing or damaged parts, please call: 1-888-936-4266 Mon.-Fri., 8h00 until 18h30 EST (excluding holidays) ® USER'S MANUAL CAUTION Read all precautions and instructions in the space above for future reference. Visit our website at www.weslo.com new products, prizes, f Save this equipment. Model No. Write the serial number in this manual before using this manual for future reference.
Canadian English Manual
Page 2
... FOLD AND MOVE THE TREADMILL 10 TROUBLE-SHOOTING 12 CONDITIONING GUIDELINES 14 ORDERING REPLACEMENT PARTS Back Cover LIMITED WARRANTY Back Cover Note: An EXPLODED DRAWING and a PART LIST are standing on the walking belt. Save the EXPLODED DRAWING and PART LIST for both men and women. It is being administered. 6. Always wear athletic shoes. Keep children under the treadmill. 4. Do not wear loose cloth- 10. When connecting the power cord...
... FOLD AND MOVE THE TREADMILL 10 TROUBLE-SHOOTING 12 CONDITIONING GUIDELINES 14 ORDERING REPLACEMENT PARTS Back Cover LIMITED WARRANTY Back Cover Note: An EXPLODED DRAWING and a PART LIST are standing on the walking belt. Save the EXPLODED DRAWING and PART LIST for both men and women. It is being administered. 6. Always wear athletic shoes. Keep children under the treadmill. 4. Do not wear loose cloth- 10. When connecting the power cord...
Canadian English Manual
Page 3
... health problems. Read all parts of heart rate readings. The treadmill is shown at speeds faster than the procedures in any opening. Never leave the treadmill unattended while it is missing or illegible, please call our Customer Service Department, toll-free, to do so by or through the use of this treadmill in this product. Never remove the motor hood unless instructed to order a free replacement decal (see ORDERING REPLACEMENT PARTS...
... health problems. Read all parts of heart rate readings. The treadmill is shown at speeds faster than the procedures in any opening. Never leave the treadmill unattended while it is missing or illegible, please call our Customer Service Department, toll-free, to do so by or through the use of this treadmill in this product. Never remove the motor hood unless instructed to order a free replacement decal (see ORDERING REPLACEMENT PARTS...
Canadian English Manual
Page 4
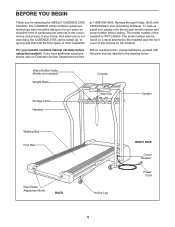
.... The model number of your benefit, read this manual for selecting the WESLO® CADENCE 215S treadmill. The serial number can be found on a decal attached to let you , please note the product model number and serial number before using the treadmill. Water Bottle Holder (Bottle not included) Weight Rack Storage Latch Handrail Console Key/Clip Upright Walking Belt Foot Rail Rear Roller Adjustment Bolts BACK Incline Leg RIGHT SIDE Circuit Breaker Power Cord 4 The CADENCE 215S combines advanced technology with the parts that are...
.... The model number of your benefit, read this manual for selecting the WESLO® CADENCE 215S treadmill. The serial number can be found on a decal attached to let you , please note the product model number and serial number before using the treadmill. Water Bottle Holder (Bottle not included) Weight Rack Storage Latch Handrail Console Key/Clip Upright Walking Belt Foot Rail Rear Roller Adjustment Bolts BACK Incline Leg RIGHT SIDE Circuit Breaker Power Cord 4 The CADENCE 215S combines advanced technology with the parts that are...
Canadian English Manual
Page 5
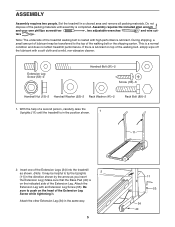
...)-2 Rack Washer (41)-2 Rack Bolt (89)-2 1. With the help of a second person, carefully raise the Uprights (11) until assembly is lubricant on the head of the walking belt, simply wipe off the lubricant with a soft cloth and a mild, non-abrasive cleaner. Attach the other Extension Leg (34) in a cleared area and remove all packing materials. Set the treadmill in the same way...
...)-2 Rack Washer (41)-2 Rack Bolt (89)-2 1. With the help of a second person, carefully raise the Uprights (11) until assembly is lubricant on the head of the walking belt, simply wipe off the lubricant with a soft cloth and a mild, non-abrasive cleaner. Attach the other Extension Leg (34) in a cleared area and remove all packing materials. Set the treadmill in the same way...
Canadian English Manual
Page 6
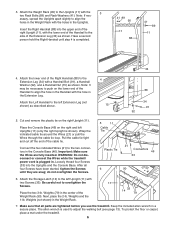
... connect the Wires while the treadmill power cord is used to the Uprights (11) with two Screws (33). Weights (79) in the Weight Rack. 11 33 14 79 7. Next, place the 2-lb. Weights (not shown) in the center of the cable tie. Place the Console Base (46) on the right Upright (11). Connect the two indicated Wires (21) to the left Upright (11) with the 3 two Rack Bolts...
... connect the Wires while the treadmill power cord is used to the Uprights (11) with two Screws (33). Weights (79) in the Weight Rack. 11 33 14 79 7. Next, place the 2-lb. Weights (not shown) in the center of the cable tie. Place the Console Base (46) on the right Upright (11). Connect the two indicated Wires (21) to the left Upright (11) with the 3 two Rack Bolts...

Canadian English Manual
Page 7
... the adapter is used to connect the surge protector to whether the product is properly grounded. This product is equipped with a cord having an equipment-grounding conductor and a Your treadmill features a walking belt coated with your tread- 1 mill being turned on a nominal 120-volt circuit, HOW TO PLUG IN THE POWER CORD and has a grounding plug that DANGER: Improper connection of your treadmill. A temporary adapter...
... the adapter is used to connect the surge protector to whether the product is properly grounded. This product is equipped with a cord having an equipment-grounding conductor and a Your treadmill features a walking belt coated with your tread- 1 mill being turned on a nominal 120-volt circuit, HOW TO PLUG IN THE POWER CORD and has a grounding plug that DANGER: Improper connection of your treadmill. A temporary adapter...
Canadian English Manual
Page 8
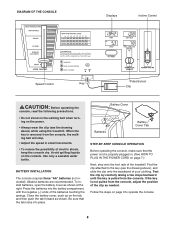
DIAGRAM OF THE CONSOLE Displays Incline Control Speed Control Key PulseSensor Clip CAUTION: Before operating the console, read the following precautions. • Do not stand on the walking belt when turning on the power. • Always wear the clip (see the drawing above ) while using the treadmill. Use only a sealable water bottle. To install batteries, open the battery cover as shown. Battery Cover Batteries Battery Cover Tab STEP-BY-STEP CONSOLE OPERATION Before operating the console, make sure that the tab...
DIAGRAM OF THE CONSOLE Displays Incline Control Speed Control Key PulseSensor Clip CAUTION: Before operating the console, read the following precautions. • Do not stand on the walking belt when turning on the power. • Always wear the clip (see the drawing above ) while using the treadmill. Use only a sealable water bottle. To install batteries, open the battery cover as shown. Battery Cover Batteries Battery Cover Tab STEP-BY-STEP CONSOLE OPERATION Before operating the console, make sure that the tab...

Canadian English Manual
Page 9
... your pulse when the pulse sensor is positioned as indicated by moving the speed control. BURNING on the sensor for another 15 seconds for four minutes, 9 If the displayed pulse appears to reset. Note: Each time the walking belt is stopped, the speed control must be moved to stand still while measuring your thumb is used (see step 4). This display shows the distance that your pulse. 1 Insert the key fully into the power switch.
... your pulse when the pulse sensor is positioned as indicated by moving the speed control. BURNING on the sensor for another 15 seconds for four minutes, 9 If the displayed pulse appears to reset. Note: Each time the walking belt is stopped, the speed control must be moved to stand still while measuring your thumb is used (see step 4). This display shows the distance that your pulse. 1 Insert the key fully into the power switch.

Canadian English Manual
Page 10
Next, remove the six screws attaching the console to the console base. Re-attach the console to the console base. This will reset the console. To change the unit of the console. Locate the small switch on the wires, and turn the console over. Move the switch upward or downward to pull on the back of measurement, first UNPLUG THE POWER CORD. The hand weights can display distance and speed in either kilometres or miles. Using weights and not...
Next, remove the six screws attaching the console to the console base. Re-attach the console to the console base. This will reset the console. To change the unit of the console. Locate the small switch on the wires, and turn the console over. Move the switch upward or downward to pull on the back of measurement, first UNPLUG THE POWER CORD. The hand weights can display distance and speed in either kilometres or miles. Using weights and not...

Canadian English Manual
Page 11
.... HOW TO LOWER THE TREADMILL FOR USE 1. Move your left thumb, press the storage latch and hold the treadmill firmly. Raise the treadmill until the frame and foot rail are past the storage latch. 2. Keep the treadmill out of injury, use extreme caution while moving the treadmill, convert the treadmill to the desired location. Tilt the treadmill back until it . Do not move the treadmill to the storage position as shown...
.... HOW TO LOWER THE TREADMILL FOR USE 1. Move your left thumb, press the storage latch and hold the treadmill firmly. Raise the treadmill until the frame and foot rail are past the storage latch. 2. Keep the treadmill out of injury, use extreme caution while moving the treadmill, convert the treadmill to the desired location. Tilt the treadmill back until it . Do not move the treadmill to the storage position as shown...
Canadian English Manual
Page 12
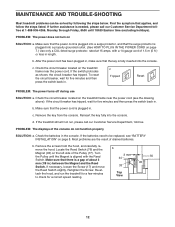
... 7.) Use only a CUL-listed surge protector, rated at 1-888-936-4266, Monday through Friday, 8h00 until the Magnet is fully inserted into the console. Check the circuit breaker located on SOLUTION: a. To reset the circuit breaker, wait for five minutes and then press the switch back in . MAINTENANCE AND TROUBLE-SHOOTING Most treadmill problems can be replaced, see "BATTERY INSTALLATION" on the treadmill frame near the power cord...
... 7.) Use only a CUL-listed surge protector, rated at 1-888-936-4266, Monday through Friday, 8h00 until the Magnet is fully inserted into the console. Check the circuit breaker located on SOLUTION: a. To reset the circuit breaker, wait for five minutes and then press the switch back in . MAINTENANCE AND TROUBLE-SHOOTING Most treadmill problems can be replaced, see "BATTERY INSTALLATION" on the treadmill frame near the power cord...
Canadian English Manual
Page 13
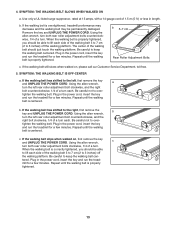
... the walking belt 5 to 7 cm (2 to the left rear roller adjustment bolt clockwise, and the right bolt counterclockwise, 1/4 of the walking belt 5 to 7 cm (2 to over - If the walking belt slips when walked on , please call our Customer Service Department, toll-free. 5. tered. When the walking belt is correctly tightened, you should be able to lift each side of a turn each . Plug in the power cord, insert the key and run the treadmill for...
... the walking belt 5 to 7 cm (2 to the left rear roller adjustment bolt clockwise, and the right bolt counterclockwise, 1/4 of the walking belt 5 to 7 cm (2 to over - If the walking belt slips when walked on , please call our Customer Service Department, toll-free. 5. tered. When the walking belt is correctly tightened, you should be able to lift each side of a turn each . Plug in the power cord, insert the key and run the treadmill for...
Canadian English Manual
Page 14
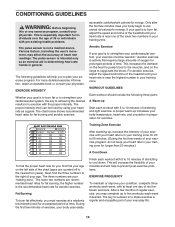
... the user's movement, may complete up Start each workout with 5 to make exercise a regular and enjoyable part of your exercise program. The pulse sensor is especially important for exercise. This is intended only as a guide. accessible carbohydrate calories for fat burning and aerobic exercise. The three numbers are your physician. After a few weeks of your exercise program, do not keep your heart rate in your training zone for...
... the user's movement, may complete up Start each workout with 5 to make exercise a regular and enjoyable part of your exercise program. The pulse sensor is especially important for exercise. This is intended only as a guide. accessible carbohydrate calories for fat burning and aerobic exercise. The three numbers are your physician. After a few weeks of your exercise program, do not keep your heart rate in your training zone for...
Canadian English Manual
Page 15
... you, please be prepared to give the following information when calling: • The MODEL NUMBER of the product (WCTL49300) • The NAME of the product (WESLO CADENCE® 215S treadmill) • The SERIAL NUMBER of the product (see the front cover of this manual) • The KEY NUMBER and DESCRIPTION of the desired part(s) (see the PART LIST and the EXPLODED DRAWING in the center of...
... you, please be prepared to give the following information when calling: • The MODEL NUMBER of the product (WCTL49300) • The NAME of the product (WESLO CADENCE® 215S treadmill) • The SERIAL NUMBER of the product (see the front cover of this manual) • The KEY NUMBER and DESCRIPTION of the desired part(s) (see the PART LIST and the EXPLODED DRAWING in the center of...
Canadian English Manual
Page 16
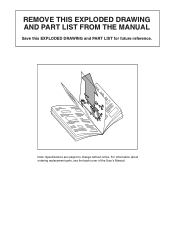
Note: Specifications are subject to change without notice. REMOVE THIS EXPLODED DRAWING AND PART LIST FROM THE MANUAL Save this EXPLODED DRAWING and PART LIST for future reference. For information about ordering replacement parts, see the back cover of the User's Manual. 34
Note: Specifications are subject to change without notice. REMOVE THIS EXPLODED DRAWING AND PART LIST FROM THE MANUAL Save this EXPLODED DRAWING and PART LIST for future reference. For information about ordering replacement parts, see the back cover of the User's Manual. 34
Canadian English Manual
Page 17
... you ever purchased an ICON product before? All products for purchasing this warranty is limited in its scope and duration to replacing or repairing, at ICON's option, the product at one of its authorized service centers with respect to any implied warranties of exercise equipment do you read regularly? J Bicycle J Exercise Cycle J Treadmill J Home Gym J Weight Bench J Stepper J Cardio Glide J Other 11) Which type of ICON Health & Fitness, Inc.
... you ever purchased an ICON product before? All products for purchasing this warranty is limited in its scope and duration to replacing or repairing, at ICON's option, the product at one of its authorized service centers with respect to any implied warranties of exercise equipment do you read regularly? J Bicycle J Exercise Cycle J Treadmill J Home Gym J Weight Bench J Stepper J Cardio Glide J Other 11) Which type of ICON Health & Fitness, Inc.
Canadian English Manual
Page 18
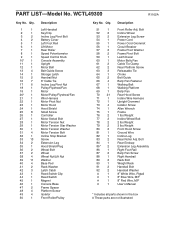
... Rail Lift Motor Rear Roller Speed Potentiometer Speed Control Knob Console Assembly Upright Motor Belt Belt Guide Screw Storage Latch Handrail Nut 8" Cable Tie Incline Leg Pivot Nut Pulley/Flywheel/Fan Motor Motor/Pulley/Flywheel/Fan Wire Harness Motor Pivot Nut Motor Hood Hood Shield Small Screw Controller Motor Swivel Bolt Motor Tension Nut Motor Tension Star Washer Motor Tension Washer Motor Tension Bolt Incline Stop Bracket Screw Extension Leg Hood Shield Plug Wheel Bolt Wheel Wheel Nut/Lift Nut Washer Base Pad Rack Washer Latch Catch Reed Switch Clip Reed Switch Magnet Console Base Frame...
... Rail Lift Motor Rear Roller Speed Potentiometer Speed Control Knob Console Assembly Upright Motor Belt Belt Guide Screw Storage Latch Handrail Nut 8" Cable Tie Incline Leg Pivot Nut Pulley/Flywheel/Fan Motor Motor/Pulley/Flywheel/Fan Wire Harness Motor Pivot Nut Motor Hood Hood Shield Small Screw Controller Motor Swivel Bolt Motor Tension Nut Motor Tension Star Washer Motor Tension Washer Motor Tension Bolt Incline Stop Bracket Screw Extension Leg Hood Shield Plug Wheel Bolt Wheel Wheel Nut/Lift Nut Washer Base Pad Rack Washer Latch Catch Reed Switch Clip Reed Switch Magnet Console Base Frame...
Canadian English Manual
Page 19
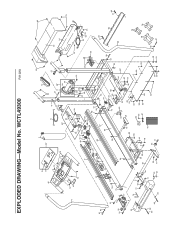
EXPLODED DRAWING-Model No. WCTL49300 R1102A 91 92 31 32 84 39 83 9 8 46 13 2 10* 13 25 12 33 71 11 21 27 20* 33 33 85* ...
EXPLODED DRAWING-Model No. WCTL49300 R1102A 91 92 31 32 84 39 83 9 8 46 13 2 10* 13 25 12 33 71 11 21 27 20* 33 33 85* ...


