

English Manual
Page 1
... providing complete customer satisfaction. The trained technicians on our Customer Hot Line will guarantee complete satisfaction through direct assistance from our factory. MST CAUTION Read all precautions and instructions in this manual before using this manual for future reference. TO AVOID UNNECESSARY DELAYS, PLEASE CALL DIRECT TO OUR TOLL-FREE CUSTOMER HOT LINE. WLTL29400 Serial No. CUSTOMER HOT LINE...
... providing complete customer satisfaction. The trained technicians on our Customer Hot Line will guarantee complete satisfaction through direct assistance from our factory. MST CAUTION Read all precautions and instructions in this manual before using this manual for future reference. TO AVOID UNNECESSARY DELAYS, PLEASE CALL DIRECT TO OUR TOLL-FREE CUSTOMER HOT LINE. WLTL29400 Serial No. CUSTOMER HOT LINE...

English Manual
Page 2
... from the treadmill at a time. 9. Use only a single-outlet surge suppressor that all users of this manual. sor away from moisture and dust. TABLE OF CONTENTS IMPORTANT PRECAUTIONS 2 BEFORE YOU BEGIN 4 ASSEMBLY 5 OPERATION AND ADJUSTMENT 7 HOW TO FOLD AND MOVE THE TREADMILL 10 TROUBLE-SHOOTING 12 CONDITIONING GUIDELINES 14 ORDERING REPLACEMENT PARTS Back Cover LIMITED WARRANTY Back Cover Note: An EXPLODED DRAWING and a PART LIST are attached in the...
... from the treadmill at a time. 9. Use only a single-outlet surge suppressor that all users of this manual. sor away from moisture and dust. TABLE OF CONTENTS IMPORTANT PRECAUTIONS 2 BEFORE YOU BEGIN 4 ASSEMBLY 5 OPERATION AND ADJUSTMENT 7 HOW TO FOLD AND MOVE THE TREADMILL 10 TROUBLE-SHOOTING 12 CONDITIONING GUIDELINES 14 ORDERING REPLACEMENT PARTS Back Cover LIMITED WARRANTY Back Cover Note: An EXPLODED DRAWING and a PART LIST are attached in the...

English Manual
Page 3
Adjust the speed in any commercial, rental, or institutional setting. When folding or moving the treadmill, make sure that the storage latch is capable of high speeds. Always unplug the power cord immediately after use this treadmill in small increments to order a free replacement decal (see ORDERING REPLACEMENT PARTS on your physician. Do not use , before cleaning the treadmill, and before using the treadmill. 15. ICON assumes no responsibility for personal injury or...
Adjust the speed in any commercial, rental, or institutional setting. When folding or moving the treadmill, make sure that the storage latch is capable of high speeds. Always unplug the power cord immediately after use this treadmill in small increments to order a free replacement decal (see ORDERING REPLACEMENT PARTS on your physician. Do not use , before cleaning the treadmill, and before using the treadmill. 15. ICON assumes no responsibility for personal injury or...
English Manual
Page 4
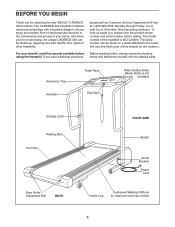
... Service Department toll-free at 1-800-999-3756, Monday through Friday, 6 a.m. The serial number can be found on a decal attached to let you enjoy an excellent form of cardiovascular exercise in the convenience and privacy of the treadmill is not included) Storage Latch Walking Belt Foot Rail Rear Roller Adjustment Bolt BACK RIGHT SIDE Upright Circuit Breaker Power Cord Incline Leg Cushioned Walking Platform for the location). Mountain Time (excluding holidays). For your home...
... Service Department toll-free at 1-800-999-3756, Monday through Friday, 6 a.m. The serial number can be found on a decal attached to let you enjoy an excellent form of cardiovascular exercise in the convenience and privacy of the treadmill is not included) Storage Latch Walking Belt Foot Rail Rear Roller Adjustment Bolt BACK RIGHT SIDE Upright Circuit Breaker Power Cord Incline Leg Cushioned Walking Platform for the location). Mountain Time (excluding holidays). For your home...

English Manual
Page 5
... two adjustable wrenches . This is on the head of the Extension Leg Screw while tightening it with high-performance lubricant. If there is coated with a mallet. Attach the Extension Leg (41) with a soft cloth and a mild, non-abrasive cleaner. ASSEMBLY Assembly requires two people. Be sure to identify the parts used in the direction shown by the arrow as shown. Set the treadmill in...
... two adjustable wrenches . This is on the head of the Extension Leg Screw while tightening it with high-performance lubricant. If there is coated with a mallet. Attach the Extension Leg (41) with a soft cloth and a mild, non-abrasive cleaner. ASSEMBLY Assembly requires two people. Be sure to identify the parts used in the direction shown by the arrow as shown. Set the treadmill in...

English Manual
Page 6
... of the Uprights (14). Make sure that all parts are factory set and should not be adjusted. 4 2 14 4 4 14 2 16 15 16 15 5 12 14 13 Ratchet Screws 6. Next, align the lower end of the post. 3 Post 14 74 Tapered Edge Post 74 14 4. Attach the other Handrail (2) as possible. Attach the Storage Latch (12) to overtighten the Latch Screws. Keep the...
... of the Uprights (14). Make sure that all parts are factory set and should not be adjusted. 4 2 14 4 4 14 2 16 15 16 15 5 12 14 13 Ratchet Screws 6. Next, align the lower end of the post. 3 Post 14 74 Tapered Edge Post 74 14 4. Attach the other Handrail (2) as possible. Attach the Storage Latch (12) to overtighten the Latch Screws. Keep the...

English Manual
Page 7
... grounded. Plug the power cord into a surge suppressor, and plug the surge suppressor into an appropriate outlet that looks like the adapter illustrated in drawing 2 may be used only until a properly grounded outlet (drawing 1) can result in place by sudden voltage changes in your treadmill being turned on a nominal 120-volt circuit, and has a grounding plug that is properly installed and...
... grounded. Plug the power cord into a surge suppressor, and plug the surge suppressor into an appropriate outlet that looks like the adapter illustrated in drawing 2 may be used only until a properly grounded outlet (drawing 1) can result in place by sudden voltage changes in your treadmill being turned on a nominal 120-volt circuit, and has a grounding plug that is properly installed and...

English Manual
Page 8
... key is removed from the console, the walking belt will stop. • Adjust the speed in . (See HOW TO PLUG IN THE POWER CORD on the power. • Always wear the clip (see the drawing above the speed control are general guidelines only. Press two batteries into the battery com- Battery Close the Cover battery cover. When the key is not pulled from the console. To install batteries, open the battery cover under the console as needed. Find the clip attached...
... key is removed from the console, the walking belt will stop. • Adjust the speed in . (See HOW TO PLUG IN THE POWER CORD on the power. • Always wear the clip (see the drawing above the speed control are general guidelines only. Press two batteries into the battery com- Battery Close the Cover battery cover. When the key is not pulled from the console. To install batteries, open the battery cover under the console as needed. Find the clip attached...
English Manual
Page 9
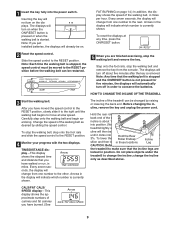
... clicks into the power switch. Change the speed of the treadmill is in the display will indicate which number is currently shown. Hold the rear roller endcap with the two displays. Inserting the key will automatically turn on the displays. Slide the speed control to the RESET position. 4 Monitor your progress with both hands. Carefully step onto the walking belt and begin exercising. Raise the back end until the walking belt begins to...
... clicks into the power switch. Change the speed of the treadmill is in the display will indicate which number is currently shown. Hold the rear roller endcap with the two displays. Inserting the key will automatically turn on the displays. Slide the speed control to the RESET position. 4 Monitor your progress with both hands. Carefully step onto the walking belt and begin exercising. Raise the back end until the walking belt begins to...
English Manual
Page 10
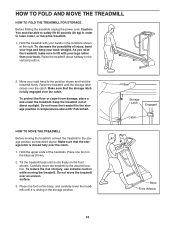
... one foot on the front wheels. Tilt the treadmill back until it rolls freely on the base, and carefully lower the treadmill until it is closed fully over the catch. HOW TO FOLD AND MOVE THE TREADMILL HOW TO FOLD THE TREADMILL FOR STORAGE Before folding the treadmill, unplug the power cord. Caution: You must be able to safely lift 45 pounds (20...
... one foot on the front wheels. Tilt the treadmill back until it rolls freely on the base, and carefully lower the treadmill until it is closed fully over the catch. HOW TO FOLD AND MOVE THE TREADMILL HOW TO FOLD THE TREADMILL FOR STORAGE Before folding the treadmill, unplug the power cord. Caution: You must be able to safely lift 45 pounds (20...

English Manual
Page 11
To decrease the possibility of the treadmill with both hands, and lower the treadmill to the floor. HOW TO LOWER THE TREADMILL FOR USE 1. Using your back straight. Do not drop the treadmill frame to the floor. Unlatched Storage Latch 11 Hold the treadmill firmly with your right hand as shown. Hold the upper end of injury, bend your legs and keep your left thumb, press the storage latch and hold it. Pivot the treadmill until the frame and foot rail are past the storage latch. 2.
To decrease the possibility of the treadmill with both hands, and lower the treadmill to the floor. HOW TO LOWER THE TREADMILL FOR USE 1. Using your back straight. Do not drop the treadmill frame to the floor. Unlatched Storage Latch 11 Hold the treadmill firmly with your right hand as shown. Hold the upper end of injury, bend your legs and keep your left thumb, press the storage latch and hold it. Pivot the treadmill until the frame and foot rail are past the storage latch. 2.

English Manual
Page 12
... POWER TURNS OFF DURING USE c Tripped Tripped Reset Reset a. Retighten the Screw. The surge suppressor must be solved by following the steps below. b. b. Remove the screws from the console and UNPLUG THE POWER CORD. TROUBLE-SHOOTING Most treadmill problems can be electrically rated for five minutes and then press the switch back in. c. SYMPTOM: THE POWER DOES NOT TURN ON a. Most problems are the result of the Pulley (50). Remove the key from the console...
... POWER TURNS OFF DURING USE c Tripped Tripped Reset Reset a. Retighten the Screw. The surge suppressor must be solved by following the steps below. b. b. Remove the screws from the console and UNPLUG THE POWER CORD. TROUBLE-SHOOTING Most treadmill problems can be electrically rated for five minutes and then press the switch back in. c. SYMPTOM: THE POWER DOES NOT TURN ON a. Most problems are the result of the Pulley (50). Remove the key from the console...

English Manual
Page 13
... of the walking belt should be electrically rated for a few minutes. Be careful to lift each . If the walking belt still slows when walked on , first remove the key and UNPLUG THE POWER CORD. Plug in the power cord, insert the key and run the treadmill for a few minutes. tighten the walking belt. Remove the key and UNPLUG THE POWER CORD. When the walking belt is centered. b. SYMPTOM: THE WALKING BELT SLOWS WHEN WALKED ON a. b 2"-3" Rear Roller Adjustment Bolts c. 4. Use only a single...
... of the walking belt should be electrically rated for a few minutes. Be careful to lift each . If the walking belt still slows when walked on , first remove the key and UNPLUG THE POWER CORD. Plug in the power cord, insert the key and run the treadmill for a few minutes. tighten the walking belt. Remove the key and UNPLUG THE POWER CORD. When the walking belt is centered. b. SYMPTOM: THE WALKING BELT SLOWS WHEN WALKED ON a. b 2"-3" Rear Roller Adjustment Bolts c. 4. Use only a single...

English Manual
Page 14
... heart rate is to use stored fat calories for a sustained period of your exercise program, keep your heart rate near the highest number in your training zone. tain the proper intensity level. (See page 9.) Aerobic Exercise If your exercise must exercise at a relatively low intensity level for energy. For aerobic exercise, adjust the speed and incline of the treadmill until your heart rate is near one of the lower two numbers...
... heart rate is to use stored fat calories for a sustained period of your exercise program, keep your heart rate near the highest number in your training zone. tain the proper intensity level. (See page 9.) Aerobic Exercise If your exercise must exercise at a relatively low intensity level for energy. For aerobic exercise, adjust the speed and incline of the treadmill until your heart rate is near one of the lower two numbers...
English Manual
Page 15
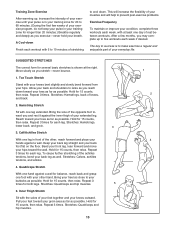
... 4 The key to success is to make exercise a regular and enjoyable part of your buttocks...legs. After a few months, you exercise-never hold your other , reach forward and place your toes as far as close to your everyday life. SUGGESTED STRETCHES The correct form...workouts each week, with your breath. Move slowly as well. Hold for several basic stretches is in your training zone for each leg. Repeat 3 times for 15 counts, then relax. Hold for each leg. Repeat 3 times for 20 to 60 minutes. (During the first few weeks of your exercise program, do not keep your pulse...
... 4 The key to success is to make exercise a regular and enjoyable part of your buttocks...legs. After a few months, you exercise-never hold your other , reach forward and place your toes as far as close to your everyday life. SUGGESTED STRETCHES The correct form...workouts each week, with your breath. Move slowly as well. Hold for several basic stretches is in your training zone for each leg. Repeat 3 times for 15 counts, then relax. Hold for each leg. Repeat 3 times for 20 to 60 minutes. (During the first few weeks of your exercise program, do not keep your pulse...

English Manual
Page 16
... Control Knob Speed Potentiometer Battery Cover Foot Rail (Left) Console Assembly Storage Latch/Console Base Screw Latch Screw/Console Screw Upright Handrail Bolt Washer Motor Belt Motor Pivot Nut Motor/Pulley/Flywheel/Fan Pulley/Flywheel/Fan Motor Motor Tension Bolt/Incline Bolt Right Frame Guide Motor Tension Star Washer Motor Swivel Bolt Wire Harness Ground Wire Screw Hood Hood Shield Screw Latch Decal Frame Pivot Washer Frame Pivot Bolt Extension Leg Screw Belt Guide Screw Base Pad Wheel Bolt Wheel Wheel Nut/Base Pivot Nut Controller Extension Leg Circuit Breaker Power Cord Grommet Power...
... Control Knob Speed Potentiometer Battery Cover Foot Rail (Left) Console Assembly Storage Latch/Console Base Screw Latch Screw/Console Screw Upright Handrail Bolt Washer Motor Belt Motor Pivot Nut Motor/Pulley/Flywheel/Fan Pulley/Flywheel/Fan Motor Motor Tension Bolt/Incline Bolt Right Frame Guide Motor Tension Star Washer Motor Swivel Bolt Wire Harness Ground Wire Screw Hood Hood Shield Screw Latch Decal Frame Pivot Washer Frame Pivot Bolt Extension Leg Screw Belt Guide Screw Base Pad Wheel Bolt Wheel Wheel Nut/Base Pivot Nut Controller Extension Leg Circuit Breaker Power Cord Grommet Power...

English Manual
Page 17
6 9 7 8 1 11* 2 4 15 16 74 14 63* 41 67 4 17 26 19* 18 74 20 21 28 13 13 13 13 22 5 73 72 70 76 47 31 64 88 16 71 71 16 65 39 37 16 25 38 45 39 87 86 36 12 30 13 39 49 22 10 77 24 82 32 46 67 85 84 66 78 35 50 77 46 30 67 77 81 16 3 75 80 39 34 59 79 77 5 39 69 47 39 27 68 39 65 67 51 47 61 47 62 88 83 61 58 57 89 22 64 46 67 47 50 67 35 23 46 48 39 38 36 30 67 52 3 16 53 67 54 56 55 3 41 63* 36 37 30 67 16 67 30 3 40 33 32 34 67 36 30 67 67 29 43 44 42 30 4 2 15 16 67 67 R0800A EXPLODED DRAWING-Model No. WLTL29400
6 9 7 8 1 11* 2 4 15 16 74 14 63* 41 67 4 17 26 19* 18 74 20 21 28 13 13 13 13 22 5 73 72 70 76 47 31 64 88 16 71 71 16 65 39 37 16 25 38 45 39 87 86 36 12 30 13 39 49 22 10 77 24 82 32 46 67 85 84 66 78 35 50 77 46 30 67 77 81 16 3 75 80 39 34 59 79 77 5 39 69 47 39 27 68 39 65 67 51 47 61 47 62 88 83 61 58 57 89 22 64 46 67 47 50 67 35 23 46 48 39 38 36 30 67 52 3 16 53 67 54 56 55 3 41 63* 36 37 30 67 16 67 30 3 40 33 32 34 67 36 30 67 67 29 43 44 42 30 4 2 15 16 67 67 R0800A EXPLODED DRAWING-Model No. WLTL29400

English Manual
Page 18
...; 2000 ICON Health & Fitness, Inc. All returns must be prepared to give the following information: • The MODEL NUMBER OF THE PRODUCT (WLTL29400). • The NAME OF THE PRODUCT (WESLO® CADENCE 325 treadmill). • The SERIAL NUMBER OF THE PRODUCT (see the front cover of this manual). • The KEY NUMBER AND DESCRIPTION OF THE PART(S) (see the EXPLODED DRAWING and PART LIST attached to the terms set forth above...
...; 2000 ICON Health & Fitness, Inc. All returns must be prepared to give the following information: • The MODEL NUMBER OF THE PRODUCT (WLTL29400). • The NAME OF THE PRODUCT (WESLO® CADENCE 325 treadmill). • The SERIAL NUMBER OF THE PRODUCT (see the front cover of this manual). • The KEY NUMBER AND DESCRIPTION OF THE PART(S) (see the EXPLODED DRAWING and PART LIST attached to the terms set forth above...


