
English Manual
Page 1
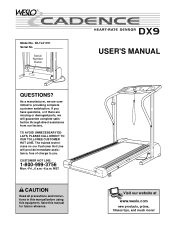
.... USER'S MANUAL Visit our website at www.weslo.com new products, prizes, fitness tips, and much more! If you . CUSTOMER HOT LINE: 1-800-999-3756 Mon.-Fri., 6 a.m.-6 p.m. MST CAUTION Read all precautions and instructions in this manual before using this manual for future reference. TO AVOID UNNECESSARY DELAYS, PLEASE CALL DIRECT TO OUR TOLL-FREE CUSTOMER HOT LINE. WLTL21191 Serial No. Model...
.... USER'S MANUAL Visit our website at www.weslo.com new products, prizes, fitness tips, and much more! If you . CUSTOMER HOT LINE: 1-800-999-3756 Mon.-Fri., 6 a.m.-6 p.m. MST CAUTION Read all precautions and instructions in this manual before using this manual for future reference. TO AVOID UNNECESSARY DELAYS, PLEASE CALL DIRECT TO OUR TOLL-FREE CUSTOMER HOT LINE. WLTL21191 Serial No. Model...

English Manual
Page 2
... from damage, place a mat under the treadmill. TABLE OF CONTENTS IMPORTANT PRECAUTIONS 2 BEFORE YOU BEGIN 4 ASSEMBLY 5 OPERATION AND ADJUSTMENT 7 HOW TO FOLD AND MOVE THE TREADMILL 10 MAINTENANCE AND TROUBLE-SHOOTING 12 CONDITIONING GUIDELINES 14 ORDERING REPLACEMENT PARTS Back Cover LIMITED WARRANTY Back Cover Note: An EXPLODED DRAWING and a PART LIST are attached in a garage or covered patio, or near water. 5. Always wear athletic shoes. Never use an extension cord. 4.
... from damage, place a mat under the treadmill. TABLE OF CONTENTS IMPORTANT PRECAUTIONS 2 BEFORE YOU BEGIN 4 ASSEMBLY 5 OPERATION AND ADJUSTMENT 7 HOW TO FOLD AND MOVE THE TREADMILL 10 MAINTENANCE AND TROUBLE-SHOOTING 12 CONDITIONING GUIDELINES 14 ORDERING REPLACEMENT PARTS Back Cover LIMITED WARRANTY Back Cover Note: An EXPLODED DRAWING and a PART LIST are attached in a garage or covered patio, or near water. 5. Always wear athletic shoes. Never use an extension cord. 4.

English Manual
Page 3
... power cord immediately after use only. Servicing other than the procedures in this treadmill in speed. 16. This is not in -home use , before cleaning the treadmill, and before using the treadmill. 15. Never start the treadmill while you are standing on your physician. Always hold the handrails while using . Never remove the motor hood unless instructed to avoid sudden jumps in any commercial, rental, or institutional setting. The pulse sensor...
... power cord immediately after use only. Servicing other than the procedures in this treadmill in speed. 16. This is not in -home use , before cleaning the treadmill, and before using the treadmill. 15. Never start the treadmill while you are standing on your physician. Always hold the handrails while using . Never remove the motor hood unless instructed to avoid sudden jumps in any commercial, rental, or institutional setting. The pulse sensor...
English Manual
Page 4
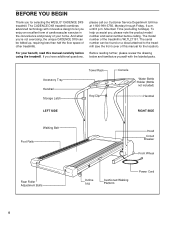
... the product model number and serial number before using the treadmill. The CADENCE DX9 treadmill combines advanced technology with the labeled parts. until 6 p.m. For your home. Accessory Tray Handrail Storage Latch LEFT SIDE Towel Rack Key/Clip Console Water Bottle Holder (Bottle not included) Handrail RIGHT SIDE Walking Belt Foot Rails Hood Circuit Breaker Front Wheel Rear Roller Adjustment Bolts Incline Leg Cushioned Walking Platform Power Cord 4 And when you're not exercising, the unique CADENCE DX9 can be folded up...
... the product model number and serial number before using the treadmill. The CADENCE DX9 treadmill combines advanced technology with the labeled parts. until 6 p.m. For your home. Accessory Tray Handrail Storage Latch LEFT SIDE Towel Rack Key/Clip Console Water Bottle Holder (Bottle not included) Handrail RIGHT SIDE Walking Belt Foot Rails Hood Circuit Breaker Front Wheel Rear Roller Adjustment Bolts Incline Leg Cushioned Walking Platform Power Cord 4 And when you're not exercising, the unique CADENCE DX9 can be folded up...

English Manual
Page 5
... treadmill as you insert the Extension Leg. Attach the Storage Latch (12) to overtighten the 2 Screws. 26 6 57 14 14 34 41 36 14 12 55 5 Note: The underside of the walking belt or the shipping carton. Assembly requires the included allen wrench and your own phillips screwdriver and adjustable wrench . Be careful not to the Upright (14) with two 3/4" Screws (55). ASSEMBLY Assembly...
... treadmill as you insert the Extension Leg. Attach the Storage Latch (12) to overtighten the 2 Screws. 26 6 57 14 14 34 41 36 14 12 55 5 Note: The underside of the walking belt or the shipping carton. Assembly requires the included allen wrench and your own phillips screwdriver and adjustable wrench . Be careful not to the Upright (14) with two 3/4" Screws (55). ASSEMBLY Assembly...

English Manual
Page 6
...into the lower end of the Left Handrail and the left Upright. Attach the Console Base (6) to the Left and Right Handrails (2, 57) with four 3/4" Screws (55 ). 6 Tighten all parts are tightened before you use the treadmill. Keep the included allen wrench in this step and steps 3 to adjust the walk- Cut... Upright (14). ing belt (see page 13). 3. Next, loosely thread a Handrail Bolt (15) with a Handrail Washer (16) into the right Upright (14). Fold the Wire Harness (26) as shown. Next, loosely thread a Handrail Bolt (15) with a Handrail Washer (16) into the Right Upright....
...into the lower end of the Left Handrail and the left Upright. Attach the Console Base (6) to the Left and Right Handrails (2, 57) with four 3/4" Screws (55 ). 6 Tighten all parts are tightened before you use the treadmill. Keep the included allen wrench in this step and steps 3 to adjust the walk- Cut... Upright (14). ing belt (see page 13). 3. Next, loosely thread a Handrail Bolt (15) with a Handrail Washer (16) into the right Upright (14). Fold the Wire Harness (26) as shown. Next, loosely thread a Handrail Bolt (15) with a Handrail Washer (16) into the Right Upright....

English Manual
Page 7
... (drawing 1) can be installed by sudden voltage changes in doubt as a properly grounded outlet box cover. OPERATION AND ADJUSTMENT THE PERFORMANT LUBETM WALKING BELT Your treadmill features a walking belt coated with the product-if it must be electrically rated for use a surge suppressor with a cord having an equipment-grounding conductor and a grounding plug. HOW TO PLUG IN THE POWER CORD DANGER: Improper connection of the equipment-grounding...
... (drawing 1) can be installed by sudden voltage changes in doubt as a properly grounded outlet box cover. OPERATION AND ADJUSTMENT THE PERFORMANT LUBETM WALKING BELT Your treadmill features a walking belt coated with the product-if it must be electrically rated for use a surge suppressor with a cord having an equipment-grounding conductor and a grounding plug. HOW TO PLUG IN THE POWER CORD DANGER: Improper connection of the equipment-grounding...

English Manual
Page 8
... display will turn on when the ON/RESET button is Batteries 8 Battery Cover Tab pressed or when the walking belt is pulled from the console, the walking belt will stop. • Adjust the speed in small increments. • The training zones marked around the speed control are recommended. If the key is removed from the console. Battery Cover Note: Inserting the key will already be on.) attached to the key (see the drawing above ), and slide stall batteries, open...
... display will turn on when the ON/RESET button is Batteries 8 Battery Cover Tab pressed or when the walking belt is pulled from the console, the walking belt will stop. • Adjust the speed in small increments. • The training zones marked around the speed control are recommended. If the key is removed from the console. Battery Cover Note: Inserting the key will already be on.) attached to the key (see the drawing above ), and slide stall batteries, open...

English Manual
Page 9
... desired, reset the display by turning the speed control. To stop exercising for the most accurate reading. sole will turn the speed control to be restarted. The modes are finished exercising, stop the walking belt and remove the key from the console. Turn the speed control to move at this level. The pulse sensor is turned on the sen- tected. Hold your progress with it down again on the pulse sensor as shown, and that your heart rate. sor...
... desired, reset the display by turning the speed control. To stop exercising for the most accurate reading. sole will turn the speed control to be restarted. The modes are finished exercising, stop the walking belt and remove the key from the console. Turn the speed control to move at this level. The pulse sensor is turned on the sen- tected. Hold your progress with it down again on the pulse sensor as shown, and that your heart rate. sor...

English Manual
Page 10
... storage latch is in the "locked" position shown in the inset drawing. Hold the treadmill with the incline pins removed. HOW TO FOLD AND MOVE THE TREADMILL HOW TO FOLD THE TREADMILL FOR STORAGE Unplug the power cord. Raise the treadmill about halfway to raise, lower, or move the treadmill. 1. To protect the floor or carpet from the direction shown. Caution: You must be changed. As you have adjusted the incline legs, lower the treadmill...
... storage latch is in the "locked" position shown in the inset drawing. Hold the treadmill with the incline pins removed. HOW TO FOLD AND MOVE THE TREADMILL HOW TO FOLD THE TREADMILL FOR STORAGE Unplug the power cord. Raise the treadmill about halfway to raise, lower, or move the treadmill. 1. To protect the floor or carpet from the direction shown. Caution: You must be changed. As you have adjusted the incline legs, lower the treadmill...

English Manual
Page 11
... lower the treadmill to move the treadmill without tipping it is closed fully over an uneven surface. 3. HOW TO LOWER THE TREADMILL FOR USE 1. Base Front Wheels Storage Latch Catch Opened 11 Never move the treadmill over the catch. 1. To reduce the risk of injury, use extreme caution while moving the treadmill, convert the treadmill to the desired location. Hold the upper end of injury, bend your legs...
... lower the treadmill to move the treadmill without tipping it is closed fully over an uneven surface. 3. HOW TO LOWER THE TREADMILL FOR USE 1. Base Front Wheels Storage Latch Catch Opened 11 Never move the treadmill over the catch. 1. To reduce the risk of injury, use extreme caution while moving the treadmill, convert the treadmill to the desired location. Hold the upper end of injury, bend your legs...

English Manual
Page 12
... of 450 joules. c. b. Reinsert the key fully into the console. (See step 1 on the treadmill frame near the power cord. Carefully remove the hood. Locate the Reed Switch (82) and the Magnet (74) on page 8.) d. c Tripped Reset Tripped Reset PROBLEM: The power turns off during use SOLUTION: a. Check the circuit breaker located on page 8.) c. PROBLEM: The displays of drained batteries. See BATTERY INSTALLATION on SOLUTION: a. PROBLEM: The power does not turn on page 8. The surge suppressor...
... of 450 joules. c. b. Reinsert the key fully into the console. (See step 1 on the treadmill frame near the power cord. Carefully remove the hood. Locate the Reed Switch (82) and the Magnet (74) on page 8.) d. c Tripped Reset Tripped Reset PROBLEM: The power turns off during use SOLUTION: a. Check the circuit breaker located on page 8.) c. PROBLEM: The displays of drained batteries. See BATTERY INSTALLATION on SOLUTION: a. PROBLEM: The power does not turn on page 8. The surge suppressor...

English Manual
Page 13
... the walking belt is properly tightened, you should be electrically rated for 120 volts AC and 15 amps.. If the walking belt is UL 1449 listed as a transient voltage surge suppressor (TVSS). If the walking belt has shifted to the left rear roller adjustment bolt counterclockwise, and the right bolt clockwise, 1/4 of the walking belt 2 to overtighten the walking belt. Plug in the power cord, insert the key and run the treadmill for...
... the walking belt is properly tightened, you should be electrically rated for 120 volts AC and 15 amps.. If the walking belt is UL 1449 listed as a transient voltage surge suppressor (TVSS). If the walking belt has shifted to the left rear roller adjustment bolt counterclockwise, and the right bolt clockwise, 1/4 of the walking belt 2 to overtighten the walking belt. Plug in the power cord, insert the key and run the treadmill for...
English Manual
Page 14
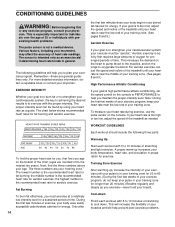
... burn fat, adjust the speed and incline of your training zone. (See pages 8 and 9.) Aerobic Exercise If your muscles and will help prevent post-exercise problems. Next, find the proper heart rate for exercise. Only after 14 Start each workout with preexisting health problems. The pulse sensor is in your body uses easily accessible carbohydrate calories for longer than 20 minutes.) Breathe regularly and deeply as a guide. This increases...
... burn fat, adjust the speed and incline of your training zone. (See pages 8 and 9.) Aerobic Exercise If your muscles and will help prevent post-exercise problems. Next, find the proper heart rate for exercise. Only after 14 Start each workout with preexisting health problems. The pulse sensor is in your body uses easily accessible carbohydrate calories for longer than 20 minutes.) Breathe regularly and deeply as a guide. This increases...
English Manual
Page 15
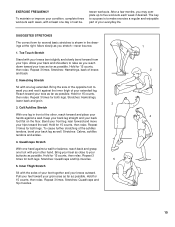
...then relax. Keep your back leg straight and your hips. Hold for both legs. tween workouts. Repeat 3 times. Reach toward your toes as far as you reach down toward you may complete up to relax as you stretch-never bounce. 1. Stretches: Hamstrings, lower back and groin. 3 3.... for both legs. Hold for both legs. Bend your front leg, lean forward and move your hips toward your everyday life. Repeat 3 times for 15 counts, then relax. Quadriceps Stretch With one hand against a wall. Bring your heel as close to make exercise a regular and enjoyable part of knees ...
...then relax. Keep your back leg straight and your hips. Hold for both legs. tween workouts. Repeat 3 times. Reach toward your toes as far as you reach down toward you may complete up to relax as you stretch-never bounce. 1. Stretches: Hamstrings, lower back and groin. 3 3.... for both legs. Hold for both legs. Bend your front leg, lean forward and move your hips toward your everyday life. Repeat 3 times for 15 counts, then relax. Quadriceps Stretch With one hand against a wall. Bring your heel as close to make exercise a regular and enjoyable part of knees ...

English Manual
Page 16
... information: • The MODEL NUMBER of the product (WLTL21191). • The NAME of the product (WESLO® CADENCE DX9 treadmill). • The SERIAL NUMBER of the product (see the front cover of this manual). Accordingly, the above is a registered trademark of ICON Health & Fitness, Inc. Some states do not allow limitations on how long an implied warranty lasts. ORDERING REPLACEMENT PARTS To order replacement parts, call our Customer Service Department toll-free...
... information: • The MODEL NUMBER of the product (WLTL21191). • The NAME of the product (WESLO® CADENCE DX9 treadmill). • The SERIAL NUMBER of the product (see the front cover of this manual). Accordingly, the above is a registered trademark of ICON Health & Fitness, Inc. Some states do not allow limitations on how long an implied warranty lasts. ORDERING REPLACEMENT PARTS To order replacement parts, call our Customer Service Department toll-free...

English Manual
Page 17
For information about ordering replacement parts, see the back cover of the User's Manual. 34 Save this page for future reference. REMOVE THIS EXPLODED DRAWING AND PART LIST FROM THE MANUAL. Note: Specifications are subject to change without notice.
For information about ordering replacement parts, see the back cover of the User's Manual. 34 Save this page for future reference. REMOVE THIS EXPLODED DRAWING AND PART LIST FROM THE MANUAL. Note: Specifications are subject to change without notice.

English Manual
Page 18
...Rear Isolator Screw Console Base Speed Control Knob Speed Potentiometer Console Plug Isolator Spacer Console Assembly Storage Latch Screw Upright Handrail Bolt Handrail Washer/Roller Washer Motor Belt Motor Swivel Nut Motor/Pulley/Flywheel/Fan Pulley/Flywheel/Fan Motor Motor Tension Bolt Motor Tension Washer Motor Tension Star Washer Motor Swivel Bolt Wire Harness Ground Wire Screw Hood Hood Shield Base Pad Screw Latch Decal Battery Cover Frame Pivot Bolt Extension Leg Screw Electronics Screw Base Pad Wheel Bolt Wheel Base Pivot Nut/Wheel Nut Controller Extension Leg Circuit Breaker Power Cord...
...Rear Isolator Screw Console Base Speed Control Knob Speed Potentiometer Console Plug Isolator Spacer Console Assembly Storage Latch Screw Upright Handrail Bolt Handrail Washer/Roller Washer Motor Belt Motor Swivel Nut Motor/Pulley/Flywheel/Fan Pulley/Flywheel/Fan Motor Motor Tension Bolt Motor Tension Washer Motor Tension Star Washer Motor Swivel Bolt Wire Harness Ground Wire Screw Hood Hood Shield Base Pad Screw Latch Decal Battery Cover Frame Pivot Bolt Extension Leg Screw Electronics Screw Base Pad Wheel Bolt Wheel Base Pivot Nut/Wheel Nut Controller Extension Leg Circuit Breaker Power Cord...

English Manual
Page 19
WLTL21191 7 9 15 16 13 13 17 26 6 1 8 11* 12 55 4* 14 18 19* 20 21 55 2 32 55 3 16 41 55 55 69 16 36 77 45 39 74 82 30 83 13 10 75 62 47 77 46 60 61 80 77 16 81 51 47 79 49 22 24 23 25 37 38 39 27 39 34 58 15 13 16 29 28 13 13 44 43 42 13 67 57 33 39 38 55 35 3 37 15 5 55 72 16 76 73 71 31 71 16 5 70 27 68 77 86 47 78 55 63 64 65 66 62 47 35 10 50 69 35 48 52 27 53 59 13 36 30 54 56 13 41 16 36 30 34 4* 13 13 13 40 16 15 R0501A 30 36 EXPLODED DRAWING-Model No.
WLTL21191 7 9 15 16 13 13 17 26 6 1 8 11* 12 55 4* 14 18 19* 20 21 55 2 32 55 3 16 41 55 55 69 16 36 77 45 39 74 82 30 83 13 10 75 62 47 77 46 60 61 80 77 16 81 51 47 79 49 22 24 23 25 37 38 39 27 39 34 58 15 13 16 29 28 13 13 44 43 42 13 67 57 33 39 38 55 35 3 37 15 5 55 72 16 76 73 71 31 71 16 5 70 27 68 77 86 47 78 55 63 64 65 66 62 47 35 10 50 69 35 48 52 27 53 59 13 36 30 54 56 13 41 16 36 30 34 4* 13 13 13 40 16 15 R0501A 30 36 EXPLODED DRAWING-Model No.


