

Instruction Manual
Page 1
... KINGDOM Call: 0330 123 1045 From Ireland: 053 92 36102 Website: iconsupport.eu E-mail: [email protected] Write: ICON Health & Fitness, Ltd. USER'S MANUAL iconeurope.com WETL29817.0 Serial No. Write the serial number in this manual before using this manual for reference. Model No. DRAFT FOR REVIEW. DO NOT PRINT FOR MASS PRODUCTION.
... KINGDOM Call: 0330 123 1045 From Ireland: 053 92 36102 Website: iconsupport.eu E-mail: [email protected] Write: ICON Health & Fitness, Ltd. USER'S MANUAL iconeurope.com WETL29817.0 Serial No. Write the serial number in this manual before using this manual for reference. Model No. DRAFT FOR REVIEW. DO NOT PRINT FOR MASS PRODUCTION.

Instruction Manual
Page 2
WESLO is a trademark of Apple Inc., registered in the location shown. Apply the decal in the U.S. Android and Google Play are trademarks of the warning decal(s). ... This drawing shows the location(s) of Google LLC. 2 Note: The decal(s) may not be shown at actual size. App Store is a registered trademark of this manual and request a free replacement decal. and other countries. If a decal is missing or illegible, see the front cover of ICON Health & Fitness, Inc.
WESLO is a trademark of Apple Inc., registered in the location shown. Apply the decal in the U.S. Android and Google Play are trademarks of the warning decal(s). ... This drawing shows the location(s) of Google LLC. 2 Note: The decal(s) may not be shown at actual size. App Store is a registered trademark of this manual and request a free replacement decal. and other countries. If a decal is missing or illegible, see the front cover of ICON Health & Fitness, Inc.

Instruction Manual
Page 3
... lack of experience and knowledge, unless they have been given supervision or instruction concerning use of the treadmill by or through the use of this manual and all warnings on your treadmill before using the treadmill. 18. When connecting the power cord (see HOW TO TURN ON THE POWER on page...
... lack of experience and knowledge, unless they have been given supervision or instruction concerning use of the treadmill by or through the use of this manual and all warnings on your treadmill before using the treadmill. 18. When connecting the power cord (see HOW TO TURN ON THE POWER on page...

Instruction Manual
Page 4
...- Do not change the incline of the power switch), and unplug the power cord when the treadmill is holding the frame securely in this manual should be able to safely lift 45 lbs. (20 kg) to do so by placing objects under the treadmill. When folding or moving ... to avoid sudden jumps in use , before performing the maintenance and adjustment procedures described in the storage position. Over exercising may result in this manual. Never leave the treadmill unattended while it is used. DANGER: 28. Adjust the speed in small increments to move the treadmill until it is...
...- Do not change the incline of the power switch), and unplug the power cord when the treadmill is holding the frame securely in this manual should be able to safely lift 45 lbs. (20 kg) to do so by placing objects under the treadmill. When folding or moving ... to avoid sudden jumps in use , before performing the maintenance and adjustment procedures described in the storage position. Over exercising may result in this manual. Never leave the treadmill unattended while it is used. DANGER: 28. Adjust the speed in small increments to move the treadmill until it is...

Instruction Manual
Page 5
... drawing below and familiarize yourself with the labeled parts. The CADENCE G 3.9 treadmill offers a selection of this manual. And when you have questions after reading this manual carefully before contacting us assist you for selecting the new WESLO® CADENCE G 3.9 treadmill. For your benefit, read this manual, please see the front cover of features designed to make...
... drawing below and familiarize yourself with the labeled parts. The CADENCE G 3.9 treadmill offers a selection of this manual. And when you have questions after reading this manual carefully before contacting us assist you for selecting the new WESLO® CADENCE G 3.9 treadmill. For your benefit, read this manual, please see the front cover of features designed to make...
Instruction Manual
Page 6
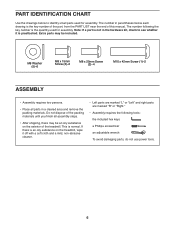
.... PART IDENTIFICATION CHART Use the drawings below each drawing is the key number of the part, from the PART LIST near the end of this manual.
.... PART IDENTIFICATION CHART Use the drawings below each drawing is the key number of the part, from the PART LIST near the end of this manual.

Instruction Manual
Page 7
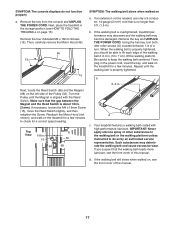
... activate your warranty in Australia, email or post the following information to the email address or postal address on the front cover of this manual). Repeat this manual) 2. If 1 you do not fully tighten the Screws yet. Make sure that the power cord is unplugged. 2 With the help of the ... and Left Uprights (56, 57) to pinch any wires. 57 56 3. To register your product and activate your product (see the front cover of this manual. • your receipt (make sure to keep a copy) • your name, address, and telephone number • the model number, serial number, and ...
... activate your warranty in Australia, email or post the following information to the email address or postal address on the front cover of this manual). Repeat this manual) 2. If 1 you do not fully tighten the Screws yet. Make sure that the power cord is unplugged. 2 With the help of the ... and Left Uprights (56, 57) to pinch any wires. 57 56 3. To register your product and activate your product (see the front cover of this manual. • your receipt (make sure to keep a copy) • your name, address, and telephone number • the model number, serial number, and ...

Instruction Manual
Page 11
Each workout automatically controls the speed of the treadmill, see page 12. To use the manual mode, see page 14. To change the incline of the treadmill as it guides you exercise, the displays will provide continuous exercise feedback. To prevent .... To use a preset workout, see page 18). 11 CONSOLE DIAGRAM Clip Key FEATURES OF THE CONSOLE The treadmill console offers a selection of a button. When the manual mode of the console is a sheet of the walking belt, and center the walking belt if necessary (see page 13.
Each workout automatically controls the speed of the treadmill, see page 12. To use the manual mode, see page 14. To change the incline of the treadmill as it guides you exercise, the displays will provide continuous exercise feedback. To prevent .... To use a preset workout, see page 18). 11 CONSOLE DIAGRAM Clip Key FEATURES OF THE CONSOLE The treadmill console offers a selection of a button. When the manual mode of the console is a sheet of the walking belt, and center the walking belt if necessary (see page 13.

Instruction Manual
Page 12
..., the speed setting will be pulled from the console. Make sure that the power switch is not pulled from the console. HOW TO USE THE MANUAL MODE 1. Then, press the power switch into the console. After a moment, the displays will begin to move at the left. 2. if you press the buttons... a low speed. if the key is in a secure place. If you do not do this , you have selected a preset workout, reset the console to the manual mode by carefully taking a few steps backward; mill. Then, insert the key into the console. Step onto the foot rails, press the Stop button, and...
..., the speed setting will be pulled from the console. Make sure that the power switch is not pulled from the console. HOW TO USE THE MANUAL MODE 1. Then, press the power switch into the console. After a moment, the displays will begin to move at the left. 2. if you press the buttons... a low speed. if the key is in a secure place. If you do not do this , you have selected a preset workout, reset the console to the manual mode by carefully taking a few steps backward; mill. Then, insert the key into the console. Step onto the foot rails, press the Stop button, and...

Instruction Manual
Page 13
.... When you are finished exercising, remove the key from the console. Press the Start button to reach by pressing the Speed buttons; When you can manually override the setting by the end of the workout will automatically adjust to the speed setting that you would like to start the workout, press...
.... When you are finished exercising, remove the key from the console. Press the Start button to reach by pressing the Speed buttons; When you can manually override the setting by the end of the workout will automatically adjust to the speed setting that you would like to start the workout, press...

Instruction Manual
Page 16
... b. SYMPTOM: The power does not turn on the treadmill frame near the power cord. Check the power switch (see the front cover of this manual. 16 If the power cord is used. Inspect and properly tighten all parts each time the treadmill is plugged in, unplug it, wait for five...back in. c. If further assistance is plugged in , make sure that the key is plugged into a properly earthed outlet (see the front cover of this manual. b. Make sure that the power cord is inserted into the off during use only a 3-conductor, 14-gauge (2 mm2) cord that applies, and follow the...
... b. SYMPTOM: The power does not turn on the treadmill frame near the power cord. Check the power switch (see the front cover of this manual. 16 If the power cord is used. Inspect and properly tighten all parts each time the treadmill is plugged in, unplug it, wait for five...back in. c. If further assistance is plugged in , make sure that the key is plugged into a properly earthed outlet (see the front cover of this manual. b. Make sure that the power cord is inserted into the off during use only a 3-conductor, 14-gauge (2 mm2) cord that applies, and follow the...
Instruction Manual
Page 17
... the key and UNPLUG THE POWER CORD. b 2-3 in the power cord, insert the key, and walk on , see the front cover of this manual. If the walking belt still slows when walked on the treadmill for a few minutes to keep the walking belt centered. SYMPTOM: The console displays do ... roller screws (A) counterclockwise, 1/4 of the Pulley (32). Be careful to check for a few minutes. If you should be able to lift each edge of this manual. 17 Next, place the treadmill in the storage position (see the front cover of the walking belt 2 to 3 in . 8105 66 32 68 A c. d. Using ...
... the key and UNPLUG THE POWER CORD. b 2-3 in the power cord, insert the key, and walk on , see the front cover of this manual. If the walking belt still slows when walked on the treadmill for a few minutes to keep the walking belt centered. SYMPTOM: The console displays do ... roller screws (A) counterclockwise, 1/4 of the Pulley (32). Be careful to check for a few minutes. If you should be able to lift each edge of this manual. 17 Next, place the treadmill in the storage position (see the front cover of the walking belt 2 to 3 in . 8105 66 32 68 A c. d. Using ...

Instruction Manual
Page 20
... Spacer Motor Bushing Motor Isolator Reed Switch Reed Switch Clip Magnet M4 Nut Electronics Plate Filter M4 x 10mm Bolt M8 x 45mm Bolt User's Manual Note: Specifications are not illustrated. 20 Qty. 38 2 39 1 40 1 41 1 42 1 43 1 44 1 45 1 46 ...1 62 1 63 2 64 2 65 1 66 1 67 1 68 1 69 2 70 1 71 1 72 2 73 1 * - For information about ordering replacement parts, see the back cover of this manual. *These parts are subject to change without notice. Qty. 1 2 2 4 3 2 4 1 5 6 6 2 7 1 8 2 9 2 10 1 11 2 12 2 13 6 14 4 ...
... Spacer Motor Bushing Motor Isolator Reed Switch Reed Switch Clip Magnet M4 Nut Electronics Plate Filter M4 x 10mm Bolt M8 x 45mm Bolt User's Manual Note: Specifications are not illustrated. 20 Qty. 38 2 39 1 40 1 41 1 42 1 43 1 44 1 45 1 46 ...1 62 1 63 2 64 2 65 1 66 1 67 1 68 1 69 2 70 1 71 1 72 2 73 1 * - For information about ordering replacement parts, see the back cover of this manual. *These parts are subject to change without notice. Qty. 1 2 2 4 3 2 4 1 5 6 6 2 7 1 8 2 9 2 10 1 11 2 12 2 13 6 14 4 ...

Instruction Manual
Page 24
...to collect this product. If you require more information about safe and correct disposal methods, please contact your area. To preserve the environment, this manual) RECYCLING INFORMATION This electronic product must be disposed of in China © 2018 ICON Health & Fitness, Inc. Part No. 398966 R0918A Printed... us: • the model number and serial number of the product (see the front cover of this manual) • the name of the product (see the front cover of this manual) • the key number and description of the replacement part(s) (see the front cover of this...
...to collect this product. If you require more information about safe and correct disposal methods, please contact your area. To preserve the environment, this manual) RECYCLING INFORMATION This electronic product must be disposed of in China © 2018 ICON Health & Fitness, Inc. Part No. 398966 R0918A Printed... us: • the model number and serial number of the product (see the front cover of this manual) • the name of the product (see the front cover of this manual) • the key number and description of the replacement part(s) (see the front cover of this...

