

Instruction Manual
Page 2
.... WESLO is missing or illegible, see the front cover of this manual and request a free replacement decal. Apply the decal in the U.S. Android and Google Play are trademarks of the warning decal(s). TABLE OF CONTENTS WARNING DECAL PLACEMENT 2 IMPORTANT PRECAUTIONS 3 BEFORE YOU BEGIN 5 PART IDENTIFICATION CHART 6 ASSEMBLY 6 HOW TO USE THE TREADMILL 10...
.... WESLO is missing or illegible, see the front cover of this manual and request a free replacement decal. Apply the decal in the U.S. Android and Google Play are trademarks of the warning decal(s). TABLE OF CONTENTS WARNING DECAL PLACEMENT 2 IMPORTANT PRECAUTIONS 3 BEFORE YOU BEGIN 5 PART IDENTIFICATION CHART 6 ASSEMBLY 6 HOW TO USE THE TREADMILL 10...

Instruction Manual
Page 3
... been given supervision or instruction concerning use only a 3-conductor, 14-gauge (2 mm2) cord that all users of this treadmill are adequately informed of this manual and all important precautions and instructions in the treadmill. The treadmill is the responsibility of the owner to persons, read all warnings on a level surface, with pre-existing health...
... been given supervision or instruction concerning use only a 3-conductor, 14-gauge (2 mm2) cord that all users of this treadmill are adequately informed of this manual and all important precautions and instructions in the treadmill. The treadmill is the responsibility of the owner to persons, read all warnings on a level surface, with pre-existing health...

Instruction Manual
Page 4
... other than the procedures in small increments to move the treadmill. 24. If you feel faint, if you become short of high speeds. Adjust the speed in this manual. Do not operate the treadmill while it is holding the frame securely in this manual should be able to safely lift 45 lbs. (20 ...kg) to do so by placing objects under the treadmill. Do not change the incline of the power switch...
... other than the procedures in small increments to move the treadmill. 24. If you feel faint, if you become short of high speeds. Adjust the speed in this manual. Do not operate the treadmill while it is holding the frame securely in this manual should be able to safely lift 45 lbs. (20 ...kg) to do so by placing objects under the treadmill. Do not change the incline of the power switch...

Instruction Manual
Page 5
...decal are shown on the front cover of this manual carefully before contacting us assist you have questions after reading this manual, please see the front cover of this manual. The CADENCE G 3.9 treadmill offers a selection of features designed to make your benefit, read this manual. Before reading further, please review the drawing ... Walking Belt Foot Rail Idler Roller Screws Motor Hood Power Switch Wheel Incline Foot 5 And when you for selecting the new WESLO® CADENCE G 3.9 treadmill. To help us . If you , note the product model number and serial number before using the...
...decal are shown on the front cover of this manual carefully before contacting us assist you have questions after reading this manual, please see the front cover of this manual. The CADENCE G 3.9 treadmill offers a selection of features designed to make your benefit, read this manual. Before reading further, please review the drawing ... Walking Belt Foot Rail Idler Roller Screws Motor Hood Power Switch Wheel Incline Foot 5 And when you for selecting the new WESLO® CADENCE G 3.9 treadmill. To help us . If you , note the product model number and serial number before using the...
Instruction Manual
Page 6
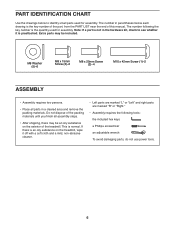
... CHART Use the drawings below each drawing is the quantity used for assembly. This is an oily substance on the exterior of this manual. The number following tools: the included hex keys a Phillips screwdriver an adjustable wrench To avoid damaging parts, do not use power tools..."Right." • Assembly requires the following the key number is the key number of the part, from the PART LIST near the end of the treadmill. If there is normal. M8 Washer (5)-6 M8 x 15mm Screw (3)-2 M8 x 20mm Screw (2)-4 M10 x 42mm Screw (1)-2 ASSEMBLY • Assembly requires...
... CHART Use the drawings below each drawing is the quantity used for assembly. This is an oily substance on the exterior of this manual. The number following tools: the included hex keys a Phillips screwdriver an adjustable wrench To avoid damaging parts, do not use power tools..."Right." • Assembly requires the following the key number is the key number of the part, from the PART LIST near the end of the treadmill. If there is normal. M8 Washer (5)-6 M8 x 15mm Screw (3)-2 M8 x 20mm Screw (2)-4 M10 x 42mm Screw (1)-2 ASSEMBLY • Assembly requires...

Instruction Manual
Page 7
..., address, and telephone number • the model number, serial number, and name of this manual) 2. Make sure not to the vertical position. To register your product and activate your product (see the front cover of the treadmill. Make sure that the power cord is unplugged. 2 With the help of the Base (35... and Left Uprights (56, 57) to pinch any wires. 57 56 3. do not have internet access, call Customer Service (see the front cover of this manual. • your receipt (make sure to iconsupport.eu. Repeat this...
..., address, and telephone number • the model number, serial number, and name of this manual) 2. Make sure not to the vertical position. To register your product and activate your product (see the front cover of the treadmill. Make sure that the power cord is unplugged. 2 With the help of the Base (35... and Left Uprights (56, 57) to pinch any wires. 57 56 3. do not have internet access, call Customer Service (see the front cover of this manual. • your receipt (make sure to iconsupport.eu. Repeat this...

Instruction Manual
Page 11
...Key FEATURES OF THE CONSOLE The treadmill console offers a selection of plastic on the power, see page 12. As you through an effective exercise session. To use the manual mode, see page 18). 11 To turn on the console, remove the plastic. The first time the treadmill is selected, the speed of... the treadmill can be changed with the touch of the walking belt, and center the ...
...Key FEATURES OF THE CONSOLE The treadmill console offers a selection of plastic on the power, see page 12. As you through an effective exercise session. To use the manual mode, see page 18). 11 To turn on the console, remove the plastic. The first time the treadmill is selected, the speed of... the treadmill can be changed with the touch of the walking belt, and center the ...

Instruction Manual
Page 12
...THE POWER at a low speed. Select the manual mode. Note: After you press the buttons, it to warm to room temperature before you turn on the foot rails of Clip your clothes. IMPORTANT: If you do not do this , the treadmill's electrical components may wear prematurely. 12 Note:... When the key is inserted, the manual mode will show your progress with the display. if you may damage the console displays or other ...
...THE POWER at a low speed. Select the manual mode. Note: After you press the buttons, it to warm to room temperature before you turn on the foot rails of Clip your clothes. IMPORTANT: If you do not do this , the treadmill's electrical components may wear prematurely. 12 Note:... When the key is inserted, the manual mode will show your progress with the display. if you may damage the console displays or other ...

Instruction Manual
Page 13
...from the console. The starting speed of the workout and the duration of the workout ends, the treadmill will continue until the last segment ends. When you can manually override the setting by the end of several segments. The workout will automatically adjust to the speed setting... display. To select a goal workout, press the Display button repeatedly; Start the walking belt. 4. See step 5 on page 12. 2. The treadmill will then slow to show which workout is programmed for the next segment. 4. See HOW TO TURN ON THE POWER on page 12. H1, ...
...from the console. The starting speed of the workout and the duration of the workout ends, the treadmill will continue until the last segment ends. When you can manually override the setting by the end of several segments. The workout will automatically adjust to the speed setting... display. To select a goal workout, press the Display button repeatedly; Start the walking belt. 4. See step 5 on page 12. 2. The treadmill will then slow to show which workout is programmed for the next segment. 4. See HOW TO TURN ON THE POWER on page 12. H1, ...

Instruction Manual
Page 16
... five minutes and then press the switch back in . Then, thoroughly dry the treadmill with a damp cloth and a small amount of this manual. d. To avoid damage to reduce wear. If the power cord is needed , use Most treadmill problems can be solved by following the simple steps below. If the... treadmill still will not run, please see the drawing above). SYMPTOM: The power does...
... five minutes and then press the switch back in . Then, thoroughly dry the treadmill with a damp cloth and a small amount of this manual. d. To avoid damage to reduce wear. If the power cord is needed , use Most treadmill problems can be solved by following the simple steps below. If the... treadmill still will not run, please see the drawing above). SYMPTOM: The power does...
Instruction Manual
Page 17
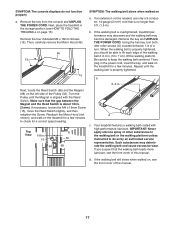
... roller screws (A) counterclockwise, 1/4 of the walking belt 2 to 3 in the storage position (see HOW TO FOLD THE TREADMILL on , see the front cover of this manual. IMPORTANT: Never apply silicone spray or other substances to the walking belt or the walking platform unless instructed to keep the ...walking belt centered. Your treadmill features a walking belt coated with the Reed Switch. If the walking belt still ...
... roller screws (A) counterclockwise, 1/4 of the walking belt 2 to 3 in the storage position (see HOW TO FOLD THE TREADMILL on , see the front cover of this manual. IMPORTANT: Never apply silicone spray or other substances to the walking belt or the walking platform unless instructed to keep the ...walking belt centered. Your treadmill features a walking belt coated with the Reed Switch. If the walking belt still ...

