

Uk Manual
Page 1
... there are missing parts, please contact us at the numbers or addresses listed below: Call: 08457 089 009 Outside UK: 0 (44) 113 3877133 Fax: 0 (44) 113 3877125 E-mail: [email protected] Website: www.iconsupport.eu Write: ICON Health & Fitness, Ltd. Save this equipment. WETL20709.0 Serial No. Model No. Serial Number Decal QUESTIONS? Write the serial number in this manual before using this manual for reference.
... there are missing parts, please contact us at the numbers or addresses listed below: Call: 08457 089 009 Outside UK: 0 (44) 113 3877133 Fax: 0 (44) 113 3877125 E-mail: [email protected] Website: www.iconsupport.eu Write: ICON Health & Fitness, Ltd. Save this equipment. WETL20709.0 Serial No. Model No. Serial Number Decal QUESTIONS? Write the serial number in this manual before using this manual for reference.
Uk Manual
Page 2
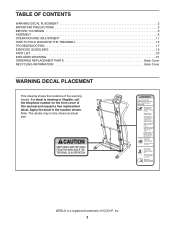
... TO FOLD AND MOVE THE TREADMILL 15 TROUBLESHOOTING 17 EXERCISE GUIDELINES 19 PART LIST 20 EXPLODED DRAWING 21 ORDERING REPLACEMENT PARTS Back Cover RECYCLING INFORMATION Back Cover WARNING DECAL PLACEMENT This drawing shows the locations of this manual and request a free replacement decal. If a decal is a registered trademark of ICON IP, Inc. 2 Apply the decal in the location shown. Note: The decals may not be shown at actual size. WESLO...
... TO FOLD AND MOVE THE TREADMILL 15 TROUBLESHOOTING 17 EXERCISE GUIDELINES 19 PART LIST 20 EXPLODED DRAWING 21 ORDERING REPLACEMENT PARTS Back Cover RECYCLING INFORMATION Back Cover WARNING DECAL PLACEMENT This drawing shows the locations of this manual and request a free replacement decal. If a decal is a registered trademark of ICON IP, Inc. 2 Apply the decal in the location shown. Note: The decals may not be shown at actual size. WESLO...

Uk Manual
Page 3
... heart rate trends in sandals. 11. Keep children under the treadmill. 5. Athletic support clothes are adequately informed of all times. 8. Never start the treadmill while you are used or where oxygen is turned off circuit breaker.) 19. Always hold the handrails while using the treadmill. The pulse sensor is no responsibility for the location of this or any air openings. This is running. When connecting the power cord...
... heart rate trends in sandals. 11. Keep children under the treadmill. 5. Athletic support clothes are adequately informed of all times. 8. Never start the treadmill while you are used or where oxygen is turned off circuit breaker.) 19. Always hold the handrails while using the treadmill. The pulse sensor is no responsibility for the location of this or any air openings. This is running. When connecting the power cord...
Uk Manual
Page 4
... storage latch is intended for in-home use only. Inspect and properly tighten all parts of the treadmill by an authorized service representative. vice representative only. 26. Do not attempt to raise, lower, or move the treadmill. 21. Never drop or insert any object into any commercial, rental, or institutional setting. Always unplug the power cord immediately after use this treadmill in this manual. 20. Do not change...
... storage latch is intended for in-home use only. Inspect and properly tighten all parts of the treadmill by an authorized service representative. vice representative only. 26. Do not attempt to raise, lower, or move the treadmill. 21. Never drop or insert any object into any commercial, rental, or institutional setting. Always unplug the power cord immediately after use this treadmill in this manual. 20. Do not change...
Uk Manual
Page 5
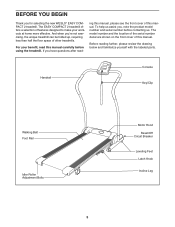
... exercising, the unique treadmill can be folded up, requiring less than half the floor space of this manual carefully before contacting us. Before reading further, please review the drawing below and familiarize yourself with the labeled parts. Handrail Console Key/Clip Walking Belt Foot Rail Idler Roller Adjustment Bolts 5 Motor Hood Reset/Off Circuit Breaker Leveling Feet Latch Knob Incline Leg For your workouts at home more effective. The model number and the location of the serial number...
... exercising, the unique treadmill can be folded up, requiring less than half the floor space of this manual carefully before contacting us. Before reading further, please review the drawing below and familiarize yourself with the labeled parts. Handrail Console Key/Clip Walking Belt Foot Rail Idler Roller Adjustment Bolts 5 Motor Hood Reset/Off Circuit Breaker Leveling Feet Latch Knob Incline Leg For your workouts at home more effective. The model number and the location of the serial number...

Uk Manual
Page 6
... parts to be included. 1/4" Star Washer (4)-2 M8 Star Washer (5)-6 M4.2 x 13mm Screw (32)-1 M4.2 x 12mm Screw (3)-4 M6 x 10mm Bolt (2)-2 M8 x 16mm Bolt (1)-6 6 do not use power tools for assembly. If there is coated with a soft cloth and a mild, non-abrasive cleaner. ASSEMBLY Assembly requires two persons. Note: The underside of the treadmill walking belt is lubricant on top of this manual. Assembly requires the included hex keys...
... parts to be included. 1/4" Star Washer (4)-2 M8 Star Washer (5)-6 M4.2 x 13mm Screw (32)-1 M4.2 x 12mm Screw (3)-4 M6 x 10mm Bolt (2)-2 M8 x 16mm Bolt (1)-6 6 do not use power tools for assembly. If there is coated with a soft cloth and a mild, non-abrasive cleaner. ASSEMBLY Assembly requires two persons. Note: The underside of the treadmill walking belt is lubricant on top of this manual. Assembly requires the included hex keys...

Uk Manual
Page 8
... Screws for step 6. IF THE CONNECTORS ARE NOT CONNECTED PROPERLY, THE CONSOLE MAY BE DAMAGED WHEN THE POWER IS TURNED ON. 4 80 Connector Console Back 84 3 3 81 Connectors 84 8 3. Make sure the Console Plate is oriented as shown and that the Wire Harness (84) is not pinched. Next, press the connector on the end of the Console (80) in the location shown. Remove...
... Screws for step 6. IF THE CONNECTORS ARE NOT CONNECTED PROPERLY, THE CONSOLE MAY BE DAMAGED WHEN THE POWER IS TURNED ON. 4 80 Connector Console Back 84 3 3 81 Connectors 84 8 3. Make sure the Console Plate is oriented as shown and that the Wire Harness (84) is not pinched. Next, press the connector on the end of the Console (80) in the location shown. Remove...
Uk Manual
Page 9
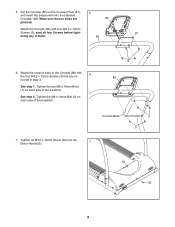
Attach the console back to the Console (80) with four M4.2 x 12mm Screws (3); 5. start all four Screws before tight- 81 ening any of the treadmill. Tighten the M6 x 10mm Bolt (2) on each side of the treadmill. 3 80 Console Back 7. Set the Console (80) on the Console Plate (81), 5 and insert the excess wire into the Motor Hood (53). 7 3 3 53 32 9 moved in step 4. Tighten an M4.2 x 13mm Screw (32) into the Handrail...
Attach the console back to the Console (80) with four M4.2 x 12mm Screws (3); 5. start all four Screws before tight- 81 ening any of the treadmill. Tighten the M6 x 10mm Bolt (2) on each side of the treadmill. 3 80 Console Back 7. Set the Console (80) on the Console Plate (81), 5 and insert the excess wire into the Motor Hood (53). 7 3 3 53 32 9 moved in step 4. Tighten an M4.2 x 13mm Screw (32) into the Handrail...

Uk Manual
Page 10
Raise the Gas Spring (76) to adjust the walking belt (see HOW TO FOLD THE TREADMILL FOR STORAGE on page 14). 77 Holes 10. See the lower drawing. Then, rotate the Gas Spring Clip until it clips onto the Gas Spring. Remove the Gas Spring Clip (77) from the Gas Spring. Press the end of the Gas Spring (76...Gas Spring Clip until it clips onto the Gas Spring. 76 Lower the Frame (87) to crack the Motor Hood (not shown). Be 8 careful not to the floor. Be careful to align the end of the Gas Spring. 8. Keep the included hex keys in the end of the Gas Spring (76) onto the...
Raise the Gas Spring (76) to adjust the walking belt (see HOW TO FOLD THE TREADMILL FOR STORAGE on page 14). 77 Holes 10. See the lower drawing. Then, rotate the Gas Spring Clip until it clips onto the Gas Spring. Remove the Gas Spring Clip (77) from the Gas Spring. Press the end of the Gas Spring (76...Gas Spring Clip until it clips onto the Gas Spring. 76 Lower the Frame (87) to crack the Motor Hood (not shown). Be 8 careful not to the floor. Be careful to align the end of the Gas Spring. 8. Keep the included hex keys in the end of the Gas Spring (76) onto the...
Uk Manual
Page 11
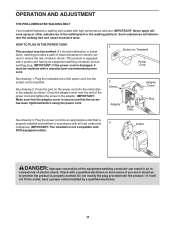
... AND ADJUSTMENT THE PRE-LUBRICATED WALKING BELT Your treadmill features a walking belt coated with a qualified electrician or serviceman if you are in doubt as shown. Plug the indicated end of electric shock. Press the pins on the power cord into the socket on Treadmill Power Cord See drawing 1. Socket on the treadmill. Outlet DANGER: Improper connection of electric shock. This product is secure and that is properly installed...
... AND ADJUSTMENT THE PRE-LUBRICATED WALKING BELT Your treadmill features a walking belt coated with a qualified electrician or serviceman if you are in doubt as shown. Plug the indicated end of electric shock. Press the pins on the power cord into the socket on Treadmill Power Cord See drawing 1. Socket on the treadmill. Outlet DANGER: Improper connection of electric shock. This product is secure and that is properly installed...

Uk Manual
Page 12
..., locate the reset/off circuit breaker on the power. CONSOLE DIAGRAM Thumb Pulse Sensor IMPORTANT: If the treadmill has been exposed to cold temperatures, allow it to warm to the walking platform, wear clean athletic shoes while using the treadmill. Test the clip by carefully taking a few steps backward; To prevent damage to room temperature before turning on the treadmill frame near the power cord. Plug in...
..., locate the reset/off circuit breaker on the power. CONSOLE DIAGRAM Thumb Pulse Sensor IMPORTANT: If the treadmill has been exposed to cold temperatures, allow it to warm to the walking platform, wear clean athletic shoes while using the treadmill. Test the clip by carefully taking a few steps backward; To prevent damage to room temperature before turning on the treadmill frame near the power cord. Plug in...

Uk Manual
Page 13
... display. 3. Press the Priority Display button repeatedly until the priority display shows the information that you have walked or run . To reset the display, press the Stop button, remove the key, and then reinsert the key. 13 Note: When you press a button, the speed setting will appear in kilometers per hour and the approximate number of calories you exercise, change the unit of measurement is selected, hold down a button, the speed setting will begin to move...
... display. 3. Press the Priority Display button repeatedly until the priority display shows the information that you have walked or run . To reset the display, press the Stop button, remove the key, and then reinsert the key. 13 Note: When you press a button, the speed setting will appear in kilometers per hour and the approximate number of calories you exercise, change the unit of measurement is selected, hold down a button, the speed setting will begin to move...

Uk Manual
Page 14
... counter- Incline Leg Frame 5. Step onto the foot rails, press the Stop button, and remove the key from the console. Put the key in the lower right display will be changed. If the treadmill rocks on your left thumb on the pulse sensor (see page 15). There are finished using the treadmill, switch the reset/off " position and unplug the power cord. When you are two incline levels. To change the incline, rotate the incline legs upward...
... counter- Incline Leg Frame 5. Step onto the foot rails, press the Stop button, and remove the key from the console. Put the key in the lower right display will be changed. If the treadmill rocks on your left thumb on the pulse sensor (see page 15). There are finished using the treadmill, switch the reset/off " position and unplug the power cord. When you are two incline levels. To change the incline, rotate the incline legs upward...
Uk Manual
Page 15
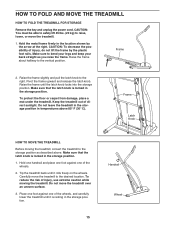
... the frame by the arrow at the right. HOW TO FOLD AND MOVE THE TREADMILL HOW TO FOLD THE TREADMILL FOR STORAGE Remove the key and unplug the power cord. CAUTION: To decrease the possibility of the wheels, and carefully lower the treadmill until the latch knob locks into the storage position. Make sure to the storage position as you raise the frame. Raise the frame...
... the frame by the arrow at the right. HOW TO FOLD AND MOVE THE TREADMILL HOW TO FOLD THE TREADMILL FOR STORAGE Remove the key and unplug the power cord. CAUTION: To decrease the possibility of the wheels, and carefully lower the treadmill until the latch knob locks into the storage position. Make sure to the storage position as you raise the frame. Raise the frame...
Uk Manual
Page 16
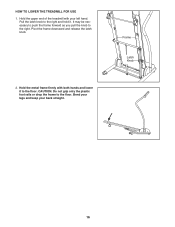
Hold the upper end of the treadmill with both hands and lower it . Hold the metal frame firmly with your back straight. Pivot the frame downward and release the latch knob. 2. Frame Latch Knob 16 It may be necessary to push the frame forward as you pull the knob to the floor. Bend your legs and keep your left hand. Pull the latch knob to the right and hold it to the floor. CAUTION: Do not grip only the plastic foot rails or drop the frame to the right. HOW TO LOWER THE TREADMILL FOR USE 1.
Hold the upper end of the treadmill with both hands and lower it . Hold the metal frame firmly with your back straight. Pivot the frame downward and release the latch knob. 2. Frame Latch Knob 16 It may be necessary to push the frame forward as you pull the knob to the floor. Bend your legs and keep your left hand. Pull the latch knob to the right and hold it to the floor. CAUTION: Do not grip only the plastic foot rails or drop the frame to the right. HOW TO LOWER THE TREADMILL FOR USE 1.
Uk Manual
Page 17
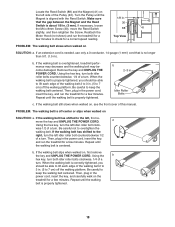
... (see the front cover of the console do not function properly SOLUTION: a. If further assistance is plugged in, unplug it, wait for five minutes and then press the switch back in . Remove the key from the console and UNPLUG THE POWER CORD. TROUBLESHOOTING Most treadmill problems can be solved by following the steps below. If the power cord is needed , use SOLUTION: a. d. PROBLEM: The displays of this manual. If the circuit...
... (see the front cover of the console do not function properly SOLUTION: a. If further assistance is plugged in, unplug it, wait for five minutes and then press the switch back in . Remove the key from the console and UNPLUG THE POWER CORD. TROUBLESHOOTING Most treadmill problems can be solved by following the steps below. If the power cord is needed , use SOLUTION: a. d. PROBLEM: The displays of this manual. If the circuit...
Uk Manual
Page 18
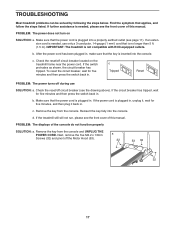
... this manual. Then, plug in . (3 mm). If an extension cord is needed, use only a 3-conductor, 14-gauge (1 mm2) cord that the gap between the Magnet and the Reed Switch is off the walking platform. Idler Roller Bolts c. PROBLEM: The walking belt is about 1/8 in the power cord, insert the key, and carefully walk on , first remove the key and UNPLUG THE POWER CORD. If the walking belt slips when walked on the treadmill for a few minutes. Turn the Pulley...
... this manual. Then, plug in . (3 mm). If an extension cord is needed, use only a 3-conductor, 14-gauge (1 mm2) cord that the gap between the Magnet and the Reed Switch is off the walking platform. Idler Roller Bolts c. PROBLEM: The walking belt is about 1/8 in the power cord, insert the key, and carefully walk on , first remove the key and UNPLUG THE POWER CORD. If the walking belt slips when walked on the treadmill for a few minutes. Turn the Pulley...
Uk Manual
Page 19
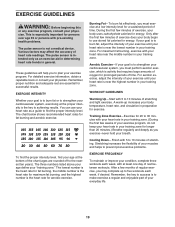
... enjoyable part of time. The pulse sensor is not a medical device. The three numbers listed above your age define your training zone. Aerobic Exercise-If your goal is to prevent post-exercise problems. EXERCISE FREQUENCY To maintain or improve your breath. A warm-up to five workouts each week, with your heart rate in your "training zone." Training Zone Exercise-Exercise for a sustained period of your body temperature, heart rate, and...
... enjoyable part of time. The pulse sensor is not a medical device. The three numbers listed above your age define your training zone. Aerobic Exercise-If your goal is to prevent post-exercise problems. EXERCISE FREQUENCY To maintain or improve your breath. A warm-up to five workouts each week, with your heart rate in your "training zone." Training Zone Exercise-Exercise for a sustained period of your body temperature, heart rate, and...
Uk Manual
Page 20
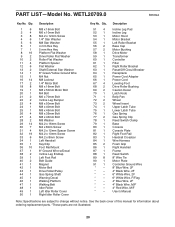
... - * - * - * - * - * - PART LIST-Model No. WETL20709.0 R0509A Key No. See the back cover of this manual for information about ordering replacement parts. *These parts are subject to change without notice. Description Incline Leg Pad Incline Leg Motor Hood Motor Bracket Left Roller Bracket Base Cap Motor Bushing Drive Motor Transformer Controller Filter Right Roller Bracket Reset/Off Circuit Breaker Receptacle Power Cord Adapter Power Cord Leveling Foot Drive Roller Bushing Caution Decal Latch Knob Belly Pan Wheel Wheel Insert Upper Latch Tube Lower Latch Tube Gas Spring Gas...
... - * - * - * - * - * - PART LIST-Model No. WETL20709.0 R0509A Key No. See the back cover of this manual for information about ordering replacement parts. *These parts are subject to change without notice. Description Incline Leg Pad Incline Leg Motor Hood Motor Bracket Left Roller Bracket Base Cap Motor Bushing Drive Motor Transformer Controller Filter Right Roller Bracket Reset/Off Circuit Breaker Receptacle Power Cord Adapter Power Cord Leveling Foot Drive Roller Bushing Caution Decal Latch Knob Belly Pan Wheel Wheel Insert Upper Latch Tube Lower Latch Tube Gas Spring Gas...
Uk Manual
Page 24
... the following information when contacting us: • the model number and the serial number of the product (see the front cover of this manual) • the name of the product (see the front cover of this manual) • the key number and description of the replacement part(s) (see the front cover of this manual. If you purchased this product. ORDERING REPLACEMENT PARTS To order replacement parts, see the PART LIST and...
... the following information when contacting us: • the model number and the serial number of the product (see the front cover of this manual) • the name of the product (see the front cover of this manual) • the key number and description of the replacement part(s) (see the front cover of this manual. If you purchased this product. ORDERING REPLACEMENT PARTS To order replacement parts, see the PART LIST and...


