
User Manual
Page 15
... "RAID Storage" on page 27. Slide the approved hard disk drive into the drive bay, making sure that it , and wait for the Power LED on the front of the device will be solid red until new volumes are a few steps you . 2. For more information, see "Logging Out and Shutting Down your Device" on page 53. Adding a Hard Disk Drive to your Device (Diskless Drives) Use the following steps to install the hard disk drive...
... "RAID Storage" on page 27. Slide the approved hard disk drive into the drive bay, making sure that it , and wait for the Power LED on the front of the device will be solid red until new volumes are a few steps you . 2. For more information, see "Logging Out and Shutting Down your Device" on page 53. Adding a Hard Disk Drive to your Device (Diskless Drives) Use the following steps to install the hard disk drive...

User Manual
Page 17
.... GETTING STARTED Getting Started with My Cloud Online Setup The online setup process walks you through the steps necessary to easily connect your My Cloud device to your network-attached devices, download the WD Sync app at http://www.mycloud.com/learn/ #mc_download. If you choose not to set up the network attached storage (NAS) for your device using USB, Remote, Internal, Cloud, and Camera backup. (See "Backing Up and Retrieving Files...
.... GETTING STARTED Getting Started with My Cloud Online Setup The online setup process walks you through the steps necessary to easily connect your My Cloud device to your network-attached devices, download the WD Sync app at http://www.mycloud.com/learn/ #mc_download. If you choose not to set up the network attached storage (NAS) for your device using USB, Remote, Internal, Cloud, and Camera backup. (See "Backing Up and Retrieving Files...

User Manual
Page 35
... shares. Note: Only one at a time can have a special user account (admin) that don't require access permission are not using it. With these privileges, you with admin privileges. MANAGING USERS AND GROUPS 5 Managing Users and Groups About Users About Groups About Users The Administrator, normally the device owner, is the person in charge of setting up and configure the device to your specific needs and add other users authorized to use the Admin logon ID to your personal cloud...
... shares. Note: Only one at a time can have a special user account (admin) that don't require access permission are not using it. With these privileges, you with admin privileges. MANAGING USERS AND GROUPS 5 Managing Users and Groups About Users About Groups About Users The Administrator, normally the device owner, is the person in charge of setting up and configure the device to your specific needs and add other users authorized to use the Admin logon ID to your personal cloud...

User Manual
Page 52
... CLOUD USER MANUAL 46 Remote Backups This option allows you proceed with a remote backup, ensure the following: You have enabled port forwarding to see Knowledge Base Answer ID 11807. NAS Server (a My Cloud device on remote backups, see the remote My Cloud device over the Internet. Click Remote Backups. 3. Enter the following information to create a Remote backup job: Job Name: Enter a Job Name for your local network), OR - BACKING UP AND RETRIEVING FILES Ejecting a USB Drive Use...
... CLOUD USER MANUAL 46 Remote Backups This option allows you proceed with a remote backup, ensure the following: You have enabled port forwarding to see Knowledge Base Answer ID 11807. NAS Server (a My Cloud device on remote backups, see the remote My Cloud device over the Internet. Click Remote Backups. 3. Enter the following information to create a Remote backup job: Job Name: Enter a Job Name for your local network), OR - BACKING UP AND RETRIEVING FILES Ejecting a USB Drive Use...
User Manual
Page 60
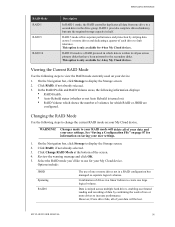
... striping data across multiple hard drives, enabling accelerated reading and recording of data by combining the work of two or more drives to increase performance. This option is only available for 4-bay My Cloud devices. Viewing the Current RAID Mode Use the following information displays: RAID Health. Auto-Rebuild status (whether or not Auto Rebuild is turned on your My Cloud device. Options include: JBOD Spanning RAID 0 The use for which data...
... striping data across multiple hard drives, enabling accelerated reading and recording of data by combining the work of two or more drives to increase performance. This option is only available for 4-bay My Cloud devices. Viewing the Current RAID Mode Use the following information displays: RAID Health. Auto-Rebuild status (whether or not Auto Rebuild is turned on your My Cloud device. Options include: JBOD Spanning RAID 0 The use for which data...

User Manual
Page 70
... users. Shared Videos-Stores video files you want to share with the Public network share, which formats are needed by default. PLAYING/STREAMING VIDEOS, PHOTOS, & MUSIC Media Types Supported by means of the Settings Screen allows you to enable or disable the DLNA and iTunes media servers. Please refer to your network to the mirrored folder. See Knowledge Base Answer ID 8412 for rescanning the NAS or fully rebuilding the DLNA...
... users. Shared Videos-Stores video files you want to share with the Public network share, which formats are needed by default. PLAYING/STREAMING VIDEOS, PHOTOS, & MUSIC Media Types Supported by means of the Settings Screen allows you to enable or disable the DLNA and iTunes media servers. Please refer to your network to the mirrored folder. See Knowledge Base Answer ID 8412 for rescanning the NAS or fully rebuilding the DLNA...

User Manual
Page 73
... need to access a Settings/Network Setup page in the user interface to establish connection so that your My Cloud device is connected to your home network for specific instructions. DLNA Devices See specific DLNA media device user manuals for instructions on connecting a DLNA device to your player's user guide for access to media content stored in a format supported by iTunes, it possible to stream music files from the My Cloud device to Windows or Mac computers running iTunes. Click WDMyCloud under the Shared section of supported media types, See "Media Types Supported" on page...
... need to access a Settings/Network Setup page in the user interface to establish connection so that your My Cloud device is connected to your home network for specific instructions. DLNA Devices See specific DLNA media device user manuals for instructions on connecting a DLNA device to your player's user guide for access to media content stored in a format supported by iTunes, it possible to stream music files from the My Cloud device to Windows or Mac computers running iTunes. Click WDMyCloud under the Shared section of supported media types, See "Media Types Supported" on page...

User Manual
Page 79
... amount of time. Click Configure to restore your Time Machine backups. The system updates automatically. Important: You must set a password for your Admin account in order to customize your system timeout. Drive Sleep is enabled to go into standby mode after approximately 10 minutes by default. Click the Configure link to schedule shutdowns for your power schedule. 3. MY CLOUD USER MANUAL 73 LCD is enabled to schedule shutdowns for 4-bay My Cloud devices. Power Schedule Web Access Timeout...
... amount of time. Click Configure to restore your Time Machine backups. The system updates automatically. Important: You must set a password for your Admin account in order to customize your system timeout. Drive Sleep is enabled to go into standby mode after approximately 10 minutes by default. Click the Configure link to schedule shutdowns for your power schedule. 3. MY CLOUD USER MANUAL 73 LCD is enabled to schedule shutdowns for 4-bay My Cloud devices. Power Schedule Web Access Timeout...

User Manual
Page 85
... IP Address. • User Management (SNMPv3): Click Users, and then click Add User. CONFIGURING SETTINGS NFS Service WebDAV Service SNMP Network File System. Select this option to enable Web Distributed Authoring and Versioning (WebDAV) service to enable web access to access files over IP networks. Select this option to enable NFS Service for your network, which allows a user to content within the same network. • To enable/disable WebDAV Service, click the toggle button. Note: In order to connect to the WebDAV service, use the...
... IP Address. • User Management (SNMPv3): Click Users, and then click Add User. CONFIGURING SETTINGS NFS Service WebDAV Service SNMP Network File System. Select this option to enable Web Distributed Authoring and Versioning (WebDAV) service to enable web access to access files over IP networks. Select this option to enable NFS Service for your network, which allows a user to content within the same network. • To enable/disable WebDAV Service, click the toggle button. Note: In order to connect to the WebDAV service, use the...
User Manual
Page 86
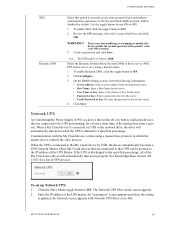
... ON. To enable Dynamic DNS, click the toggle button to turn ON or OFF. 1. Please note that UPS can be pointed to the IP address of UPS devices. Click Configure. 3. Create a password, and click Save. MY CLOUD USER MANUAL 80 CONFIGURING SETTINGS SSH Dynamic DNS Select this device outside the normal operation of the UPS master. WARNING! Network UPS An Uninterruptible Power Supply (UPS) is a device that works off of...
... ON. To enable Dynamic DNS, click the toggle button to turn ON or OFF. 1. Please note that UPS can be pointed to the IP address of UPS devices. Click Configure. 3. Create a password, and click Save. MY CLOUD USER MANUAL 80 CONFIGURING SETTINGS SSH Dynamic DNS Select this device outside the normal operation of the UPS master. WARNING! Network UPS An Uninterruptible Power Supply (UPS) is a device that works off of...

User Manual
Page 87
... improve data availability. Click Add Link to connect to add links to aggregate remote shares. Enter the Local Folder Name for the linked, remote shares. To enable Share Aggregation, click the toggle button to access one another. In the Share Aggregation Settings window, enter the Root Folder Name to create a container for the folder displayed under the Root Folder. Enter the Remote Host hostname, or, the IP address of the target device. Manually enter the Remote Share name...
... improve data availability. Click Add Link to connect to add links to aggregate remote shares. Enter the Local Folder Name for the linked, remote shares. To enable Share Aggregation, click the toggle button to access one another. In the Share Aggregation Settings window, enter the Root Folder Name to create a container for the folder displayed under the Root Folder. Enter the Remote Host hostname, or, the IP address of the target device. Manually enter the Remote Share name...

User Manual
Page 88
... Server is disabled by assigning default or custom port numbers. CONFIGURING SETTINGS Active Directory Enabling this option to enable LLTD on your connections to particular services by default. 1. Click Apply. MY CLOUD USER MANUAL 82 To enable/disable Active Directory, click the toggle button. Review the information on Port Forwarding, click Learn More to see your My Cloud device to join. Enter a backup Password to ON. Port Forwarding The Port Forwarding section of the Network screen allows you to manage your network for both SSH and Remote Backup services...
... Server is disabled by assigning default or custom port numbers. CONFIGURING SETTINGS Active Directory Enabling this option to enable LLTD on your connections to particular services by default. 1. Click Apply. MY CLOUD USER MANUAL 82 To enable/disable Active Directory, click the toggle button. Review the information on Port Forwarding, click Learn More to see your My Cloud device to join. Enter a backup Password to ON. Port Forwarding The Port Forwarding section of the Network screen allows you to manage your network for both SSH and Remote Backup services...
User Manual
Page 92
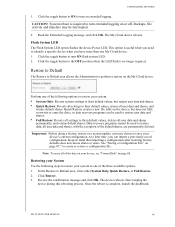
... this rebooting process. Backups, file activity and transfers may choose to their default values, deletes all user data and shares, with the exception of the default shares, are permanently deleted. Flash System LED The Flash System LED option flashes the device Power LED. Click the toggle button to restore data; all user data and shares permanently, and retains default shares. See "Saving a Configuration File" on or off. Once the reboot is no longer required. System reboot is useful when you can be used to turn extended logging...
... this rebooting process. Backups, file activity and transfers may choose to their default values, deletes all user data and shares, with the exception of the default shares, are permanently deleted. Flash System LED The Flash System LED option flashes the device Power LED. Click the toggle button to restore data; all user data and shares permanently, and retains default shares. See "Saving a Configuration File" on or off. Once the reboot is no longer required. System reboot is useful when you can be used to turn extended logging...

User Manual
Page 95
... the image size for your image file in the left column, then click Add>>. 8. Click Next. 6. CONFIGURING SETTINGS Creating an ISO Image An ISO image is a file that you'd like to remove from the ISO image, then click In the About ISO Mount area, click Create ISO Image. 2. In the Image Name field, enter a name for the ISO image. 3. Use the...
... the image size for your image file in the left column, then click Add>>. 8. Click Next. 6. CONFIGURING SETTINGS Creating an ISO Image An ISO image is a file that you'd like to remove from the ISO image, then click In the About ISO Mount area, click Create ISO Image. 2. In the Image Name field, enter a name for the ISO image. 3. Use the...

User Manual
Page 96
... by email, depending on page 24). MY CLOUD USER MANUAL 90 On the ISO Mount screen, click the Modify icon next to the ISO share that you'd like to enable NFS Access for the ISO Share, click the toggle button. The Edit ISO Share dialog box appears. Complete the following steps to view. 2. Deleting an ISO Share Use the following fields: Media Serving: To enable Media Serving...
... by email, depending on page 24). MY CLOUD USER MANUAL 90 On the ISO Mount screen, click the Modify icon next to the ISO share that you'd like to enable NFS Access for the ISO Share, click the toggle button. The Edit ISO Share dialog box appears. Complete the following steps to view. 2. Deleting an ISO Share Use the following fields: Media Serving: To enable Media Serving...

User Manual
Page 114
... camera backups 51 disk status 55 DLNA 67 internal backups 47 iSCSI 56 media servers 62 shares 37 Volume Virtualization 58 WD Media Players 67 accessing content 14 general settings 69 iTunes on My Cloud device 67 online support ii personal cloud using media players 66 remote cloud access 40 accessories 3 action icons 101 Active Directory settings 82 adding a hard disk drive 9 a single user 30 apps 60 groups 34 media content to a folder 66 multiple users 30 Port Forwarding Services 83 AFP Services 78 alerts details 25 dismissing 25 email...
... camera backups 51 disk status 55 DLNA 67 internal backups 47 iSCSI 56 media servers 62 shares 37 Volume Virtualization 58 WD Media Players 67 accessing content 14 general settings 69 iTunes on My Cloud device 67 online support ii personal cloud using media players 66 remote cloud access 40 accessories 3 action icons 101 Active Directory settings 82 adding a hard disk drive 9 a single user 30 apps 60 groups 34 media content to a folder 66 multiple users 30 Port Forwarding Services 83 AFP Services 78 alerts details 25 dismissing 25 email...

User Manual
Page 116
... updates 92 Flash System LED 86 Front USB Port Backups 45 FTP Access 78 G general settings 68 accessing 69 Active Directory settings 82 cloud access 71 Energy Saver 72 language and clock settings 70 Local Master Browser 81 Mac backup 73 Network Profile 76 Network Services 76 Network settings 75 services settings 74 share aggregation 81 workgroup 81 groups about 34 adding 34 assigning a user 32 assigning quotas 35 assigning share access 35 assigning shares 35 editing settings 34 quota rules 33 removing 35 viewing 34 H hard disk adding to diskless drive 9 viewing...
... updates 92 Flash System LED 86 Front USB Port Backups 45 FTP Access 78 G general settings 68 accessing 69 Active Directory settings 82 cloud access 71 Energy Saver 72 language and clock settings 70 Local Master Browser 81 Mac backup 73 Network Profile 76 Network Services 76 Network settings 75 services settings 74 share aggregation 81 workgroup 81 groups about 34 adding 34 assigning a user 32 assigning quotas 35 assigning share access 35 assigning shares 35 editing settings 34 quota rules 33 removing 35 viewing 34 H hard disk adding to diskless drive 9 viewing...

User Manual
Page 117
... Ethernet (Network) 8 description 7 Front Panel Power 7 link aggregation 77 speed 77 LLTD 82 Local Master Browser 81 logging off of your device 27 M Mac backups 73 creating an alias for shared drive 14 Machine noise compliance, Germany 96 managing alerts 24 apps 60 USB backups 43 users and groups 29 manual updates 94 manually adding an app 61 mapping public folders 15 Max SMB Protocol 81 media content adding 66 media players accessing in My Cloud device 66 accessing your personal cloud using...
... Ethernet (Network) 8 description 7 Front Panel Power 7 link aggregation 77 speed 77 LLTD 82 Local Master Browser 81 logging off of your device 27 M Mac backups 73 creating an alias for shared drive 14 Machine noise compliance, Germany 96 managing alerts 24 apps 60 USB backups 43 users and groups 29 manual updates 94 manually adding an app 61 mapping public folders 15 Max SMB Protocol 81 media content adding 66 media players accessing in My Cloud device 66 accessing your personal cloud using...

User Manual
Page 118
... 3 password updating 32 updating user 32 photos viewing 62 Port Forwarding 82 adding 83 deleting 83 power button shutting down using the 27 Precautions 8 Pre-installation Instructions 8 preparing your system 86 RF emission compliance 95 RoHS environmental compliance, China 96 Running a Diagnostic Test 85 S S.M.A.R.T. and Canada 95 Safety instructions 1 saving configuration file 87 scan disk for errors 88 scanning 88 services settings 74 setting up network UPS 80 settings general 68 Share aggregation settings 81 shared drive creating a Mac alias...
... 3 password updating 32 updating user 32 photos viewing 62 Port Forwarding 82 adding 83 deleting 83 power button shutting down using the 27 Precautions 8 Pre-installation Instructions 8 preparing your system 86 RF emission compliance 95 RoHS environmental compliance, China 96 Running a Diagnostic Test 85 S S.M.A.R.T. and Canada 95 Safety instructions 1 saving configuration file 87 scan disk for errors 88 scanning 88 services settings 74 setting up network UPS 80 settings general 68 Share aggregation settings 81 shared drive creating a Mac alias...

User Manual
Page 119
... password 32 UPS network connection 80 network setup 80 USB backups creating 44 managing 43 USB Copy Button MY CLOUD USER MANUAL INDEX creating backups 45 USB drive connecting 43 User settings 29 user import file creating 104 format 104 user password updating 32 users about 29 adding a single 30 adding multiple 30 assigning a group to 32 assigning quotas 33 assigning quotas to 32 creating multiple 31 enabling remote cloud access 40 group quota rules 33 importing multiple 31 quotas 32 removing 33 settings, editing 32 updating password 32 viewing 29 viewing list of 29 Users Panel 23 Using Mac...
... password 32 UPS network connection 80 network setup 80 USB backups creating 44 managing 43 USB Copy Button MY CLOUD USER MANUAL INDEX creating backups 45 USB drive connecting 43 User settings 29 user import file creating 104 format 104 user password updating 32 users about 29 adding a single 30 adding multiple 30 assigning a group to 32 assigning quotas 33 assigning quotas to 32 creating multiple 31 enabling remote cloud access 40 group quota rules 33 importing multiple 31 quotas 32 removing 33 settings, editing 32 updating password 32 viewing 29 viewing list of 29 Users Panel 23 Using Mac...


