
User Manual
Page 3
... SAFETY INSTRUCTIONS 5 Circuit Overload 6 Power Cord Protection 6 Ventilation 6 Safety: Lamp Disposal 6 WARNINGS AND PRECAUTIONS 7 ANTENNA INSTALLATION SAFETY 8 Lighting 8 Power lines 8 CLEANING THE LCD TV 9 Dolby-Digital Notice 9 PACKAGE CONTENTS 10 CONTROL PANEL 11 TERMINALS 12 REMOTE CONTROL 13 REMOTE CONTROL OPERATION 15 INSTALLING THE REMOTE CONTROL BATTERIES .. 15 REMOTE CONTROL TRANSMISSION RANGE .......... 15 LCD TV BASE 16 INSTALLING THE LCD TV BASE 16 REMOVING THE LCD TV BASE 17 ANTENNA CONNECTION 18 OUTDOOR ANTENNA CONNECTION 18 CABLE TV (CTV/DTV) CONNECTION 18...
... SAFETY INSTRUCTIONS 5 Circuit Overload 6 Power Cord Protection 6 Ventilation 6 Safety: Lamp Disposal 6 WARNINGS AND PRECAUTIONS 7 ANTENNA INSTALLATION SAFETY 8 Lighting 8 Power lines 8 CLEANING THE LCD TV 9 Dolby-Digital Notice 9 PACKAGE CONTENTS 10 CONTROL PANEL 11 TERMINALS 12 REMOTE CONTROL 13 REMOTE CONTROL OPERATION 15 INSTALLING THE REMOTE CONTROL BATTERIES .. 15 REMOTE CONTROL TRANSMISSION RANGE .......... 15 LCD TV BASE 16 INSTALLING THE LCD TV BASE 16 REMOVING THE LCD TV BASE 17 ANTENNA CONNECTION 18 OUTDOOR ANTENNA CONNECTION 18 CABLE TV (CTV/DTV) CONNECTION 18...

User Manual
Page 4
English TABLE OF CONTENTS EXTERNAL DEVICE CONNECTIONS 19 POWER CONNECTION 21 CONNECTING AC POWER 21 INITIAL SETUP 21 BASIC OPERATIONS 22 TURNING THE POWER ON AND OFF 22 ADJUSTING THE VOLUME 22 CHANGING CHANNELS 23 SELECTING THE INPUT SOURCE 23 ADJUSTING THE DISPLAY FORMAT 24 ADJUSTING THE LCD BACKLIGHT 24 SETUP MENUS 25 SETUP MENU OPERATION 25 PICTURE 26 AUDIO 30 VIEW MODE 33 VIEW MODE (VGA 34 CHANNELS 36 SETTINGS 40 WALL MOUNT OPTION 51 WALL MOUNT INSTALLATION REMINDERS 51 TROUBLESHOOTING 52 SPECIFICATIONS 55 ii
English TABLE OF CONTENTS EXTERNAL DEVICE CONNECTIONS 19 POWER CONNECTION 21 CONNECTING AC POWER 21 INITIAL SETUP 21 BASIC OPERATIONS 22 TURNING THE POWER ON AND OFF 22 ADJUSTING THE VOLUME 22 CHANGING CHANNELS 23 SELECTING THE INPUT SOURCE 23 ADJUSTING THE DISPLAY FORMAT 24 ADJUSTING THE LCD BACKLIGHT 24 SETUP MENUS 25 SETUP MENU OPERATION 25 PICTURE 26 AUDIO 30 VIEW MODE 33 VIEW MODE (VGA 34 CHANNELS 36 SETTINGS 40 WALL MOUNT OPTION 51 WALL MOUNT INSTALLATION REMINDERS 51 TROUBLESHOOTING 52 SPECIFICATIONS 55 ii
User Manual
Page 8
... not installed and used , use a grounded power supply cord and the provided shielded video interface cable with the instructions. English IMPORTANT INFORMATION FCC COMPLIANCE STATEMENT This equipment has been tested and complies with the limits for assistance. However, there is no guarantee that interference will void the user's authority to part 15 of the following measures: • Reorient or relocate the receiving antenna...
... not installed and used , use a grounded power supply cord and the provided shielded video interface cable with the instructions. English IMPORTANT INFORMATION FCC COMPLIANCE STATEMENT This equipment has been tested and complies with the limits for assistance. However, there is no guarantee that interference will void the user's authority to part 15 of the following measures: • Reorient or relocate the receiving antenna...

User Manual
Page 12
... Power service grounding electrode system (NEC Art 250 part H) Lighting Z Z Z For added protection for the LCD TV during a heavy storm-lightning may strike while you are holding the cable cord, causing serious injury. Antenna Grounding According to the National Electrical Code, ANSI/NFPA 70 Grounding clamps Antenna lead in the vicinity of the lead-in wire to an antenna discharge unit, connection...
... Power service grounding electrode system (NEC Art 250 part H) Lighting Z Z Z For added protection for the LCD TV during a heavy storm-lightning may strike while you are holding the cable cord, causing serious injury. Antenna Grounding According to the National Electrical Code, ANSI/NFPA 70 Grounding clamps Antenna lead in the vicinity of the lead-in wire to an antenna discharge unit, connection...

User Manual
Page 16
...power cord from this input to a computer or other device with component output to an external video device such as a DVD player, game system, cable, or satellite box. Connect to these jacks. 8. YPbPr input Connect an external video device with a VGA output. AV2 Audio input Connect this outlet to an antenna or cable service. 12. PC/VGA 4. Using a 15-pin VGA cable, connect to an external audio source. 12 SPDIF (optical) audio Connect this input to an external digital audio out receiver. 7. AV audio input Connect this output to an external audio source. 11. HDMI...
...power cord from this input to a computer or other device with component output to an external video device such as a DVD player, game system, cable, or satellite box. Connect to these jacks. 8. YPbPr input Connect an external video device with a VGA output. AV2 Audio input Connect this outlet to an antenna or cable service. 12. PC/VGA 4. Using a 15-pin VGA cable, connect to an external audio source. 12 SPDIF (optical) audio Connect this input to an external digital audio out receiver. 7. AV audio input Connect this output to an external audio source. 11. HDMI...
User Manual
Page 17
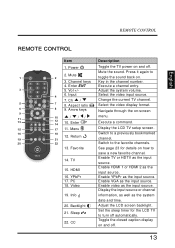
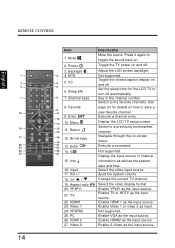
.... Vol +/- Enable HDMI 1 or HDMI 2 as the input source. Enable VGA as the input source. Adjust the system volume. 6. PC 18. Menu Display the LCD TV setup screen. 16 18 Switch to turn off automatically. Aspect ratio Select the video display format. 6 8 9. Display the input source or channel 19. Backlight 21. Adjust the LCD screen backlight. Power Toggle the TV power on how to 1 2. Enable YPbPr as the input source. Mute the sound. Enter ENT Execute a channel entry. 3 5. Ch / Change the current...
.... Vol +/- Enable HDMI 1 or HDMI 2 as the input source. Enable VGA as the input source. Adjust the system volume. 6. PC 18. Menu Display the LCD TV setup screen. 16 18 Switch to turn off automatically. Aspect ratio Select the video display format. 6 8 9. Display the input source or channel 19. Backlight 21. Adjust the LCD screen backlight. Power Toggle the TV power on how to 1 2. Enable YPbPr as the input source. Mute the sound. Enter ENT Execute a channel entry. 3 5. Ch / Change the current...
User Manual
Page 18
... TV power on -screen menu. Set the sleep timer for details on how to save a new favorite channel. Key in the channel number. Switch to a previously bookmarked channel. Switch to the favorite channels. Not supported. Display the input source or channel information as well as the input source. Change the current TV channel. Select the video display format. Enable YPbPr as the system date and time. Not supported. Backlight 1 2 4. ZZZ MTS 5 Favorite 6 A 6. Input 17. Video 1 24. Video 2 Description Mute the sound...
... TV power on -screen menu. Set the sleep timer for details on how to save a new favorite channel. Key in the channel number. Switch to a previously bookmarked channel. Switch to the favorite channels. Not supported. Display the input source or channel information as well as the input source. Change the current TV channel. Select the video display format. Enable YPbPr as the system date and time. Not supported. Backlight 1 2 4. ZZZ MTS 5 Favorite 6 A 6. Input 17. Video 1 24. Video 2 Description Mute the sound...
User Manual
Page 22
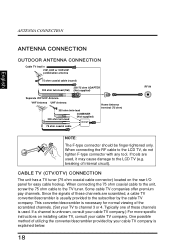
... unknown, consult your cable TV company.) For more specific instructions on the rear I/O panel for normal viewing of the scrambled channels. (Set your cable TV company is usually provided to the LCD TV (e.g. When connecting the 75 ohm coaxial cable to the unit, screw the 75 ohm cable to the LCD TV, do not tighten F-type connector with any tool. When connecting the RF cable to the TV tuner.
... unknown, consult your cable TV company.) For more specific instructions on the rear I/O panel for normal viewing of the scrambled channels. (Set your cable TV company is usually provided to the LCD TV (e.g. When connecting the 75 ohm coaxial cable to the unit, screw the 75 ohm cable to the LCD TV, do not tighten F-type connector with any tool. When connecting the RF cable to the TV tuner.
User Manual
Page 23
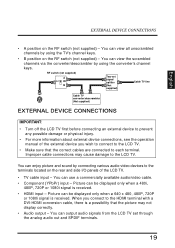
... signal is received. • HDMI input - You can output audio signals from the LCD TV set signal splitter (Not supplied) Cable TV line Cable TV converter/descrambler (Not supplied) EXTERNAL DEVICE CONNECTIONS IMPORTANT: • Turn off the LCD TV first before connecting an external device to prevent any possible damage or physical injury. • For more information about external device connections, see the operation manual of the LCD TV. • TV cable input - You can view the scrambled channels...
... signal is received. • HDMI input - You can output audio signals from the LCD TV set signal splitter (Not supplied) Cable TV line Cable TV converter/descrambler (Not supplied) EXTERNAL DEVICE CONNECTIONS IMPORTANT: • Turn off the LCD TV first before connecting an external device to prevent any possible damage or physical injury. • For more information about external device connections, see the operation manual of the LCD TV. • TV cable input - You can view the scrambled channels...

User Manual
Page 24
... component terminal, COMPONENT connection is recommended (high-quality pictures can be viewed) Y Pb Pr Audio Audio (R) (L) Audio cable Component cable Audio cable Cable system or antenna Antenna cable HDMI R COMPONENT Y Pb Pr L R L PC / VGA SPDIF OUT PC AUDIO AV 1 L R AUDIO R L AV 2 USB RGB cable 3.5 mm stereo mini jack cable Video Audio PC SPDIF cable AUDIO OUT Audio amplifier Video Audio Audio (L) (R) Home Video game system Camcorder VCR Audio output terminal DVD Player Digital TV turner 20 English EXTERNAL DEVICE CONNECTIONS The following diagram shows...
... component terminal, COMPONENT connection is recommended (high-quality pictures can be viewed) Y Pb Pr Audio Audio (R) (L) Audio cable Component cable Audio cable Cable system or antenna Antenna cable HDMI R COMPONENT Y Pb Pr L R L PC / VGA SPDIF OUT PC AUDIO AV 1 L R AUDIO R L AV 2 USB RGB cable 3.5 mm stereo mini jack cable Video Audio PC SPDIF cable AUDIO OUT Audio amplifier Video Audio Audio (L) (R) Home Video game system Camcorder VCR Audio output terminal DVD Player Digital TV turner 20 English EXTERNAL DEVICE CONNECTIONS The following diagram shows...

User Manual
Page 25
... L R AV 1 L R INITIAL SETUP Press on the control panel or on the remote control to turn on how to set up the LCD TV's operational settings. Turn off all connected devices before plugging in the power cord. The SetupWizard will guide you on the LCD TV. POWER CONNECTION POWER CONNECTION CONNECTING AC POWER IMPORTANT: The LCD TV works on a 120 VAC, 60 Hz power input voltage ONLY. Connect the power cord to the LCD TV then to use the SetupWizard. Menu Volume Channel Source Power 21 Select the...
... L R AV 1 L R INITIAL SETUP Press on the control panel or on the remote control to turn on how to set up the LCD TV's operational settings. Turn off all connected devices before plugging in the power cord. The SetupWizard will guide you on the LCD TV. POWER CONNECTION POWER CONNECTION CONNECTING AC POWER IMPORTANT: The LCD TV works on a 120 VAC, 60 Hz power input voltage ONLY. Connect the power cord to the LCD TV then to use the SetupWizard. Menu Volume Channel Source Power 21 Select the...

User Manual
Page 26
Menu LED Behavior Description Volume Turns from amber When LED Setting to blue when power is set to OFF. When LED Settings is turned off the sound. BASIC OPERATIONS English BASIC OPERATIONS TURNING THE POWER ON AND OFF Turning on the power Press on the control panel or on the remote control to turn on the sound. 22 Channel on and turns from the remote control. • In standby mode, a small amount of electricity is still consumed even when the power is...
Menu LED Behavior Description Volume Turns from amber When LED Setting to blue when power is set to OFF. When LED Settings is turned off the sound. BASIC OPERATIONS English BASIC OPERATIONS TURNING THE POWER ON AND OFF Turning on the power Press on the control panel or on the remote control to turn on the sound. 22 Channel on and turns from the remote control. • In standby mode, a small amount of electricity is still consumed even when the power is...

User Manual
Page 27
... remote control keys to change channels. SELECTING THE INPUT SOURCE There are two ways to the preferred favorite channel. Using the Individual Input Keys TV, PC, Video, YPbPr, HDMI Keys Press any of the following instructions to change the input source: TV, PC, Video, YPbPr, or HDMI. 23 English BASIC OPERATIONS CHANGING CHANNELS Referred to in the channel number using the channel keys and the • key then press ENT. Saving a channel as a favorite 1 Display the channel...
... remote control keys to change channels. SELECTING THE INPUT SOURCE There are two ways to the preferred favorite channel. Using the Individual Input Keys TV, PC, Video, YPbPr, HDMI Keys Press any of the following instructions to change the input source: TV, PC, Video, YPbPr, or HDMI. 23 English BASIC OPERATIONS CHANGING CHANNELS Referred to in the channel number using the channel keys and the • key then press ENT. Saving a channel as a favorite 1 Display the channel...

User Manual
Page 33
... Use Hue to the current input source. 29 English SETUP MENUS Adjusting Color Temperature 1 Use the / keys to select Color temperature and press . 2 Press the / keys on the remote control to adjust the option level. 3 Press to save and exit the screen. Reset NOTE: The configuration settings for the Picture sub-menus will only be applied to adjust the balance of the red, green, and blue colors in the display. Reset...
... Use Hue to the current input source. 29 English SETUP MENUS Adjusting Color Temperature 1 Use the / keys to select Color temperature and press . 2 Press the / keys on the remote control to adjust the option level. 3 Press to save and exit the screen. Reset NOTE: The configuration settings for the Picture sub-menus will only be applied to adjust the balance of the red, green, and blue colors in the display. Reset...

User Manual
Page 43
... source you select: • Cable: Choose this setting if you are receiving TV channels with an antenna (over the air) Manual Search Use Manual Search to select Manual Search and press Add screen appears. . English SETUP MENUS Adjusting Audio Language 1 Use the / keys to select Audio Language and press . 2 Press the / keys on the remote control to save and exit the screen. Channel Add _ Enter :Select Adding Channels Manually Enter: Confirm Menu: Exit 1 Use...
... source you select: • Cable: Choose this setting if you are receiving TV channels with an antenna (over the air) Manual Search Use Manual Search to select Manual Search and press Add screen appears. . English SETUP MENUS Adjusting Audio Language 1 Use the / keys to select Audio Language and press . 2 Press the / keys on the remote control to save and exit the screen. Channel Add _ Enter :Select Adding Channels Manually Enter: Confirm Menu: Exit 1 Use...

User Manual
Page 46
Parental Control Use Parental Control to use the Parental Control. Enter Password Enter: Confirm Menu: Exit After you enter the correct password, the Parental Control menu is 999999. The factory password is shown. The following options are displayed. To display the hidden submenu, set to As Broadcaster, Black, White, Green, Blue, Red, Cyan, Yellow, or Magenta. English SETUP MENUS • Size: Can be set to As Broadcaster, Small, Medium, or Large. • Font Color: Can be set to As...
Parental Control Use Parental Control to use the Parental Control. Enter Password Enter: Confirm Menu: Exit After you enter the correct password, the Parental Control menu is 999999. The factory password is shown. The following options are displayed. To display the hidden submenu, set to As Broadcaster, Black, White, Green, Blue, Red, Cyan, Yellow, or Magenta. English SETUP MENUS • Size: Can be set to As Broadcaster, Small, Medium, or Large. • Font Color: Can be set to As...
User Manual
Page 56
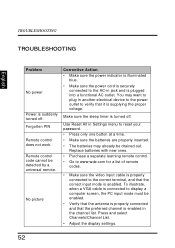
... power cord is securely connected to the correct terminal, and that the preferred channel is turned off . Replace batteries with new ones. • Purchase a separate learning remote control. • Go to www.wde.com for a list of remote codes. • Make sure the video input cable is properly connected to the AC-in jack and is enabled. Use Reset All in Settings menu to reset your password. • Press only one button...
... power cord is securely connected to the correct terminal, and that the preferred channel is turned off . Replace batteries with new ones. • Purchase a separate learning remote control. • Go to www.wde.com for a list of remote codes. • Make sure the video input cable is properly connected to the AC-in jack and is enabled. Use Reset All in Settings menu to reset your password. • Press only one button...

User Manual
Page 57
... TV mode (cutoff • Replace poor antenna cables and/or picture, snowy connectors to the LCD TV's VGA port. English TROUBLESHOOTING Problem Corrective Action No picture or the No • Signal message appears when a • VGA cable is connected. • Make sure the VGA cable is securely connected. Adjust the Hue, Saturation and Color Temperature settings in Picture menu. • In HDMI mode, make sure the external device is compatible with the computer screen. 53...
... TV mode (cutoff • Replace poor antenna cables and/or picture, snowy connectors to the LCD TV's VGA port. English TROUBLESHOOTING Problem Corrective Action No picture or the No • Signal message appears when a • VGA cable is connected. • Make sure the VGA cable is securely connected. Adjust the Hue, Saturation and Color Temperature settings in Picture menu. • In HDMI mode, make sure the external device is compatible with the computer screen. 53...
User Manual
Page 58
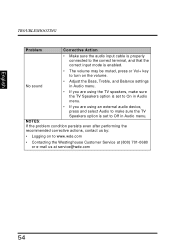
... on the volume. English TROUBLESHOOTING Problem Corrective Action • Make sure the audio input cable is properly connected to the correct terminal, and that the correct input mode is set to Off in Audio menu. • If you are using the TV speakers, make sure the TV Speakers option is set to www.wde.com • Contacting the Westinghouse Customer Service at service@wde.com 54 No sound • Adjust the...
... on the volume. English TROUBLESHOOTING Problem Corrective Action • Make sure the audio input cable is properly connected to the correct terminal, and that the correct input mode is set to Off in Audio menu. • If you are using the TV speakers, make sure the TV Speakers option is set to www.wde.com • Contacting the Westinghouse Customer Service at service@wde.com 54 No sound • Adjust the...
User Manual
Page 59
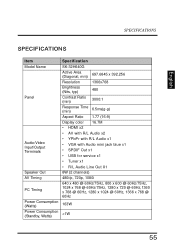
English SPECIFICATIONS SPECIFICATIONS Item Model Name Panel Audio/Video Input/Output Terminals Speaker Out AV Timing PC Timing Power Consumption (Watts) Power Consumption (Standby, Watts) Specification SK-32H640G Active Area (Diagonal, mm) 697.6845 x 392.256 Resolution 1366x768 Brightness (Nits, typ) 480 Contrast Ratio (min) 3000:1 Response Time (min) 6.5ms(g-g) Aspect Ratio 1.77 (16:9) Display color 16.7M • HDMI x2 • AV with R/L Audio x2 • YPbPr with R/L Audio x1 • VGA with Audio mini...
English SPECIFICATIONS SPECIFICATIONS Item Model Name Panel Audio/Video Input/Output Terminals Speaker Out AV Timing PC Timing Power Consumption (Watts) Power Consumption (Standby, Watts) Specification SK-32H640G Active Area (Diagonal, mm) 697.6845 x 392.256 Resolution 1366x768 Brightness (Nits, typ) 480 Contrast Ratio (min) 3000:1 Response Time (min) 6.5ms(g-g) Aspect Ratio 1.77 (16:9) Display color 16.7M • HDMI x2 • AV with R/L Audio x2 • YPbPr with R/L Audio x1 • VGA with Audio mini...


