
User Manual
Page 3
...THE STAND 3 PREFACE SAFETY 4 PRECAUTIONS 5 CONTENTS FRONT/BACK 6 CONNECTIONS OF LCD TV 7 TV INSTALLATION 8 REMOTE CONTROL 9 MENU OPERATION 10 TROUBLESHOOTING 11 SPECIFICATIONS TABLE OF CONTENTS 2 4 5 5 7 8 Power Cord Connection 9 Antenna Connection 9 AV Connection 10 YPbPr(component) Connection 10 VGA(PC) Connection 11 Service Port Function 11 HDMI Connection 12 Remote control instructions in TV mode 13 Remote control setup 14 SETUP WIZARD 15 Operating the Menu 17 PICTURE Menu 18 AUDIO Menu 19 TIME Menu 19 SETUP Menu 20 LOCK Menu 22 CHANNEL...
...THE STAND 3 PREFACE SAFETY 4 PRECAUTIONS 5 CONTENTS FRONT/BACK 6 CONNECTIONS OF LCD TV 7 TV INSTALLATION 8 REMOTE CONTROL 9 MENU OPERATION 10 TROUBLESHOOTING 11 SPECIFICATIONS TABLE OF CONTENTS 2 4 5 5 7 8 Power Cord Connection 9 Antenna Connection 9 AV Connection 10 YPbPr(component) Connection 10 VGA(PC) Connection 11 Service Port Function 11 HDMI Connection 12 Remote control instructions in TV mode 13 Remote control setup 14 SETUP WIZARD 15 Operating the Menu 17 PICTURE Menu 18 AUDIO Menu 19 TIME Menu 19 SETUP Menu 20 LOCK Menu 22 CHANNEL...

User Manual
Page 4
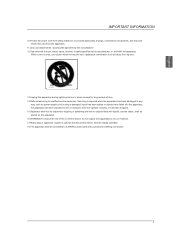
... in accordance with the manufacturer's instructions. 8.Do not install near water. 6.Clean only with dry cloth. 7.Do not block any heat sources such as radiators, heat registers, stoves, or other . A grounding type plug has two blades and a third grounding prong. Refer to service manual for use near any ventilation openings. CAUTION: USE OF ANY CONTROLS, ADJUSTMENTS, OR PROCEDURES OTHER THAN THOSE...
... in accordance with the manufacturer's instructions. 8.Do not install near water. 6.Clean only with dry cloth. 7.Do not block any heat sources such as radiators, heat registers, stoves, or other . A grounding type plug has two blades and a third grounding prong. Refer to service manual for use near any ventilation openings. CAUTION: USE OF ANY CONTROLS, ADJUSTMENTS, OR PROCEDURES OTHER THAN THOSE...
User Manual
Page 5
... specified by the manufacturer. 12.Use only with the cart, stand, tripod, bracket, or table specified by the manufacturer, or sold with liquids, suchas vases, shall be placed on the apparatus. 16.WARNING:To reduce the risk of time. 14.Refer all servicing to qualified service personnel. When a cart is used as power-supply cord or plug is required when the apparatus...
... specified by the manufacturer. 12.Use only with the cart, stand, tripod, bracket, or table specified by the manufacturer, or sold with liquids, suchas vases, shall be placed on the apparatus. 16.WARNING:To reduce the risk of time. 14.Refer all servicing to qualified service personnel. When a cart is used as power-supply cord or plug is required when the apparatus...
User Manual
Page 10
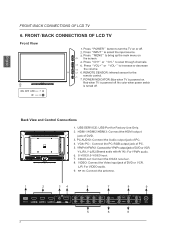
English CH+ CH- VOL+ VOL- Red when TV is powered off . MENU INPUT POWER Back View and Control Connections (Shared audio with AV IN) S-VIDEO:S-VIDEO input. No color when power switch is powered on. RF IN SERVICE 8 RF IN FRONT/BACK CONNECTIONS OF LCD TV INPUT Blue when TV is turned off . FRONT/BACK CONNECTIONS OF LCD TV 6.
English CH+ CH- VOL+ VOL- Red when TV is powered off . MENU INPUT POWER Back View and Control Connections (Shared audio with AV IN) S-VIDEO:S-VIDEO input. No color when power switch is powered on. RF IN SERVICE 8 RF IN FRONT/BACK CONNECTIONS OF LCD TV INPUT Blue when TV is turned off . FRONT/BACK CONNECTIONS OF LCD TV 6.

User Manual
Page 11
... service for correct installation and connection. The antenna system as shown. TV INSTALL ATION Power Cord Connection - After installation, insert the 75-ohm antenna plug into the antenna jack as shown can be installed. Connect the power cord correctly as shown. - The power indicator on the LCD TV. English Antenna Connection To ensure good picture and sound, TV antenna system needs to switch on the front panel lights up in red or green. VHF ANTENNA UHF ANTENNA OUTDOOR ANTENNA AMPLIFIER INDOOR ANTENNA AMPLIFIER POWER PLUG...
... service for correct installation and connection. The antenna system as shown. TV INSTALL ATION Power Cord Connection - After installation, insert the 75-ohm antenna plug into the antenna jack as shown can be installed. Connect the power cord correctly as shown. - The power indicator on the LCD TV. English Antenna Connection To ensure good picture and sound, TV antenna system needs to switch on the front panel lights up in red or green. VHF ANTENNA UHF ANTENNA OUTDOOR ANTENNA AMPLIFIER INDOOR ANTENNA AMPLIFIER POWER PLUG...
User Manual
Page 12
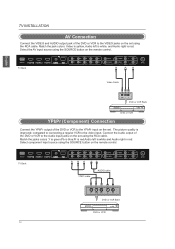
... YPbPr cable AUDIO cable Y Pb Pr L R DVD or VCR Back DVD or VCR 10 Select component input source using the SOURCE button on the remote control. English TV INSTALLATION AV Connection Connect the VIDEO and AUDIO output jack of the DVD or VCR to the VIDEO jacks on the set. Match the jack colors: Video is yellow, Audio left is white and Audio right in red. SERVICE AC IN TV Back RF IN Video Cable VIDEO L R DVD or VCR Back DVD or VCR YPbPr (Component) Connection Connect...
... YPbPr cable AUDIO cable Y Pb Pr L R DVD or VCR Back DVD or VCR 10 Select component input source using the SOURCE button on the remote control. English TV INSTALLATION AV Connection Connect the VIDEO and AUDIO output jack of the DVD or VCR to the VIDEO jacks on the set. Match the jack colors: Video is yellow, Audio left is white and Audio right in red. SERVICE AC IN TV Back RF IN Video Cable VIDEO L R DVD or VCR Back DVD or VCR YPbPr (Component) Connection Connect...
User Manual
Page 13
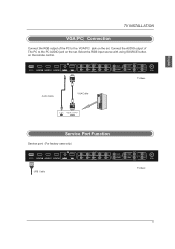
SERVICE RF IN TV Back Audio Cable VGA Cable AUDIO RGB-PC OUTPUT Service Port Function Service port: (For factory uses only.) SERVICE USB Cable RF IN TV Back 11 Select the RGB input source with using SOURCE button on the set . English TV INSTALLATION VGA(PC) Connection Connect the RGB output of The PC to the VGA(PC) jack on the remote control. Connect the AUDIO output of the PC to the PC AUDIO jack on the set .
SERVICE RF IN TV Back Audio Cable VGA Cable AUDIO RGB-PC OUTPUT Service Port Function Service port: (For factory uses only.) SERVICE USB Cable RF IN TV Back 11 Select the RGB input source with using SOURCE button on the set . English TV INSTALLATION VGA(PC) Connection Connect the RGB output of The PC to the VGA(PC) jack on the remote control. Connect the AUDIO output of the PC to the PC AUDIO jack on the set .

User Manual
Page 15
... scan through channels. SOURCE Press SOURCE to display the OSD input source, press ▲▼to select an input source, and then press OK to display the TV favourite program list. 13 FAV Press to confirm. REMOTE CONTROL Remote control instructions in the VGA source). Press again or press VOL+ to enter a program number for multiple program channel such as 2-1,etc. Press this button to un-mute the TV. P.MODE Select the picture mode. SLEEP Set the sleep timer...
... scan through channels. SOURCE Press SOURCE to display the OSD input source, press ▲▼to select an input source, and then press OK to display the TV favourite program list. 13 FAV Press to confirm. REMOTE CONTROL Remote control instructions in the VGA source). Press again or press VOL+ to enter a program number for multiple program channel such as 2-1,etc. Press this button to un-mute the TV. P.MODE Select the picture mode. SLEEP Set the sleep timer...

User Manual
Page 17
... Connected... Home optimizes the video setting for cable,satellite,Blu-ray,DVD,and gaming. For optimal vide quality,we recommend HDMI or component (refer to Quick connect guide or user manual to help setup your HDTV for Scanning channels or accessing your external devices for everyday use the up and Down arrows on your remote control to select the language to help you determine what connection you using ). HDMI1 Component1 Other Antenna Go Back :Select Enter:Next INPUT SOURCE...
... Connected... Home optimizes the video setting for cable,satellite,Blu-ray,DVD,and gaming. For optimal vide quality,we recommend HDMI or component (refer to Quick connect guide or user manual to help setup your HDTV for Scanning channels or accessing your external devices for everyday use the up and Down arrows on your remote control to select the language to help you determine what connection you using ). HDMI1 Component1 Other Antenna Go Back :Select Enter:Next INPUT SOURCE...

User Manual
Page 18
... Found: 00 Menu:Quit Anten na[ATSC] channel access inform ati on Model: Serial no:xxxxxxxxxxxxx To enable your remote control to scan channels from the Antenna or coaxial cable input Use the Up and Down arrows on your Tv's tuner you will need the following access information:Model(see above),Channel scan Type:ATSC, Serial Number(see above). Click here to connect a cable box satellite box Click here to connect a game,Blu-ray,dvd,or other player Click here...
... Found: 00 Menu:Quit Anten na[ATSC] channel access inform ati on Model: Serial no:xxxxxxxxxxxxx To enable your remote control to scan channels from the Antenna or coaxial cable input Use the Up and Down arrows on your Tv's tuner you will need the following access information:Model(see above),Channel scan Type:ATSC, Serial Number(see above). Click here to connect a cable box satellite box Click here to connect a game,Blu-ray,dvd,or other player Click here...

User Manual
Page 19
... Setup Close Caption DLC Restore Default Setup k Lock En gli sh Standard Of f On Channel Select Move MEN U Exit LOCK MENU: Allows you to your main menu option. MENU OPERATION English Operating the Menu 1.Press the POWER button to turn the LCD TV on. 2.Press the MENU button on the remote control, the on-screen menu will appear on the screen. 3.Use the LEFT and RIGHT buttons to select your picture settings.(select TV source for example) Picture Audio Picture Mode Contrast Brightness Color Sharpness Color...
... Setup Close Caption DLC Restore Default Setup k Lock En gli sh Standard Of f On Channel Select Move MEN U Exit LOCK MENU: Allows you to your main menu option. MENU OPERATION English Operating the Menu 1.Press the POWER button to turn the LCD TV on. 2.Press the MENU button on the remote control, the on-screen menu will appear on the screen. 3.Use the LEFT and RIGHT buttons to select your picture settings.(select TV source for example) Picture Audio Picture Mode Contrast Brightness Color Sharpness Color...
User Manual
Page 20
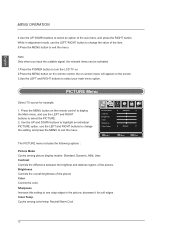
... Color Sharpness Color Temp. 12 6 Time Setup Lock Standard Chann el Neutral Select Move MENU Exit The PICTURE menu includes the following options : Picture Mode Cycles among color temp: Neutral,Warm,Cool. 18 decrease it for example. 1. Note: Only when you input the suitable signal, the relevant items can be activated. 1.Press the POWER button to turn the LCD TV on. 2.Press the MENU button on the remote control, the on-screen menu...
... Color Sharpness Color Temp. 12 6 Time Setup Lock Standard Chann el Neutral Select Move MENU Exit The PICTURE menu includes the following options : Picture Mode Cycles among color temp: Neutral,Warm,Cool. 18 decrease it for example. 1. Note: Only when you input the suitable signal, the relevant items can be activated. 1.Press the POWER button to turn the LCD TV on. 2.Press the MENU button on the remote control, the on-screen menu...

User Manual
Page 21
... an individual TIME option, use the LEFT and RIGHT buttons to change the setting, and press the MENU button to select the TIME. 2. Press the MENU button on the remote control to display the Main menu, and use the UP and DOWN buttons to exit. 12 Picture Audio 6 Time Sleep Time Zone Daylight Saving Time Setup Lock Off Pacific Off Channel Select Move MEN U Exit 19 Press the MENU button on the remote control to display the Main menu, and use the...
... an individual TIME option, use the LEFT and RIGHT buttons to change the setting, and press the MENU button to select the TIME. 2. Press the MENU button on the remote control to display the Main menu, and use the UP and DOWN buttons to exit. 12 Picture Audio 6 Time Sleep Time Zone Daylight Saving Time Setup Lock Off Pacific Off Channel Select Move MEN U Exit 19 Press the MENU button on the remote control to display the Main menu, and use the...
User Manual
Page 22
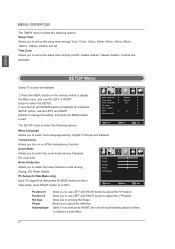
... VGA Mode only) Input PC signal first, then press SOURCE button to select Select VGA mode, press RIGHT button to confirm. 12 6 Time Setup Move Lock Channel MEN U Exit Position-H Position-V Horloge Phase Automatique Allow you to use the LEFT and RIGHT buttons to change the setting, and press the MENU button to exit. Select "Auto"and press RIGHT, the unit will automatically adjust all items to set up the sleep timer...
... VGA Mode only) Input PC signal first, then press SOURCE button to select Select VGA mode, press RIGHT button to confirm. 12 6 Time Setup Move Lock Channel MEN U Exit Position-H Position-V Horloge Phase Automatique Allow you to use the LEFT and RIGHT buttons to change the setting, and press the MENU button to exit. Select "Auto"and press RIGHT, the unit will automatically adjust all items to set up the sleep timer...

User Manual
Page 23
... and RIGHT buttons to select. DLC Dynamic luminance control ON or OFF . English MENU OPERATION Close Caption Use Down button to highlight the Close Caption item, then press RIGHT button to enter into the following menu. CC Mode Allows you su re No Yes Select Move MEN U Exit 21 Pictu re Audio 12 6 Time Setu p Lock Chan nel Ar e you to factory settings. Restore Default Restores all settings to select...
... and RIGHT buttons to select. DLC Dynamic luminance control ON or OFF . English MENU OPERATION Close Caption Use Down button to highlight the Close Caption item, then press RIGHT button to enter into the following menu. CC Mode Allows you su re No Yes Select Move MEN U Exit 21 Pictu re Audio 12 6 Time Setu p Lock Chan nel Ar e you to factory settings. Restore Default Restores all settings to select...
User Manual
Page 24
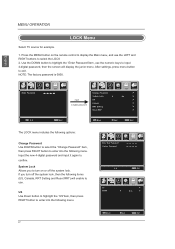
... input 4-digital password, then the screen will unable to use the LEFT and RIGHT buttons to turn off the system lock. Press the MENU button on or off the system lock, then the following items (US, Canada, RRT Setting and Reset RRT) will display the junior menu. Input the new 4-digital password and input it again to exit. NOTE: The factory password is 0000. 12 Picture Audio 6 Time Enter Password Setup Lock Channel input 4-digital password 12 Picture Audio 6 Time Change Password System Lock US Canada RRT Setting Reset...
... input 4-digital password, then the screen will unable to use the LEFT and RIGHT buttons to turn off the system lock. Press the MENU button on or off the system lock, then the following items (US, Canada, RRT Setting and Reset RRT) will display the junior menu. Input the new 4-digital password and input it again to exit. NOTE: The factory password is 0000. 12 Picture Audio 6 Time Enter Password Setup Lock Channel input 4-digital password 12 Picture Audio 6 Time Change Password System Lock US Canada RRT Setting Reset...

User Manual
Page 25
... Movie rating (MPAA) is appropriate for television. Restricted. Canada Use Down button to highlight the "Canada" item, then press RIGHT button to reset the RRT setting. 12 Pic tur e Audio 6 Time Ca nada English Ca nada French Setup Lock E E Channel Move Select MENU Exit 23 Reset RRT Allows you to enter into the following menu. Movie is used for original movies rated by the Motion...
... Movie rating (MPAA) is appropriate for television. Restricted. Canada Use Down button to highlight the "Canada" item, then press RIGHT button to reset the RRT setting. 12 Pic tur e Audio 6 Time Ca nada English Ca nada French Setup Lock E E Channel Move Select MENU Exit 23 Reset RRT Allows you to enter into the following menu. Movie is used for original movies rated by the Motion...

User Manual
Page 26
... input signal in Antenna item, allows you can press RIGHT button to select the CHANNEL. 2. MENU Exit 24 English MENU OPERATION CHANNEL Menu Select TV source. 1. Picture Audio Cable System Start to Scan 12 6 Time Setup Lock Auto Channel If you select "Air"as input signal in Antenna item, you to stop . Press the MENU button on the remote control to display the Main menu, and use the LEFT and RIGHT buttons to change the setting, and press the MENU button to exit. 12 Picture Audio 6 Time Air/Cable Auto Scan...
... input signal in Antenna item, allows you can press RIGHT button to select the CHANNEL. 2. MENU Exit 24 English MENU OPERATION CHANNEL Menu Select TV source. 1. Picture Audio Cable System Start to Scan 12 6 Time Setup Lock Auto Channel If you select "Air"as input signal in Antenna item, you to stop . Press the MENU button on the remote control to display the Main menu, and use the LEFT and RIGHT buttons to change the setting, and press the MENU button to exit. 12 Picture Audio 6 Time Air/Cable Auto Scan...

User Manual
Page 28
... solve problems by something. The cables of the remote control is correct, the noise may come from other electrical devices or appliances. Make sure that the IR of the antenna are correctly plugged in . No color shades Stain on the screen Double or multiple display image Snow on the screen The remote control does not work "Zip" made noise on TV cover No sound Adjust...
... solve problems by something. The cables of the remote control is correct, the noise may come from other electrical devices or appliances. Make sure that the IR of the antenna are correctly plugged in . No color shades Stain on the screen Double or multiple display image Snow on the screen The remote control does not work "Zip" made noise on TV cover No sound Adjust...

User Manual
Page 29
Screen Size Display Type Resolution(Pixel) Aspect Ratio Power Supply Power Consumption TV System Video Input Format Audio Output Power ANTENNA AV-IN YPbPr - IN VGA(PC) - IN COAXIAL - OUT COMMON INTERFACE USB IPOD Disc Physical Format DVD DVDVideoOutputFormat Inc Stand (LxWxHmm) Dimensions Exc Sand (LxWxHmm) Weight Net (Kgs) Gross (Kgs) 60 Inch TFT LCD 1920 X 1080 16:9 AC110-240V 50/60Hz 400W ATSC/NTSC PAL/NTSC L / R 2X8W YES YES YES YES YES YES...
Screen Size Display Type Resolution(Pixel) Aspect Ratio Power Supply Power Consumption TV System Video Input Format Audio Output Power ANTENNA AV-IN YPbPr - IN VGA(PC) - IN COAXIAL - OUT COMMON INTERFACE USB IPOD Disc Physical Format DVD DVDVideoOutputFormat Inc Stand (LxWxHmm) Dimensions Exc Sand (LxWxHmm) Weight Net (Kgs) Gross (Kgs) 60 Inch TFT LCD 1920 X 1080 16:9 AC110-240V 50/60Hz 400W ATSC/NTSC PAL/NTSC L / R 2X8W YES YES YES YES YES YES...


