
Quick Start Guide
Page 1
... panel. Connect a DVD Player Connect a DVD player to satellite set top box or digital cable. www.westinghousedigital.com W2602 BK LCD TV Quick Connect Guide Westinghouse Digital Electronics KEYPAD S-Video/AV Inputs VGA/YPbPr/DVI Inputs Congratulations on the LCD. Press Power on the keypad to the cable ready NTSC tuner... step can be skipped if you get started in 3 easy steps. Antenna 23 Connect the Tuner Connect either analog cable or TV antenna wire to turn on purchasing a HD-ready LCD TV!
... panel. Connect a DVD Player Connect a DVD player to satellite set top box or digital cable. www.westinghousedigital.com W2602 BK LCD TV Quick Connect Guide Westinghouse Digital Electronics KEYPAD S-Video/AV Inputs VGA/YPbPr/DVI Inputs Congratulations on the LCD. Press Power on the keypad to the cable ready NTSC tuner... step can be skipped if you get started in 3 easy steps. Antenna 23 Connect the Tuner Connect either analog cable or TV antenna wire to turn on purchasing a HD-ready LCD TV!

User Manual
Page 4
...to remove. • Never remove the rear cover. To ensure reliable operation of moisture. • Do not place heavy objects on or pinched by Westinghouse Digital. • If your safety, please read all warnings and instructions marked on the cabinet are difficult to . Do not place anything on your LCD... on the LCD TV, audio/video cables, or power cord. • If the LCD TV emits smoke, abnormal noise, or a strange odor, immediately turn it . • Place your LCD display with liquids, such as a bookcase or rack unless proper ventilation is clean and free of the LCD TV and...
...to remove. • Never remove the rear cover. To ensure reliable operation of moisture. • Do not place heavy objects on or pinched by Westinghouse Digital. • If your safety, please read all warnings and instructions marked on the cabinet are difficult to . Do not place anything on your LCD... on the LCD TV, audio/video cables, or power cord. • If the LCD TV emits smoke, abnormal noise, or a strange odor, immediately turn it . • Place your LCD display with liquids, such as a bookcase or rack unless proper ventilation is clean and free of the LCD TV and...

User Manual
Page 5
... a lightning storm, or when it is damaged, liquid has been spilled or objects have fallen into your LCD TV and wait for the grounding electrode. Turn off your wall outlet, consult an electrician for replacement of the obsolete outlet. 10) Protect the power cord from touching such power lines or circuits...
... a lightning storm, or when it is damaged, liquid has been spilled or objects have fallen into your LCD TV and wait for the grounding electrode. Turn off your wall outlet, consult an electrician for replacement of the obsolete outlet. 10) Protect the power cord from touching such power lines or circuits...
User Manual
Page 6
..., there is a NEMA5-15 style (Figure A2), UL Listed, and CSA Labeled. Also, any unauthorized changes or modifications not expressly approved by Westinghouse Digital will not occur in a particular installation. Some examples are designed to part 15 of destination and must be used . SEV Canada CSA Britain... only a shielded BNC (5) cable. For LCD TVs placed directly on , the user is encouraged to try to correct the interference by turning the equipment off and on the floor, only SJT type cord sets may be used to operate this equipment does cause harmful interference to radio...
..., there is a NEMA5-15 style (Figure A2), UL Listed, and CSA Labeled. Also, any unauthorized changes or modifications not expressly approved by Westinghouse Digital will not occur in a particular installation. Some examples are designed to part 15 of destination and must be used . SEV Canada CSA Britain... only a shielded BNC (5) cable. For LCD TVs placed directly on , the user is encouraged to try to correct the interference by turning the equipment off and on the floor, only SJT type cord sets may be used to operate this equipment does cause harmful interference to radio...

User Manual
Page 7
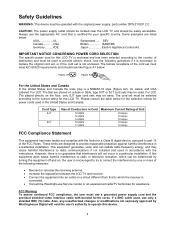
... the case: 1. Some chemical cleaners have been reported to damage the screen and/or LCD TV case. Disclaimer Westinghouse Digital does not recommend the use of any ammonia or alcohol-based cleaners. 5 Westinghouse Digital will not be liable for damage resulting from the use of any ammonia or alcohol-based cleaners on...-free cloth. abrasive detergent onto a clean, soft, lint-free cloth, then wipe the surface. Cleaning the LCD TV • MAKE SURE THE LCD TV IS TURNED OFF • NEVER SPRAY OR POUR ANY LIQUID DIRECTLY ONTO THE SCREEN OR CASE To clean the screen: 1.
... the case: 1. Some chemical cleaners have been reported to damage the screen and/or LCD TV case. Disclaimer Westinghouse Digital does not recommend the use of any ammonia or alcohol-based cleaners. 5 Westinghouse Digital will not be liable for damage resulting from the use of any ammonia or alcohol-based cleaners on...-free cloth. abrasive detergent onto a clean, soft, lint-free cloth, then wipe the surface. Cleaning the LCD TV • MAKE SURE THE LCD TV IS TURNED OFF • NEVER SPRAY OR POUR ANY LIQUID DIRECTLY ONTO THE SCREEN OR CASE To clean the screen: 1.

User Manual
Page 9
Menu 2. Input 5. Power ON/OFF 7 Power Button Turn OSD Menu ON/OFF Increase/Decrease sound volume or adjust a highlighted control while in the OSD MENU. Volume + / 3. Select Active Video Input or choose a selection while in the OSD Menu. Side View of the LCD TV 1. Channel + / 4. Channel up/down when input is TV or highlight a control while in the OSD Menu.
Menu 2. Input 5. Power ON/OFF 7 Power Button Turn OSD Menu ON/OFF Increase/Decrease sound volume or adjust a highlighted control while in the OSD MENU. Volume + / 3. Select Active Video Input or choose a selection while in the OSD Menu. Side View of the LCD TV 1. Channel + / 4. Channel up/down when input is TV or highlight a control while in the OSD Menu.
User Manual
Page 11
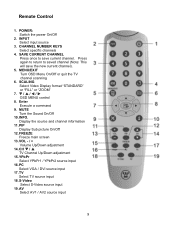
...specific channels 4. VOL - / + Volume Up/Down adjustment 14. YPbPr Select YPbPr1 / YPbPr2 source input 16. S-Video Select S-Video source input 19. MENU/EXIT Turn OSD Menu On/Off or quit the TV channel scanning 6. PIP Display Sub picture On/Off 12. CH T / S TV Channel Up/Down adjustment 15. INPUT...Press again to return to save the new current channel). 5. SCALING Select Video Display format "STANDARD" or "FILL" or "ZOOM" 7. Enter Execute a command 9. MUTE Turn the Sound On/Off 10. FREEZE Freeze main screen 13. TV Select TV source input 18. AV Select AV1 / AV2 source input 9
...specific channels 4. VOL - / + Volume Up/Down adjustment 14. YPbPr Select YPbPr1 / YPbPr2 source input 16. S-Video Select S-Video source input 19. MENU/EXIT Turn OSD Menu On/Off or quit the TV channel scanning 6. PIP Display Sub picture On/Off 12. CH T / S TV Channel Up/Down adjustment 15. INPUT...Press again to return to save the new current channel). 5. SCALING Select Video Display format "STANDARD" or "FILL" or "ZOOM" 7. Enter Execute a command 9. MUTE Turn the Sound On/Off 10. FREEZE Freeze main screen 13. TV Select TV source input 18. AV Select AV1 / AV2 source input 9

User Manual
Page 13
AUDIO CONNECTION: Connect a stereo mini cable from your PC VGA OUT port to the LCD TV VGA IN port. VCR (Not supplied) (Not supplied) 11 IMPORTANT: Before beginning, make sure all of the following compatible devices into the back of the LCD TV. Connect AV, Component, S-Video, Antenna/Cable to the AUDIO IN port on the LCD TV. 3. Connect audio and video cables to a PC VGA CONNECTION: Connect an analog VGA cable from the PC's AUDIO OUT port to Video Devices Connect one or all devices are turned off. 2.
AUDIO CONNECTION: Connect a stereo mini cable from your PC VGA OUT port to the LCD TV VGA IN port. VCR (Not supplied) (Not supplied) 11 IMPORTANT: Before beginning, make sure all of the following compatible devices into the back of the LCD TV. Connect AV, Component, S-Video, Antenna/Cable to the AUDIO IN port on the LCD TV. 3. Connect audio and video cables to a PC VGA CONNECTION: Connect an analog VGA cable from the PC's AUDIO OUT port to Video Devices Connect one or all devices are turned off. 2.

User Manual
Page 14
... card's user guide of the LCD TV, or press the Power ON (Red) button on TV Inputs: See page 18 to 1280 x 720 at 75Hz. Turn Power On Press the Power ON button on the right side of you computer to auto scan and edit available channels. 8. If connecting to a properly...
... card's user guide of the LCD TV, or press the Power ON (Red) button on TV Inputs: See page 18 to 1280 x 720 at 75Hz. Turn Power On Press the Power ON button on the right side of you computer to auto scan and edit available channels. 8. If connecting to a properly...
User Manual
Page 20
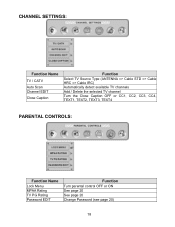
CHANNEL SETTINGS: Function Name TV / CATV Auto Scan Channel EDIT Close Caption Function Select TV Source Type (ANTENNA => Cable STD => Cable HRC => Cable IRC) Automatically detect available TV channels Add / Delete the selected TV channel Turn the Close Caption OFF or CC1, CC2, CC3, CC4, TEXT1, TEXT2, TEXT3, TEXT4 PARENTAL CONTROLS: Function Name Lock Menu MPAA Rating TV PG Rating Password EDIT Function Turn parental control OFF or ON See page 20 See page 20 Change Password (see page 20) 18
CHANNEL SETTINGS: Function Name TV / CATV Auto Scan Channel EDIT Close Caption Function Select TV Source Type (ANTENNA => Cable STD => Cable HRC => Cable IRC) Automatically detect available TV channels Add / Delete the selected TV channel Turn the Close Caption OFF or CC1, CC2, CC3, CC4, TEXT1, TEXT2, TEXT3, TEXT4 PARENTAL CONTROLS: Function Name Lock Menu MPAA Rating TV PG Rating Password EDIT Function Turn parental control OFF or ON See page 20 See page 20 Change Password (see page 20) 18
User Manual
Page 22
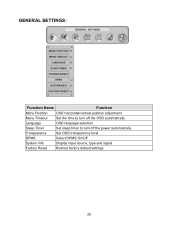
GENERAL SETTINGS: Function Name Function Menu Position OSD horizontal/vertical position adjustment Menu Timeout Set the time to turn off the OSD automatically Language OSD language selection Sleep Timer Set sleep timer to turn off the power automatically Transparency Set OSD transparency level DPMS Select DPMS On/Off System Info Display Input source, type and signal Factory Reset Restore factory default settings 20
GENERAL SETTINGS: Function Name Function Menu Position OSD horizontal/vertical position adjustment Menu Timeout Set the time to turn off the OSD automatically Language OSD language selection Sleep Timer Set sleep timer to turn off the power automatically Transparency Set OSD transparency level DPMS Select DPMS On/Off System Info Display Input source, type and signal Factory Reset Restore factory default settings 20


