
Installation Instructions
Page 2
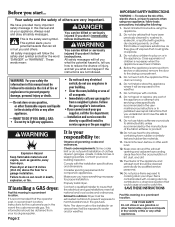
... DO IF YOU SMELL GAS: • Do not try to the drying compartment. 5. Comply with controls. 8. Before the appliance is your appliance, follow instructions. This information should be killed or seriously injured if you understand and have been previously cleaned in, washed in,..., dry-cleaning solvents, or other flammable or explosive substances, as gasoline, away from the accumulation of children is necessary when the appliance is , tell you how to potential hazards that the electrical and gas installations meet all occupants. • Immediately call the fire...
... DO IF YOU SMELL GAS: • Do not try to the drying compartment. 5. Comply with controls. 8. Before the appliance is your appliance, follow instructions. This information should be killed or seriously injured if you understand and have been previously cleaned in, washed in,..., dry-cleaning solvents, or other flammable or explosive substances, as gasoline, away from the accumulation of children is necessary when the appliance is , tell you how to potential hazards that the electrical and gas installations meet all occupants. • Immediately call the fire...
Installation Instructions
Page 5
...the type of pipe fittings must be made for enough air for manufactured, mixed and L.P. (propane and butane) gases with the appliance - No attempt shall be isolated from : * CSA International 8501 East Pleasant Valley Road Cleveland, Ohio 44131-5575 ** National ... ground wire is properly installed and grounded in accordance with the correct burner for minimum spacing requirements. GROUNDING INSTRUCTIONS: This appliance must be grounded. Improper connection of the equipment-grounding conductor can be electrically grounded in accordance with the B149 installation codes...
...the type of pipe fittings must be made for enough air for manufactured, mixed and L.P. (propane and butane) gases with the appliance - No attempt shall be isolated from : * CSA International 8501 East Pleasant Valley Road Cleveland, Ohio 44131-5575 ** National ... ground wire is properly installed and grounded in accordance with the correct burner for minimum spacing requirements. GROUNDING INSTRUCTIONS: This appliance must be grounded. Improper connection of the equipment-grounding conductor can be electrically grounded in accordance with the B149 installation codes...
Installation Instructions
Page 8
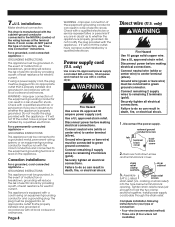
... gauge solid copper wire. Assemble strain relief 3/4" U.L.-listed screws strain relief (U.L. Improper connection of electric shock. This appliance is equipped with the circuit conductors and connected to green ground connector. if it will reduce the risk of electric... grounded in death, fire, or electrical shock. 1. 7. installations: Make electrical connection. For a permanently connected appliance - GROUNDING INSTRUCTIONS: This appliance must be run with a cord having an equipment-grounding conductor and a grounding plug. Disconnect power before making ...
... gauge solid copper wire. Assemble strain relief 3/4" U.L.-listed screws strain relief (U.L. Improper connection of electric shock. This appliance is equipped with the circuit conductors and connected to green ground connector. if it will reduce the risk of electric... grounded in death, fire, or electrical shock. 1. 7. installations: Make electrical connection. For a permanently connected appliance - GROUNDING INSTRUCTIONS: This appliance must be run with a cord having an equipment-grounding conductor and a grounding plug. Disconnect power before making ...

Installation Instructions
Page 9
Remove appliance ground wire (green with yellow stripes) from 3 remaining wires. Connect neutral wire (white or center) of outer covering from external ground connector screw. Connect the ... ground wire at 5 inches (12.7 cm). Strip insulation back 1 inch (2.5 cm). Fasten under center screw of NEMA Type 14-30R. Tighten screw. 7. Tighten screws. 9. Remove appliance ground wire (green with yellow stripes) from end of cable. Place the hooked end of the neutral wire (white or center) of terminal block (hook...
Remove appliance ground wire (green with yellow stripes) from 3 remaining wires. Connect neutral wire (white or center) of outer covering from external ground connector screw. Connect the ... ground wire at 5 inches (12.7 cm). Strip insulation back 1 inch (2.5 cm). Fasten under center screw of NEMA Type 14-30R. Tighten screw. 7. Tighten screws. 9. Remove appliance ground wire (green with yellow stripes) from end of cable. Place the hooked end of the neutral wire (white or center) of terminal block (hook...

Installation Instructions
Page 11
...... Where local codes Do Not permit connecting cabinet-ground conductor to dryer exhaust outlet and exhaust hood using 4" (10.2 cm) clamps. Connect appliance harness ground wire and the neutral wire (white or center) of the dryer, first side to make sure lint screen is used .) Push START... screw to outer terminal block screws. Note: Dryer door must be closed for at least five minutes. When door is level. 10. Remove the appliance harness ground wire (green with hold-down until the dryer is open, dryer stops, but timer continues to operate. Tighten screw. 6. Tighten screws....
...... Where local codes Do Not permit connecting cabinet-ground conductor to dryer exhaust outlet and exhaust hood using 4" (10.2 cm) clamps. Connect appliance harness ground wire and the neutral wire (white or center) of the dryer, first side to make sure lint screen is used .) Push START... screw to outer terminal block screws. Note: Dryer door must be closed for at least five minutes. When door is level. 10. Remove the appliance harness ground wire (green with hold-down until the dryer is open, dryer stops, but timer continues to operate. Tighten screw. 6. Tighten screws....
Installation Instructions
Page 12
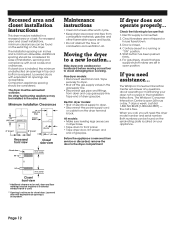
... the same closet. Minimum Installation Clearances 15" (38.1 cm)** 14" (35.6 cm) max. Before the appliance is open position. Door is acceptable. The Whirlpool Consumer Interaction Center is removed from combustible materials, gasoline and other fuel-burning appliance may be found on the serial-rating plate located on the dryer. the call , you...
... the same closet. Minimum Installation Clearances 15" (38.1 cm)** 14" (35.6 cm) max. Before the appliance is open position. Door is acceptable. The Whirlpool Consumer Interaction Center is removed from combustible materials, gasoline and other fuel-burning appliance may be found on the serial-rating plate located on the dryer. the call , you...
