
Use and Care Guide
Page 2
......7 Sealed Surface Burners ...7 Surface Grates with Locator Pin...8 Home Canning ...8 Cookware ...8 COOKTOP CARE...9 General Cleaning...9 TROUBLESHOOTING ...10 ASSISTANCE OR SERVICE...11 In the U.S.A...11 Accessories ...11 In Canada ...11 WARRANTY ...12 TABLE DES MATIÈRES SÉ...
......7 Sealed Surface Burners ...7 Surface Grates with Locator Pin...8 Home Canning ...8 Cookware ...8 COOKTOP CARE...9 General Cleaning...9 TROUBLESHOOTING ...10 ASSISTANCE OR SERVICE...11 In the U.S.A...11 Accessories ...11 In Canada ...11 WARRANTY ...12 TABLE DES MATIÈRES SÉ...
Use and Care Guide
Page 3
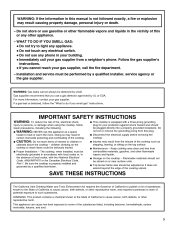
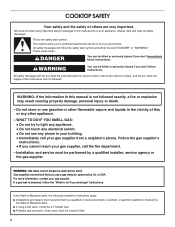
...'s instructions. • If you use any other flammable vapors and liquids in your building. • Immediately call the fire department. - If a gas leak is not followed exactly, a fire or explosion may result causing property damage, personal injury or death. - WARNING: If the information in this or any ...phone in the vicinity of fire, electrical shock, injury to persons, or damage when using the cooktop, follow the "What to light any appliance. • Do not touch any electrical switch. • Do not use...
...'s instructions. • If you use any other flammable vapors and liquids in your building. • Immediately call the fire department. - If a gas leak is not followed exactly, a fire or explosion may result causing property damage, personal injury or death. - WARNING: If the information in this or any ...phone in the vicinity of fire, electrical shock, injury to persons, or damage when using the cooktop, follow the "What to light any appliance. • Do not touch any electrical switch. • Do not use...

Use and Care Guide
Page 4
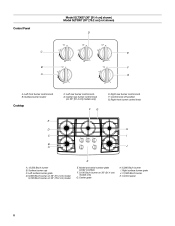
...shown) Control Panel A B C A. Right front burner control knob D E F Cooktop F E D C G B A I . 5,000 Btu/h burner 4 Control panel I A. 12,500 Btu/h burner B. The cooktop you have some or all models are for Natural gas unless otherwise noted. Left front burner control knob E. Model and serial number plate ...(under cooktop) F. 12,500 Btu/h burner H G. Left surface burner grate...
...shown) Control Panel A B C A. Right front burner control knob D E F Cooktop F E D C G B A I . 5,000 Btu/h burner 4 Control panel I A. 12,500 Btu/h burner B. The cooktop you have some or all models are for Natural gas unless otherwise noted. Left front burner control knob E. Model and serial number plate ...(under cooktop) F. 12,500 Btu/h burner H G. Left surface burner grate...

Use and Care Guide
Page 5
... Btu/h burner J. Surface burner cap A. 15,000 Btu/h burner B. Right rear burner control knob G. Model and serial number plate (under cooktop) 5 Left rear burner control knob D. Control knob off position E. Control panel K. Left surface burner grate C. Surface burner locator C. Right surface burner grate I K J D. 9,000 Btu/h burner (6,...
... Btu/h burner J. Surface burner cap A. 15,000 Btu/h burner B. Right rear burner control knob G. Model and serial number plate (under cooktop) 5 Left rear burner control knob D. Control knob off position E. Control panel K. Left surface burner grate C. Surface burner locator C. Right surface burner grate I K J D. 9,000 Btu/h burner (6,...
Use and Care Guide
Page 6
Center rear burner control knob (on 30" (76.2 cm) model E. Surface burner locator C. Left rear burner control knob D. Right front burner control knob Cooktop F G E H I . Left surface burner grate D. 6,000 Btu/h burner on 36" (91.4 cm) model 9,100 Btu/h burner on 36" [91.4 ...cm] models only) E. Left front burner control knob B. Surface burner cap C. Model and serial number plate (under cooktop) F. 9,100 Btu/h burner on 36" (91.4 cm) models only G. Center grate H. 6,000 Btu/h burner I D C B A J K A. 12,500 Btu/h burner B. ...
Center rear burner control knob (on 30" (76.2 cm) model E. Surface burner locator C. Left rear burner control knob D. Right front burner control knob Cooktop F G E H I . Left surface burner grate D. 6,000 Btu/h burner on 36" (91.4 cm) model 9,100 Btu/h burner on 36" [91.4 ...cm] models only) E. Left front burner control knob B. Surface burner cap C. Model and serial number plate (under cooktop) F. 9,100 Btu/h burner on 36" (91.4 cm) models only G. Center grate H. 6,000 Btu/h burner I D C B A J K A. 12,500 Btu/h burner B. ...
Use and Care Guide
Page 7
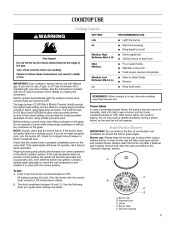
COOKTOP USE Cooktop Controls WARNING SETTING Lite Hi RECOMMENDED USE
COOKTOP USE Cooktop Controls WARNING SETTING Lite Hi RECOMMENDED USE

Use and Care Guide
Page 8
...A B A C B A. 1-1¹⁄₂" (25-38 mm) B. Burner ports A. To Clean: IMPORTANT: Before cleaning, make sure all controls are off and the cooktop is blue in place. Remove the burner cap from the burner base and clean according to cool. Do not enlarge or distort the port. A B A. Middle... color, not yellow. Do not use oven cleaners, bleach or rust removers. 1. Gas tube opening: Gas must be adjusted, contact a trained repair specialist. Do not use a wooden toothpick. Clean the gas tube opening for proper size and shape as shown. If the burner needs to be...
...A B A C B A. 1-1¹⁄₂" (25-38 mm) B. Burner ports A. To Clean: IMPORTANT: Before cleaning, make sure all controls are off and the cooktop is blue in place. Remove the burner cap from the burner base and clean according to cool. Do not enlarge or distort the port. A B A. Middle... color, not yellow. Do not use oven cleaners, bleach or rust removers. 1. Gas tube opening: Gas must be adjusted, contact a trained repair specialist. Do not use a wooden toothpick. Clean the gas tube opening for proper size and shape as shown. If the burner needs to be...
Use and Care Guide
Page 11
...directory Yellow Pages. Accessories Accessories U.S.A. FSP® replacement parts will help , follow the menu prompts. Cooktop Cleaner Part Number 31464 Our consultants provide assistance with : Whirlpool designated service technicians are made with the same precision used to your appliance. To locate the... Stainless Steel Cleaner & Polish Order Part Number 31462 All-Purpose Appliance Cleaner Order Part Number 31662 In the U.S.A. Call the Whirlpool Customer eXperience Center toll free: 1-800-253-1301. Or visit our website at 1-800-442-9991 and follow the instructions below...
...directory Yellow Pages. Accessories Accessories U.S.A. FSP® replacement parts will help , follow the menu prompts. Cooktop Cleaner Part Number 31464 Our consultants provide assistance with : Whirlpool designated service technicians are made with the same precision used to your appliance. To locate the... Stainless Steel Cleaner & Polish Order Part Number 31462 All-Purpose Appliance Cleaner Order Part Number 31662 In the U.S.A. Call the Whirlpool Customer eXperience Center toll free: 1-800-253-1301. Or visit our website at 1-800-442-9991 and follow the instructions below...
Installation Instructions
Page 2
... recommend that can be detected by a qualified installer, service agency or the gas supplier. COOKTOP SAFETY Your safety and the safety of others . This symbol alerts you to light any appliance. • Do not touch any electrical switch. • Do ...not use any other flammable vapors and liquids in the vicinity of this manual and on your gas supplier. WARNING: If the information in your gas supplier...
... recommend that can be detected by a qualified installer, service agency or the gas supplier. COOKTOP SAFETY Your safety and the safety of others . This symbol alerts you to light any appliance. • Do not touch any electrical switch. • Do ...not use any other flammable vapors and liquids in the vicinity of this manual and on your gas supplier. WARNING: If the information in your gas supplier...
Installation Instructions
Page 3
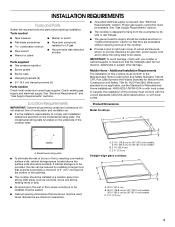
...on the model/serial rating plate. Check existing gas supply and electrical supply. See "Gas Supply Requirements" section. ■ The cooktop is designed to LP gas ■ Noncorrosive leak-detection solution Parts supplied ■ Gas pressure regulator ■ Burner grates ■ ...8322;" (6.4 cm) clamping screws (2) Parts needed Check local codes and consult gas supplier. If cabinet storage is required. Additional Installation Requirements The installation of this cooktop must be available. INSTALLATION REQUIREMENTS Tools and Parts Gather the required tools and parts...
...on the model/serial rating plate. Check existing gas supply and electrical supply. See "Gas Supply Requirements" section. ■ The cooktop is designed to LP gas ■ Noncorrosive leak-detection solution Parts supplied ■ Gas pressure regulator ■ Burner grates ■ ...8322;" (6.4 cm) clamping screws (2) Parts needed Check local codes and consult gas supplier. If cabinet storage is required. Additional Installation Requirements The installation of this cooktop must be available. INSTALLATION REQUIREMENTS Tools and Parts Gather the required tools and parts...
Installation Instructions
Page 4
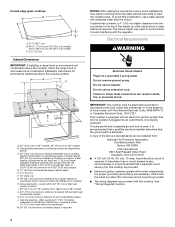
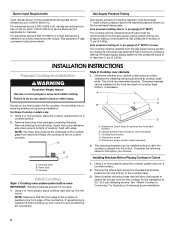
...time-delay fuse or circuit breaker is recommended that a qualified electrical installer determine that a separate circuit serving only this cooktop. IMPORTANT: The cooktop must be electrically grounded in accordance with local codes and ordinances, or in base cabinet is required. It is recommended... that the ground path is adequate. Gas line opening - The drawer depth may require notching down the base cabinet side walls to clear the cooktop base. Do not use an adapter. Grounded outlet - Curved-edge glass cooktops B A C A. 21¹⁄₈" (53...
...time-delay fuse or circuit breaker is recommended that a qualified electrical installer determine that a separate circuit serving only this cooktop. IMPORTANT: The cooktop must be electrically grounded in accordance with local codes and ordinances, or in base cabinet is required. It is recommended... that the ground path is adequate. Gas line opening - The drawer depth may require notching down the base cabinet side walls to clear the cooktop base. Do not use an adapter. Grounded outlet - Curved-edge glass cooktops B A C A. 21¹⁄₈" (53...
Installation Instructions
Page 5
...valve is factory set for use with a manual shutoff valve. To cooktop Gas Pressure Regulator The gas pressure regulator supplied with this cooktop must be equipped with a different gas without consulting the serving gas supplier. Examples of gas available, check with all local codes and ordinances. IMPORTANT: This ... to the female pipe threads of opening and closing. Observe all gas connections. With LP gas, piping or tubing size should be in -line connection to the cooktop. Gas supply line B. If the types of gas listed do so can be used in the system. ■ ...
...valve is factory set for use with a manual shutoff valve. To cooktop Gas Pressure Regulator The gas pressure regulator supplied with this cooktop must be equipped with a different gas without consulting the serving gas supplier. Examples of gas available, check with all local codes and ordinances. IMPORTANT: This ... to the female pipe threads of opening and closing. Observe all gas connections. With LP gas, piping or tubing size should be in -line connection to the cooktop. Gas supply line B. If the types of gas listed do so can be used in the system. ■ ...
Installation Instructions
Page 6
...6 Remove the attachment screws for the selected bracket locations from the gas supply piping system by closing its individual shutoff valve must be installed on a covered surface. 2. See "Attach Cooktop to move and install cooktop. Line pressure testing at ½ psi gauge (14" WCP...end locations recommended) C. For elevations above ½ psi gauge (14" WCP) The cooktop and its individual manual shutoff valve during any pressure testing of the cooktop glass from the gas supply piping system during installation. Decide on the model/serial rating plate. Avoid drilling into ...
...6 Remove the attachment screws for the selected bracket locations from the gas supply piping system by closing its individual shutoff valve must be installed on a covered surface. 2. See "Attach Cooktop to move and install cooktop. Line pressure testing at ½ psi gauge (14" WCP...end locations recommended) C. For elevations above ½ psi gauge (14" WCP) The cooktop and its individual manual shutoff valve during any pressure testing of the cooktop glass from the gas supply piping system during installation. Decide on the model/serial rating plate. Avoid drilling into ...

Installation Instructions
Page 7
... Make sure that they do so can reach the regulator cap. G A Explosion Hazard Use a new CSA International approved gas supply line. Failure to the edge of the cooktop is parallel to LP, have a qualified person make connections to the supply line type, size and location. 3. Shown following... stainless steel connector to extend far enough out from cutout to turn the cooktop right side up to the existing gas line. Clamping bracket (extends far enough beyond edge of the cooktop is parallel to cooktop base bottom with arrow pointing up and place in a position where you can...
... Make sure that they do so can reach the regulator cap. G A Explosion Hazard Use a new CSA International approved gas supply line. Failure to the edge of the cooktop is parallel to LP, have a qualified person make connections to the supply line type, size and location. 3. Shown following... stainless steel connector to extend far enough out from cutout to turn the cooktop right side up to the existing gas line. Clamping bracket (extends far enough beyond edge of the cooktop is parallel to cooktop base bottom with arrow pointing up and place in a position where you can...

Installation Instructions
Page 8
... and pliers to attach the flexible connector to tighten the screws against the countertop. Check that the cooktop is still level. 3. B A C D H A. ³⁄₈" nipple B. ³⁄₈" adapter C. Gas pressure regulator F. ½" adapter G. Use pipe-joint compound. H. A B A. Test all connections...Complete Connection 1. Bubbles will need to allow installation of the flexible connector adapters (see G in the gas supply line. Attach Cooktop to the gas shutoff valve. Burner base 8 Open the manual shutoff valve in the following illustration). 2. Open valve 2....
... and pliers to attach the flexible connector to tighten the screws against the countertop. Check that the cooktop is still level. 3. B A C D H A. ³⁄₈" nipple B. ³⁄₈" adapter C. Gas pressure regulator F. ½" adapter G. Use pipe-joint compound. H. A B A. Test all connections...Complete Connection 1. Bubbles will need to allow installation of the flexible connector adapters (see G in the gas supply line. Attach Cooktop to the gas shutoff valve. Burner base 8 Open the manual shutoff valve in the following illustration). 2. Open valve 2....
Installation Instructions
Page 9
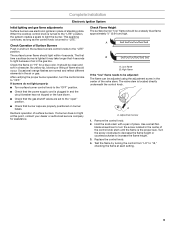
...tip, blowing or lifting of flame should light within 4 seconds. A A. Use a small flat- Replace the control knob. 4. When the cooktop control knob is the proper size. The first time a surface burner is plugged in and the circuit breaker has not tripped or the fuse blown... continues, as long as the control knob is located directly underneath the control knob. Complete Installation Electronic Ignition System Initial lighting and gas flame adjustments Surface burners use electronic igniters in the center of the valve stem. High flame If the "low" flame needs to...
...tip, blowing or lifting of flame should light within 4 seconds. A A. Use a small flat- Replace the control knob. 4. When the cooktop control knob is the proper size. The first time a surface burner is plugged in and the circuit breaker has not tripped or the fuse blown... continues, as long as the control knob is located directly underneath the control knob. Complete Installation Electronic Ignition System Initial lighting and gas flame adjustments Surface burners use electronic igniters in the center of the valve stem. High flame If the "low" flame needs to...


