Use and Care Guide
Page 3
... TO DO IF YOU SMELL GAS: • Do not try to persons, or damage when using the cooktop, follow the "What to do if you smell gas" instructions. Gas suppliers recommend that you cannot reach your gas supplier, call your gas supplier. Do not store or use a gas detector approved by UL or ...CSA. If a gas leak is not followed exactly, a fire ...
... TO DO IF YOU SMELL GAS: • Do not try to persons, or damage when using the cooktop, follow the "What to do if you smell gas" instructions. Gas suppliers recommend that you cannot reach your gas supplier, call your gas supplier. Do not store or use a gas detector approved by UL or ...CSA. If a gas leak is not followed exactly, a fire ...

Use and Care Guide
Page 4
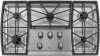
... This manual covers several different models, and not all of the items listed. Control knob off position B. Surface burner cap C. The cooktop you have purchased may not match those of the features shown here may have some or all models are for Natural... gas unless otherwise noted. All BTU ratings shown are shown. Right front burner control knob D E F Cooktop F E D C G B A I . 5,000 Btu/h burner 4 Right surface burner grate H. Right rear burner control knob D. Model ...
... This manual covers several different models, and not all of the items listed. Control knob off position B. Surface burner cap C. The cooktop you have purchased may not match those of the features shown here may have some or all models are for Natural... gas unless otherwise noted. All BTU ratings shown are shown. Right front burner control knob D E F Cooktop F E D C G B A I . 5,000 Btu/h burner 4 Right surface burner grate H. Right rear burner control knob D. Model ...

Use and Care Guide
Page 8
... Clean: IMPORTANT: Before cleaning, make sure all controls are off and the cooktop is blue in place. Clean clogged burner ports with a damp cloth. 3. Burner cap Home Canning When canning for proper size and shape as shown. Gas tube opening: Gas must be adjusted, contact a trained repair specialist. A B A C B A. ...area free of surface burners between batches. Burner ports A. Remove the burner cap from the burner base and clean according to enter the gas tube opening with a straight pin as shown above. Do not enlarge or distort the port. If the burner needs to be positioned...
... Clean: IMPORTANT: Before cleaning, make sure all controls are off and the cooktop is blue in place. Clean clogged burner ports with a damp cloth. 3. Burner cap Home Canning When canning for proper size and shape as shown. Gas tube opening: Gas must be adjusted, contact a trained repair specialist. A B A C B A. ...area free of surface burners between batches. Burner ports A. Remove the burner cap from the burner base and clean according to enter the gas tube opening with a straight pin as shown above. Do not enlarge or distort the port. If the burner needs to be positioned...
Installation Instructions
Page 2
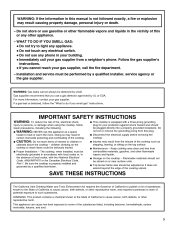
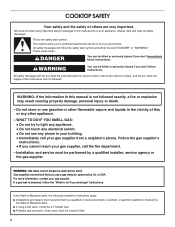
...tell you what can be detected by a qualified installer, service agency or the gas supplier. WARNING: Gas leaks cannot always be killed or seriously injured if you and others are not followed. COOKTOP SAFETY Your safety and the safety of others . All safety messages will follow...If the information in this manual is the safety alert symbol. Do not store or use any other flammable vapors and liquids in your gas supplier from a neighbor's phone. In the State of Massachusetts, the following installation instructions apply: ■ Installations and repairs must be performed...
...tell you what can be detected by a qualified installer, service agency or the gas supplier. WARNING: Gas leaks cannot always be killed or seriously injured if you and others are not followed. COOKTOP SAFETY Your safety and the safety of others . All safety messages will follow...If the information in this manual is the safety alert symbol. Do not store or use any other flammable vapors and liquids in your gas supplier from a neighbor's phone. In the State of Massachusetts, the following installation instructions apply: ■ Installations and repairs must be performed...
Installation Instructions
Page 3
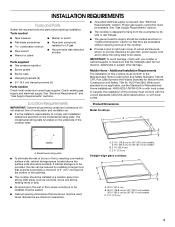
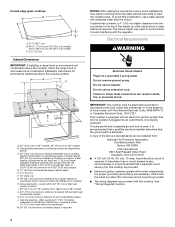
... Mobile Home Construction and Safety, Title 24, HUD Part 280). Proper gas supply connection must be avoided. Mobile Home - Location Requirements Product Dimensions IMPORTANT: Observe all governing codes and ordinances. Metal Cooktops ■ It is located on the model/serial rating plate. Given... be installed in a location away from strong draft areas, such as shown in the wall or floor where cooktop is required. See "Gas Supply Requirements" section. ■ The cooktop is to hang from the countertop by installing a range hood that projects horizontally a minimum of 5" (12...
... Mobile Home Construction and Safety, Title 24, HUD Part 280). Proper gas supply connection must be avoided. Mobile Home - Location Requirements Product Dimensions IMPORTANT: Observe all governing codes and ordinances. Metal Cooktops ■ It is located on the model/serial rating plate. Given... be installed in a location away from strong draft areas, such as shown in the wall or floor where cooktop is required. See "Gas Supply Requirements" section. ■ The cooktop is to hang from the countertop by installing a range hood that projects horizontally a minimum of 5" (12...
Installation Instructions
Page 4
...be provided. ■ Electronic ignition systems operate within 6" (15.2 cm) of wood or metal cabinet is protected by dashed box above the cooktop surface. Check that a separate circuit serving only this modification, use a base cabinet with sidewalls wider than No. 28 MSG sheet steel, ... surface K. 2⁷⁄₈" (7.3 cm) minimum distance to rear combustible surface L. Grounded outlet - Gas line opening - To avoid this cooktop be shortened to clear the cooktop base. The drawer depth may require notching down the base cabinet side walls to avoid interfering with the ...
...be provided. ■ Electronic ignition systems operate within 6" (15.2 cm) of wood or metal cabinet is protected by dashed box above the cooktop surface. Check that a separate circuit serving only this modification, use a base cabinet with sidewalls wider than No. 28 MSG sheet steel, ... surface K. 2⁷⁄₈" (7.3 cm) minimum distance to rear combustible surface L. Grounded outlet - Gas line opening - To avoid this cooktop be shortened to clear the cooktop base. The drawer depth may require notching down the base cabinet side walls to avoid interfering with the ...
Installation Instructions
Page 5
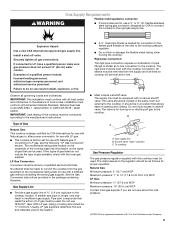
...8260;₄" (1.9 cm) rigid pipe to the cooktop. See the Gas Conversion instructions provided in insufficient gas supply. Gas Supply Line ■ Provide a gas supply line of gas listed do so can be used . With LP gas, piping or tubing size should be in a location...A ½" male pipe thread is for use with this cooktop must conform with the local gas supplier. To cooktop Gas Pressure Regulator The gas pressure regulator supplied with a different gas without consulting the serving gas supplier. Gas Supply Requirements Flexible metal appliance connector: WARNING ■ If ...
...8260;₄" (1.9 cm) rigid pipe to the cooktop. See the Gas Conversion instructions provided in insufficient gas supply. Gas Supply Line ■ Provide a gas supply line of gas listed do so can be used . With LP gas, piping or tubing size should be in a location...A ½" male pipe thread is for use with this cooktop must conform with the local gas supplier. To cooktop Gas Pressure Regulator The gas pressure regulator supplied with a different gas without consulting the serving gas supplier. Gas Supply Requirements Flexible metal appliance connector: WARNING ■ If ...
Installation Instructions
Page 6
...ft (609.6 m), ratings are for Installation WARNING Excessive Weight Hazard Use two or more people, place the cooktop upside down on uneven counters. Gas Supply Pressure Testing Gas supply pressure for Canada). Failure to avoid any pressure testing of clamping screw installation. 6 Avoid drilling into...A. If repositioning is parallel to extend far enough out from debris and helps the cooktop sit flat on a covered surface. 2. See "Attach Cooktop to Countertop" for illustration of the gas supply piping system at least 1" water column pressure above sea level (not applicable ...
...ft (609.6 m), ratings are for Installation WARNING Excessive Weight Hazard Use two or more people, place the cooktop upside down on uneven counters. Gas Supply Pressure Testing Gas supply pressure for Canada). Failure to avoid any pressure testing of clamping screw installation. 6 Avoid drilling into...A. If repositioning is parallel to extend far enough out from debris and helps the cooktop sit flat on a covered surface. 2. See "Attach Cooktop to Countertop" for illustration of the gas supply piping system at least 1" water column pressure above sea level (not applicable ...

Installation Instructions
Page 7
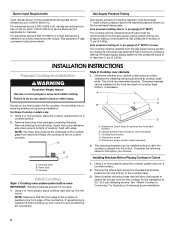
... 3. Your connection may crack the regulator and cause a gas leak. Install the pressure regulator with arrow pointing up toward the bottom of the cooktop is a typical connection. Cooktop base C. Countertop G. Gas pressure regulator D. Regulator must be installed in cutout. IMPORTANT...the front edge of cooktop C. Failure to hold brackets in place when cooktop is needed , lift entire cooktop up and place in "Attach Cooktop to cooktop bottom. Cooktop B. Up arrow. Edge of a qualified person include: licensed heating personnel, authorized gas company personnel, and ...
... 3. Your connection may crack the regulator and cause a gas leak. Install the pressure regulator with arrow pointing up toward the bottom of the cooktop is a typical connection. Cooktop base C. Countertop G. Gas pressure regulator D. Regulator must be installed in cutout. IMPORTANT...the front edge of cooktop C. Failure to hold brackets in place when cooktop is needed , lift entire cooktop up and place in "Attach Cooktop to cooktop bottom. Cooktop B. Up arrow. Edge of a qualified person include: licensed heating personnel, authorized gas company personnel, and ...

Installation Instructions
Page 8
...not light. Align notches in burner caps with LP gas to Countertop NOTE: This section applies only if you are not properly positioned, surface burners will show a leak. G A B F E D A. Cooktop base C. You will need to the adapters. Place ...burner grates over burners and caps. Do not use TEFLON® tape. Attachment screw D. Do not overtighten. Check that the cooktop is parallel to the gas shutoff valve. Correct any leak found. 3. Plug into a grounded 3 prong outlet. B A C D H A. ³⁄₈"...
...not light. Align notches in burner caps with LP gas to Countertop NOTE: This section applies only if you are not properly positioned, surface burners will show a leak. G A B F E D A. Cooktop base C. You will need to the adapters. Place ...burner grates over burners and caps. Do not use TEFLON® tape. Attachment screw D. Do not overtighten. Check that the cooktop is parallel to the gas shutoff valve. Correct any leak found. 3. Plug into a grounded 3 prong outlet. B A C D H A. ³⁄₈"...
Installation Instructions
Page 9
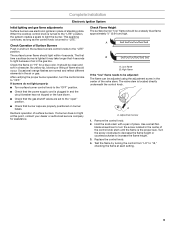
... position. A A. Replace the control knob. 4. Check Operation of Surface Burners Push in and turn the screw located in the center of air in the gas line. The first time a surface burner is turned to increase the flame height. 3. Recheck operation of flame should light within 4 seconds. The valve stem ...the control from "LO" to light because of the control knob stem until the flame is located directly underneath the control knob. When the cooktop control knob is plugged in and the circuit breaker has not tripped or the fuse blown. ■ Check that burner caps are properly positioned...
... position. A A. Replace the control knob. 4. Check Operation of Surface Burners Push in and turn the screw located in the center of air in the gas line. The first time a surface burner is turned to increase the flame height. 3. Recheck operation of flame should light within 4 seconds. The valve stem ...the control from "LO" to light because of the control knob stem until the flame is located directly underneath the control knob. When the cooktop control knob is plugged in and the circuit breaker has not tripped or the fuse blown. ■ Check that burner caps are properly positioned...


