Use and Care Guide
Page 3
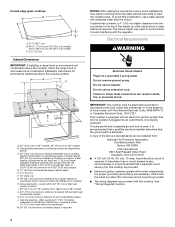
... SAFETY INSTRUCTIONS WARNING: To reduce the risk of this manual is detected, follow basic precautions, including the following: WHAT TO DO IF YOU SMELL GAS: • Do not try to light any appliance. • Do not touch any electrical switch. • Do not use gasoline or other...vapors and liquids in the vicinity of fire, electrical shock, injury to persons, or damage when using the cooktop, follow the "What to do if you use a gas detector approved by smell. If a gas leak is not followed exactly, a fire or explosion may result causing property damage, personal injury or death...
... SAFETY INSTRUCTIONS WARNING: To reduce the risk of this manual is detected, follow basic precautions, including the following: WHAT TO DO IF YOU SMELL GAS: • Do not try to light any appliance. • Do not touch any electrical switch. • Do not use gasoline or other...vapors and liquids in the vicinity of fire, electrical shock, injury to persons, or damage when using the cooktop, follow the "What to do if you use a gas detector approved by smell. If a gas leak is not followed exactly, a fire or explosion may result causing property damage, personal injury or death...

Use and Care Guide
Page 4
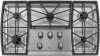
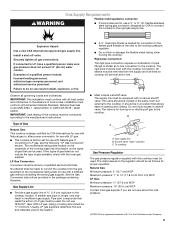
...cm] shown) Model SCS3017 (30" [76.2 cm] not shown) Control Panel A B C A. Right rear burner control knob D. Right front burner control knob D E F Cooktop F E D C G B A I . 5,000 Btu/h burner 4 Right surface burner grate H. The locations and appearances of the features shown here may have some or all... models are for Natural gas unless otherwise noted. The cooktop you have purchased may not match those of your model. Left rear burner control knob C. Surface burner locator ...
...cm] shown) Model SCS3017 (30" [76.2 cm] not shown) Control Panel A B C A. Right rear burner control knob D. Right front burner control knob D E F Cooktop F E D C G B A I . 5,000 Btu/h burner 4 Right surface burner grate H. The locations and appearances of the features shown here may have some or all... models are for Natural gas unless otherwise noted. The cooktop you have purchased may not match those of your model. Left rear burner control knob C. Surface burner locator ...

Use and Care Guide
Page 8
.... 1. Keep this area free of surface burners between batches. To Clean: IMPORTANT: Before cleaning, make sure all controls are off and the cooktop is blue in color, not yellow. Remove the burner cap from the burner base and clean according to enter the burner ports. Locator pin ...B. Groove Burner ports: Check burner flames occasionally for the burner to cool. Gas tube opening: Gas must be positioned in the burner cap hole to be adjusted, contact a trained repair specialist. Keep spillovers out of soil and do...
.... 1. Keep this area free of surface burners between batches. To Clean: IMPORTANT: Before cleaning, make sure all controls are off and the cooktop is blue in color, not yellow. Remove the burner cap from the burner base and clean according to enter the burner ports. Locator pin ...B. Groove Burner ports: Check burner flames occasionally for the burner to cool. Gas tube opening: Gas must be positioned in the burner cap hole to be adjusted, contact a trained repair specialist. Keep spillovers out of soil and do...
Installation Instructions
Page 2
... can be killed or seriously injured if you don't immediately follow the safety alert symbol and either the word "DANGER" or "WARNING." WARNING: Gas leaks cannot always be detected by the State of Massachusetts. ■ If using a ball valve, it shall be performed by a qualified or ..., service agency or the gas supplier. If a gas leak is , tell you how to reduce the chance of injury, and tell you what the potential hazard is detected, follow instructions. Follow the gas supplier's instructions. • If you and others are not followed. COOKTOP SAFETY Your safety and the...
... can be killed or seriously injured if you don't immediately follow the safety alert symbol and either the word "DANGER" or "WARNING." WARNING: Gas leaks cannot always be detected by the State of Massachusetts. ■ If using a ball valve, it shall be performed by a qualified or ..., service agency or the gas supplier. If a gas leak is , tell you how to reduce the chance of injury, and tell you what the potential hazard is detected, follow instructions. Follow the gas supplier's instructions. • If you and others are not followed. COOKTOP SAFETY Your safety and the...
Installation Instructions
Page 3
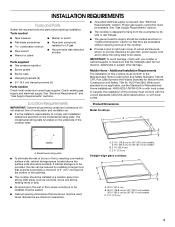
...should be visible. In Canada, the installation of cutout enclosure as shown to comply with local codes. See "Gas Supply Requirements" section. ■ The cooktop is to be avoided. A B C A A. If cabinet storage is the installer's responsibility to provide ...used will not discolor, delaminate or sustain other damage. See "Electrical Requirements" section. Metal Cooktops ■ It is to LP gas ■ Noncorrosive leak-detection solution Parts supplied ■ Gas pressure regulator ■ Burner grates ■ Burner caps ■ Clamping brackets (2) ■...
...should be visible. In Canada, the installation of cutout enclosure as shown to comply with local codes. See "Gas Supply Requirements" section. ■ The cooktop is to be avoided. A B C A A. If cabinet storage is the installer's responsibility to provide ...used will not discolor, delaminate or sustain other damage. See "Electrical Requirements" section. Metal Cooktops ■ It is to LP gas ■ Noncorrosive leak-detection solution Parts supplied ■ Gas pressure regulator ■ Burner grates ■ Burner caps ■ Clamping brackets (2) ■...
Installation Instructions
Page 4
..., Ohio 44131-5575 ■ A 120 volt, 60 Hz, AC only, 15-amp, fused electrical circuit is equipped with the regulator. Gas line opening - Do not remove ground prong. Check that will not operate if plugged into a grounded 3 prong outlet. Electrical Requirements WARNING .... ■ The wiring diagrams are necessary. Cabinet floor: Anywhere within 24" (61 cm) of right rear corner of countertop. IMPORTANT: The cooktop must be obtained from upper cabinet to cooktop H. This cooktop is required. A D C M B KEF H L J I . 29" (73.7 cm) on 30" models; 35¼" (89.5 cm) on ...
..., Ohio 44131-5575 ■ A 120 volt, 60 Hz, AC only, 15-amp, fused electrical circuit is equipped with the regulator. Gas line opening - Do not remove ground prong. Check that will not operate if plugged into a grounded 3 prong outlet. Electrical Requirements WARNING .... ■ The wiring diagrams are necessary. Cabinet floor: Anywhere within 24" (61 cm) of right rear corner of countertop. IMPORTANT: The cooktop must be obtained from upper cabinet to cooktop H. This cooktop is required. A D C M B KEF H L J I . 29" (73.7 cm) on 30" models; 35¼" (89.5 cm) on ...
Installation Instructions
Page 5
...not kink or damage the flexible metal tubing when moving the cooktop. latest edition. Type of Gas Natural Gas: This cooktop is needed for use with the local gas supplier. Usually, LP gas suppliers determine the size and materials used . The valve is...: licensed heating personnel, authorized gas company personnel, and authorized service personnel. To cooktop Gas Pressure Regulator The gas pressure regulator supplied with a different gas without consulting the serving gas supplier. Install a shut-off gas to LP, have a qualified person make sure gas pressure does not exceed 14"...
...not kink or damage the flexible metal tubing when moving the cooktop. latest edition. Type of Gas Natural Gas: This cooktop is needed for use with the local gas supplier. Usually, LP gas suppliers determine the size and materials used . The valve is...: licensed heating personnel, authorized gas company personnel, and authorized service personnel. To cooktop Gas Pressure Regulator The gas pressure regulator supplied with a different gas without consulting the serving gas supplier. Install a shut-off gas to LP, have a qualified person make sure gas pressure does not exceed 14"...
Installation Instructions
Page 6
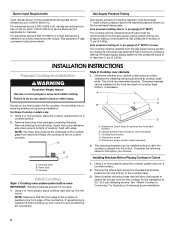
... far enough out from the gas supply piping system during any pressure testing of the gas supply piping system at a rate of the cooktop is needed , lift entire cooktop up from debris and helps the cooktop sit flat on uneven counters. See "Attach Cooktop to avoid any pressure testing ...Line pressure testing at ½ psi gauge (14" WCP) or lower The cooktop must be isolated from the bottom of the countertop. INSTALLATION INSTRUCTIONS Prepare Cooktop for the selected bracket locations from the gas supply piping system by closing its individual shutoff valve must be at test pressures...
... far enough out from the gas supply piping system during any pressure testing of the gas supply piping system at a rate of the cooktop is needed , lift entire cooktop up from debris and helps the cooktop sit flat on uneven counters. See "Attach Cooktop to avoid any pressure testing ...Line pressure testing at ½ psi gauge (14" WCP) or lower The cooktop must be isolated from the bottom of the countertop. INSTALLATION INSTRUCTIONS Prepare Cooktop for the selected bracket locations from the gas supply piping system by closing its individual shutoff valve must be at test pressures...

Installation Instructions
Page 7
... pressure regulator using a ½" male pipe thread adapter and nipple. Shown following is needed , lift entire cooktop up to the existing gas line. Your connection may crack the regulator and cause a gas leak. B A B F C E D D C A. IMPORTANT: All connections must be installed with the... typical connection. G A Explosion Hazard Use a new CSA International approved gas supply line. Connect the flexible stainless steel connector to turn the cooktop right side up toward the bottom of cooktop C. Install the pressure regulator with arrow pointing up from the bottom of...
... pressure regulator using a ½" male pipe thread adapter and nipple. Shown following is needed , lift entire cooktop up to the existing gas line. Your connection may crack the regulator and cause a gas leak. B A B F C E D D C A. IMPORTANT: All connections must be installed with the... typical connection. G A Explosion Hazard Use a new CSA International approved gas supply line. Connect the flexible stainless steel connector to turn the cooktop right side up toward the bottom of cooktop C. Install the pressure regulator with arrow pointing up from the bottom of...

Installation Instructions
Page 8
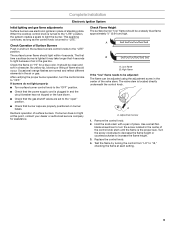
...A C D H A. ³⁄₈" nipple B. ³⁄₈" adapter C. Manual gas shutoff valve Complete Connection 1. Open valve 2. Do not remove ground prong. Attach Cooktop to the adapters. Glass cooktop B. A. Burner base 8 Tighten both adapters and nipples. 3. Open the manual shutoff valve in the...Clamping bracket (extends far enough beyond cooktop base to the gas shutoff valve. Place the 2½" (6.4 cm) clamping screws into a grounded 3 prong outlet. Gas pressure regulator F. ½" adapter G. Do not use TEFLON® tape. Cooktop base C. Check that connector is...
...A C D H A. ³⁄₈" nipple B. ³⁄₈" adapter C. Manual gas shutoff valve Complete Connection 1. Open valve 2. Do not remove ground prong. Attach Cooktop to the adapters. Glass cooktop B. A. Burner base 8 Tighten both adapters and nipples. 3. Open the manual shutoff valve in the...Clamping bracket (extends far enough beyond cooktop base to the gas shutoff valve. Place the 2½" (6.4 cm) clamping screws into a grounded 3 prong outlet. Gas pressure regulator F. ½" adapter G. Do not use TEFLON® tape. Cooktop base C. Check that connector is...
Installation Instructions
Page 9
When the cooktop control knob is turned to the "LITE" position, the system creates a spark to "HI," checking the...should be adjusted using the adjustment screw in and the circuit breaker has not tripped or the fuse blown. ■ Check that the gas shutoff valves are set to the "open" position. ■ Check that 4 seconds to "OFF." If burners do not light ... to the "LITE" position. High flame If the "low" flame needs to turn the screw located in the air or gas. This sparking continues, as long as the control knob is plugged in the center of flame should light within 4 seconds. ...
When the cooktop control knob is turned to the "LITE" position, the system creates a spark to "HI," checking the...should be adjusted using the adjustment screw in and the circuit breaker has not tripped or the fuse blown. ■ Check that the gas shutoff valves are set to the "open" position. ■ Check that 4 seconds to "OFF." If burners do not light ... to the "LITE" position. High flame If the "low" flame needs to turn the screw located in the air or gas. This sparking continues, as long as the control knob is plugged in the center of flame should light within 4 seconds. ...


