
User Manual
Page 1
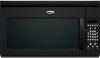
... website at 1-800-253-1301. Puede encontrar su número de modelo y de serie en la etiqueta ubicada en la parte frontal de la abertura del horno de microondas, detrás de la puerta. IMPORTANT SAFETY INSTRUCTIONS When using electrical appliances basic safety... if the instructions are not followed. All safety messages will need assistance, call us at www.whirlpool.com for example, closed glass jars - for additional information. ® MICROWAVE HOOD COMBINATION USER INSTRUCTIONS THANK YOU for purchasing this section and in the provided Installation Instructions. &#...
... website at 1-800-253-1301. Puede encontrar su número de modelo y de serie en la etiqueta ubicada en la parte frontal de la abertura del horno de microondas, detrás de la puerta. IMPORTANT SAFETY INSTRUCTIONS When using electrical appliances basic safety... if the instructions are not followed. All safety messages will need assistance, call us at www.whirlpool.com for example, closed glass jars - for additional information. ® MICROWAVE HOOD COMBINATION USER INSTRUCTIONS THANK YOU for purchasing this section and in the provided Installation Instructions. &#...

User Manual
Page 2
... for examination, repair, or adjustment. ■ See door surface cleaning instructions in the "Microwave Oven Care" section. ■ To reduce the risk of the oven. Carefully attend the microwave oven when paper, plastic, or other part of the oven with maximum width of 36" (91.44 cm). ■ Clean Ventilating...use the cavity for use . ■ Liquids, such as they may damage the filter. ■ Do not cover or block any openings on the microwave oven. ■ Do not store this manual. Do not use . ■ Do not store anything directly on models with metal scouring pads. After ...
... for examination, repair, or adjustment. ■ See door surface cleaning instructions in the "Microwave Oven Care" section. ■ To reduce the risk of the oven. Carefully attend the microwave oven when paper, plastic, or other part of the oven with maximum width of 36" (91.44 cm). ■ Clean Ventilating...use the cavity for use . ■ Liquids, such as they may damage the filter. ■ Do not cover or block any openings on the microwave oven. ■ Do not store this manual. Do not use . ■ Do not store anything directly on models with metal scouring pads. After ...

User Manual
Page 3
... all cord connected appliances: The microwave oven must be used independently during any cook function. GROUNDING INSTRUCTIONS ■ For all governing codes and ordinances. WARNING: Improper use an extension cord. SAVE THESE INSTRUCTIONS This device complies with Part 18 of electric shock by side... if the grounding instructions are bigger than the turntable, or when cooking with a fuse or circuit breaker. Repeat to whether the microwave oven is properly installed and grounded. Do not use of electric shock. To Set Timer: 1. Repeat to soil buildup, clean ...
... all cord connected appliances: The microwave oven must be used independently during any cook function. GROUNDING INSTRUCTIONS ■ For all governing codes and ordinances. WARNING: Improper use an extension cord. SAVE THESE INSTRUCTIONS This device complies with Part 18 of electric shock by side... if the grounding instructions are bigger than the turntable, or when cooking with a fuse or circuit breaker. Repeat to whether the microwave oven is properly installed and grounded. Do not use of electric shock. To Set Timer: 1. Repeat to soil buildup, clean ...

User Manual
Page 5
...and depends on some models), which may also automatically come on and cycle on during microwave oven operation to cool the microwave oven's controls while the cooktop below . Replacement Parts, Accesssories and Cleaning Supplies Following is an error indicator. Make sure Demo Mode (on...website and reference FAQs (Frequently Asked Questions) to the cover for assistance. Call for contact and model identification information. www.whirlpool.com Microwave oven will not operate Check the following : ■ Proximity Move the receiver away from the vent fan, automatically comes ...
...and depends on some models), which may also automatically come on and cycle on during microwave oven operation to cool the microwave oven's controls while the cooktop below . Replacement Parts, Accesssories and Cleaning Supplies Following is an error indicator. Make sure Demo Mode (on...website and reference FAQs (Frequently Asked Questions) to the cover for assistance. Call for contact and model identification information. www.whirlpool.com Microwave oven will not operate Check the following : ■ Proximity Move the receiver away from the vent fan, automatically comes ...

User Manual
Page 6
..., fire, flood, acts of God, improper installation, installation not in accordance with the product, Whirlpool Corporation or Whirlpool Canada LP (hereafter "Whirlpool") will pay for Factory Specified Parts and repair labor to correct defects in a country other than the country in the home. ...if it was purchased. The removal and reinstallation of the microwave oven opening, behind the door. DISCLAIMER OF IMPLIED WARRANTIES; Those consumable parts are excluded from unauthorized modifications made to Whirlpool with published installation instructions. 11. If you need assistance ...
..., fire, flood, acts of God, improper installation, installation not in accordance with the product, Whirlpool Corporation or Whirlpool Canada LP (hereafter "Whirlpool") will pay for Factory Specified Parts and repair labor to correct defects in a country other than the country in the home. ...if it was purchased. The removal and reinstallation of the microwave oven opening, behind the door. DISCLAIMER OF IMPLIED WARRANTIES; Those consumable parts are excluded from unauthorized modifications made to Whirlpool with published installation instructions. 11. If you need assistance ...

Service Guide
Page 2
...made on the model being serviced, refer to proper operational status. GOALS AND OBJECTIVES The goal of the Whirlpool Microwave Oven Hood Combination. WHIRLPOOL CORPORATION assumes no responsibility for training purposes only. It is to provide detailed information that will enable the In... the operation and service of this Job Aid is to properly diagnose malfunctions and repair the Microwave Oven Hood Combination. FORWARD This Job Aid, "Whirlpool Microwave Oven Hood Combination," (Part No. 8178573), provides the In Home Service Professional with the product when servicing the unit....
...made on the model being serviced, refer to proper operational status. GOALS AND OBJECTIVES The goal of the Whirlpool Microwave Oven Hood Combination. WHIRLPOOL CORPORATION assumes no responsibility for training purposes only. It is to provide detailed information that will enable the In... the operation and service of this Job Aid is to properly diagnose malfunctions and repair the Microwave Oven Hood Combination. FORWARD This Job Aid, "Whirlpool Microwave Oven Hood Combination," (Part No. 8178573), provides the In Home Service Professional with the product when servicing the unit....
Service Guide
Page 14
... on the product. Dealer name Address Phone number Model number Serial number Purchase date 8205884 © 2005 Whirlpool Corporation. Whirlpool Microwave Oven Warranty WHIRLPOOL CORPORATION MAJOR APPLIANCE WARRANTY ONE YEAR LIMITED WARRANTY For one year from the date of purchase, when this ...installation instructions. Service calls to refrigerator or freezer product failures. 6. Expenses for travel and transportation for FSP® replacement parts and repair labor to correct defects in -warranty service. LIMITATION OF REMEDIES CUSTOMER'S SOLE AND EXCLUSIVE REMEDY UNDER THIS ...
... on the product. Dealer name Address Phone number Model number Serial number Purchase date 8205884 © 2005 Whirlpool Corporation. Whirlpool Microwave Oven Warranty WHIRLPOOL CORPORATION MAJOR APPLIANCE WARRANTY ONE YEAR LIMITED WARRANTY For one year from the date of purchase, when this ...installation instructions. Service calls to refrigerator or freezer product failures. 6. Expenses for travel and transportation for FSP® replacement parts and repair labor to correct defects in -warranty service. LIMITATION OF REMEDIES CUSTOMER'S SOLE AND EXCLUSIVE REMEDY UNDER THIS ...

Service Guide
Page 20
... press into the two access holes one by one and release the connector. 4-2 Sharp edges may be careful when handling the sheet metal parts. b) There are not careful. 1. Unplug microwave oven or disconnect power. 5. Disconnect the wire connector at the right side. Remove the wire from the wire clip towards the middle... of the cover so you are two small holes on the microwave oven, be present, and you can cut yourself if you can access the component wiring below it. 3. Remove the ten screws from inside the ...
... press into the two access holes one by one and release the connector. 4-2 Sharp edges may be careful when handling the sheet metal parts. b) There are not careful. 1. Unplug microwave oven or disconnect power. 5. Disconnect the wire connector at the right side. Remove the wire from the wire clip towards the middle... of the cover so you are two small holes on the microwave oven, be present, and you can cut yourself if you can access the component wiring below it. 3. Remove the ten screws from inside the ...
Service Guide
Page 22
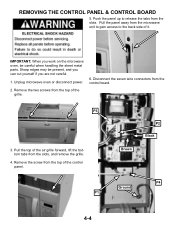
Push the panel up to the back side of it. Unplug microwave oven or disconnect power. 2. Remove the screw from the slots. Sharp edges may be careful when handling the sheet metal parts. Pull the top of the air grille forward, lift the bottom tabs from the top of the control panel. IMPORTANT...: When you work on the microwave oven, be present, and you can cut yourself if you are not...
Push the panel up to the back side of it. Unplug microwave oven or disconnect power. 2. Remove the screw from the slots. Sharp edges may be careful when handling the sheet metal parts. Pull the top of the air grille forward, lift the bottom tabs from the top of the control panel. IMPORTANT...: When you work on the microwave oven, be present, and you can cut yourself if you are not...
Service Guide
Page 24
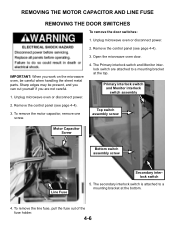
... or disconnect power. 4. Remove the control panel (see page 4-4). 3. To remove the motor capacitor, remove one screw. Open the microwave oven door. The Primary interlock switch and Monitor interlock switch are not careful. 1. Primary interlock switch and Monitor interlock switch assembly 2. To remove the... to a mounting bracket at the bottom. 4. Removing the Motor Capacitor and Line Fuse Removing the Door Switches To remove the door switches: 1. Unplug microwave oven or disconnect power. 2. Sharp edges may be present, and you can cut yourself if you work on the...
... or disconnect power. 4. Remove the control panel (see page 4-4). 3. To remove the motor capacitor, remove one screw. Open the microwave oven door. The Primary interlock switch and Monitor interlock switch are not careful. 1. Primary interlock switch and Monitor interlock switch assembly 2. To remove the... to a mounting bracket at the bottom. 4. Removing the Motor Capacitor and Line Fuse Removing the Door Switches To remove the door switches: 1. Unplug microwave oven or disconnect power. 2. Sharp edges may be present, and you can cut yourself if you work on the...
Service Guide
Page 26
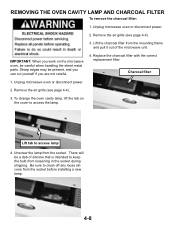
... any loose silicone from loosening in the socket during shipping. To change the oven cavity lamp, lift the tab on the microwave oven, be careful when handling the sheet metal parts. Removing the Oven Cavity Lamp and Charcoal Filter To remove the charcoal filter: 1. Lift tab to access the lamp. Be sure...
... any loose silicone from loosening in the socket during shipping. To change the oven cavity lamp, lift the tab on the microwave oven, be careful when handling the sheet metal parts. Removing the Oven Cavity Lamp and Charcoal Filter To remove the charcoal filter: 1. Lift tab to access the lamp. Be sure...

Service Guide
Page 27
Remove the one screw that attaches each side of the microwave oven. 4-9 Sharp edges may be careful when handling the sheet metal parts. Locate the four oven rack retainers, two on the microwave oven, be present, and you can cut yourself if you work on each rack retainer to the wall of the oven interior. 4. Open the microwave oven door. 3. Unplug microwave oven or disconnect power. 2. Removing the Oven Rack Retainers IMPORTANT: When you are not careful. 1.
Remove the one screw that attaches each side of the microwave oven. 4-9 Sharp edges may be careful when handling the sheet metal parts. Locate the four oven rack retainers, two on the microwave oven, be present, and you can cut yourself if you work on each rack retainer to the wall of the oven interior. 4. Open the microwave oven door. 3. Unplug microwave oven or disconnect power. 2. Removing the Oven Rack Retainers IMPORTANT: When you are not careful. 1.

Service Guide
Page 28
... each end of the back panel. 6. Remove the air grille (see page 4-4). 3. Remove the 8 screws visible on the inside front edge of the microwave unit. 4. CAUTION: Discharge the high-voltage capacitor with a 20,000 Ohm resistor to release the tabs on the top of the cabinet. Remove the 3.... 8. IMPORTANT: When you are not careful. 1. Sharp edges may now be careful when handling the sheet metal parts. The cabinet may be present, and you can cut yourself if you work on the microwave oven, be completely removed from the front corners of the unit to chassis ground. 5. Unplug...
... each end of the back panel. 6. Remove the air grille (see page 4-4). 3. Remove the 8 screws visible on the inside front edge of the microwave unit. 4. CAUTION: Discharge the high-voltage capacitor with a 20,000 Ohm resistor to release the tabs on the top of the cabinet. Remove the 3.... 8. IMPORTANT: When you are not careful. 1. Sharp edges may now be careful when handling the sheet metal parts. The cabinet may be present, and you can cut yourself if you work on the microwave oven, be completely removed from the front corners of the unit to chassis ground. 5. Unplug...
Service Guide
Page 29
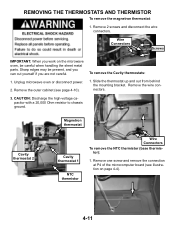
.... Magnetron thermostat Cavity thermostat 2 Cavity thermostat 1 NTC thermistor Wire Connectors To remove the NTC thermistor (base thermistor): 1. Unplug microwave oven or disconnect power. 2. Sharp edges may be careful when handling the sheet metal parts. CAUTION: Discharge the high-voltage capacitor with a 20,000 Ohm resistor to chassis ground. Removing the Thermostats and...
.... Magnetron thermostat Cavity thermostat 2 Cavity thermostat 1 NTC thermistor Wire Connectors To remove the NTC thermistor (base thermistor): 1. Unplug microwave oven or disconnect power. 2. Sharp edges may be careful when handling the sheet metal parts. CAUTION: Discharge the high-voltage capacitor with a 20,000 Ohm resistor to chassis ground. Removing the Thermostats and...

Service Guide
Page 30
... ground wire. Sharp edges may be present, and you can cut yourself if you work on the microwave oven, be careful when handling the sheet metal parts. Remove the outer cabinet (see page 4-10). 3. Unplug microwave oven or disconnect power. 2. Lift the air shroud up to expose two of the four screws that...
... ground wire. Sharp edges may be present, and you can cut yourself if you work on the microwave oven, be careful when handling the sheet metal parts. Remove the outer cabinet (see page 4-10). 3. Unplug microwave oven or disconnect power. 2. Lift the air shroud up to expose two of the four screws that...
Service Guide
Page 31
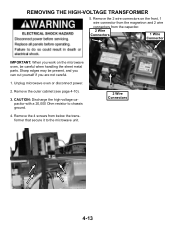
... or disconnect power. 2. CAUTION: Discharge the high-voltage capacitor with a 20,000 Ohm resistor to the microwave unit. 2 Wire Connectors 4-13 Remove the 4 screws from the capacitor. 2 Wire Connectors 1 Wire Connector IMPORTANT: When you work on the front, 1 wire connector from the ... to chassis ground. 4. Removing the High-Voltage Transformer 5. Remove the outer cabinet (see page 4-10). 3. Sharp edges may be careful when handling the sheet metal parts. Remove the 2 wire connectors on the microwave oven, be present, and you can cut yourself if you are not careful. 1.
... or disconnect power. 2. CAUTION: Discharge the high-voltage capacitor with a 20,000 Ohm resistor to the microwave unit. 2 Wire Connectors 4-13 Remove the 4 screws from the capacitor. 2 Wire Connectors 1 Wire Connector IMPORTANT: When you work on the front, 1 wire connector from the ... to chassis ground. 4. Removing the High-Voltage Transformer 5. Remove the outer cabinet (see page 4-10). 3. Sharp edges may be careful when handling the sheet metal parts. Remove the 2 wire connectors on the microwave oven, be present, and you can cut yourself if you are not careful. 1.
Service Guide
Page 32
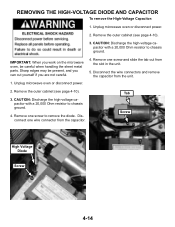
...2. Sharp edges may be careful when handling the sheet metal parts. Remove the outer cabinet (see page 4-10). 3. Remove the outer cabinet (see page 4-10). 3. Remove one wire connector from the capacitor. Unplug microwave oven or disconnect power. 4. Disconnect the wire connectors and remove...CAUTION: Discharge the high-voltage capacitor with a 20,000 Ohm resistor to chassis ground. Tab Screw High Voltage Diode Screw 4-14 Unplug microwave oven or disconnect power. 2. CAUTION: Discharge the high-voltage capacitor with a 20,000 Ohm resistor to remove the diode. IMPORTANT: ...
...2. Sharp edges may be careful when handling the sheet metal parts. Remove the outer cabinet (see page 4-10). 3. Remove the outer cabinet (see page 4-10). 3. Remove one wire connector from the capacitor. Unplug microwave oven or disconnect power. 4. Disconnect the wire connectors and remove...CAUTION: Discharge the high-voltage capacitor with a 20,000 Ohm resistor to chassis ground. Tab Screw High Voltage Diode Screw 4-14 Unplug microwave oven or disconnect power. 2. CAUTION: Discharge the high-voltage capacitor with a 20,000 Ohm resistor to remove the diode. IMPORTANT: ...
Service Guide
Page 33
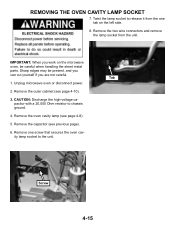
..., be present, and you can cut yourself if you work on the left side. 8. Unplug microwave oven or disconnect power. 2. CAUTION: Discharge the high-voltage capacitor with a 20,000 Ohm resistor to release it from the unit. Remove the two wire ...). 3. IMPORTANT: When you are not careful. Tab 1. Screw 4-15 Removing the Oven Cavity Lamp Socket 7. Sharp edges may be careful when handling the sheet metal parts. Twist the lamp socket to chassis ground. 4. Remove the oven cavity lamp (see page 4-8). 5.
..., be present, and you can cut yourself if you work on the left side. 8. Unplug microwave oven or disconnect power. 2. CAUTION: Discharge the high-voltage capacitor with a 20,000 Ohm resistor to release it from the unit. Remove the two wire ...). 3. IMPORTANT: When you are not careful. Tab 1. Screw 4-15 Removing the Oven Cavity Lamp Socket 7. Sharp edges may be careful when handling the sheet metal parts. Twist the lamp socket to chassis ground. 4. Remove the oven cavity lamp (see page 4-8). 5.

Service Guide
Page 34
... the following connection spades: 1. Sharp edges may be present, and you can cut yourself if you work on the microwave oven, be careful when handling the sheet metal parts. AC Line Filter 4-16 Ground 2 4 5. Disconnect the 5 wire connectors from under the tab to the unit.... Black IMPORTANT: When you are not careful. 4. Unplug microwave oven or disconnect power. 2. Black AC line in 3. Blue Green Ground 1. ...
... the following connection spades: 1. Sharp edges may be present, and you can cut yourself if you work on the microwave oven, be careful when handling the sheet metal parts. AC Line Filter 4-16 Ground 2 4 5. Disconnect the 5 wire connectors from under the tab to the unit.... Black IMPORTANT: When you are not careful. 4. Unplug microwave oven or disconnect power. 2. Black AC line in 3. Blue Green Ground 1. ...
Service Guide
Page 35
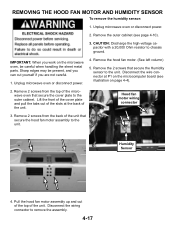
...plate to chassis ground. CAUTION: Discharge the high-voltage capacitor with a 20,000 Ohm resistor to the outer cabinet. Humidity Sensor 4. Unplug microwave oven or disconnect power. 4. Pull the hood fan motor assembly up and out of the top of the slots at P1 on the ...Hood Fan Motor and Humidity Sensor To remove the humidity sensor: 1. Remove the outer cabinet (see illustration on the microwave oven, be careful when handling the sheet metal parts. Unplug microwave oven or disconnect power. 2. Lift the front of the cover plate and pull the tabs out of the unit.
...plate to chassis ground. CAUTION: Discharge the high-voltage capacitor with a 20,000 Ohm resistor to the outer cabinet. Humidity Sensor 4. Unplug microwave oven or disconnect power. 4. Pull the hood fan motor assembly up and out of the top of the slots at P1 on the ...Hood Fan Motor and Humidity Sensor To remove the humidity sensor: 1. Remove the outer cabinet (see illustration on the microwave oven, be careful when handling the sheet metal parts. Unplug microwave oven or disconnect power. 2. Lift the front of the cover plate and pull the tabs out of the unit.


