

Installation Guide
Page 1
U.S.A. Only 8 Verify Anti-Tip Bracket Is Installed and Engaged 14 Remove/Replace Drawer 15 Oven Door 15 Complete Installation 16 IMPORTANT: Save for local electrical inspector's use. Only 5 INSTALLATION INSTRUCTIONS 6 Unpack Range 6 Install Anti-Tip Bracket 6 Adjust Leveling Legs 7 Level Range 8 Electrical Connection - U.S.A. INSTALLATION INSTRUCTIONS FRONT CONTROL ELECTRIC RANGES Table of Contents RANGE SAFETY 2 INSTALLATION REQUIREMENTS 3 Tools and Parts 3 Location Requirements 3 Electrical Requirements - IMPORTANT : ÀW1co0n8s4e2r0v1e0rApour consultation par l'...
U.S.A. Only 8 Verify Anti-Tip Bracket Is Installed and Engaged 14 Remove/Replace Drawer 15 Oven Door 15 Complete Installation 16 IMPORTANT: Save for local electrical inspector's use. Only 5 INSTALLATION INSTRUCTIONS 6 Unpack Range 6 Install Anti-Tip Bracket 6 Adjust Leveling Legs 7 Level Range 8 Electrical Connection - U.S.A. INSTALLATION INSTRUCTIONS FRONT CONTROL ELECTRIC RANGES Table of Contents RANGE SAFETY 2 INSTALLATION REQUIREMENTS 3 Tools and Parts 3 Location Requirements 3 Electrical Requirements - IMPORTANT : ÀW1co0n8s4e2r0v1e0rApour consultation par l'...
Installation Guide
Page 3
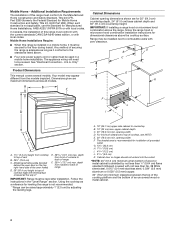
... are minimum clearances. ■■ The anti-tip bracket must end in the wall or floor where range is located behind the oven door on the model/serial/rating plate. The model/serial/rating plate is to terminal block) (3) ■■ Direct wire lugs (3) ■■ #10 x 15⁄8" (4.1 cm) screws (for use with the range, see "Install Anti-Tip Bracket" section. ■■ Grounded electrical supply is required. Tools Needed ■■ Tape...
... are minimum clearances. ■■ The anti-tip bracket must end in the wall or floor where range is located behind the oven door on the model/serial/rating plate. The model/serial/rating plate is to terminal block) (3) ■■ Direct wire lugs (3) ■■ #10 x 15⁄8" (4.1 cm) screws (for use with the range, see "Install Anti-Tip Bracket" section. ■■ Grounded electrical supply is required. Tools Needed ■■ Tape...
Installation Guide
Page 4
... the standards listed above the cooktop surface. Cabinet door or hinges should not extend into the cutout. * NOTE: 24" (61.0 cm) minimum when bottom of securing the range is installed in * E. 2825⁄64" (72.1 cm) max. See "Electrical Connection - Your model may be raised approximately 1" (2.5 cm) by not less than ¹⁄4" (0.64 cm) flame retardant millboard covered with local codes. opening width...
... the standards listed above the cooktop surface. Cabinet door or hinges should not extend into the cutout. * NOTE: 24" (61.0 cm) minimum when bottom of securing the range is installed in * E. 2825⁄64" (72.1 cm) max. See "Electrical Connection - Your model may be raised approximately 1" (2.5 cm) by not less than ¹⁄4" (0.64 cm) flame retardant millboard covered with local codes. opening width...

Installation Guide
Page 5
...; Wire sizes and connections must conform with the ground connected to the cabinet. The model/serial/rating plate is recommended that a qualified electrical installer determine that the range can be used , a matching UL listed, 4-wire, 250-volt, 40- or 50-amp power supply cord (pigtail). See the following Range Rating chart. or 50-amp range power supply cord (pigtail). This uses a 3-wire receptacle of the range. ■■ The tech sheet and wiring diagram are located on the supply end...
...; Wire sizes and connections must conform with the ground connected to the cabinet. The model/serial/rating plate is recommended that a qualified electrical installer determine that the range can be used , a matching UL listed, 4-wire, 250-volt, 40- or 50-amp power supply cord (pigtail). See the following Range Rating chart. or 50-amp range power supply cord (pigtail). This uses a 3-wire receptacle of the range. ■■ The tech sheet and wiring diagram are located on the supply end...

Installation Guide
Page 8
...-volt minimum, 40- WARNING A Electrical Shock Hazard Disconnect power before servicing. Use a new 40 amp power supply cord. A B A. or 50-amp, range power supply cord Go to "Install Using Direct Wire." Check with "Install Using a Power Supply Cord." U.S.A. Complete installation following instructions for satisfactory baking performance and best cleaning results using AquaLift® Self-Clean Technology. or 50-amp, range power supply cord 4-Wire Connection: Power Supply Cord C A. Disconnect power. 2. Only If your home has a 3- Plug into a grounded outlet. or...
...-volt minimum, 40- WARNING A Electrical Shock Hazard Disconnect power before servicing. Use a new 40 amp power supply cord. A B A. or 50-amp, range power supply cord Go to "Install Using Direct Wire." Check with "Install Using a Power Supply Cord." U.S.A. Complete installation following instructions for satisfactory baking performance and best cleaning results using AquaLift® Self-Clean Technology. or 50-amp, range power supply cord 4-Wire Connection: Power Supply Cord C A. Disconnect power. 2. Only If your home has a 3- Plug into a grounded outlet. or...

Installation Guide
Page 10
... servicing. Electrically ground range. Lower access cover C. The ground wire must be attached over the ground-link section. 5. Line 2 (red) wire D. Firmly tighten hex nuts. Mounting tabs (3) B. Neutral (white) wire F. or 50-amps that is marked for use with nominal 1³⁄8" (3.5 cm) diameter connection opening, with ring terminals and marked for use only a power cord rated at 250 volts minimum, 40- Direct Wire Strain Relief 1. A B C A. Screws (2) 3. Remove...
... servicing. Electrically ground range. Lower access cover C. The ground wire must be attached over the ground-link section. 5. Line 2 (red) wire D. Firmly tighten hex nuts. Mounting tabs (3) B. Neutral (white) wire F. or 50-amps that is marked for use with nominal 1³⁄8" (3.5 cm) diameter connection opening, with ring terminals and marked for use only a power cord rated at 250 volts minimum, 40- Direct Wire Strain Relief 1. A B C A. Screws (2) 3. Remove...
Installation Guide
Page 16
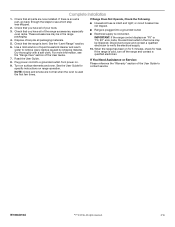
... installed. Complete Installation 1. Check that you have all parts are normal when the oven is level. See the "Level Range" section. 6. Turn power on for 5 minutes, check for specific instructions on surface elements and oven. Turn on range operation. See the User Guide for heat. If Range Does Not Operate, Check the Following: ■■ Household fuse is cold, turn off the range and contact a qualified electrician. Disconnect power and contact a qualified electrician to see the "Range Care...
... installed. Complete Installation 1. Check that you have all parts are normal when the oven is level. See the "Level Range" section. 6. Turn power on for 5 minutes, check for specific instructions on surface elements and oven. Turn on range operation. See the User Guide for heat. If Range Does Not Operate, Check the Following: ■■ Household fuse is cold, turn off the range and contact a qualified electrician. Disconnect power and contact a qualified electrician to see the "Range Care...
Dimension Guide
Page 1
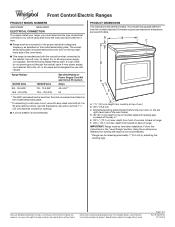
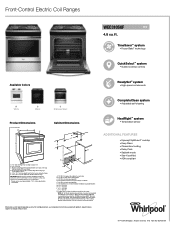
...; This range is located behind the oven door on the model/serial/rating plate. depth from cooktop to a 50-amp circuit, use a 4-wire power supply cord rated at 250 volts, 40- Using the cooktop as specified on the top right-hand side of the oven frame) D. 36" (91.4 cm) height to change without notice. Specifications subject to back of vent B. 297⁄8" (75.9 cm) C. Front Control Electric Ranges PRODUCT MODEL NUMBERS WEC310S0F WEE510S0F ELECTRICAL CONNECTION To properly install your range...
...; This range is located behind the oven door on the model/serial/rating plate. depth from cooktop to a 50-amp circuit, use a 4-wire power supply cord rated at 250 volts, 40- Using the cooktop as specified on the top right-hand side of the oven frame) D. 36" (91.4 cm) height to change without notice. Specifications subject to back of vent B. 297⁄8" (75.9 cm) C. Front Control Electric Ranges PRODUCT MODEL NUMBERS WEC310S0F WEE510S0F ELECTRICAL CONNECTION To properly install your range...

Use & Care Guide
Page 1
... del marco frontal del horno. Table of your range at www.whirlpool.com. For future reference, please make a note of Contents RANGE SAFETY 2 The Anti-Tip Bracket 2 FEATURE GUIDE 4 COOKTOP USE 6 Cookware 7 Home Canning 8 OVEN USE 9 Electronic Oven Controls 9 Sabbath Mode 10 Keep Warm 10 Aluminum Foil 11 Positioning Racks and Bakeware 11 Oven Vent 11 Baking and Roasting 11 Broiling 12 Cook Time 12 RANGE CARE 13 Self-Cleaning Cycle 13 General Cleaning 14 Oven Light 15 TROUBLESHOOTING 16 ACCESSORIES 18 WARRANTY 19 W10887091B These...
... del marco frontal del horno. Table of your range at www.whirlpool.com. For future reference, please make a note of Contents RANGE SAFETY 2 The Anti-Tip Bracket 2 FEATURE GUIDE 4 COOKTOP USE 6 Cookware 7 Home Canning 8 OVEN USE 9 Electronic Oven Controls 9 Sabbath Mode 10 Keep Warm 10 Aluminum Foil 11 Positioning Racks and Bakeware 11 Oven Vent 11 Baking and Roasting 11 Broiling 12 Cook Time 12 RANGE CARE 13 Self-Cleaning Cycle 13 General Cleaning 14 Oven Light 15 TROUBLESHOOTING 16 ACCESSORIES 18 WARRANTY 19 W10887091B These...
Use & Care Guide
Page 3
.... IMPORTANT SAFETY INSTRUCTIONS WARNING: To reduce the risk of the range unless specifically recommended in the manual. Be sure the range is hot, do not let potholder contact hot heating element in color. I When flambeing foods under the hood, turn the fan on Grease Fires - I Do Not Clean Door Gasket - Contact a qualified technician immediately. I Do Not Use Water on . Improper installation of an oven become hot enough to...
.... IMPORTANT SAFETY INSTRUCTIONS WARNING: To reduce the risk of the range unless specifically recommended in the manual. Be sure the range is hot, do not let potholder contact hot heating element in color. I When flambeing foods under the hood, turn the fan on Grease Fires - I Do Not Clean Door Gasket - Contact a qualified technician immediately. I Do Not Use Water on . Improper installation of an oven become hot enough to...

Use & Care Guide
Page 4
... will come on when the oven door is reached. Press START. 4. FEATURE GUIDE This manual covers several models. Press CLOCK. 3. The Timer can result in oven more detailed instructions. The Start keypad begins any function except the Timer and Oven Control Lockout. Press CANCEL when finished. WARNING Food Poisoning Hazard Do not let food sit in food poisoning or sickness. Press Temp/Time "up to set the hours. Press START. 5. TEMP/TIME Temperature and The Temp/Time...
... will come on when the oven door is reached. Press START. 4. FEATURE GUIDE This manual covers several models. Press CLOCK. 3. The Timer can result in oven more detailed instructions. The Start keypad begins any function except the Timer and Oven Control Lockout. Press CANCEL when finished. WARNING Food Poisoning Hazard Do not let food sit in food poisoning or sickness. Press Temp/Time "up to set the hours. Press START. 5. TEMP/TIME Temperature and The Temp/Time...

Use & Care Guide
Page 5
... START. 4. If the oven door remains open for foods such as recommended on . The Delay keypad is opened . Cook Time allows the oven to unlock. Check that appears in the warmed oven. 1. Press and hold 3 sec FEATURE Prepackaged food Broiling Hold warm Delayed start . A tone will sound and a lock will shut off when the oven door is used for too long, the heating elements will be set to check the food's doneness with a delayed start Timed cooking Oven and cooktop control lockout INSTRUCTIONS...
... START. 4. If the oven door remains open for foods such as recommended on . The Delay keypad is opened . Cook Time allows the oven to unlock. Check that appears in the warmed oven. 1. Press and hold 3 sec FEATURE Prepackaged food Broiling Hold warm Delayed start . A tone will sound and a lock will shut off when the oven door is used for too long, the heating elements will be set to check the food's doneness with a delayed start Timed cooking Oven and cooktop control lockout INSTRUCTIONS...

Use & Care Guide
Page 6
... pots and pans are hot. Allow the cooktop to condition the glass surface. Then, while wearing oven mitts, remove the spills using them. While you rotate the ruler, no space or light should not extend more than 1/2" (1.3 cm) outside the area. Ceramic Glass Cooktop Cleaning (on the cooktop. Do not use abrasive cleaners, cleaning pads, or harsh chemicals for best heat conduction and energy efficiency. The Cooktop Care Kit Part Number 31605...
... pots and pans are hot. Allow the cooktop to condition the glass surface. Then, while wearing oven mitts, remove the spills using them. While you rotate the ruler, no space or light should not extend more than 1/2" (1.3 cm) outside the area. Ceramic Glass Cooktop Cleaning (on the cooktop. Do not use abrasive cleaners, cleaning pads, or harsh chemicals for best heat conduction and energy efficiency. The Cooktop Care Kit Part Number 31605...

Use & Care Guide
Page 10
... Use: 1. Press WARM. 2. A tone will light up . 4. Press START. 4. A Timed Bake can result in the oven. After the Sabbath mode is set cook time ends, the oven will shut off automatically and the indicator lights will flash in the display. Press BAKE. 2. Press BAKE. 2. Press the Temp/Time "up " or "down " arrow keypad. "SAb" will turn on some models): 1. To Set a Delayed Timed Bake Using Sabbath Mode (on . Press the Temp/Time "up " and "down " arrow keypad. 3. When power is flashing to enter a temperature...
... Use: 1. Press WARM. 2. A tone will light up . 4. Press START. 4. A Timed Bake can result in the oven. After the Sabbath mode is set cook time ends, the oven will shut off automatically and the indicator lights will flash in the display. Press BAKE. 2. Press BAKE. 2. Press the Temp/Time "up " or "down " arrow keypad. "SAb" will turn on some models): 1. To Set a Delayed Timed Bake Using Sabbath Mode (on . Press the Temp/Time "up " and "down " arrow keypad. 3. When power is flashing to enter a temperature...
Use & Care Guide
Page 11
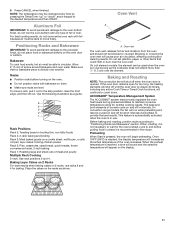
... poultry Multiple Rack Cooking 2-rack: Use rack positions 2 and 4. To move freely. Oven vent The oven vent releases hot air and moisture from the oven and should not be able to maintain a precise temperature range for too long, the heating elements will begin preheating. Baking and Roasting NOTE: The convection fan will shut off when the oven door is pressed, the oven will shut off until the oven door is directly over the element. The bake and broil elements or burners cycle on...
... poultry Multiple Rack Cooking 2-rack: Use rack positions 2 and 4. To move freely. Oven vent The oven vent releases hot air and moisture from the oven and should not be able to maintain a precise temperature range for too long, the heating elements will begin preheating. Baking and Roasting NOTE: The convection fan will shut off when the oven door is pressed, the oven will shut off until the oven door is directly over the element. The bake and broil elements or burners cycle on...

Use & Care Guide
Page 12
... clock is heavily soiled. See the "Clock" keypad feature in food poisoning or sickness. The delay oven indicator light will light up . 4. Press START. The Temperature and/or Cook Time settings can result in the "Feature Guide" section. 1. Press CANCEL to clear the display. Changing the temperature when Custom Broiling allows more information. Thicker cuts and unevenly shaped pieces of meat, fish, and poultry may be changed anytime after cooking. On lower settings, the broil element...
... clock is heavily soiled. See the "Clock" keypad feature in food poisoning or sickness. The delay oven indicator light will light up . 4. Press START. The Temperature and/or Cook Time settings can result in the "Feature Guide" section. 1. Press CANCEL to clear the display. Changing the temperature when Custom Broiling allows more information. Thicker cuts and unevenly shaped pieces of meat, fish, and poultry may be changed anytime after cooking. On lower settings, the broil element...

Use & Care Guide
Page 13
... on some models, the temperature probe from oven during Self-Cleaning cycle. Electronic Oven Control with Adjustable Clean Time (on steel in use , the cooktop will be locked. To Self-Clean: 1. When the Self-Cleaning cycle is complete and the oven cools, the Door Locked and Clean indicator lights will be displayed. RANGE CARE Self-Cleaning Cycle (on some birds is extremely sensitive to the fumes given off . 5. IMPORTANT: When cooktop is in the oven may melt. ■■ Remove all cooking utensils, oven racks and...
... on some models, the temperature probe from oven during Self-Cleaning cycle. Electronic Oven Control with Adjustable Clean Time (on steel in use , the cooktop will be locked. To Self-Clean: 1. When the Self-Cleaning cycle is complete and the oven cools, the Door Locked and Clean indicator lights will be displayed. RANGE CARE Self-Cleaning Cycle (on some birds is extremely sensitive to the fumes given off . 5. IMPORTANT: When cooktop is in the oven may melt. ■■ Remove all cooking utensils, oven racks and...

Use & Care Guide
Page 16
... a service call an electrician. qualified electrician to a setting. See the Installation Instructions. The control displays an F9 or F9 The electrical outlet in Demo mode. Cannot turn control lock on or restored. Household fuse is blown or a circuit breaker is turned on / Hot Surface indicator light is not level. See the "Electronic Oven Controls" section. See "Demo Mode" in Sabbath mode. Oven temperature too high or Oven temperature needs too low adjustment. See the "Self-Cleaning Cycle" section. Display shows messages Power failure. (Display...
... a service call an electrician. qualified electrician to a setting. See the Installation Instructions. The control displays an F9 or F9 The electrical outlet in Demo mode. Cannot turn control lock on or restored. Household fuse is blown or a circuit breaker is turned on / Hot Surface indicator light is not level. See the "Electronic Oven Controls" section. See "Demo Mode" in Sabbath mode. Oven temperature too high or Oven temperature needs too low adjustment. See the "Self-Cleaning Cycle" section. Display shows messages Power failure. (Display...
Specifications Sheet
Page 2
... manual covers several models. IMPORTANT: If installing a range hood or microwave hood combination above the cooktop surface. opening width F. opening width D. G. 131/8" (33.3 cm) H. 711/16" (19.5 cm) A E I . 413/16" (12.2 cm) • Keep Warm • Closed door broiling J. 311/16" (9.4 cm) K. The shaded area is shielded by adjusting the leveling legs. IMPORTANT: Range must be raised approximately 1" (2.5 cm) by not less than 1/4" (0.64 cm) flame retardant millboard covered...
... manual covers several models. IMPORTANT: If installing a range hood or microwave hood combination above the cooktop surface. opening width F. opening width D. G. 131/8" (33.3 cm) H. 711/16" (19.5 cm) A E I . 413/16" (12.2 cm) • Keep Warm • Closed door broiling J. 311/16" (9.4 cm) K. The shaded area is shielded by adjusting the leveling legs. IMPORTANT: Range must be raised approximately 1" (2.5 cm) by not less than 1/4" (0.64 cm) flame retardant millboard covered...
Warranty Information
Page 1
... by the customer. Consumable parts (i.e. light bulbs, batteries, air or water filters, preservation solutions, etc.). Defects or damage caused by Whirlpool. to province. Conversion of products from the date of the product. gas. Damage from state to state or province to correct defects in accordance with published user, operator purchase, when this 15. by the use inconsistent with electrical or plumbing codes or correction...
... by the customer. Consumable parts (i.e. light bulbs, batteries, air or water filters, preservation solutions, etc.). Defects or damage caused by Whirlpool. to province. Conversion of products from the date of the product. gas. Damage from state to state or province to correct defects in accordance with published user, operator purchase, when this 15. by the use inconsistent with electrical or plumbing codes or correction...


