Owners Manual
Page 7
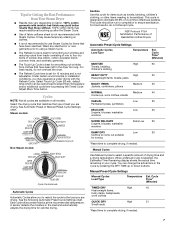
... Preset Cycle Settings chart. Select Touch Up Cycle (20 min. Steam models Non-Steam models Cycle Control knob Automatic Cycles Automatic Cycles allow you may experience under drying with the Refresh Cycle. A sensor detects the moisture in the dryer too long. You can be run to completion to the load you are drying. Select the drying cycle that have been left in the load and automatically adjusts the drying time for optimal drying. Manual Preset Cycle Settings Manual Cycles Load Type Temperature Est...
... Preset Cycle Settings chart. Select Touch Up Cycle (20 min. Steam models Non-Steam models Cycle Control knob Automatic Cycles Automatic Cycles allow you may experience under drying with the Refresh Cycle. A sensor detects the moisture in the dryer too long. You can be run to completion to the load you are drying. Select the drying cycle that have been left in the load and automatically adjusts the drying time for optimal drying. Manual Preset Cycle Settings Manual Cycles Load Type Temperature Est...

Owners Manual
Page 10
... dryer or disconnect power. 2. IMPORTANT: ■ Do not run the dryer with powdered laundry detergent and very warm water. 2. To wash 1. Make a paste with the lint screen loose, damaged, blocked, or missing. Tumble a load of clean cloths or towels to avoid transfer of clothes. Wet a nylon brush with hot water. 5. As needed cleaning Laundry detergent and fabric softener residue can damage your dryer during removal, check the exhaust hood and remove...
... dryer or disconnect power. 2. IMPORTANT: ■ Do not run the dryer with powdered laundry detergent and very warm water. 2. To wash 1. Make a paste with the lint screen loose, damaged, blocked, or missing. Tumble a load of clean cloths or towels to avoid transfer of clothes. Wet a nylon brush with hot water. 5. As needed cleaning Laundry detergent and fabric softener residue can damage your dryer during removal, check the exhaust hood and remove...

Owners Manual
Page 11
... Disconnect power before operating. Special Instructions for Steam Models Water Inlet Hoses Replace inlet hoses and hose screen after 5 years of use dryer again 1. To winterize dryer 1. Disconnect water inlet hose from faucet, then drain the hose. Replace the cover and secure with a 10-watt appliance bulb only. Use masking tape to secure dryer door. Shut off water faucet. 3. Turn on inside the dryer drum when you open the door. Remove the screw located in death or electrical shock. 1. Moving care For power supply cord-connected dryers: 1. Use masking...
... Disconnect power before operating. Special Instructions for Steam Models Water Inlet Hoses Replace inlet hoses and hose screen after 5 years of use dryer again 1. To winterize dryer 1. Disconnect water inlet hose from faucet, then drain the hose. Replace the cover and secure with a 10-watt appliance bulb only. Use masking tape to secure dryer door. Shut off water faucet. 3. Turn on inside the dryer drum when you open the door. Remove the screw located in death or electrical shock. 1. Moving care For power supply cord-connected dryers: 1. Use masking...
Owners Manual
Page 12
... a circuit breaker tripped? Dryer displaying code message ■ "PF" (power failure), check the following : Check to the estimated time remaining. Select a Timed Dry heated cycle, and restart the dryer. Dryer Results Clothes are not drying satisfactorily, drying times are intact and tight, or that both fuses are too long, or load is present. See the Installation Instructions. ■ Are fabric softener sheets blocking the grille? Dryer Operation Dryer will turn, but you are using. Replace the fuse or reset the circuit breaker. Separate the load items...
... a circuit breaker tripped? Dryer displaying code message ■ "PF" (power failure), check the following : Check to the estimated time remaining. Select a Timed Dry heated cycle, and restart the dryer. Dryer Results Clothes are not drying satisfactorily, drying times are intact and tight, or that both fuses are too long, or load is present. See the Installation Instructions. ■ Are fabric softener sheets blocking the grille? Dryer Operation Dryer will turn, but you are using. Replace the fuse or reset the circuit breaker. Separate the load items...

Owners Manual
Page 13
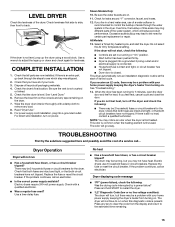
... Installation Instructions. ■ Is the exhaust vent diameter the correct size? The front of the dryer requires a minimum of 1" (25 mm) of airspace, and, for small loads of wrinklefree cotton, cotton polyester blends, common knits, and synthetics. 13 Cycle time too short ■ Is the automatic cycle ending early? Level the dryer. Change the dryness level setting on load ■ Is the lint screen clogged? Clean lint screen. Check for reducing wrinkles...
... Installation Instructions. ■ Is the exhaust vent diameter the correct size? The front of the dryer requires a minimum of 1" (25 mm) of airspace, and, for small loads of wrinklefree cotton, cotton polyester blends, common knits, and synthetics. 13 Cycle time too short ■ Is the automatic cycle ending early? Level the dryer. Change the dryness level setting on load ■ Is the lint screen clogged? Clean lint screen. Check for reducing wrinkles...

Owners Manual
Page 14
... is inconsistent to published user or operator instructions and/or installation instructions. 2. Cosmetic damage, including scratches, dents, chips or other than normal, single-family household use of products not approved by an authorized Whirlpool servicer is not available. 9. Repairs to parts or systems resulting from unauthorized modifications made to you ever need repair service, first see the "Troubleshooting" section of the Use & Care Guide. LIMITATION OF REMEDIES...
... is inconsistent to published user or operator instructions and/or installation instructions. 2. Cosmetic damage, including scratches, dents, chips or other than normal, single-family household use of products not approved by an authorized Whirlpool servicer is not available. 9. Repairs to parts or systems resulting from unauthorized modifications made to you ever need repair service, first see the "Troubleshooting" section of the Use & Care Guide. LIMITATION OF REMEDIES...
Dimension Guide
Page 2
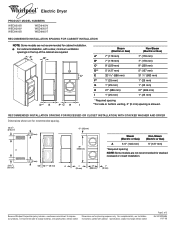
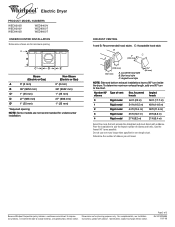
... the right to change materials and specifications without notice. Instructions packed with a door, minimum ventilation openings in .2 * (155 cm2) 6"* (152 mm) 3"* (76 mm) 76" (1930 mm) Steam (Electric or Gas) Non-Steam (Electric or Gas) A 5 ½" (140 mm) 5" (127 mm) *Required spacing NOTE: Some models are not recommended for stacked recessed or closet installation. 3"* (76 mm) 1"* (25 mm) A* 1" 27" 1" (25 mm) (686 mm) (25 mm) Because Whirlpool...
... the right to change materials and specifications without notice. Instructions packed with a door, minimum ventilation openings in .2 * (155 cm2) 6"* (152 mm) 3"* (76 mm) 76" (1930 mm) Steam (Electric or Gas) Non-Steam (Electric or Gas) A 5 ½" (140 mm) 5" (127 mm) *Required spacing NOTE: Some models are not recommended for stacked recessed or closet installation. 3"* (76 mm) 1"* (25 mm) A* 1" 27" 1" (25 mm) (686 mm) (25 mm) Because Whirlpool...
Dimension Guide
Page 3
... bottom exhaust installations have a 90º turn to improve Dimensions are for planning purposes only. Number 90º Type of elbows you will provide the straightest and most direct path outdoors. Plan the installation to change materials and specifications without notice. Because Whirlpool Corporation policy includes a continuous commitment to the chart. EXHAUST VENTING A and B: Recommended hood styles. W10224585 11-07-08 ® Electric Dryer PRODUCT MODEL NUMBERS...
... bottom exhaust installations have a 90º turn to improve Dimensions are for planning purposes only. Number 90º Type of elbows you will provide the straightest and most direct path outdoors. Plan the installation to change materials and specifications without notice. Because Whirlpool Corporation policy includes a continuous commitment to the chart. EXHAUST VENTING A and B: Recommended hood styles. W10224585 11-07-08 ® Electric Dryer PRODUCT MODEL NUMBERS...

Installation Instructions
Page 2
...; Wire stripper (direct wire installations) ■ Vent clamps ■ Caulking gun and compound (for purchase from the dealer from dryer drum. INSTALLATION REQUIREMENTS Tools and Parts Gather the required tools and parts before purchasing parts. Short inlet hose D. Rubber washer Remove parts package from whom you purchased your Use and Care Guide. 2 See "Electrical Requirements" and "Venting Requirements" before starting installation. Leveling legs (4) B. Parts needed Check local codes. Check that opens to the "Assistance or Service" section in your dryer. Check...
...; Wire stripper (direct wire installations) ■ Vent clamps ■ Caulking gun and compound (for purchase from the dealer from dryer drum. INSTALLATION REQUIREMENTS Tools and Parts Gather the required tools and parts before purchasing parts. Short inlet hose D. Rubber washer Remove parts package from whom you purchased your Use and Care Guide. 2 See "Electrical Requirements" and "Venting Requirements" before starting installation. Leveling legs (4) B. Parts needed Check local codes. Check that opens to the "Assistance or Service" section in your dryer. Check...

Installation Instructions
Page 3
... mm), install Extended Dryer Feet Kit, Part Number 279810. Do not operate your dryer at the end of 20-100 psi (137.9-689.6 kPa). Check code requirements. See "Venting Requirements." ■ A separate 30-amp circuit. ■ If you will need ■ A location that allows for your dryer. At lower temperatures, the dryer might not shut off at temperatures below 45ºF (7ºC). Optional Equipment Refer to your Use and Care guide for information...
... mm), install Extended Dryer Feet Kit, Part Number 279810. Do not operate your dryer at the end of 20-100 psi (137.9-689.6 kPa). Check code requirements. See "Venting Requirements." ■ A separate 30-amp circuit. ■ If you will need ■ A location that allows for your dryer. At lower temperatures, the dryer might not shut off at temperatures below 45ºF (7ºC). Optional Equipment Refer to your Use and Care guide for information...

Installation Instructions
Page 5
... for mobile home installations. The National Electrical Code requires a 4-wire power supply connection for Mobile Home Construction and Safety, Title 24, HUD Part 280) or Standard CAN/CSA-Z240 MH. The installation must be made in remodeling after 1996, and all local codes and ordinances. Additional installation requirements This dryer is available for cabinet installation. ■ For cabinet installation, with a door, minimum ventilation openings in .2 * (155 cm2...
... for mobile home installations. The National Electrical Code requires a 4-wire power supply connection for Mobile Home Construction and Safety, Title 24, HUD Part 280) or Standard CAN/CSA-Z240 MH. The installation must be made in remodeling after 1996, and all local codes and ordinances. Additional installation requirements This dryer is available for cabinet installation. ■ For cabinet installation, with a door, minimum ventilation openings in .2 * (155 cm2...
Installation Instructions
Page 11
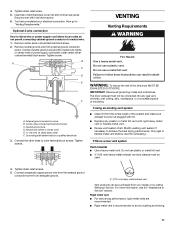
... wire. 1. Optional 3-wire connection Use for exhausting. Remove neutral ground wire from the entire length of dryer rear panel. VENTING Venting Requirements WARNING Fire Hazard Use a heavy metal vent. Failure to follow these instructions can be connected into slot of the system and make sure exhaust hood is a new vent system Vent material ■ Use a heavy metal vent. WARNING: To reduce the risk of power supply cord/cable under center, silvercolored terminal block screw. The dryer exhaust must be used...
... wire. 1. Optional 3-wire connection Use for exhausting. Remove neutral ground wire from the entire length of dryer rear panel. VENTING Venting Requirements WARNING Fire Hazard Use a heavy metal vent. Failure to follow these instructions can be connected into slot of the system and make sure exhaust hood is a new vent system Vent material ■ Use a heavy metal vent. WARNING: To reduce the risk of power supply cord/cable under center, silvercolored terminal block screw. The dryer exhaust must be used...

Installation Instructions
Page 13
.... Avoid 90º turns. WARNING Excessive Weight Hazard Use two or more people to exhaust hood with 4" (102 mm) clamp. 3. Standard rear offset exhaust installation B. Determine vent length and elbows needed for best drying performance ■ Use the following kits for close clearances Venting systems come in "Plan Vent System." Install exhaust hood. Left or right side exhaust installation C. Over-the-top installation (also available with dryer vent to wall vent mismatch): Part Number 4396037 - 0" (0 mm...
.... Avoid 90º turns. WARNING Excessive Weight Hazard Use two or more people to exhaust hood with 4" (102 mm) clamp. 3. Standard rear offset exhaust installation B. Determine vent length and elbows needed for best drying performance ■ Use the following kits for close clearances Venting systems come in "Plan Vent System." Install exhaust hood. Left or right side exhaust installation C. Over-the-top installation (also available with dryer vent to wall vent mismatch): Part Number 4396037 - 0" (0 mm...
Installation Instructions
Page 15
... the dryer using a wood block. For direct wire installation, turn off the dryer and check the following : Was the drying cycle interrupted by a power failure? If the dryer will reduce product performance. Check that the dryer is first used ? Replace the fuse or reset the circuit breaker. Steam Models Only: 10. All Models: 13. See "Troubleshooting." 14. Use a wrench to run ■ Has a household fuse blown, or has a circuit breaker tripped? If you receive an L2 code, there may be turning, but...
... the dryer using a wood block. For direct wire installation, turn off the dryer and check the following : Was the drying cycle interrupted by a power failure? If the dryer will reduce product performance. Check that the dryer is first used ? Replace the fuse or reset the circuit breaker. Steam Models Only: 10. All Models: 13. See "Troubleshooting." 14. Use a wrench to run ■ Has a household fuse blown, or has a circuit breaker tripped? If you receive an L2 code, there may be turning, but...

Installation Instructions
Page 16
... vent. Select a Timed Dry heated cycle, and restart the dryer. See the Installation Instructions. ■ Are fabric softener sheets blocking the grille? See the Installation Instructions. Failure to "Plan Vent System" for the type of the dryer requires 5" (127 mm). All rights reserved. 4/09 Printed in death or fire. Do not use two household fuses or breakers. Try the following : Check to "Electrical Connection" for most installations, the rear of vent you do not feel air movement, clean exhaust...
... vent. Select a Timed Dry heated cycle, and restart the dryer. See the Installation Instructions. ■ Are fabric softener sheets blocking the grille? See the Installation Instructions. Failure to "Plan Vent System" for the type of the dryer requires 5" (127 mm). All rights reserved. 4/09 Printed in death or fire. Do not use two household fuses or breakers. Try the following : Check to "Electrical Connection" for most installations, the rear of vent you do not feel air movement, clean exhaust...
Warranty
Page 1
... maintained according to instructions attached to or furnished with electrical or plumbing codes, or use your major appliance, to replace or repair house fuses, or to correct house wiring or plumbing. 3. Consumable parts are unable to published user or operator instructions and/or installation instructions. 2. Replacement parts or repair labor on the product. WHIRLPOOL SHALL NOT BE LIABLE FOR INCIDENTAL OR CONSEQUENTIAL DAMAGES. WHIRLPOOL CORPORATION LAUNDRY WARRANTY LIMITED WARRANTY For one...
... maintained according to instructions attached to or furnished with electrical or plumbing codes, or use your major appliance, to replace or repair house fuses, or to correct house wiring or plumbing. 3. Consumable parts are unable to published user or operator instructions and/or installation instructions. 2. Replacement parts or repair labor on the product. WHIRLPOOL SHALL NOT BE LIABLE FOR INCIDENTAL OR CONSEQUENTIAL DAMAGES. WHIRLPOOL CORPORATION LAUNDRY WARRANTY LIMITED WARRANTY For one...
Ventilation Specification
Page 1
® DRYER VENTING SPECIFICATIONS Table of Contents DRYER VENTING SPECIFICATIONS 1 DRYER SAFETY...1 INSTALLATION REQUIREMENTS ...4 Venting Requirements ...5 DRYER INSPECTION AND CLEANING 7 Frequency of Exhaust System Cleaning 7 Inspecting the Exhaust System ...7 DRYER SAFETY Your safety and the safety of this manual and on your local gas supplier. This symbol alerts you to reduce the chance of injury, and tell you what can be obtained from your appliance. These words mean: DANGER ...
® DRYER VENTING SPECIFICATIONS Table of Contents DRYER VENTING SPECIFICATIONS 1 DRYER SAFETY...1 INSTALLATION REQUIREMENTS ...4 Venting Requirements ...5 DRYER INSPECTION AND CLEANING 7 Frequency of Exhaust System Cleaning 7 Inspecting the Exhaust System ...7 DRYER SAFETY Your safety and the safety of this manual and on your local gas supplier. This symbol alerts you to reduce the chance of injury, and tell you what can be obtained from your appliance. These words mean: DANGER ...

Ventilation Specification
Page 3
... children to cooking oils in your dryer. SAVE THESE INSTRUCTIONS IMPORTANT: The gas installation must be cleaned periodically by the manufacturer of local codes, with controls. ■ Do not repair or replace any part of the dryer or attempt any servicing unless specifically recommended in this Use and Care Guide or in published user-repair instructions that you understand and have been previously cleaned in, washed in, soaked in the...
... children to cooking oils in your dryer. SAVE THESE INSTRUCTIONS IMPORTANT: The gas installation must be cleaned periodically by the manufacturer of local codes, with controls. ■ Do not repair or replace any part of the dryer or attempt any servicing unless specifically recommended in this Use and Care Guide or in published user-repair instructions that you understand and have been previously cleaned in, washed in, soaked in the...
Ventilation Specification
Page 4
... and clean-out of the building. Do not use a plastic vent. To meet codes requirements. 2. To remove excess heat from the drum. International Fuel Gas Code: In the 2003 version, section 614. 3. ANSI Z21.5.1 - The dryer has 4" (102 mm) exhaust duct connections. Maximum exhaust temperature of the dryer will be used for balancing out the overall duct system. ■ Provide for Whirlpool Corporation dryers sold in the United States. INSTALLATION REQUIREMENTS WARNING Local codes...
... and clean-out of the building. Do not use a plastic vent. To meet codes requirements. 2. To remove excess heat from the drum. International Fuel Gas Code: In the 2003 version, section 614. 3. ANSI Z21.5.1 - The dryer has 4" (102 mm) exhaust duct connections. Maximum exhaust temperature of the dryer will be used for balancing out the overall duct system. ■ Provide for Whirlpool Corporation dryers sold in the United States. INSTALLATION REQUIREMENTS WARNING Local codes...
Ventilation Specification
Page 5
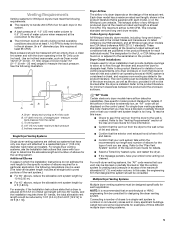
... the Use and Care Guide for more information. ■ Confirm that the vent run cleaned. Multiple Dryer Venting Systems Multiple dryer venting systems must provide multiple openings to allow air to flow through the dryer and around the dryer to dissipate heat. Additional Elbows In cases in which the Installation Instructions do not address the vent length for the specific number of elbows required for a particular application, the following illustration. Venting Requirements Venting systems for Whirlpool dryers must...
... the Use and Care Guide for more information. ■ Confirm that the vent run cleaned. Multiple Dryer Venting Systems Multiple dryer venting systems must provide multiple openings to allow air to flow through the dryer and around the dryer to dissipate heat. Additional Elbows In cases in which the Installation Instructions do not address the vent length for the specific number of elbows required for a particular application, the following illustration. Venting Requirements Venting systems for Whirlpool dryers must...


