
Owners Manual
Page 10
... it . Non-Use or Storage Care Operate your clothes, or cause the dryer to remove. 2. See "Cleaning the Lint Screen." 3. This helps to avoid unintended flooding (due to a residue buildup. The control panel has an indicator light to remind you should be removed every 2 years, or more frequently, if it becomes clogged due to...
... it . Non-Use or Storage Care Operate your clothes, or cause the dryer to remove. 2. See "Cleaning the Lint Screen." 3. This helps to avoid unintended flooding (due to a residue buildup. The control panel has an indicator light to remind you should be removed every 2 years, or more frequently, if it becomes clogged due to...

Owners Manual
Page 11
...water faucet. 3. Transport hose separately. 5. Remove the cover. 3. Turn bulb counterclockwise. Unplug the power supply cord. 2. Transport hose separately. 4. Replace all parts and panels before servicing. Use masking tape to faucet. Turn on inside the dryer drum when you open the door. Replace... your inlet hoses, record the date of hose failure. Flush water pipes. Plug in dryer or reconnect power. Plug in dryer or reconnect power. 11 Remove the screw located in dryer base. 6. Replace the cover and secure with a 10-watt appliance bulb only. Disconnect...
...water faucet. 3. Transport hose separately. 5. Remove the cover. 3. Turn bulb counterclockwise. Unplug the power supply cord. 2. Transport hose separately. 4. Replace all parts and panels before servicing. Use masking tape to faucet. Turn on inside the dryer drum when you open the door. Replace... your inlet hoses, record the date of hose failure. Flush water pipes. Plug in dryer or reconnect power. Plug in dryer or reconnect power. 11 Remove the screw located in dryer base. 6. Replace the cover and secure with a 10-watt appliance bulb only. Disconnect...
Installation Instructions
Page 9
.... A D E B F C (127 5" mm) A. Neutral wire (white or center wire) 4. Tighten screws. 9 You have 5 ft (1.52 m) of dryer rear panel. Ground wire (green or bare) of the other wires to the terminal block, place the hooked end of the wire under the center screw of... external ground conductor screw. Center, silver-colored terminal block screw E. Squeeze hooked ends together. Neutral ground wire D. Tighten screws. 1. Remove center, silver-colored terminal block screw. 2. External ground conductor screw - Place the hooked ends of power supply cable C. ¾" ...
.... A D E B F C (127 5" mm) A. Neutral wire (white or center wire) 4. Tighten screws. 9 You have 5 ft (1.52 m) of dryer rear panel. Ground wire (green or bare) of the other wires to the terminal block, place the hooked end of the wire under the center screw of... external ground conductor screw. Center, silver-colored terminal block screw E. Squeeze hooked ends together. Neutral ground wire D. Tighten screws. 1. Remove center, silver-colored terminal block screw. 2. External ground conductor screw - Place the hooked ends of power supply cable C. ¾" ...

Installation Instructions
Page 10
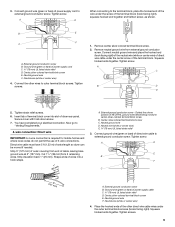
...cover with hold -down screw. 6. Now go to the center, silver-colored terminal screw of cable. Spade terminals with outer covering. Loosen or remove center, silver-colored terminal block screw. 2. Neutral wire (white or center wire) E. ¾" (19 mm) UL listed strain relief 3....ft (1.52 m) of the other wires to the terminal block, place the hooked end of the wire under the center screw of dryer rear panel. Direct wire cable must have completed your electrical connection. Strip insulation back 1" (25 mm). External ground conductor screw B. External ground ...
...cover with hold -down screw. 6. Now go to the center, silver-colored terminal screw of cable. Spade terminals with outer covering. Loosen or remove center, silver-colored terminal block screw. 2. Neutral wire (white or center wire) E. ¾" (19 mm) UL listed strain relief 3....ft (1.52 m) of the other wires to the terminal block, place the hooked end of the wire under the center screw of dryer rear panel. Direct wire cable must have completed your electrical connection. Strip insulation back 1" (25 mm). External ground conductor screw B. External ground ...
Installation Instructions
Page 11
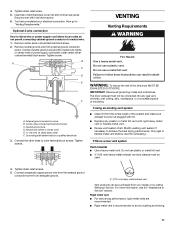
... ■ Replace any gas vent, chimney, wall, ceiling, attic, crawlspace, or a concealed space of dryer rear panel. Optional 3-wire connection Use for exhausting. Remove center, silver-colored terminal block screw. 2. External ground conductor screw B. Connect the other wires to follow ... 3. Center, silver-colored terminal block screw C. Tighten screws. Do not use a plastic vent. Grounding path determined by calling Whirlpool Service. 4. Remove neutral ground wire from your electrical connection. Do not use plastic or metal foil vent. ■ 4" (102 mm) heavy...
... ■ Replace any gas vent, chimney, wall, ceiling, attic, crawlspace, or a concealed space of dryer rear panel. Optional 3-wire connection Use for exhausting. Remove center, silver-colored terminal block screw. 2. External ground conductor screw B. Connect the other wires to follow ... 3. Center, silver-colored terminal block screw C. Tighten screws. Do not use a plastic vent. Grounding path determined by calling Whirlpool Service. 4. Remove neutral ground wire from your electrical connection. Do not use plastic or metal foil vent. ■ 4" (102 mm) heavy...

Installation Instructions
Page 14
...the coupling an additional two-thirds turn . Stand the dryer up. Attach "Y" connector to the "Y" connector. 7. Attach this end to brass male end of dryer back panel. Attach washer cold inlet hose to the cold water faucet. The dryer vent must be attached directly to cold water faucet, go... and inside the coupling. Do not use old hoses. 1. Turn cold water faucet off and remove washer inlet hose. 2. Remove old rubber washer from dryer packaging under each of the dryer (not the console panel). Continue with a 4" (102 mm) clamp. 2. Check that the vent is seated on fill...
...the coupling an additional two-thirds turn . Stand the dryer up. Attach "Y" connector to the "Y" connector. 7. Attach this end to brass male end of dryer back panel. Attach washer cold inlet hose to the cold water faucet. The dryer vent must be attached directly to cold water faucet, go... and inside the coupling. Do not use old hoses. 1. Turn cold water faucet off and remove washer inlet hose. 2. Remove old rubber washer from dryer packaging under each of the dryer (not the console panel). Continue with a 4" (102 mm) clamp. 2. Check that the vent is seated on fill...


