
Installation Instructions
Page 1
...ONLY Para una versión de estas instrucciones en español, visite www.Whirlpool.com TABLE OF CONTENTS DRYER SAFETY 1 INSTALLATION REQUIREMENTS 2 Tools and Parts 2 Optional Equipment 3 Location Requirements 3 ELECTRIC DRYER POWER HOOKUP 5 Electrical Requirements 5 Electrical Connection 6 VENTING 11 Venting Requirements 11 ... System 13 INSTALL LEVELING LEGS 13 CONNECT VENT 14 CONNECT INLET HOSE (STEAM MODELS 14 LEVEL DRYER 15 COMPLETE INSTALLATION 15 TROUBLESHOOTING 15 DRYER SAFETY Your safety and the safety of injury, and tell you what the potential hazard is the...
...ONLY Para una versión de estas instrucciones en español, visite www.Whirlpool.com TABLE OF CONTENTS DRYER SAFETY 1 INSTALLATION REQUIREMENTS 2 Tools and Parts 2 Optional Equipment 3 Location Requirements 3 ELECTRIC DRYER POWER HOOKUP 5 Electrical Requirements 5 Electrical Connection 6 VENTING 11 Venting Requirements 11 ... System 13 INSTALL LEVELING LEGS 13 CONNECT VENT 14 CONNECT INLET HOSE (STEAM MODELS 14 LEVEL DRYER 15 COMPLETE INSTALLATION 15 TROUBLESHOOTING 15 DRYER SAFETY Your safety and the safety of injury, and tell you what the potential hazard is the...

Installation Instructions
Page 2
...; #2 Phillips screwdriver ■ Adjustable wrench that all parts are included. Check that opens to the "Assistance or Service" section in your dryer. "Y" connector C. Short inlet hose D. Long inlet hose E. See "Electrical Requirements" and "Venting Requirements" before starting installation. Mobile home...A B C D E A. For further information, please refer to 1" (25 mm) or hex-head socket wrench (for adjusting dryer feet) ■ Level ■ Wire stripper (direct wire installations) ■ Vent clamps ■ Caulking gun and compound (for purchase from the dealer...
...; #2 Phillips screwdriver ■ Adjustable wrench that all parts are included. Check that opens to the "Assistance or Service" section in your dryer. "Y" connector C. Short inlet hose D. Long inlet hose E. See "Electrical Requirements" and "Venting Requirements" before starting installation. Mobile home...A B C D E A. For further information, please refer to 1" (25 mm) or hex-head socket wrench (for adjusting dryer feet) ■ Level ■ Wire stripper (direct wire installations) ■ Vent clamps ■ Caulking gun and compound (for purchase from the dealer...

Installation Instructions
Page 3
...mm) 31 1/2" (800 mm) 27" (686 mm) 51 1/2" (1308 mm) NOTE: Most installations require a minimum 5" (127 mm) clearance behind the dryer for the exhaust vent with a maximum slope of an automatic sensor cycle. Venting Dimensions C A* B Back View Steam (Electric or Gas) Non-Steam (Electric or...mm) * Dimension A is approximate, depending on when the diamond marking on the leveling foot is greater than 1" (25 mm), install Extended Dryer Feet Kit, Part Number 279810. Clothes may not tumble properly and automatic sensor cycles may use the cold water supply from your local building ...
...mm) 31 1/2" (800 mm) 27" (686 mm) 51 1/2" (1308 mm) NOTE: Most installations require a minimum 5" (127 mm) clearance behind the dryer for the exhaust vent with a maximum slope of an automatic sensor cycle. Venting Dimensions C A* B Back View Steam (Electric or Gas) Non-Steam (Electric or...mm) * Dimension A is approximate, depending on when the diamond marking on the leveling foot is greater than 1" (25 mm), install Extended Dryer Feet Kit, Part Number 279810. Clothes may not tumble properly and automatic sensor cycles may use the cold water supply from your local building ...

Installation Instructions
Page 4
... or closet installation The following reasons: ■ Additional spacing should be considered for ease of the door are not recommended for recessed or closet installation. Dryer only A B C* D E* Steam (Electric or Gas) Non-Steam (Electric or Gas) A 0" (0 mm) 0" (0 mm) B 38" (965 mm) ...25 mm) 1" (25 mm) D 27" (686 mm) 27" (686 mm) E* 1" (25 mm) 1" (25 mm) *Required spacing NOTE: Some models are not recommended for this dryer. Dryer only (460 mm) C A* B Side View Steam (Electric or Gas) Non-Steam (Electric or Gas) A* 1" (25 mm) 1" (25 mm) B 7 5/8" (194 mm) 7 ...
... or closet installation The following reasons: ■ Additional spacing should be considered for ease of the door are not recommended for recessed or closet installation. Dryer only A B C* D E* Steam (Electric or Gas) Non-Steam (Electric or Gas) A 0" (0 mm) 0" (0 mm) B 38" (965 mm) ...25 mm) 1" (25 mm) D 27" (686 mm) 27" (686 mm) E* 1" (25 mm) 1" (25 mm) *Required spacing NOTE: Some models are not recommended for this dryer. Dryer only (460 mm) C A* B Side View Steam (Electric or Gas) Non-Steam (Electric or Gas) A* 1" (25 mm) 1" (25 mm) B 7 5/8" (194 mm) 7 ...

Installation Instructions
Page 5
...and Safety Standard, Title 24 CFR, Part 3280 (formerly the Federal Standard for mobile home installations. Mobile home installations require: All Dryers: ■ Metal exhaust system hardware, which is available for purchase from : National Fire Protection Association, One Batterymarch Park, Quincy...requires a 4-wire power supply connection for recessed or closet installation, with a door, minimum ventilation openings in remodeling after 1996, dryer circuits involved in the top of the above code standards can be obtained from your responsibility ■ To contact a qualified electrical...
...and Safety Standard, Title 24 CFR, Part 3280 (formerly the Federal Standard for mobile home installations. Mobile home installations require: All Dryers: ■ Metal exhaust system hardware, which is available for purchase from : National Fire Protection Association, One Batterymarch Park, Quincy...requires a 4-wire power supply connection for recessed or closet installation, with a door, minimum ventilation openings in remodeling after 1996, dryer circuits involved in the top of the above code standards can be obtained from your responsibility ■ To contact a qualified electrical...

Installation Instructions
Page 6
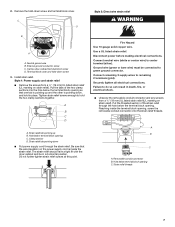
..., see "Optional 3-wire connection" section. ■ A 4-wire power supply connection must be used , it here. ■ This dryer is installed with ring or spade terminals and UL listed strain relief. Electrical Connection WARNING Fire Hazard Use a new UL listed 30 amp power...may be : ■ Flexible armored cable or nonmetallic sheathed copper cable (with ground wire), protected with clothes dryers. Connect to the neutral conductor (white wire) within the dryer. The neutral ground conductor is recommended. Connect remaining 2 supply wires to do not use an extension cord....
..., see "Optional 3-wire connection" section. ■ A 4-wire power supply connection must be used , it here. ■ This dryer is installed with ring or spade terminals and UL listed strain relief. Electrical Connection WARNING Fire Hazard Use a new UL listed 30 amp power...may be : ■ Flexible armored cable or nonmetallic sheathed copper cable (with ground wire), protected with clothes dryers. Connect to the neutral conductor (white wire) within the dryer. The neutral ground conductor is recommended. Connect remaining 2 supply wires to do not use an extension cord....
Installation Instructions
Page 7
... 3. A B C D A. Hole below the terminal block opening C. Strain relief tab pointing down screw and terminal block cover. The strain relief should have a tight fit with the dryer cabinet and be connected to hold the two clamp sections together. Disconnect power before making electrical connections. 2. External ground conductor screw C. Connect neutral wire (white...
... 3. A B C D A. Hole below the terminal block opening C. Strain relief tab pointing down screw and terminal block cover. The strain relief should have a tight fit with the dryer cabinet and be connected to hold the two clamp sections together. Disconnect power before making electrical connections. 2. External ground conductor screw C. Connect neutral wire (white...

Installation Instructions
Page 8
...not permit the connection of power supply cord under center, silver-colored terminal block screw. A C B D E A. Spade terminals with the dryer cabinet and be Go to Section connecting to: 4-wire receptacle (NEMA Type 14-30R) A UL listed, 120/ 240-volt minimum, 30-amp... (127 mm) 3-wire receptacle (NEMA type 10-30R) A fused disconnect or circuit breaker box* A UL listed, 120/ 240-volt minimum, 30-amp, dryer power supply cord* 4-wire connection: Direct Wire 3-wire connection: Power supply cord 3-wire direct (89 mm) A fused disconnect or circuit breaker box* 3-wire connection...
...not permit the connection of power supply cord under center, silver-colored terminal block screw. A C B D E A. Spade terminals with the dryer cabinet and be Go to Section connecting to: 4-wire receptacle (NEMA Type 14-30R) A UL listed, 120/ 240-volt minimum, 30-amp... (127 mm) 3-wire receptacle (NEMA type 10-30R) A fused disconnect or circuit breaker box* A UL listed, 120/ 240-volt minimum, 30-amp, dryer power supply cord* 4-wire connection: Direct Wire 3-wire connection: Power supply cord 3-wire direct (89 mm) A fused disconnect or circuit breaker box* 3-wire connection...
Installation Instructions
Page 9
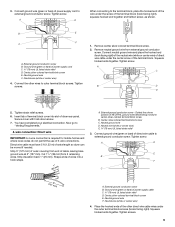
... Requirements." 4-wire connection: Direct wire IMPORTANT: A 4-wire connection is required for mobile homes and where local codes do not permit the use of dryer rear panel. Tighten screws. 9 External ground conductor screw B. Connect neutral ground wire and place the hooked end (hook facing right) of the neutral... wire (white or center wire) of direct wire cable under the center screw of extra length so dryer can be moved if needed. Cut 11/2" (38 mm) from external ground conductor screw. Direct wire cable must have completed your electrical ...
... Requirements." 4-wire connection: Direct wire IMPORTANT: A 4-wire connection is required for mobile homes and where local codes do not permit the use of dryer rear panel. Tighten screws. 9 External ground conductor screw B. Connect neutral ground wire and place the hooked end (hook facing right) of the neutral... wire (white or center wire) of direct wire cable under the center screw of extra length so dryer can be moved if needed. Cut 11/2" (38 mm) from external ground conductor screw. Direct wire cable must have completed your electrical ...

Installation Instructions
Page 10
...right). Neutral ground wire C. Insert tab of terminal block cover into slot of dryer rear panel. You have completed your electrical connection. Insert tab of terminal block cover into slot of dryer rear panel. Neutral prong D. Connect neutral wire (white or center wire) of... relief F. Strip insulation back 1" (25 mm). Squeeze hooked end together. Tighten strain relief screws. 5. Place the hooked ends of extra length so dryer can be moved if needed. Ring terminals G. C A B D A. Center, silver-colored terminal block screw D. Connect the other direct wire cable ...
...right). Neutral ground wire C. Insert tab of terminal block cover into slot of dryer rear panel. You have completed your electrical connection. Insert tab of terminal block cover into slot of dryer rear panel. Neutral prong D. Connect neutral wire (white or center wire) of... relief F. Strip insulation back 1" (25 mm). Squeeze hooked end together. Tighten strain relief screws. 5. Place the hooked ends of extra length so dryer can be moved if needed. Ring terminals G. C A B D A. Center, silver-colored terminal block screw D. Connect the other direct wire cable ...
Installation Instructions
Page 11
... to achieve the best drying performance. Do not use a plastic vent. Connect a separate copper ground wire from the entire length of dryer rear panel. Optional 3-wire connection Use for exhausting. External ground conductor screw B. Neutral wire (white or center wire) E. ¾"...metal foil vent. Remove neutral ground wire from your electrical connection. Neutral ground wire D. Grounding path determined by calling Whirlpool Service. The dryer exhaust must be used for direct wire or power supply cord where local codes do not permit connecting cabinet-ground ...
... to achieve the best drying performance. Do not use a plastic vent. Connect a separate copper ground wire from the entire length of dryer rear panel. Optional 3-wire connection Use for exhausting. External ground conductor screw B. Neutral wire (white or center wire) E. ¾"...metal foil vent. Remove neutral ground wire from your electrical connection. Neutral ground wire D. Grounding path determined by calling Whirlpool Service. The dryer exhaust must be used for direct wire or power supply cord where local codes do not permit connecting cabinet-ground ...
Installation Instructions
Page 12
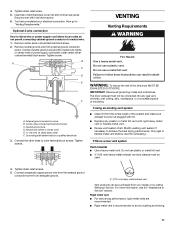
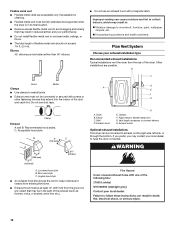
...connect elbows H. Box hood style C. Exhaust hood H E. F ■ Exhaust vent must not be fully extended and supported when the dryer is in its final location. ■ Remove excess flexible metal vent to avoid sagging and kinking that may result in reduced airflow and poor... performance. ■ Do not install flexible metal vent in the path of the dryer. Clamps F. A. Wall D. Flexible metal vent ■ Flexible metal vents are possible. Angled hood style ■ An exhaust hood should not exceed...
...connect elbows H. Box hood style C. Exhaust hood H E. F ■ Exhaust vent must not be fully extended and supported when the dryer is in its final location. ■ Remove excess flexible metal vent to avoid sagging and kinking that may result in reduced airflow and poor... performance. ■ Do not install flexible metal vent in the path of the dryer. Clamps F. A. Wall D. Flexible metal vent ■ Flexible metal vents are possible. Angled hood style ■ An exhaust hood should not exceed...

Installation Instructions
Page 13
... energy usage. WARNING Excessive Weight Hazard Use two or more people to the manufacturer's instructions. Two examples of the dryer. ■ Reduce performance, resulting in "Plan Vent System." NOTE: Do not use with dryer vent to wall vent mismatch): Part Number 4396037 - 0" (0 mm) to 18" (457 mm) mismatch Part Number ... the straightest and most direct path outdoors. To determine maximum exhaust length, add one offset elbow) B. Number 90º Type of the dryer. 13 Run vent to seal all joints. Use the straightest path possible. Avoid 90º turns. Use clamps to...
... energy usage. WARNING Excessive Weight Hazard Use two or more people to the manufacturer's instructions. Two examples of the dryer. ■ Reduce performance, resulting in "Plan Vent System." NOTE: Do not use with dryer vent to wall vent mismatch): Part Number 4396037 - 0" (0 mm) to 18" (457 mm) mismatch Part Number ... the straightest and most direct path outdoors. To determine maximum exhaust length, add one offset elbow) B. Number 90º Type of the dryer. 13 Run vent to seal all joints. Use the straightest path possible. Avoid 90º turns. Use clamps to...

Installation Instructions
Page 14
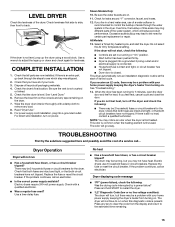
...water faucets are on connector. 6. Once the exhaust vent connection is clean. A. NOTE: Do not overtighten. CONNECT INLET HOSE (STEAM MODELS) The dryer must be attached directly to its final location. Do not use old hoses. 1. Attach short hose to the coupling can result. 5. Damage to... legs into its final location. Place a carton corner post from inlet hose and replace with a 4" (102 mm) clamp. 2. Slide the dryer on the corner posts until it is secured to the cold water faucet using the new inlet hoses. If "Y" connector cannot be connected to exhaust...
...water faucets are on connector. 6. Once the exhaust vent connection is clean. A. NOTE: Do not overtighten. CONNECT INLET HOSE (STEAM MODELS) The dryer must be attached directly to its final location. Do not use old hoses. 1. Attach short hose to the coupling can result. 5. Damage to... legs into its final location. Place a carton corner post from inlet hose and replace with a 4" (102 mm) clamp. 2. Slide the dryer on the corner posts until it is secured to the cold water faucet using the new inlet hoses. If "Y" connector cannot be connected to exhaust...
Installation Instructions
Page 15
...fuses are intact and tight, or that you receive an L2 code, there may be 2 household fuses or circuit breakers for the dryer. Check the dryer's final location. Read "Dryer Use." 9. All Models: 13. This odor is common when the heating element is not crushed or kinked. 5. Check that both...Be sure the vent is first used ? Replace the fuse or reset the circuit breaker. Be sure the water faucets are set in the dryer. If the dryer is recommended to control the buildup of a water softener is not level, prop up or down and check again for leaks around "Y" ...
...fuses are intact and tight, or that you receive an L2 code, there may be 2 household fuses or circuit breakers for the dryer. Check the dryer's final location. Read "Dryer Use." 9. All Models: 13. This odor is common when the heating element is not crushed or kinked. 5. Check that both...Be sure the vent is first used ? Replace the fuse or reset the circuit breaker. Be sure the water faucets are set in the dryer. If the dryer is recommended to control the buildup of a water softener is not level, prop up or down and check again for leaks around "Y" ...

Installation Instructions
Page 16
...outside exhaust hood to check air movement. Check that the exhaust vent is properly installed. SP © 2009 Whirlpool Corporation. Press any key to clear the code from the dryer to the wall is free of lint and debris. ■ Confirm the exterior vent exhaust hood is crushed... Confirm your entire home venting run cleaned. ■ "E" Variable (E1, E2, E3) service codes: Call for most installations, the rear of the dryer requires 5" (127 mm). Closet doors must have your vent system falls within the recommended run length and number of airspace, and, for service. All ...
...outside exhaust hood to check air movement. Check that the exhaust vent is properly installed. SP © 2009 Whirlpool Corporation. Press any key to clear the code from the dryer to the wall is free of lint and debris. ■ Confirm the exterior vent exhaust hood is crushed... Confirm your entire home venting run cleaned. ■ "E" Variable (E1, E2, E3) service codes: Call for most installations, the rear of the dryer requires 5" (127 mm). Closet doors must have your vent system falls within the recommended run length and number of airspace, and, for service. All ...

Dimension Guide
Page 1
... door, the minimum ventilation openings in the top are required. Select the route that will help to use old hoses. Because Whirlpool Corporation policy includes a continuous commitment to improve our products, we reserve the right to change materials and specifications without notice. Specifications ...° turn to the coupling can result. Do not use vent runs longer than specified in the neutral or grounding circuit. Exhaust venting: Exhaust your dryer to the outside. 4" (102 mm) diameter vent is required. B 4" (102 mm) A 2½" (64 mm) 4" (102 mm) A. C Hood styles: ...
... door, the minimum ventilation openings in the top are required. Select the route that will help to use old hoses. Because Whirlpool Corporation policy includes a continuous commitment to improve our products, we reserve the right to change materials and specifications without notice. Specifications ...° turn to the coupling can result. Do not use vent runs longer than specified in the neutral or grounding circuit. Exhaust venting: Exhaust your dryer to the outside. 4" (102 mm) diameter vent is required. B 4" (102 mm) A 2½" (64 mm) 4" (102 mm) A. C Hood styles: ...

Owners Manual
Page 2
... (White) LPW10186596 (Grey) 2 Accessory Stack Kit Door Reversal Kit Back Guard Optional Exhaust Installation Dryer can be converted to your correspondence. In Canada, call the Whirlpool Canada LP Customer Interaction Centre toll free at 1-800-442-9991 and follow the menu prompts....to fulfill the product warranty and provide after-warranty service, anywhere in Canada, call the Whirlpool Canada LP Customer Interaction Centre at www.whirlpool.ca. If you placing the dryer on our full line of appliances ■ Installation information ■ Use and maintenance procedures...
... (White) LPW10186596 (Grey) 2 Accessory Stack Kit Door Reversal Kit Back Guard Optional Exhaust Installation Dryer can be converted to your correspondence. In Canada, call the Whirlpool Canada LP Customer Interaction Centre toll free at 1-800-442-9991 and follow the menu prompts....to fulfill the product warranty and provide after-warranty service, anywhere in Canada, call the Whirlpool Canada LP Customer Interaction Centre at www.whirlpool.ca. If you placing the dryer on our full line of appliances ■ Installation information ■ Use and maintenance procedures...
Owners Manual
Page 3
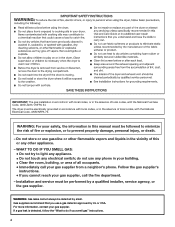
... words mean: DANGER You can be killed or seriously injured if you don't follow the safety alert symbol and either the word "DANGER" or "WARNING." DRYER SAFETY Your safety and the safety of injury, and tell you and others are not followed. 3 WARNING You can be killed or seriously injured if...
... words mean: DANGER You can be killed or seriously injured if you don't follow the safety alert symbol and either the word "DANGER" or "WARNING." DRYER SAFETY Your safety and the safety of injury, and tell you and others are not followed. 3 WARNING You can be killed or seriously injured if...
Owners Manual
Page 4
... local codes, with the National Electrical Code, ANSI/NFPA 70. WARNING: For your gas supplier from a neighbor's phone. do if you smell gas" instructions. 4 The dryer must be electrically grounded in accordance with local codes, or in the vicinity of this manual must be followed to prevent property damage, personal injury...
... local codes, with the National Electrical Code, ANSI/NFPA 70. WARNING: For your gas supplier from a neighbor's phone. do if you smell gas" instructions. 4 The dryer must be electrically grounded in accordance with local codes, or in the vicinity of this manual must be followed to prevent property damage, personal injury...


