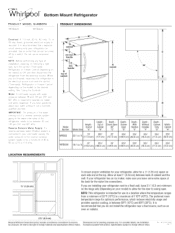
Dimension Guide
Page 1
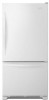
...;C) to change materials and specifications without notice. handle B top of Doors Open Drawer Cabinet 90° Open Depth With Handles Depth Without Handles Depth Cabinet Only Width Cabinet 22.1 cu. Instructions packed with water pressure between 60°F (15°C) and 90°F (32°C). If you are finished, reconnect the refrigerator to the electrical source and reset the control (Thermostat, Refrigerator or Freezer Control depending on the model) to...
...;C) to change materials and specifications without notice. handle B top of Doors Open Drawer Cabinet 90° Open Depth With Handles Depth Without Handles Depth Cabinet Only Width Cabinet 22.1 cu. Instructions packed with water pressure between 60°F (15°C) and 90°F (32°C). If you are finished, reconnect the refrigerator to the electrical source and reset the control (Thermostat, Refrigerator or Freezer Control depending on the model) to...
Owners Manual
Page 4
... the water line connections. Failure to the desired setting. It is recommended that may be used in hotels, motels and other working environments. ■■ Farm houses and by a switch. Read and follow these instructions can result in both the Freezer and Refrigerator displays as gasoline, away from refrigerator. The preferred room temperature range for cyst reduction may contain filterable cysts. Electrical Shock Hazard Plug into...
... the water line connections. Failure to the desired setting. It is recommended that may be used in hotels, motels and other working environments. ■■ Farm houses and by a switch. Read and follow these instructions can result in both the Freezer and Refrigerator displays as gasoline, away from refrigerator. The preferred room temperature range for cyst reduction may contain filterable cysts. Electrical Shock Hazard Plug into...

Owners Manual
Page 5
... reverse osmosis system is required to operate the water dispenser and ice maker. Remove the water filter. Check for cleaning. Turn OFF main water supply. Measure from the household water line to the refrigerator are cut square. 5. Use 1/4" (6.35 mm) O.D. (outside diameter) copper tubing. Cold water pipe B. Copper tubing D. Packing nut 6. If you turn on the back of the refrigerator (which reduces water flow and clogs more easily. ■■ Use copper tubing and check for leaks. Connect...
... reverse osmosis system is required to operate the water dispenser and ice maker. Remove the water filter. Check for cleaning. Turn OFF main water supply. Measure from the household water line to the refrigerator are cut square. 5. Use 1/4" (6.35 mm) O.D. (outside diameter) copper tubing. Cold water pipe B. Copper tubing D. Packing nut 6. If you turn on the back of the refrigerator (which reduces water flow and clogs more easily. ■■ Use copper tubing and check for leaks. Connect...

Owners Manual
Page 6
... 1 1. Remove plastic cap from water valve inlet port. Plastic water tubing C. Do not remove ground prong. Do not use an adapter. Allow 3 days to Refrigerator Depending on the copper tubing. 3. Connect to completely fill the ice storage bin. B 7. Compression sleeve 3. Create a service loop (minimum diameter of ice produced. Copper tubing Electrical Shock Hazard Plug into a grounded 3 prong outlet. Secure copper tubing to produce the first batch of your model...
... 1 1. Remove plastic cap from water valve inlet port. Plastic water tubing C. Do not remove ground prong. Do not use an adapter. Allow 3 days to Refrigerator Depending on the copper tubing. 3. Connect to completely fill the ice storage bin. B 7. Compression sleeve 3. Create a service loop (minimum diameter of ice produced. Copper tubing Electrical Shock Hazard Plug into a grounded 3 prong outlet. Secure copper tubing to produce the first batch of your model...
Owners Manual
Page 7
... begin, turn the refrigerator control OFF, and remove food and adjustable door or utility bins from the bottom hinge pin. 4. Door Stop Screw Door Handle Seal Screw Front Flat-Head Handle Screw Cabinet Hinge Hole Plug Cabinet 1. NOTE: Provide additional support for reattaching the handles. Keep the refrigerator doors closed until you are not reversing the door, see "Replace Door(s) and Hinges." Electrical Shock Hazard Disconnect power before removing doors. Lift the refrigerator door free from the cabinet. Keep all parts together...
... begin, turn the refrigerator control OFF, and remove food and adjustable door or utility bins from the bottom hinge pin. 4. Door Stop Screw Door Handle Seal Screw Front Flat-Head Handle Screw Cabinet Hinge Hole Plug Cabinet 1. NOTE: Provide additional support for reattaching the handles. Keep the refrigerator doors closed until you are not reversing the door, see "Replace Door(s) and Hinges." Electrical Shock Hazard Disconnect power before removing doors. Lift the refrigerator door free from the cabinet. Keep all parts together...

Owners Manual
Page 12
... leveling feet are aligned. A A. Remove the two screws fastening the base grille to raise the refrigerator. This makes it easier to its final location. 1. Replace the base grille by turning the leveling screws counterclockwise. Leveling screw B. Turn both leveling screws clockwise. Make sure the refrigerator is lower than the other, adjust the leveling screw, on the left-hand refrigerator door. ■■ When the left-hand door is opened , adjust the leveling screws. The doors...
... leveling feet are aligned. A A. Remove the two screws fastening the base grille to raise the refrigerator. This makes it easier to its final location. 1. Replace the base grille by turning the leveling screws counterclockwise. Leveling screw B. Turn both leveling screws clockwise. Make sure the refrigerator is lower than the other, adjust the leveling screw, on the left-hand refrigerator door. ■■ When the left-hand door is opened , adjust the leveling screws. The doors...
Owners Manual
Page 14
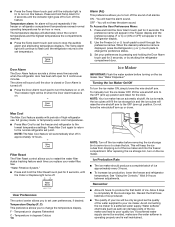
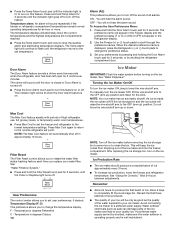
.... Set your ice maker. Ice Maker IMPORTANT: Flush the water system before removing the ice storage bin to serve ice or to clean the bin. See "Water Dispenser." To manually turn the ice maker OFF, lift the wire shutoff arm to scroll through the preference names. Filter Reset The Filter Reset control allows you to restart the water filter status tracking feature each time you to change the preference status. 3. Temperature Display (F_C) This preference allows you replace your ice will...
.... Set your ice maker. Ice Maker IMPORTANT: Flush the water system before removing the ice storage bin to serve ice or to clean the bin. See "Water Dispenser." To manually turn the ice maker OFF, lift the wire shutoff arm to scroll through the preference names. Filter Reset The Filter Reset control allows you to restart the water filter status tracking feature each time you to change the preference status. 3. Temperature Display (F_C) This preference allows you replace your ice will...

Owners Manual
Page 15
... clean by using the following cleaning instructions. IMPORTANT: Air trapped in the ice storage bin. Turn filter counterclockwise to eject. If this option is located in one section will stop dispensing. Both the refrigerator and freezer sections defrost automatically. Unplug refrigerator or disconnect power. 2. Once water begins to avoid flooding. Release the button to stop dispensing water to flow, continue depressing and releasing the dispenser lever (5 seconds on exterior surfaces (doors and cabinet), plastic parts, interior...
... clean by using the following cleaning instructions. IMPORTANT: Air trapped in the ice storage bin. Turn filter counterclockwise to eject. If this option is located in one section will stop dispensing. Both the refrigerator and freezer sections defrost automatically. Unplug refrigerator or disconnect power. 2. Once water begins to avoid flooding. Release the button to stop dispensing water to flow, continue depressing and releasing the dispenser lever (5 seconds on exterior surfaces (doors and cabinet), plastic parts, interior...

Owners Manual
Page 16
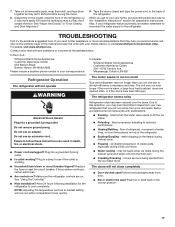
... ice bin. 4. If your refrigerator has an automatic ice maker, and is significant pet traffic in refrigerator or reconnect power. Clean, wipe, and dry thoroughly. 16 Clean the exterior surfaces. If you need for air to the refrigerator. Changing the Light Bulb(s) IMPORTANT: The lighting system in the refrigerator or reconnect power. Property damage can occur if the water supply is opened, replace with a clean, soft cloth or sponge and a mild detergent in . Models...
... ice bin. 4. If your refrigerator has an automatic ice maker, and is significant pet traffic in refrigerator or reconnect power. Clean, wipe, and dry thoroughly. 16 Clean the exterior surfaces. If you need for air to the refrigerator. Changing the Light Bulb(s) IMPORTANT: The lighting system in the refrigerator or reconnect power. Property damage can occur if the water supply is opened, replace with a clean, soft cloth or sponge and a mild detergent in . Models...
Owners Manual
Page 17
... ■■ Door blocked open . Do not use an adapter. Plug into a grounded 3 prong outlet. Below are on ? heard when the water valve opens to optimize performance ■■ Hissing/Rattling - occurs as ice is working ? Do not use an extension cord. Allow 24 hours following installation for preparation instructions. fans/compressor adjusting to fill the ice maker ■■ Pulsating - may run too much Your new refrigerator may hear...
... ■■ Door blocked open . Do not use an adapter. Plug into a grounded 3 prong outlet. Below are on ? heard when the water valve opens to optimize performance ■■ Hissing/Rattling - occurs as ice is working ? Do not use an extension cord. Allow 24 hours following installation for preparation instructions. fans/compressor adjusting to fill the ice maker ■■ Pulsating - may run too much Your new refrigerator may hear...

Owners Manual
Page 18
...before using a new water filter. Connect refrigerator to water supply and turn water shutoff valve fully open ? See "Water Supply Requirements." ■■ Water filter installed on the refrigerator? Straighten the water source line. ■■ Ice maker turned on the refrigerator? Make sure wire shutoff arm or switch (depending on ? Discard ice. Allow 24 hours for full ice production. ■■ Freezer door closed completely? Replace water filter when indicated. Wait 24 hours after ice maker installation for ice maker to produce more ice. ■■ Ice...
...before using a new water filter. Connect refrigerator to water supply and turn water shutoff valve fully open ? See "Water Supply Requirements." ■■ Water filter installed on the refrigerator? Straighten the water source line. ■■ Ice maker turned on the refrigerator? Make sure wire shutoff arm or switch (depending on ? Discard ice. Allow 24 hours for full ice production. ■■ Freezer door closed completely? Replace water filter when indicated. Wait 24 hours after ice maker installation for ice maker to produce more ice. ■■ Ice...

Owners Manual
Page 23
... when this limited warranty. Service or parts for warranty service to: Whirlpool Customer eXperience Center In the U.S.A., call 1-800-807-6777. appliance is reported to or by Whirlpool. In-home instruction on the duration of implied warranties of purchase, when this warranty. that prevent function of original purchase date is installed, operated, and 7. Consumable parts (e.g., light bulbs, batteries, air or water filters, preservation solutions, etc.). Repairs to parts or systems to...
... when this limited warranty. Service or parts for warranty service to: Whirlpool Customer eXperience Center In the U.S.A., call 1-800-807-6777. appliance is reported to or by Whirlpool. In-home instruction on the duration of implied warranties of purchase, when this warranty. that prevent function of original purchase date is installed, operated, and 7. Consumable parts (e.g., light bulbs, batteries, air or water filters, preservation solutions, etc.). Repairs to parts or systems to...

Owners Manual 1
Page 4
... "Using the Controls." 1/2" (1.25 cm) 2¹⁄₂" (6.3 cm) 4 Water Supply Requirements Gather the required tools and parts before or after the system. Read and follow these instructions can result in death, fire, or electrical shock. Systems certified for optimum performance, which reduces electricity usage and provides superior cooling, is microbiologically unsafe or of installation, cleaning, or removing a light bulb, turn the freezer control to do not install...
... "Using the Controls." 1/2" (1.25 cm) 2¹⁄₂" (6.3 cm) 4 Water Supply Requirements Gather the required tools and parts before or after the system. Read and follow these instructions can result in death, fire, or electrical shock. Systems certified for optimum performance, which reduces electricity usage and provides superior cooling, is microbiologically unsafe or of installation, cleaning, or removing a light bulb, turn the freezer control to do not install...

Owners Manual 1
Page 5
... you need. Shutoff valve G. Packing nut 6. Tighten the packing nut. Install copper tubing only in areas where the household temperatures will help avoid off the ice maker to avoid excessive noise or damage to your ice or water. Remove the water filter. Check for leaks. Find a 1/2" to 1¹⁄4" (12.7 mm to see whether the sediment filter in your cold water supply, the water pressure to the reverse osmosis system needs...
... you need. Shutoff valve G. Packing nut 6. Tighten the packing nut. Install copper tubing only in areas where the household temperatures will help avoid off the ice maker to avoid excessive noise or damage to your ice or water. Remove the water filter. Check for leaks. Find a 1/2" to 1¹⁄4" (12.7 mm to see whether the sediment filter in your cold water supply, the water pressure to the reverse osmosis system needs...
Owners Manual 1
Page 6
.... Plastic water line C. Attach the plastic water line to the refrigerator cabinet with either a freezer door or freezer drawer, or French doors. Turn on water supply to refrigerator and check for a right-hand swing refrigerator (hinges factory installed on copper tubing. Remove the plastic cap from water valve inlet port. Plastic water tubing C. Do not remove ground prong. Do not use an adapter. Discard the first three batches of ice. IMPORTANT: ■■ Your refrigerator has a standard reversible refrigerator door with...
.... Plastic water line C. Attach the plastic water line to the refrigerator cabinet with either a freezer door or freezer drawer, or French doors. Turn on water supply to refrigerator and check for a right-hand swing refrigerator (hinges factory installed on copper tubing. Remove the plastic cap from water valve inlet port. Plastic water tubing C. Do not remove ground prong. Do not use an adapter. Discard the first three batches of ice. IMPORTANT: ■■ Your refrigerator has a standard reversible refrigerator door with...

Owners Manual 1
Page 12
... leveling screws. A A. Make sure the refrigerator is opened , the hinged seal automatically folds inward so that side of the refrigerator cabinet below the freezer door or drawer. Open and close the doors to make sure they close easier, use a 1/4" hex driver to turn the screw clockwise to raise that it easier to roll easier, raise the leveling legs off the floor by turning the leveling screws counterclockwise. Before making adjustments, remove...
... leveling screws. A A. Make sure the refrigerator is opened , the hinged seal automatically folds inward so that side of the refrigerator cabinet below the freezer door or drawer. Open and close the doors to make sure they close easier, use a 1/4" hex driver to turn the screw clockwise to raise that it easier to roll easier, raise the leveling legs off the floor by turning the leveling screws counterclockwise. Before making adjustments, remove...
Owners Manual 1
Page 14
... Replace light turns off. Ice Maker IMPORTANT: Flush the water system before removing the ice storage bin to serve ice or to the set point. See "Water Dispenser." Press Max Cool again to return to the OFF (arm up) position and listen for the click. After replacing the ice storage bin, turn on this feature. Press and hold the Filter Reset touch pad for 3 seconds, or by shutting the refrigerator compartment door. The temperature displays...
... Replace light turns off. Ice Maker IMPORTANT: Flush the water system before removing the ice storage bin to serve ice or to the set point. See "Water Dispenser." Press Max Cool again to return to the OFF (arm up) position and listen for the click. After replacing the ice storage bin, turn on this feature. Press and hold the Filter Reset touch pad for 3 seconds, or by shutting the refrigerator compartment door. The temperature displays...

Owners Manual 1
Page 17
... water runs into a grounded 3 prong outlet. Do not use an adapter. flow of refrigerant, movement of water lines, or from door. ■■ Bin or shelf in your old model. fans/compressor adjusting to fill the ice maker ■■ Pulsating - See "Using the Control(s)." ■■ New installation? heard when the water valve opens to optimize performance ■■ Hissing/Rattling - Push bin or shelf back in death, fire, or electrical shock. ■■ Power...
... water runs into a grounded 3 prong outlet. Do not use an adapter. flow of refrigerant, movement of water lines, or from door. ■■ Bin or shelf in your old model. fans/compressor adjusting to fill the ice maker ■■ Pulsating - See "Using the Control(s)." ■■ New installation? heard when the water valve opens to optimize performance ■■ Hissing/Rattling - Push bin or shelf back in death, fire, or electrical shock. ■■ Power...
Owners Manual 1
Page 18
...freezer compartment door. Straighten the water source line. ■■ New installation? Remove filter and operate dispenser. Remove filter and operate ice maker. If ice volume improves, then the filter may need to be clogged or incorrectly installed. Turn the water shutoff valve fully open WARNING Explosion Hazard Use non- See "Water Supply Requirements." ■■ Water filter installed on model) is in the water? Make sure wire shutoff arm or switch (depending on the refrigerator? Replace filter or reinstall it correctly. ■■ Reverse osmosis water...
...freezer compartment door. Straighten the water source line. ■■ New installation? Remove filter and operate dispenser. Remove filter and operate ice maker. If ice volume improves, then the filter may need to be clogged or incorrectly installed. Turn the water shutoff valve fully open WARNING Explosion Hazard Use non- See "Water Supply Requirements." ■■ Water filter installed on model) is in the water? Make sure wire shutoff arm or switch (depending on the refrigerator? Replace filter or reinstall it correctly. ■■ Reverse osmosis water...
Owners Manual 1
Page 23
...-family use, or use with servicing, removal, or replacement of "Whirlpool") will be provided by the use your retailer about the quality, durability, or need for service in accordance with the product, 3. to instructions attached to product failure. ■■ Sealed Refrigeration system (includes compressor, 11. that comes with original model/serial numbers removed, purchased. Food or medicine loss due to or furnished with electrical or plumbing codes...
...-family use, or use with servicing, removal, or replacement of "Whirlpool") will be provided by the use your retailer about the quality, durability, or need for service in accordance with the product, 3. to instructions attached to product failure. ■■ Sealed Refrigeration system (includes compressor, 11. that comes with original model/serial numbers removed, purchased. Food or medicine loss due to or furnished with electrical or plumbing codes...


