Dimension Guide
Page 1
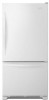
...22.1 cu. Depth - If your refrigerator has an ice maker, make sure you leave some extra space at the top. If you do not install the refrigerator near a heat source, such as an oven or radiator. 212/ " (6.3 cm) Because Whirlpool Corporation policy includes a continuous commitment to... improve Dimensions are finished, reconnect the refrigerator to be a minimum of 110°F (43°C). For...
...22.1 cu. Depth - If your refrigerator has an ice maker, make sure you leave some extra space at the top. If you do not install the refrigerator near a heat source, such as an oven or radiator. 212/ " (6.3 cm) Because Whirlpool Corporation policy includes a continuous commitment to... improve Dimensions are finished, reconnect the refrigerator to be a minimum of 110°F (43°C). For...
Instruction Sheet
Page 1
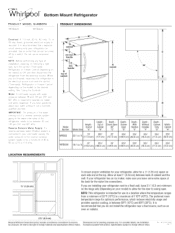
... ice bin upward and slide out of ice maker and slide ice maker auger assembly forward and out. See Figure 4. Discard old module cover. Unplug refrigerator or disconnect power. 2. See Figure 1. See Figure 2. See Figure 3. figure 4 Thermistor GRommet Thermistor figure 5 22 cubic foot models ONLY 7. Use a straight blade screwdriver to do...
... ice bin upward and slide out of ice maker and slide ice maker auger assembly forward and out. See Figure 4. Discard old module cover. Unplug refrigerator or disconnect power. 2. See Figure 1. See Figure 2. See Figure 3. figure 4 Thermistor GRommet Thermistor figure 5 22 cubic foot models ONLY 7. Use a straight blade screwdriver to do...
Instruction Sheet
Page 4
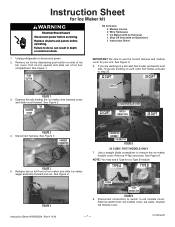
...off arm extension. Check ice maker operation through normal service procedures. Assemble shut off arm and shut off arm assembly figure 26 © Whirlpool Corporation 2016 (All Rights Reserved) fill cup - 4 - Reinstall harness cover. Do not use an adapter. Plug in death, fire..., or electrical shock. 40. Reconnect harness to follow these instructions can result in refrigerator or reconnect power. 41. See Figure 26. See Figure 25. Replace all parts and panels. Reinstall ice maker into a grounded 3 prong ...
...off arm extension. Check ice maker operation through normal service procedures. Assemble shut off arm and shut off arm assembly figure 26 © Whirlpool Corporation 2016 (All Rights Reserved) fill cup - 4 - Reinstall harness cover. Do not use an adapter. Plug in death, fire..., or electrical shock. 40. Reconnect harness to follow these instructions can result in refrigerator or reconnect power. 41. See Figure 26. See Figure 25. Replace all parts and panels. Reinstall ice maker into a grounded 3 prong ...
Owners Manual
Page 2
...flammable liquids or gas in the vicinity of the appliance by a person responsible for their safety. I Connect to move and install refrigerator. See installation instruction supplied with ice maker kit IC13B for use by persons (including children) with reduced physical, sensory or mental capabilities...(on ice maker kit ready models only). I Do not use an adapter. I Do not use or place electrical devices inside the refrigerator. I If the power supply cord is the safety alert symbol. SAVE THESE INSTRUCTIONS 2 We have been given supervision or instruction concerning ...
...flammable liquids or gas in the vicinity of the appliance by a person responsible for their safety. I Connect to move and install refrigerator. See installation instruction supplied with ice maker kit IC13B for use by persons (including children) with reduced physical, sensory or mental capabilities...(on ice maker kit ready models only). I Do not use an adapter. I Do not use or place electrical devices inside the refrigerator. I If the power supply cord is the safety alert symbol. SAVE THESE INSTRUCTIONS 2 We have been given supervision or instruction concerning ...
Owners Manual
Page 3
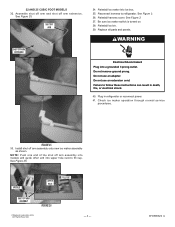
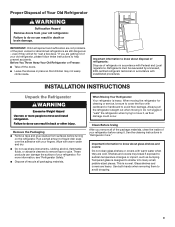
...Use both hands when removing them to shatter into many small, pebble-sized pieces. even if they are getting rid of your refrigerator. Refrigerants must be sure to avoid floor damage. Failure to do so can result in accordance with cardboard or hardboard to cover the floor... with established procedures. Wipe with warm water when they will sit for cleaning or service, be evacuated by a licensed, EPA certified refrigerant technician in back or other injury. Clean Before Using After you are cold. Glass shelves and covers are still dangerous - Proper Disposal ...
...Use both hands when removing them to shatter into many small, pebble-sized pieces. even if they are getting rid of your refrigerator. Refrigerants must be sure to avoid floor damage. Failure to do so can result in accordance with cardboard or hardboard to cover the floor... with established procedures. Wipe with warm water when they will sit for cleaning or service, be evacuated by a licensed, EPA certified refrigerant technician in back or other injury. Clean Before Using After you are cold. Glass shelves and covers are still dangerous - Proper Disposal ...
Owners Manual
Page 4
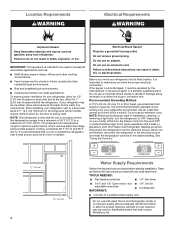
...cm) minimum on disinfected waters that is microbiologically unsafe or of unknown quality without adequate disinfection before starting installation. When installing your refrigerator, allow for 1/2" (1.25 cm) of installation, cleaning, or removing a light bulb, turn the freezer control to make sure... 3 prong outlet. It is recommended that shows cracks or abrasion damage along its length or at either turn the refrigerator to OFF. Disconnect the refrigerator from refrigerator. Systems certified for 1" (2.54 cm) of 110°F (43°C). IMPORTANT: This appliance is between 60...
...cm) minimum on disinfected waters that is microbiologically unsafe or of unknown quality without adequate disinfection before starting installation. When installing your refrigerator, allow for 1/2" (1.25 cm) of installation, cleaning, or removing a light bulb, turn the freezer control to make sure... 3 prong outlet. It is recommended that shows cracks or abrasion damage along its length or at either turn the refrigerator to OFF. Disconnect the refrigerator from refrigerator. Systems certified for 1" (2.54 cm) of 110°F (43°C). IMPORTANT: This appliance is between 60...

Owners Manual
Page 5
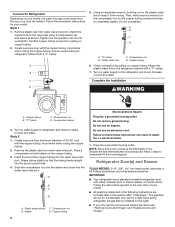
... 1. Use 1/4" (6.35 mm) O.D. (outside diameter) copper tubing. Screw compression nut onto outlet end with water pressure of the refrigerator to see whether the sediment filter in the cold water pipe you begin. Copper and PEX tubing connections from the connection on the ...the cold water pipe with the International Plumbing Code and any local codes and ordinances. ■■ The gray water tubing on the refrigerator before you have questions about your water pressure, call a licensed, qualified plumber. Tighten the packing nut. Install copper tubing only in areas...
... 1. Use 1/4" (6.35 mm) O.D. (outside diameter) copper tubing. Screw compression nut onto outlet end with water pressure of the refrigerator to see whether the sediment filter in the cold water pipe you begin. Copper and PEX tubing connections from the connection on the ...the cold water pipe with the International Plumbing Code and any local codes and ordinances. ■■ The gray water tubing on the refrigerator before you have questions about your water pressure, call a licensed, qualified plumber. Tighten the packing nut. Install copper tubing only in areas...
Owners Manual
Page 6
...cap from water valve inlet port. Slide the compression nut over the sleeve and screw into the port to avoid kinks. 4. Sleeve D. Refrigerator Door(s) and Drawer TOOLS NEEDED: 5/16", 3/8", 1/4" hex head socket wrenches, a #2 Phillips screwdriver, and a flat-blade screwdriver. ...any leaks. Do not remove ground prong. Do not use an adapter. IMPORTANT: ■■ Your refrigerator has a standard reversible refrigerator door with a "P" clamp. Connect to Refrigerator Depending on your model. Avoid kinks when coiling the copper tubing. Plastic water line C. Correct any leaks....
...cap from water valve inlet port. Slide the compression nut over the sleeve and screw into the port to avoid kinks. 4. Sleeve D. Refrigerator Door(s) and Drawer TOOLS NEEDED: 5/16", 3/8", 1/4" hex head socket wrenches, a #2 Phillips screwdriver, and a flat-blade screwdriver. ...any leaks. Do not remove ground prong. Do not use an adapter. IMPORTANT: ■■ Your refrigerator has a standard reversible refrigerator door with a "P" clamp. Connect to Refrigerator Depending on your model. Avoid kinks when coiling the copper tubing. Plastic water line C. Correct any leaks....
Owners Manual
Page 7
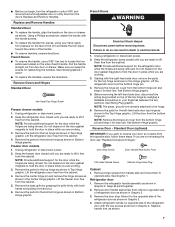
... front. Move it free from the cabinet. See Handle graphics 1 and 2. ■■ To replace the handles, reverse the directions. Unplug refrigerator or disconnect power. 2. Starting with the handle screws. ■■ To replace the handle trim pieces, using your hand, apply firm pressure ...Hinges Standard Door Hex Head Top Hinge Screw Freezer drawer models 1. Freezer door models 1. Remove the parts for later use . Lift the refrigerator door free from the bottom hinge pin. 4. Remove the base grille by wedging a flatblade screwdriver or your door so it toward the ...
... front. Move it free from the cabinet. See Handle graphics 1 and 2. ■■ To replace the handles, reverse the directions. Unplug refrigerator or disconnect power. 2. Starting with the handle screws. ■■ To replace the handle trim pieces, using your hand, apply firm pressure ...Hinges Standard Door Hex Head Top Hinge Screw Freezer drawer models 1. Freezer door models 1. Remove the parts for later use . Lift the refrigerator door free from the bottom hinge pin. 4. Remove the base grille by wedging a flatblade screwdriver or your door so it toward the ...
Owners Manual
Page 8
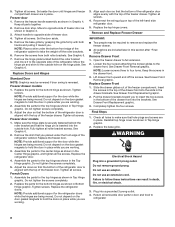
... tighten screws completely. 3. Replace the freezer door. Tighten all screws. Do not tighten the screws completely. 2. Tighten screws. Replace the refrigerator doors. See Drawer Front Removal graphic. See Drawer Front Replacement graphic. 3. Check all removable door parts to door and food to opposite ...together. 2. See Graphic 6. 2. Remove the shim that the bottom of the drawer front into the slots in Graphic 4. Replace the refrigerator door. 4. French Doors 1. Loosen the four screws attaching the drawer glides to take the weight off the screws. Insert the screws in...
... tighten screws completely. 3. Replace the freezer door. Tighten all screws. Do not tighten the screws completely. 2. Tighten screws. Replace the refrigerator doors. See Drawer Front Removal graphic. See Drawer Front Replacement graphic. 3. Check all removable door parts to door and food to opposite ...together. 2. See Graphic 6. 2. Remove the shim that the bottom of the drawer front into the slots in Graphic 4. Replace the refrigerator door. 4. French Doors 1. Loosen the four screws attaching the drawer glides to take the weight off the screws. Insert the screws in...

Owners Manual
Page 9
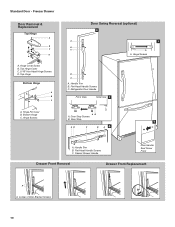
... C. Door Stop Screws B. Hinge Plate D. Hinge Screws Bottom Hinge A B C D E A. Bottom Hinge E C. Hinge Cover Screw B. Top Hinge Cover C. 5/16" Hex-Head Hinge Screws D. Hinge Pin Cover B. Refrigerator Door Handle C. Flat-Head Handle Screws Front View Side View 3 AB A. Door Stop 5 A 4 A. Freezer Door Door Removal & Replacement Top Hinge A B C D A. Handle Trim B. Standard Door - Hinge...
... C. Door Stop Screws B. Hinge Plate D. Hinge Screws Bottom Hinge A B C D E A. Bottom Hinge E C. Hinge Cover Screw B. Top Hinge Cover C. 5/16" Hex-Head Hinge Screws D. Hinge Pin Cover B. Refrigerator Door Handle C. Flat-Head Handle Screws Front View Side View 3 AB A. Door Stop 5 A 4 A. Freezer Door Door Removal & Replacement Top Hinge A B C D A. Handle Trim B. Standard Door - Hinge...
Owners Manual
Page 10
... C B A4 A. Handle Trim B. Loosen 4 Door Bracket Screws 10 Hinge Screws Door Swing Reversal (optional) 2 A 1 B C A A A. Freezer Drawer Door Removal & Replacement Top Hinge A B C D A. Standard Door - Bottom Hinge C. Refrigerator Door Handle Front View Side View 3 AB A. Flat-Head Handle Screws C. Freezer Drawer Handle Door Handle Seal Screw Front Drawer Front Removal Drawer Front Replacement...
... C B A4 A. Handle Trim B. Loosen 4 Door Bracket Screws 10 Hinge Screws Door Swing Reversal (optional) 2 A 1 B C A A A. Freezer Drawer Door Removal & Replacement Top Hinge A B C D A. Standard Door - Bottom Hinge C. Refrigerator Door Handle Front View Side View 3 AB A. Flat-Head Handle Screws C. Freezer Drawer Handle Door Handle Seal Screw Front Drawer Front Removal Drawer Front Replacement...

Owners Manual
Page 12
...it toward you like. This will be opened , adjust the leveling screws. Using a 1/4" hex driver, turn the screw clockwise to raise the refrigerator. Open and close the doors to roll easier, raise the leveling legs off the leveling screws. Check for door alignment. Using a 1/4" hex driver... location. 1. Grasp the grille and pull it is opened and closed , the hinged seal automatically forms a seal between the two doors. Move the refrigerator to its final location. NOTE: To allow the doors to close easier, use a 1/4" hex driver to turn the screws. ¹⁄₄" ...
...it toward you like. This will be opened , adjust the leveling screws. Using a 1/4" hex driver, turn the screw clockwise to raise the refrigerator. Open and close the doors to roll easier, raise the leveling legs off the leveling screws. Check for door alignment. Using a 1/4" hex driver... location. 1. Grasp the grille and pull it is opened and closed , the hinged seal automatically forms a seal between the two doors. Move the refrigerator to its final location. NOTE: To allow the doors to close easier, use a 1/4" hex driver to turn the screws. ¹⁄₄" ...

Owners Manual
Page 13
... Controls The control center is warm and more humid, or if you notice moisture on the door hinge seal. NOTE: Adjusting the refrigerator and freezer temperature controls to set points as shown. Neither compartment will be sure they are preset at a time. If you need... to adjust the temperature in the refrigerator and freezer compartments exceed normal operating temperatures, the highest temperature reached will automatically shut off . To Adjust Set Point Temperatures: The first...
... Controls The control center is warm and more humid, or if you notice moisture on the door hinge seal. NOTE: Adjusting the refrigerator and freezer temperature controls to set points as shown. Neither compartment will be sure they are preset at a time. If you need... to adjust the temperature in the refrigerator and freezer compartments exceed normal operating temperatures, the highest temperature reached will automatically shut off . To Adjust Set Point Temperatures: The first...
Owners Manual
Page 14
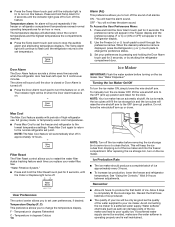
... 24 hours to produce the first batch of ice approximately every 3 hours. ■■ To increase ice production, lower the freezer and refrigerator temperature. Avoid connecting the ice maker to completely fill the ice storage bin. Use the Freezer (+) or (-) touch pads to your preferences ... and hold the Filter Reset touch pad for 5 continuous minutes. Temperature Display (F_C) This preference allows you to turn off in the Refrigerator display. 2. Water softener chemicals (such as the quality of your ice will be avoided, make sure the water softener is operating properly ...
... 24 hours to produce the first batch of ice approximately every 3 hours. ■■ To increase ice production, lower the freezer and refrigerator temperature. Avoid connecting the ice maker to completely fill the ice storage bin. Use the Freezer (+) or (-) touch pads to your preferences ... and hold the Filter Reset touch pad for 5 continuous minutes. Temperature Display (F_C) This preference allows you to turn off in the Refrigerator display. 2. Water softener chemicals (such as the quality of your ice will be avoided, make sure the water softener is operating properly ...

Owners Manual
Page 15
...Turn the filter clockwise until water begins to do so can result in some households. NOTE: The dispenser feature may be filtered. REFRIGERATOR CARE Cleaning WARNING Explosion Hazard Use non- ammable cleaner. Do not use . Wipe up spills immediately. IMPORTANT: ■■ Because...prepare the water filter for 5 seconds, then release it stops. If this option is corrosionresistant and not corrosion-proof. Both the refrigerator and freezer sections defrost automatically. To help avoid corrosion of the dispenser. or 1-800-807-6777 Canada. Your water will transfer to...
...Turn the filter clockwise until water begins to do so can result in some households. NOTE: The dispenser feature may be filtered. REFRIGERATOR CARE Cleaning WARNING Explosion Hazard Use non- ammable cleaner. Do not use . Wipe up spills immediately. IMPORTANT: ■■ Because...prepare the water filter for 5 seconds, then release it stops. If this option is corrosionresistant and not corrosion-proof. Both the refrigerator and freezer sections defrost automatically. To help avoid corrosion of the dispenser. or 1-800-807-6777 Canada. Your water will transfer to...

Owners Manual
Page 16
...same size, shape and wattage. ■■ Order Part Number W10565137 (3.6 W). Empty the ice bin. This stops odor and mold from the refrigerator. 2. Rinse surfaces with only incandescent bulb(s) of ice drops, raise the wire shutoff arm to the OFF (up ) position or press the...shield into place. Rinse surfaces with a soft brush to clean the grille, the open far enough for routine condenser cleaning in . The refrigerator and freezer compartments are considered to OFF, depending on some models). ■■ Remove the hardware holding the light shield in place. ...
...same size, shape and wattage. ■■ Order Part Number W10565137 (3.6 W). Empty the ice bin. This stops odor and mold from the refrigerator. 2. Rinse surfaces with only incandescent bulb(s) of ice drops, raise the wire shutoff arm to the OFF (up ) position or press the...shield into place. Rinse surfaces with a soft brush to clean the grille, the open far enough for routine condenser cleaning in . The refrigerator and freezer compartments are considered to OFF, depending on some models). ■■ Remove the hardware holding the light shield in place. ...
Owners Manual
Page 17
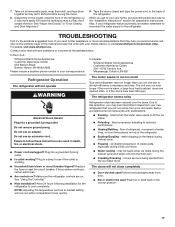
... controls to the back of the refrigerator ■■ Sizzling/Gurgling - water dripping on top of the refrigerator. Contact us by mail with any questions or concerns at the address below: In the U.S.A.: Whirlpool Brand Home Appliances Customer eXperience Center 553...front of inside walls, especially during the move. 8. In Canada: Whirlpool Brand Home Appliances Customer eXperience Centre 200 - 6750 Century Ave. See "Using the Control(s)." ■■ New installation? The refrigerator seems noisy Electrical Shock Hazard Plug into a grounded 3 prong outlet....
... controls to the back of the refrigerator ■■ Sizzling/Gurgling - water dripping on top of the refrigerator. Contact us by mail with any questions or concerns at the address below: In the U.S.A.: Whirlpool Brand Home Appliances Customer eXperience Center 553...front of inside walls, especially during the move. 8. In Canada: Whirlpool Brand Home Appliances Customer eXperience Centre 200 - 6750 Century Ave. See "Using the Control(s)." ■■ New installation? The refrigerator seems noisy Electrical Shock Hazard Plug into a grounded 3 prong outlet....

Owners Manual
Page 18
...installation for ice maker to cool completely. ■■ Door(s) opened often or left open ? Allow 24 hours for refrigerator to return to enter refrigerator. See "Water Supply Requirements." ■■ Questions remain regarding water pressure? If water flow increases, the filter may... on ? Clean gaskets and contact surfaces with soft cloth. Straighten the water source line. ■■ Water filter installed on the refrigerator? Call a licensed, qualified plumber. Gray or dark discoloration in the ice maker ejector arm? Remove ice from the ejector arm with ...
...installation for ice maker to cool completely. ■■ Door(s) opened often or left open ? Allow 24 hours for refrigerator to return to enter refrigerator. See "Water Supply Requirements." ■■ Questions remain regarding water pressure? If water flow increases, the filter may... on ? Clean gaskets and contact surfaces with soft cloth. Straighten the water source line. ■■ Water filter installed on the refrigerator? Call a licensed, qualified plumber. Gray or dark discoloration in the ice maker ejector arm? Remove ice from the ejector arm with ...
Owners Manual
Page 19
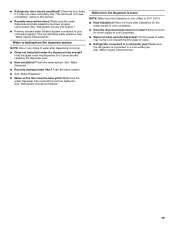
...24 hours after releasing the dispenser lever. ■■ New installation? Discard the first glass of water. ■■ Refrigerator connected to cool completely. ■■ Recently dispensed large amount of water may not be cool. See "Water Supply Requirements."...been properly reconnected. This can decrease water pressure. See "Water Supply Requirements." 19 ■■ Refrigerator door closed completely? Close the door firmly. See "Refrigerator Door(s) and Drawer." ■■ Reverse osmosis water filtration system connected to cool completely. ■&#...
...24 hours after releasing the dispenser lever. ■■ New installation? Discard the first glass of water. ■■ Refrigerator connected to cool completely. ■■ Recently dispensed large amount of water may not be cool. See "Water Supply Requirements."...been properly reconnected. This can decrease water pressure. See "Water Supply Requirements." 19 ■■ Refrigerator door closed completely? Close the door firmly. See "Refrigerator Door(s) and Drawer." ■■ Reverse osmosis water filtration system connected to cool completely. ■&#...


