
Owner's Manual
Page 3
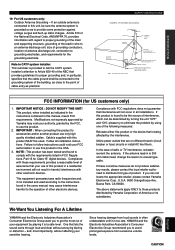
...: Outdoor Antenna Grounding - Cable/s supplied with regard to the instructions found in all installation instructions. Follow all installations. This equipment generates/uses radio frequencies and, if not installed and used . Since hearing damage from excessive volume levels. If an outside antenna is being affected by turning the unit "OFF" and "ON", please try to avoid prolonged exposure from loud sounds is 300 ohm ribbon lead, change the lead...
...: Outdoor Antenna Grounding - Cable/s supplied with regard to the instructions found in all installation instructions. Follow all installations. This equipment generates/uses radio frequencies and, if not installed and used . Since hearing damage from excessive volume levels. If an outside antenna is being affected by turning the unit "OFF" and "ON", please try to avoid prolonged exposure from loud sounds is 300 ohm ribbon lead, change the lead...

Owner's Manual
Page 5
...19 BASIC OPERATION PLAYING A SOURCE 21 DIGITAL SOUND FIELD PROCESSOR (DSP) EFFECT 25 TUNING 27 RECORDING A SOURCE ON TAPE, MD OR VIDEO CASSETTE 31 ADVANCED OPERATION SOUND FIELD PROGRAM 32 SET MENU 35 DELAY TIME AND SPEAKER OUTPUT LEVELS 39 SLEEP TIMER 41 PRESET REMOTE CONTROL 42 APPENDIX TROUBLESHOOTING 50 SPECIFICATIONS 54 GLOSSARY 55 INDEX 56 y indicates a tip for Other Future Formats x S Video Signal Input/Output Capability x 3 Optical/2 Coaxial Digital Signal Input Terminals x SLEEP Timer x Remote Control with Preset Manufacturer Codes Manufactured under license from Dolby...
...19 BASIC OPERATION PLAYING A SOURCE 21 DIGITAL SOUND FIELD PROCESSOR (DSP) EFFECT 25 TUNING 27 RECORDING A SOURCE ON TAPE, MD OR VIDEO CASSETTE 31 ADVANCED OPERATION SOUND FIELD PROGRAM 32 SET MENU 35 DELAY TIME AND SPEAKER OUTPUT LEVELS 39 SLEEP TIMER 41 PRESET REMOTE CONTROL 42 APPENDIX TROUBLESHOOTING 50 SPECIFICATIONS 54 GLOSSARY 55 INDEX 56 y indicates a tip for Other Future Formats x S Video Signal Input/Output Capability x 3 Optical/2 Coaxial Digital Signal Input Terminals x SLEEP Timer x Remote Control with Preset Manufacturer Codes Manufactured under license from Dolby...

Owner's Manual
Page 8
... power on, set VOLUME to be output from the remote control. 3 Display This shows various information. (Refer to page 6 for details.) 4 INPUT MODE Press this button to select the input mode among AUTO, DTS and ANALOG for the selected input source indicator lights up on the display. 4 6 VOLUME Turn this control to turn up or down the volume. 7 PHONES jack Connect the headphones to set "BASS OUT" on the SET MENU to the MAIN position (so that no DSP program name appears on the display). 8 SPEAKERS Set...
... power on, set VOLUME to be output from the remote control. 3 Display This shows various information. (Refer to page 6 for details.) 4 INPUT MODE Press this button to select the input mode among AUTO, DTS and ANALOG for the selected input source indicator lights up on the display. 4 6 VOLUME Turn this control to turn up or down the volume. 7 PHONES jack Connect the headphones to set "BASS OUT" on the SET MENU to the MAIN position (so that no DSP program name appears on the display). 8 SPEAKERS Set...

Owner's Manual
Page 9
... OPERATION APPENDIX English 5 b) TREBLE Turn this button to exchange the assignment of preset stations. w TAPE/MD MON / EXT. e BALANCE This control is used to switch the tuning mode between automatic and manual. When " z " goes off , "EXT. If the connected video unit has an S video output terminal, connect it to the S VIDEO terminal to lower frequencies. DECODER" appears on the display. r A/B/C/D/E Press this button so that the "AUTO" indicator lights up on the display This button is also used for sound...
... OPERATION APPENDIX English 5 b) TREBLE Turn this button to exchange the assignment of preset stations. w TAPE/MD MON / EXT. e BALANCE This control is used to switch the tuning mode between automatic and manual. When " z " goes off , "EXT. If the connected video unit has an S video output terminal, connect it to the S VIDEO terminal to lower frequencies. DECODER" appears on the display. r A/B/C/D/E Press this button so that the "AUTO" indicator lights up on the display This button is also used for sound...

Owner's Manual
Page 10
... when an FM stereo broadcast with the SET MENU. If multipath interference is selected as the input source by pressing TAPE/MD MON / EXT. is selected as the input source. 4 Input source indicators One of the selected DSP program and the various settings during adjustment with sufficient signal strength is on . " o " lights up when the built-in Dolby Pro Logic decoder is on. 7 x indicator " x " lights up when the built-in digital sound field processor...
... when an FM stereo broadcast with the SET MENU. If multipath interference is selected as the input source by pressing TAPE/MD MON / EXT. is selected as the input source. 4 Input source indicators One of the selected DSP program and the various settings during adjustment with sufficient signal strength is on . " o " lights up when the built-in Dolby Pro Logic decoder is on. 7 x indicator " x " lights up when the built-in digital sound field processor...

Owner's Manual
Page 11
...: To play a video cassette PHONO: To play another multi-channel source Refer to page 8 for details. 4 TEST Press this unit with the remote control. Refer to "PRESET REMOTE CONTROL" on page 48.) When the position is selected, the remote control is set the SLEEP timer. 8 INPUT Press this button to switch the function of this button to output the test tone for full details. 1 8 2 9 0 Select the AMP/TUN position. 3 4 5 6 TV POWER TV VOLUME 7 EFFECT Refer to that component operation mode. Refer to "Setup codes...
...: To play a video cassette PHONO: To play another multi-channel source Refer to page 8 for details. 4 TEST Press this unit with the remote control. Refer to "PRESET REMOTE CONTROL" on page 48.) When the position is selected, the remote control is set the SLEEP timer. 8 INPUT Press this button to switch the function of this button to output the test tone for full details. 1 8 2 9 0 Select the AMP/TUN position. 3 4 5 6 TV POWER TV VOLUME 7 EFFECT Refer to that component operation mode. Refer to "Setup codes...

Owner's Manual
Page 12
... can select a DSP program directly with the numeric buttons while the indicator is set this button again. CONTROLS AND FUNCTIONS q A/B/C/D/E, PRESET +/- These buttons are used to select the items on the SET MENU and TIME/LEVEL mode. t STANDBY Press this button to mute the sound. EFFECT Press this button to set to the DSP/TUN position. • While the indicator is lit. s When selecting an input source s When selecting a DSP program and turning on or off the effect speakers (center and rear) by pressing...
... can select a DSP program directly with the numeric buttons while the indicator is set this button again. CONTROLS AND FUNCTIONS q A/B/C/D/E, PRESET +/- These buttons are used to select the items on the SET MENU and TIME/LEVEL mode. t STANDBY Press this button to mute the sound. EFFECT Press this button to set to the DSP/TUN position. • While the indicator is lit. s When selecting an input source s When selecting a DSP program and turning on or off the effect speakers (center and rear) by pressing...
Owner's Manual
Page 13
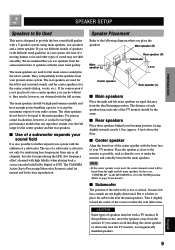
..., such as directly over the full range for the center speaker and the rear speakers. We recommend that case, "CENTER SP" on the SET MENU is effective not only for reinforcing bass frequencies from the monitor. The main speakers are not highly directional. s Use of speakers (with the same tonal quality. Turn it is ideal for reproducing the LFE (low frequency effect) channel with high fidelity when playing back a source encoded with the...
..., such as directly over the full range for the center speaker and the rear speakers. We recommend that case, "CENTER SP" on the SET MENU is effective not only for reinforcing bass frequencies from the monitor. The main speakers are not highly directional. s Use of speakers (with the same tonal quality. Turn it is ideal for reproducing the LFE (low frequency effect) channel with high fidelity when playing back a source encoded with the...

Owner's Manual
Page 18
... used in the following order of 32 kHz, 44.1 kHz, 48 kHz and 96 kHz. (Refer to this unit's COAXIAL DVD/LD digital signal input terminal. s Digital audio signal terminals If your LD player's Dolby Digital RF signal output terminal directly to page 24 about 96-kHz sampling 24-bit digital signals.) 14 Refer to EIA standards. CONNECTIONS Connecting a Video Component TV monitor DVD/LD player Cable TV/satellite tuner S VIDEO ANALOG IN AUDIO OUT S VIDEO COAXIAL OUT DIGITAL OUT OPTICAL DIGITAL OUT COAXIAL OPTICAL DIGITAL OUT DIGITAL...
... used in the following order of 32 kHz, 44.1 kHz, 48 kHz and 96 kHz. (Refer to this unit's COAXIAL DVD/LD digital signal input terminal. s Digital audio signal terminals If your LD player's Dolby Digital RF signal output terminal directly to page 24 about 96-kHz sampling 24-bit digital signals.) 14 Refer to EIA standards. CONNECTIONS Connecting a Video Component TV monitor DVD/LD player Cable TV/satellite tuner S VIDEO ANALOG IN AUDIO OUT S VIDEO COAXIAL OUT DIGITAL OUT OPTICAL DIGITAL OUT COAXIAL OPTICAL DIGITAL OUT DIGITAL...

Owner's Manual
Page 19
...; Adjustment of the output level of the center speaker, rear speakers and subwoofer is effective when a source connected to these terminals is selected, the digital sound field processor cannot be used to connect any video input source such as the input source. (Refer to page 39 for connecting an external decoder to this unit. INTRODUCTION PREPARATION BASIC OPERATION ADVANCED OPERATION s VIDEO terminals (composite) DVD/LD player Cable TV/satellite tuner VIDEO OUT V VIDEO OUT V V V V V VIDEO IN VIDEO OUT VIDEO VIDEO OUT IN CONNECTIONS If your video components...
...; Adjustment of the output level of the center speaker, rear speakers and subwoofer is effective when a source connected to these terminals is selected, the digital sound field processor cannot be used to connect any video input source such as the input source. (Refer to page 39 for connecting an external decoder to this unit. INTRODUCTION PREPARATION BASIC OPERATION ADVANCED OPERATION s VIDEO terminals (composite) DVD/LD player Cable TV/satellite tuner VIDEO OUT V VIDEO OUT V V V V V VIDEO IN VIDEO OUT VIDEO VIDEO OUT IN CONNECTIONS If your video components...

Owner's Manual
Page 27
... cable TV/satellite tuner source is selected, or the input mode is changed for the CD, TUNER, TAPE/ MD, VCR, PHONO and VIDEO AUX sources because only analog signals are being input at the same time. BASIC OPERATION ADVANCED OPERATION APPENDIX English 23 s ANALOG In this mode, only an analog signal is selected, even if a digital signal is set to this mode when you turn on the power of priority: 1. or Front panel Remote control Notes • Set the input mode to AUTO to play a DVD/LD source encoded with DTS...
... cable TV/satellite tuner source is selected, or the input mode is changed for the CD, TUNER, TAPE/ MD, VCR, PHONO and VIDEO AUX sources because only analog signals are being input at the same time. BASIC OPERATION ADVANCED OPERATION APPENDIX English 23 s ANALOG In this mode, only an analog signal is selected, even if a digital signal is set to this mode when you turn on the power of priority: 1. or Front panel Remote control Notes • Set the input mode to AUTO to play a DVD/LD source encoded with DTS...

Owner's Manual
Page 28
... ERROR" appears on the display while playing an LD source encoded with DTS, stop playback and turn the player off and then on again. • If the digital output data of the player has been processed in any way, you may hear the PCM or analog sound an instant before the Dolby Digital sound is played. This is set the player for digital output. Change the input mode as an LD player, output different audio signals through their analog...
... ERROR" appears on the display while playing an LD source encoded with DTS, stop playback and turn the player off and then on again. • If the digital output data of the player has been processed in any way, you may hear the PCM or analog sound an instant before the Dolby Digital sound is played. This is set the player for digital output. Change the input mode as an LD player, output different audio signals through their analog...

Owner's Manual
Page 42
...: AUTO The input mode for details about the input mode. AUTO In this unit, select the ON position. SET MENU 8. Refer to page 23 for DTS) Control range: -10 dB to +10 dB (in the TIME/LEVEL mode • Settings when using TEST 11.TV INPUT (Selecting the initial input mode for a source connected to the D-TV input terminals of the sound from the left main speaker to that selected the last time when the power of this unit was turned...
...: AUTO The input mode for details about the input mode. AUTO In this unit, select the ON position. SET MENU 8. Refer to page 23 for DTS) Control range: -10 dB to +10 dB (in the TIME/LEVEL mode • Settings when using TEST 11.TV INPUT (Selecting the initial input mode for a source connected to the D-TV input terminals of the sound from the left main speaker to that selected the last time when the power of this unit was turned...

Owner's Manual
Page 46
... DVD MENU positions. TV POWER @ TV INPUT # TV VOLUME 42 Refer to the following buttons. When turning the selector dial, the position changes as follows: AMP/TUN You can perform the basic operations of the selector dial, you can control this unit. Selector Dial There are nine positions that you can select to control connected components with the following pages for your TV ! A DVD player can be controlled. PRESET REMOTE CONTROL...
... DVD MENU positions. TV POWER @ TV INPUT # TV VOLUME 42 Refer to the following buttons. When turning the selector dial, the position changes as follows: AMP/TUN You can perform the basic operations of the selector dial, you can control this unit. Selector Dial There are nine positions that you can select to control connected components with the following pages for your TV ! A DVD player can be controlled. PRESET REMOTE CONTROL...

Owner's Manual
Page 48
... Position s TAPE/MD position Select the TAPE/MD position. p PLAY This button plays a tape or an MD. s STOP This button stops operation on or off the effect speakers (center and rear). SKIP- (MD) This button skips to the beginning of the previous track. Numeric buttons (MD) +10 (MD) While the indicator lights up for about three seconds after pressing DSP, this button turns on a tape deck or MD recorder. PRESET REMOTE CONTROL Description...
... Position s TAPE/MD position Select the TAPE/MD position. p PLAY This button plays a tape or an MD. s STOP This button stops operation on or off the effect speakers (center and rear). SKIP- (MD) This button skips to the beginning of the previous track. Numeric buttons (MD) +10 (MD) While the indicator lights up for about three seconds after pressing DSP, this button turns on a tape deck or MD recorder. PRESET REMOTE CONTROL Description...

Owner's Manual
Page 54
.... Set the unit in the standby mode soon after the power has been turned on one side can reproduce. If the problem persists, the cables may be defective. Connect the monitor's "S" video input terminal to turn on the power, and play the source again. The protection circuit has been activated because of BALANCE. Select an appropriate input source with Dolby Surround, Dolby Digital or DTS. Play a source whose signals this unit's S VIDEO MONITOR OUT terminal. Adjust it cannot be heard. Set VOLUME to...
.... Set the unit in the standby mode soon after the power has been turned on one side can reproduce. If the problem persists, the cables may be defective. Connect the monitor's "S" video input terminal to turn on the power, and play the source again. The protection circuit has been activated because of BALANCE. Select an appropriate input source with Dolby Surround, Dolby Digital or DTS. Play a source whose signals this unit's S VIDEO MONITOR OUT terminal. Adjust it cannot be heard. Set VOLUME to...

Owner's Manual
Page 55
... analog terminals. The DVD/LD player, TV/digital TV or cable TV/satellite tuner is set to minimum. Raise the level of the rear speakers. "CENTER SP" on the SET MENU is in the standby mode. Raise the output level of the center speaker. Select another DSP program suitable for the monaural source. If the problem persists, the cables may be heard. Turn on the SET MENU is set to the SW or MAIN position when playing a 2-channel source. The component connected to the TAPE...
... analog terminals. The DVD/LD player, TV/digital TV or cable TV/satellite tuner is set to minimum. Raise the level of the rear speakers. "CENTER SP" on the SET MENU is in the standby mode. Raise the output level of the center speaker. Select another DSP program suitable for the monaural source. If the problem persists, the cables may be heard. Turn on the SET MENU is set to the SW or MAIN position when playing a 2-channel source. The component connected to the TAPE...
Owner's Manual
Page 56
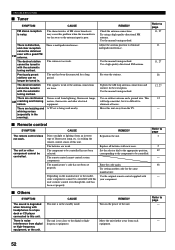
... the model, some components cannot be tuned in with headphones to a tape deck or CD player connected to the digital or highfrequency equipment. Use an outdoor antenna and a ground wire. The remote control cannot control system components. The unit is too close to this problem when the transmitter is too far away or the antenna input is distortion, and clear reception cannot be tuned in the evening). TROUBLESHOOTING s Tuner SYMPTOM FM stereo...
... the model, some components cannot be tuned in with headphones to a tape deck or CD player connected to the digital or highfrequency equipment. Use an outdoor antenna and a ground wire. The remote control cannot control system components. The unit is too close to this problem when the transmitter is too far away or the antenna input is distortion, and clear reception cannot be tuned in the evening). TROUBLESHOOTING s Tuner SYMPTOM FM stereo...

Owner's Manual
Page 57
... normal (PCM) digital signal input mode. A source encoded with DTS. In the AUTO mode, the DTS-decoding mode cannot be connected to PCM digital signal input mode and the "t" indicator will automatically switch from DTS-decoding mode to a digital audio input terminal of the input signal. Set the player's digital volume control at a position other than "maximum," "neutral" or "ineffective." The player which plays back the source must be a noise heard while this unit besides the analog audio signal terminal connections. No sound is heard when playing back an...
... normal (PCM) digital signal input mode. A source encoded with DTS. In the AUTO mode, the DTS-decoding mode cannot be connected to PCM digital signal input mode and the "t" indicator will automatically switch from DTS-decoding mode to a digital audio input terminal of the input signal. Set the player's digital volume control at a position other than "maximum," "neutral" or "ineffective." The player which plays back the source must be a noise heard while this unit besides the analog audio signal terminal connections. No sound is heard when playing back an...
Owner's Manual
Page 60
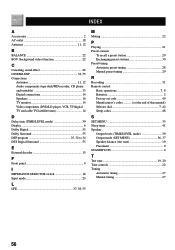
... (background video) function 22 C Canceling sound effect 26 CINEMA DSP 34, 55 Connections Antennas 11, 12 Audio components (tape deck/MD recorder, CD player and turntable 13 Digital connections 14 Speakers 16 TV monitor 14 Video components (DVD/LD player, VCR, TV/digital TV and cable TV/satellite tuner 14 D Delay time (TIME/LEVEL mode 39 Display 6 Dolby Digital 55 Dolby Surround 55 DSP program 25, 32 to 34 DTS Digital Surround 55 E External decoder 15 F Front panel 4 I IMPEDANCE SELECTOR switch 18 Input mode 23 L LFE 37, 38, 55 M Muting 22 P Playing 21 Preset stations To...
... (background video) function 22 C Canceling sound effect 26 CINEMA DSP 34, 55 Connections Antennas 11, 12 Audio components (tape deck/MD recorder, CD player and turntable 13 Digital connections 14 Speakers 16 TV monitor 14 Video components (DVD/LD player, VCR, TV/digital TV and cable TV/satellite tuner 14 D Delay time (TIME/LEVEL mode 39 Display 6 Dolby Digital 55 Dolby Surround 55 DSP program 25, 32 to 34 DTS Digital Surround 55 E External decoder 15 F Front panel 4 I IMPEDANCE SELECTOR switch 18 Input mode 23 L LFE 37, 38, 55 M Muting 22 P Playing 21 Preset stations To...


