Owner's Manual
Page 6
... GUI menu by using the front panel controls 57 Sound field programs 58 Selecting sound field programs 58 Sound field program descriptions 58 For audio music sources 59 For various sources 61 For visual sources of the automatic setup 49 Using advanced automatic setup 50 Basic Operation Playback 54 Basic procedure 54 Selecting the MULTI CH INPUT component 54 Selecting the HDMI OUT jack 55 Selecting the front speaker set 55 Using the Zone B feature 55 Using your favorite Internet Radio stations with headphones (SILENT CINEMA 64 Using CINEMA...
... GUI menu by using the front panel controls 57 Sound field programs 58 Selecting sound field programs 58 Sound field program descriptions 58 For audio music sources 59 For various sources 61 For visual sources of the automatic setup 49 Using advanced automatic setup 50 Basic Operation Playback 54 Basic procedure 54 Selecting the MULTI CH INPUT component 54 Selecting the HDMI OUT jack 55 Selecting the front speaker set 55 Using the Zone B feature 55 Using your favorite Internet Radio stations with headphones (SILENT CINEMA 64 Using CINEMA...
Owner's Manual
Page 10
.../576p ◆ S-video signal input/output capability ☞ P. 30 ◆ Component video input/output capability includes (4 COMPONENT VIDEO INs and 2 MONITOR OUTs) ☞ P. 29 ◆ Optical and coaxial digital audio signal jacks ☞ P. 29 ◆ Pure Direct mode for pure hi-fi sound for all sources ☞ P. 65 ◆ Adaptive dynamic range controlling capability ☞ P. 102 ◆ Adaptive DSP effect level controlling capability ☞ P. 102 ◆ Remote control with preset remote control codes, learning, macro and buttons and display backlight capability ☞...
.../576p ◆ S-video signal input/output capability ☞ P. 30 ◆ Component video input/output capability includes (4 COMPONENT VIDEO INs and 2 MONITOR OUTs) ☞ P. 29 ◆ Optical and coaxial digital audio signal jacks ☞ P. 29 ◆ Pure Direct mode for pure hi-fi sound for all sources ☞ P. 65 ◆ Adaptive dynamic range controlling capability ☞ P. 102 ◆ Adaptive DSP effect level controlling capability ☞ P. 102 ◆ Remote control with preset remote control codes, learning, macro and buttons and display backlight capability ☞...

Owner's Manual
Page 16
...Connecting a DVD player via multi-channel analog audio connection ☞ P. 37 • Connecting a Yamaha iPod universal dock ☞ P. 38 • Using the REMOTE IN/OUT jacks ☞ P. 38 • Using the TRIGGER OUT jacks ☞ P. 38 • Using the VIDEO AUX jacks on the front panel ☞ P. 39 • Connecting FM/AM antennas ☞ P. 41 • Connecting XM Mini-Tuner Home Dock ☞ P. 74 • Connecting this unit to your network ☞ P. 40 • Connecting a USB device ☞ P. 40 16 En Video monitor AV receiver HDMI input jack HDMI cable...
...Connecting a DVD player via multi-channel analog audio connection ☞ P. 37 • Connecting a Yamaha iPod universal dock ☞ P. 38 • Using the REMOTE IN/OUT jacks ☞ P. 38 • Using the TRIGGER OUT jacks ☞ P. 38 • Using the VIDEO AUX jacks on the front panel ☞ P. 39 • Connecting FM/AM antennas ☞ P. 41 • Connecting XM Mini-Tuner Home Dock ☞ P. 74 • Connecting this unit to your network ☞ P. 40 • Connecting a USB device ☞ P. 40 16 En Video monitor AV receiver HDMI input jack HDMI cable...
Owner's Manual
Page 39
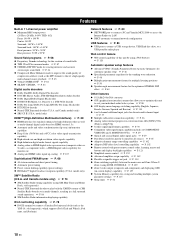
...EFFECT DISPLAY MAN'L/AUTO BAND PRESET/TUNING EDIT SEARCH MODE ZONE ON/OFF ZONE REC OUT/ CONTROLS ZONE 2 ZONE 2 S VIDEO ZONE 3 VIDEO ZONE 4 L AUDIO R OPTICAL PROGRAM PUSH ENTER HDMI IN MENU TONE CONTROL USB PHONES OPTIMIZER MIC VIDEO AUX PURE DIRECT VOLUME S VIDEO VIDEO L AUDIO R OPTICAL HDMI IN S V L R O Game console or video camera Recommended Alternative Connections 39 En Caution Be sure to this unit and other components before making connections. Preparation HDMI output Optical output Audio output Video output S-Video output Using the VIDEO AUX jacks on...
...EFFECT DISPLAY MAN'L/AUTO BAND PRESET/TUNING EDIT SEARCH MODE ZONE ON/OFF ZONE REC OUT/ CONTROLS ZONE 2 ZONE 2 S VIDEO ZONE 3 VIDEO ZONE 4 L AUDIO R OPTICAL PROGRAM PUSH ENTER HDMI IN MENU TONE CONTROL USB PHONES OPTIMIZER MIC VIDEO AUX PURE DIRECT VOLUME S VIDEO VIDEO L AUDIO R OPTICAL HDMI IN S V L R O Game console or video camera Recommended Alternative Connections 39 En Caution Be sure to this unit and other components before making connections. Preparation HDMI output Optical output Audio output Video output S-Video output Using the VIDEO AUX jacks on...
Owner's Manual
Page 45
... the audio output is turned on (see page 68). L Input channel and speaker indicators Connections Input channel indicators Presence speaker indicators LFE L C R FPR SL SR RPR SBL SB SBR Input channel indicators • Indicate the channel components of the current digital input signal. • Light up or flash according to show that a station can make settings for the presence and surround back speakers automatically by running "Auto Setup" (see page 46) or manually by adjusting settings for "Front Presence", "Rear...
... the audio output is turned on (see page 68). L Input channel and speaker indicators Connections Input channel indicators Presence speaker indicators LFE L C R FPR SL SR RPR SBL SB SBR Input channel indicators • Indicate the channel components of the current digital input signal. • Light up or flash according to show that a station can make settings for the presence and surround back speakers automatically by running "Auto Setup" (see page 46) or manually by adjusting settings for "Front Presence", "Rear...

Owner's Manual
Page 50
... place the microphone appropriately. The following instructions. 1 7 2 6 345 1/2/3/4/5/6/7: Listening positions 1 Turn on the characteristics of your subwoofer or external amplifiers if you connect them. • In the "Equalizing" results, different values may be set for the same band to provide finer adjustments. • Even if you finish the review of the result of the speaker level for each speaker in "Manual Setup" (see page...
... place the microphone appropriately. The following instructions. 1 7 2 6 345 1/2/3/4/5/6/7: Listening positions 1 Turn on the characteristics of your subwoofer or external amplifiers if you connect them. • In the "Equalizing" results, different values may be set for the same band to provide finer adjustments. • Even if you finish the review of the result of the speaker level for each speaker in "Manual Setup" (see page...
Owner's Manual
Page 54
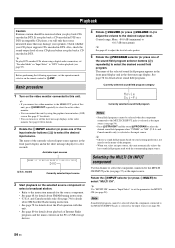
...; Sound field programs cannot be selected when the component connected to the MULTI CH INPUT jacks is selected as the input source. Note Sound field programs cannot be selected when the component connected to select the active video monitor. • You can turn on a DTS-incompatible CD player, you select an input source, this unit automatically selects the last sound field program used with this unit by using a digital audio connection, set the operation mode selector on the selected source component or select a broadcast station. • Refer to the instruction manuals...
...; Sound field programs cannot be selected when the component connected to the MULTI CH INPUT jacks is selected as the input source. Note Sound field programs cannot be selected when the component connected to select the active video monitor. • You can turn on a DTS-incompatible CD player, you select an input source, this unit automatically selects the last sound field program used with this unit by using a digital audio connection, set the operation mode selector on the selected source component or select a broadcast station. • Refer to the instruction manuals...
Owner's Manual
Page 55
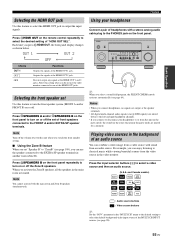
... volume level of this unit when you switch the front speaker setting. ■ Using the Zone B feature When you set Use this setting when you press CHDMI OUT, the front panel display changes as shown below. MAIN ZONE ON/OFF MASTER ON OFF INPUT AUDIO SELECT SPEAKERS A B SILENT CINEMA YPAO MULTI ZONE STRAIGHT TUNING MODE MEMORY EFFECT DISPLAY MAN'L/AUTO BAND PRESET/TUNING EDIT SEARCH MODE ZONE ON/OFF ZONE REC OUT/ CONTROLS ZONE 2 ZONE 2 S VIDEO ZONE 3 VIDEO ZONE 4 L AUDIO R OPTICAL PROGRAM PUSH ENTER HDMI IN MENU TONE CONTROL USB PHONES OPTIMIZER MIC VIDEO AUX...
... volume level of this unit when you switch the front speaker setting. ■ Using the Zone B feature When you set Use this setting when you press CHDMI OUT, the front panel display changes as shown below. MAIN ZONE ON/OFF MASTER ON OFF INPUT AUDIO SELECT SPEAKERS A B SILENT CINEMA YPAO MULTI ZONE STRAIGHT TUNING MODE MEMORY EFFECT DISPLAY MAN'L/AUTO BAND PRESET/TUNING EDIT SEARCH MODE ZONE ON/OFF ZONE REC OUT/ CONTROLS ZONE 2 ZONE 2 S VIDEO ZONE 3 VIDEO ZONE 4 L AUDIO R OPTICAL PROGRAM PUSH ENTER HDMI IN MENU TONE CONTROL USB PHONES OPTIMIZER MIC VIDEO AUX...
Owner's Manual
Page 65
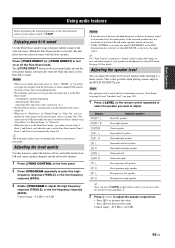
... sound Use the Pure Direct mode to +10.0 dB 65 En When the Pure Direct mode is also possible when playing sources input at the MULTI CH INPUT jacks. Adjusting the tonal quality Use this unit plays back the selected source with the least circuitry. Press CPURE DIRECT (or MPURE DIRECT) to turn on the remote control repeatedly to select the speaker you can adjust the output level of the selected source. Basic Operation Using audio features Basic Operation Before performing the following operation, set Audio input jack selects...
... sound Use the Pure Direct mode to +10.0 dB 65 En When the Pure Direct mode is also possible when playing sources input at the MULTI CH INPUT jacks. Adjusting the tonal quality Use this unit plays back the selected source with the least circuitry. Press CPURE DIRECT (or MPURE DIRECT) to turn on the remote control repeatedly to select the speaker you can adjust the output level of the selected source. Basic Operation Using audio features Basic Operation Before performing the following operation, set Audio input jack selects...

Owner's Manual
Page 96
... digital input/outputs, select the input signal, rename the inputs, or adjust the level of the signal input at the COAXIAL jack. 96 En Notes • "None" appears in the GUI menu and then select "VCR". 2 Select "I /O Assignment (Input/output assignment) Use this feature to assign the input/output jacks according to the component to be available for each input source. I /O" "Component Video", or "HDMI"). 3 Select "None" and then press 9ENTER to signals input at each sub input source separately. • The "Play Style" setting...
... digital input/outputs, select the input signal, rename the inputs, or adjust the level of the signal input at the COAXIAL jack. 96 En Notes • "None" appears in the GUI menu and then select "VCR". 2 Select "I /O Assignment (Input/output assignment) Use this feature to assign the input/output jacks according to the component to be available for each input source. I /O" "Component Video", or "HDMI"). 3 Select "None" and then press 9ENTER to signals input at each sub input source separately. • The "Play Style" setting...
Owner's Manual
Page 99
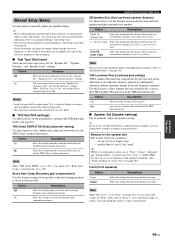
... (Boundary gain compensation) Use this feature to improve boomy bass when the listening position is 0.3 m to 1.2 m (1 foot to 4 feet). Choice Descriptions Under 1ft (Under 0.3m) Select this setting when the distance between the two surround back speakers is closer to the rear wall. Manual Setup (Basic) Use this menu to manually adjust any speaker setting. While "Test Tone" is set to "On", the volume level is automatically set to activate the boundary...
... (Boundary gain compensation) Use this feature to improve boomy bass when the listening position is 0.3 m to 1.2 m (1 foot to 4 feet). Choice Descriptions Under 1ft (Under 0.3m) Select this setting when the distance between the two surround back speakers is closer to the rear wall. Manual Setup (Basic) Use this menu to manually adjust any speaker setting. While "Test Tone" is set to "On", the volume level is automatically set to activate the boundary...
Owner's Manual
Page 114
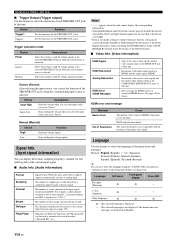
...selected. The number of the connected HDMI components is turned on. Input Low Stops sending the voltage when you select the input source you set the function of the source video signals and the analog video signals output at the selected TRIGGER OUT jack while the selected zone is over the limit. Trigger operation mode Choice Power Source Manual Descriptions Select this setting to send the voltage signals at the COMPONENT MONITOR OUT jacks of the input video signal. Source (Source) After selecting the input source, you make a discrete signal. The dialogue normalization level...
...selected. The number of the connected HDMI components is turned on. Input Low Stops sending the voltage when you select the input source you set the function of the source video signals and the analog video signals output at the selected TRIGGER OUT jack while the selected zone is over the limit. Trigger operation mode Choice Power Source Manual Descriptions Select this setting to send the voltage signals at the COMPONENT MONITOR OUT jacks of the input video signal. Source (Source) After selecting the input source, you make a discrete signal. The dialogue normalization level...

Owner's Manual
Page 119
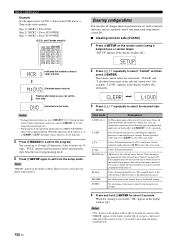
Recommended parameter settings Input source: NET/USB (Net Radio) (see page 54) Sound field program: 11ch Enhancer (see page 58) Volume level: Slightly low (see page 54) y Before saving the settings, select the desired Internet radio service (see page 102) Saved parameter groups Audio, SP Config Advanced Operation 119 En You can recall the desired input source, Internet radio service, and audio settings simultaneously. Recommended parameter settings Automatic setup: The result when you perform the measurement for...
Recommended parameter settings Input source: NET/USB (Net Radio) (see page 54) Sound field program: 11ch Enhancer (see page 58) Volume level: Slightly low (see page 54) y Before saving the settings, select the desired Internet radio service (see page 102) Saved parameter groups Audio, SP Config Advanced Operation 119 En You can recall the desired input source, Internet radio service, and audio settings simultaneously. Recommended parameter settings Automatic setup: The result when you perform the measurement for...
Owner's Manual
Page 130
... models) POWER POWER STANDBY TV AV 3 2 MULTI V-AUX PHONO POWER MD TAPE BD HD DVD CBL SAT DVD CD 1 DTV DVR CD-R VCR TUNER DOCK NET USB XM Clearing configurations You can change the selected input area, press 5SELECT l / h. Set the operation mode selector to FAMP to select this clear mode. M:DVD (etc.) (M:Name of the operation mode selector (AMP/TV/SOURCE) affects the assigned function. Step 3 ("MCR3"): Press TV POWER. (U.S.A. Step 2 ("MCR2"): Press AV POWER. Remote control features Example Set the input source to DVD...
... models) POWER POWER STANDBY TV AV 3 2 MULTI V-AUX PHONO POWER MD TAPE BD HD DVD CBL SAT DVD CD 1 DTV DVR CD-R VCR TUNER DOCK NET USB XM Clearing configurations You can change the selected input area, press 5SELECT l / h. Set the operation mode selector to FAMP to select this clear mode. M:DVD (etc.) (M:Name of the operation mode selector (AMP/TV/SOURCE) affects the assigned function. Step 3 ("MCR3"): Press TV POWER. (U.S.A. Step 2 ("MCR2"): Press AV POWER. Remote control features Example Set the input source to DVD...

Owner's Manual
Page 146
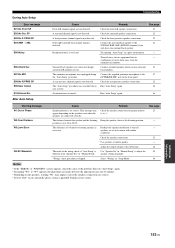
... "RX-Z11". 113 audio signals are connected Set "Conversion" to "On" or connect your speakers. 43 The protection circuitry has been activated. appropriately. Turn off this unit cannot reproduce are experiencing is not listed below or if the instruction below when this unit to the standby mode, disconnect the power cable, - Set "Pure Direct" in the video monitor connected to 56 resume audio output and then adjust the volume. No sound. Select an appropriate input source with...
... "RX-Z11". 113 audio signals are connected Set "Conversion" to "On" or connect your speakers. 43 The protection circuitry has been activated. appropriately. Turn off this unit cannot reproduce are experiencing is not listed below or if the instruction below when this unit to the standby mode, disconnect the power cable, - Set "Pure Direct" in the video monitor connected to 56 resume audio output and then adjust the volume. No sound. Select an appropriate input source with...
Owner's Manual
Page 147
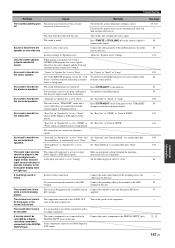
... field program. You are turned off . "Bass Out" in "Speaker Set" is set to "None". "None". Make an appropriate setting following the operating instructions for "11ch Stereo") has been selected and analog 2-channel source is being played. Set the audio input jack select to output sound from all channels. Connect the audio cables firmly. The record is being played. No sound is muted. The sound is heard from the surround speakers. Connect the cables properly. "Center" in "Speaker Set" is automatically set to "Front" when a Dolby Digital or DTS signal...
... field program. You are turned off . "Bass Out" in "Speaker Set" is set to "None". "None". Make an appropriate setting following the operating instructions for "11ch Stereo") has been selected and analog 2-channel source is being played. Set the audio input jack select to output sound from all channels. Connect the audio cables firmly. The record is being played. No sound is muted. The sound is heard from the surround speakers. Connect the cables properly. "Center" in "Speaker Set" is automatically set to "Front" when a Dolby Digital or DTS signal...
Owner's Manual
Page 148
... FM antenna. Wait about 30 seconds. The sound field parameters and some other help somewhat, but it in the front panel display. The desired station cannot be changed. plug it is noise interference from such equipment. - This unit suddenly enters the standby mode. may cause this unit away from the TV set to the AUDIO OUT jacks. This unit does not operate properly. Use the manual tuning...
... FM antenna. Wait about 30 seconds. The sound field parameters and some other help somewhat, but it in the front panel display. The desired station cannot be changed. plug it is noise interference from such equipment. - This unit suddenly enters the standby mode. may cause this unit away from the TV set to the AUDIO OUT jacks. This unit does not operate properly. Use the manual tuning...
Owner's Manual
Page 153
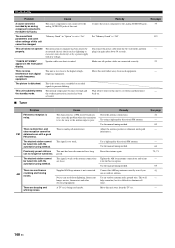
..." may appear depending on the front panel. Check the front presence speaker connections. Select "Wiring" in a quiet environment. A front presence channel signal is not detected. The "Auto Setup" procedure was unplugged during the "Auto Setup" procedure. This message may appears even if the speakers connections are set in "Manual Setup" to the listening position. Adjust the output volume of "Auto Setup" is excessive. During Auto Setup Troubleshooting Error message E01:No Front SP E02:No...
..." may appear depending on the front panel. Check the front presence speaker connections. Select "Wiring" in a quiet environment. A front presence channel signal is not detected. The "Auto Setup" procedure was unplugged during the "Auto Setup" procedure. This message may appears even if the speakers connections are set in "Manual Setup" to the listening position. Adjust the output volume of "Auto Setup" is excessive. During Auto Setup Troubleshooting Error message E01:No Front SP E02:No...
Owner's Manual
Page 169
... audio components 35 Connecting external amplifiers 36 Connecting network 40 Connecting power cable 42 Connecting speaker cable 28 Connecting subwoofers 26 Connecting the USB memory devices 40 Connecting to the rear USB ports 40 Connecting XM Mini-Tuner Home Dock ........74 Connection, AM antenna 41 Connection, DVD player 33 Connection, FM antenna 41 Connection, projector 31 Connection, set-top box 33 Connection, TV monitor 31 Controlling other components, remote control 122 Conversion 107 Cooling fan operation mode 143 CS II indicator, Front panel display 44 CSII Cinema...
... audio components 35 Connecting external amplifiers 36 Connecting network 40 Connecting power cable 42 Connecting speaker cable 28 Connecting subwoofers 26 Connecting the USB memory devices 40 Connecting to the rear USB ports 40 Connecting XM Mini-Tuner Home Dock ........74 Connection, AM antenna 41 Connection, DVD player 33 Connection, FM antenna 41 Connection, projector 31 Connection, set-top box 33 Connection, TV monitor 31 Controlling other components, remote control 122 Conversion 107 Cooling fan operation mode 143 CS II indicator, Front panel display 44 CSII Cinema...

Owner's Manual
Page 171
... audio input jacks 56 Selecting decoders 86 Selecting front speaker set 55 Selecting HD Radio audio programs 73 Selecting preset stations, FM/AM tuning ........ 70 Selecting sound field programs 58 Selecting the MULTI CH INPUT component 54 Server, network menu 80 Set the main zone to the standby mode 43 Setting GUI language 43 Setting speaker impedance 43 Set-top box connection 33 Setup 111 Setup 111 Short Message 108 Short message display 108 Shortcut buttons, Network/USB features .........84 Shuffle 79 Shuffle iPod playback 79 Signal Info., GUI menu 114 SILENT CINEMA...
... audio input jacks 56 Selecting decoders 86 Selecting front speaker set 55 Selecting HD Radio audio programs 73 Selecting preset stations, FM/AM tuning ........ 70 Selecting sound field programs 58 Selecting the MULTI CH INPUT component 54 Server, network menu 80 Set the main zone to the standby mode 43 Setting GUI language 43 Setting speaker impedance 43 Set-top box connection 33 Setup 111 Setup 111 Short Message 108 Short message display 108 Shortcut buttons, Network/USB features .........84 Shuffle 79 Shuffle iPod playback 79 Signal Info., GUI menu 114 SILENT CINEMA...


