
Owner's Manual
Page 3
... USB PRG SELECT CLASSICAL 1 CLASSICAL 2 LIVE/CLUB ENTERTAIN 1 2 3 4 MOVIE STEREO ENHANCER SUR. Refer to the motions or operation. DECODE 6 7 8 THX STRAIGHT 9 0 M N R O P 3 En (U.S.A. Remote control 1 2 POWER POWER STANDBY POWER TV AV MULTI V-AUX PHONO MD TAPE BD HD DVD DVD CD CD-R 3 CBL SAT DTV DVR VCR TUNER DOCK NET USB XM 4 AMP TV...
... USB PRG SELECT CLASSICAL 1 CLASSICAL 2 LIVE/CLUB ENTERTAIN 1 2 3 4 MOVIE STEREO ENHANCER SUR. Refer to the motions or operation. DECODE 6 7 8 THX STRAIGHT 9 0 M N R O P 3 En (U.S.A. Remote control 1 2 POWER POWER STANDBY POWER TV AV MULTI V-AUX PHONO MD TAPE BD HD DVD DVD CD CD-R 3 CBL SAT DTV DVR VCR TUNER DOCK NET USB XM 4 AMP TV...
Owner's Manual
Page 6
... mode 78 The functions of the play information display 79 Using Network/USB features 80 Navigating the network and USB menus 80 Remote control operation 81 Using a PC server or Yamaha MCX-2000 82 Installing Windows Media Player 11 on your PC 82 Registering this unit by using the graphical user interface (GUI...) menu 57 Items in GUI menu 57 Basic controls in the GUI menu 57 Basic operation of the GUI menu by using the front...
... mode 78 The functions of the play information display 79 Using Network/USB features 80 Navigating the network and USB menus 80 Remote control operation 81 Using a PC server or Yamaha MCX-2000 82 Installing Windows Media Player 11 on your PC 82 Registering this unit by using the graphical user interface (GUI...) menu 57 Items in GUI menu 57 Basic controls in the GUI menu 57 Basic operation of the GUI menu by using the front...

Owner's Manual
Page 7
... (Web Control Center 120 Remote control features 121 Controlling this unit, a TV, or other components 121 Controlling this unit 121 Controlling a TV 121 Controlling other components 122 Selecting a component to be controlled 123 Controlling optional components (Option mode 123 Customizing the remote control 123 Setting the backlight mode of the remote control (LIGHT)........124 Setting remote control codes (P-SET 124 Programming codes from other remote controls (LEARN...
... (Web Control Center 120 Remote control features 121 Controlling this unit, a TV, or other components 121 Controlling this unit 121 Controlling a TV 121 Controlling other components 122 Selecting a component to be controlled 123 Controlling optional components (Option mode 123 Customizing the remote control 123 Setting the backlight mode of the remote control (LIGHT)........124 Setting remote control codes (P-SET 124 Programming codes from other remote controls (LEARN...

Owner's Manual
Page 8
This receiver supports network connections. Patent No's: 5,451,942;5,956,674;5,974,380;5,978,762;6,226,616;6,487,535 & other countries. and worldwide patents issued & pending. This ... button name on the remote control is given in some jurisdictions. Manufactured under license from iBiquity Digital Corporation. "Dolby", "Pro Logic", and the double-D symbol are registered trademarks of improvements, etc. DTS is a trademark of THX Ltd., which may be registered in part as a result of iBiquity Digital Corporation. YAMAHA CORPORATION hereby grants...
This receiver supports network connections. Patent No's: 5,451,942;5,956,674;5,974,380;5,978,762;6,226,616;6,487,535 & other countries. and worldwide patents issued & pending. This ... button name on the remote control is given in some jurisdictions. Manufactured under license from iBiquity Digital Corporation. "Dolby", "Pro Logic", and the double-D symbol are registered trademarks of improvements, etc. DTS is a trademark of THX Ltd., which may be registered in part as a result of iBiquity Digital Corporation. YAMAHA CORPORATION hereby grants...

Owner's Manual
Page 9
Introduction Introduction Features 10 Getting started 11 Supplied accessories ...11 Using the remote control ...12 Opening and closing the front panel door 12 Quick start guide 13 Preparation: Check the items 13 Step 1: Set up your speakers ...14 Step 2: Connect your Blu-ray Disc/HD DVD player and other components 16 Step 3: Turn on the power and start playback 17 What do you want to do with this unit 18
Introduction Introduction Features 10 Getting started 11 Supplied accessories ...11 Using the remote control ...12 Opening and closing the front panel door 12 Quick start guide 13 Preparation: Check the items 13 Step 1: Set up your speakers ...14 Step 2: Connect your Blu-ray Disc/HD DVD player and other components 16 Step 3: Turn on the power and start playback 17 What do you want to do with this unit 18
Owner's Manual
Page 10
...65 ◆ Adaptive dynamic range controlling capability ☞ P. 102 ◆ Adaptive DSP effect level controlling capability ☞ P. 102 ◆ Remote control with preset remote control codes, learning, macro and buttons and display backlight capability ☞ P. 121 ◆ Simplified remote control ☞ P. 132 ◆...+ 140 W Front presence: 50 W + 50 W Rear presence: 50 W + 50 W Sound field programs ☞ P. 58 ◆ Proprietary Yamaha technology for the creation of sound fields ◆ THX Ultra2 Plus surround modes ☞ P. 87 ◆ CINEMA DSP HD³ mode for creating...
...65 ◆ Adaptive dynamic range controlling capability ☞ P. 102 ◆ Adaptive DSP effect level controlling capability ☞ P. 102 ◆ Remote control with preset remote control codes, learning, macro and buttons and display backlight capability ☞ P. 121 ◆ Simplified remote control ☞ P. 132 ◆...+ 140 W Front presence: 50 W + 50 W Rear presence: 50 W + 50 W Sound field programs ☞ P. 58 ◆ Proprietary Yamaha technology for the creation of sound fields ◆ THX Ultra2 Plus surround modes ☞ P. 87 ◆ CINEMA DSP HD³ mode for creating...

Owner's Manual
Page 11
..., or if exhausted batteries remain in accordance with your local regulations. • If the remote control is cleared, insert new batteries, set up the remote control code and program any acquired functions that you received all of the following parts. dispose of them immediately. Notes • Change all of ...8226; Do not use alkaline batteries. • If the batteries have leaked, dispose of the battery compartment. model) (U.S.A. Remote control POWER POWER STANDBY POWER TV AV MULTI V-AUX PHONO BD HD DVD CBL SAT DVD DTV TUNER DOCK CD DVR NET USB MD TAPE CD-R VCR XM AMP...
..., or if exhausted batteries remain in accordance with your local regulations. • If the remote control is cleared, insert new batteries, set up the remote control code and program any acquired functions that you received all of the following parts. dispose of them immediately. Notes • Change all of ...8226; Do not use alkaline batteries. • If the batteries have leaked, dispose of the battery compartment. model) (U.S.A. Remote control POWER POWER STANDBY POWER TV AV MULTI V-AUX PHONO BD HD DVD CBL SAT DVD DTV TUNER DOCK CD DVR NET USB MD TAPE CD-R VCR XM AMP...

Owner's Manual
Page 12
... panel door When you do not want to aim the remote control directly at the component you can control. SOURCE Operates the component selected with the motion sensor and the remote control lights up the remote control buttons and the display window (4). To open the door by...backlight mode (see page 121). Aim this window at the remote control sensor on the lower part of high humidity, such as near a bath - Getting started Using the remote control The remote control transmits a directional infrared ray. Remote control sensor MAIN ZONE ON/OFF MASTER ON OFF INPUT AUDIO SELECT ...
... panel door When you do not want to aim the remote control directly at the component you can control. SOURCE Operates the component selected with the motion sensor and the remote control lights up the remote control buttons and the display window (4). To open the door by...backlight mode (see page 121). Aim this window at the remote control sensor on the lower part of high humidity, such as near a bath - Getting started Using the remote control The remote control transmits a directional infrared ray. Remote control sensor MAIN ZONE ON/OFF MASTER ON OFF INPUT AUDIO SELECT ...

Owner's Manual
Page 17
... to CAMP and then press CHDMI OUT repeatedly to set "HDMI OUT SEL" to receive infrared signals from the standby mode, press AMAIN ZONE ON/OFF on the front panel (or EPOWER on the remote control). Refer to "Troubleshooting" on pages 146 to 52 for other troubles. 17 En ...To optimize the speaker settings for details: - Any other sound modes for each input source (BD/HD DVD, etc.). This unit performs the stored remote control operations after "Please wait" disappears. 3 Rotate the DINPUT selector to set for playback. y The recommended sound field program is set the input source...
... to CAMP and then press CHDMI OUT repeatedly to set "HDMI OUT SEL" to receive infrared signals from the standby mode, press AMAIN ZONE ON/OFF on the front panel (or EPOWER on the remote control). Refer to "Troubleshooting" on pages 146 to 52 for other troubles. 17 En ...To optimize the speaker settings for details: - Any other sound modes for each input source (BD/HD DVD, etc.). This unit performs the stored remote control operations after "Please wait" disappears. 3 Rotate the DINPUT selector to set for playback. y The recommended sound field program is set the input source...

Owner's Manual
Page 18
...the tonal quality of the speakers ☞ P. 65 • Customizing the sound field programs ☞ P. 86 Additional features • Setting the remote control ☞ P. 121 • Displaying the current input source signal information in the GUI ☞ P. 114 • Saving and recalling the ...system settings of this unit (System Memory) ☞ P. 115 • Controlling this unit using a Web browser ☞ P. 120 • Using headphones ☞ P. 55 • Using this unit in multiple rooms simultaneously ...
...the tonal quality of the speakers ☞ P. 65 • Customizing the sound field programs ☞ P. 86 Additional features • Setting the remote control ☞ P. 121 • Displaying the current input source signal information in the GUI ☞ P. 114 • Saving and recalling the ...system settings of this unit (System Memory) ☞ P. 115 • Controlling this unit using a Web browser ☞ P. 120 • Using headphones ☞ P. 55 • Using this unit in multiple rooms simultaneously ...
Owner's Manual
Page 38
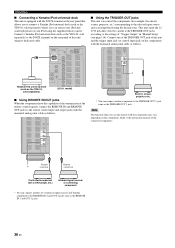
...) to the DOCK terminal on the components. Refer to the settings of "Trigger Output" in Remote control out Controlled component (CD or DVD player, etc.) Infrared signal receiver or controlling component * You can connect another set of infrared signal receiver and Yamaha component to the TRIGGER OUT 2 jack same as the TRIGGER OUT 1 jack. DOCK TRIGGER OUT...
...) to the DOCK terminal on the components. Refer to the settings of "Trigger Output" in Remote control out Controlled component (CD or DVD player, etc.) Infrared signal receiver or controlling component * You can connect another set of infrared signal receiver and Yamaha component to the TRIGGER OUT 2 jack same as the TRIGGER OUT 1 jack. DOCK TRIGGER OUT...

Owner's Manual
Page 43
... BMASTER ON/OFF is pressed inward to turn off this unit. The setting you made is turned on this unit. This unit performs the stored remote control operations after "Please wait" disappears. ■ Turning off . 2 Press and hold MPROGRAM until this unit produces sounds, and while "Please wait"... displayed in English. 7 Press BMASTER ON/OFF to release it takes approximately 20 seconds until "ADVANCED SETUP" appears in order to receive infrared signals from the remote control. ■ Turning on the main zone from the standby mode Press AMAIN ZONE ON/OFF (or EPOWER) to save the new...
... BMASTER ON/OFF is pressed inward to turn off this unit. The setting you made is turned on this unit. This unit performs the stored remote control operations after "Please wait" disappears. ■ Turning off . 2 Press and hold MPROGRAM until this unit produces sounds, and while "Please wait"... displayed in English. 7 Press BMASTER ON/OFF to release it takes approximately 20 seconds until "ADVANCED SETUP" appears in order to receive infrared signals from the remote control. ■ Turning on the main zone from the standby mode Press AMAIN ZONE ON/OFF (or EPOWER) to save the new...

Owner's Manual
Page 46
... the speaker setting for your listening room (YPAO) Optimizing the speaker setting for your listening room (YPAO) This unit employs the YPAO (Yamaha Parametric Room Acoustic Optimizer) technology which lets you use the external amplifiers (see page 36), the amplifiers are turned on and the settings are...is sufficiently quiet. ❏ Set the operation mode selector on and the volume level is set the parameters that it is turned on the remote control to F AMP. recommends setting the level and the distance of the main speakers. If there is too much ambient noise, the results ...
... the speaker setting for your listening room (YPAO) Optimizing the speaker setting for your listening room (YPAO) This unit employs the YPAO (Yamaha Parametric Room Acoustic Optimizer) technology which lets you use the external amplifiers (see page 36), the amplifiers are turned on and the settings are...is sufficiently quiet. ❏ Set the operation mode selector on and the volume level is set the parameters that it is turned on the remote control to F AMP. recommends setting the level and the distance of the main speakers. If there is too much ambient noise, the results ...

Owner's Manual
Page 48
... the automatic setup using the connected video monitor. 1 Turn on page 50. Angle (Speaker angle) For details, refer to "Using advanced automatic setup" on the remote control. This unit starts the measurements immediately. Information Setup Menu Start Start:ENTER 4 Press 9k to the default. Optimizing the speaker setting for the listening room...
... the automatic setup using the connected video monitor. 1 Turn on page 50. Angle (Speaker angle) For details, refer to "Using advanced automatic setup" on the remote control. This unit starts the measurements immediately. Information Setup Menu Start Start:ENTER 4 Press 9k to the default. Optimizing the speaker setting for the listening room...

Owner's Manual
Page 51
... accurate measurements of the speaker angles, we strongly recommend that a check mark appears in the video monitor. Make sure that the arrow mark on the remote control. If the check mark does not appears, press 9ENTER to select "Setup Menu" and then 9h. Information Setup Menu Start Start:ENTER 4 Press 9k to...
... accurate measurements of the speaker angles, we strongly recommend that a check mark appears in the video monitor. Make sure that the arrow mark on the remote control. If the check mark does not appears, press 9ENTER to select "Setup Menu" and then 9h. Information Setup Menu Start Start:ENTER 4 Press 9k to...
Owner's Manual
Page 54
See page 57 for details. • You can control this unit. • See page 80 for a few seconds. See page 108 for details. 2 Rotate the DINPUT selector (or...sound field program Notes • Sound field programs cannot be exercised when you connect two video monitors to the HDMI OUT jacks of your speakers. Control range: Mute, -80.0 dB (minimum) to +16.5 dB (maximum) y See page 65 to adjust the level of each speaker. 5 ... to the MULTI CH INPUT jacks is selected as the input source. y • Choose a sound field program based on the remote control to select "MULTI CH".
See page 57 for details. • You can control this unit. • See page 80 for a few seconds. See page 108 for details. 2 Rotate the DINPUT selector (or...sound field program Notes • Sound field programs cannot be exercised when you connect two video monitors to the HDMI OUT jacks of your speakers. Control range: Mute, -80.0 dB (minimum) to +16.5 dB (maximum) y See page 65 to adjust the level of each speaker. 5 ... to the MULTI CH INPUT jacks is selected as the input source. y • Choose a sound field program based on the remote control to select "MULTI CH".
Owner's Manual
Page 55
...EFFECT DISPLAY MAN'L/AUTO BAND PRESET/TUNING EDIT SEARCH MODE ZONE ON/OFF ZONE REC OUT/ CONTROLS ZONE 2 ZONE 2 S VIDEO ZONE 3 VIDEO ZONE 4 L AUDIO R OPTICAL PROGRAM PUSH ENTER HDMI IN MENU TONE CONTROL USB PHONES OPTIMIZER MIC VIDEO AUX PURE DIRECT VOLUME y When you activate the Zone B speakers... (U.S.A. Press GSPEAKERS A and/or GSPEAKERS B on the front panel to turn the front speaker system (FRONT A and/or FRONT B) on the remote control repeatedly to select the default background video input source of the MULTI CH INPUT sources (see page 98). 55 En Press CHDMI OUT on or...
...EFFECT DISPLAY MAN'L/AUTO BAND PRESET/TUNING EDIT SEARCH MODE ZONE ON/OFF ZONE REC OUT/ CONTROLS ZONE 2 ZONE 2 S VIDEO ZONE 3 VIDEO ZONE 4 L AUDIO R OPTICAL PROGRAM PUSH ENTER HDMI IN MENU TONE CONTROL USB PHONES OPTIMIZER MIC VIDEO AUX PURE DIRECT VOLUME y When you activate the Zone B speakers... (U.S.A. Press GSPEAKERS A and/or GSPEAKERS B on the front panel to turn the front speaker system (FRONT A and/or FRONT B) on the remote control repeatedly to select the default background video input source of the MULTI CH INPUT sources (see page 98). 55 En Press CHDMI OUT on or...

Owner's Manual
Page 56
... switch the input jack assigned to an input source when more than one of the input selector buttons (3) on the remote control to select the desired input source. 2 Start playback on the remote control to resume the audio output. • You can adjust the muting level by pressing AMAIN ZONE ON/OFF (or DSTANDBY... press JVOLUME +/- OFF 30min. 60min. SLEEP Flashes STRAIGHT SLEEP Lights up in "Input Select" (see page 112). • You can also rotate EVOLUME on the remote control to the selected sound field program.
... switch the input jack assigned to an input source when more than one of the input selector buttons (3) on the remote control to select the desired input source. 2 Start playback on the remote control to resume the audio output. • You can adjust the muting level by pressing AMAIN ZONE ON/OFF (or DSTANDBY... press JVOLUME +/- OFF 30min. 60min. SLEEP Flashes STRAIGHT SLEEP Lights up in "Input Select" (see page 112). • You can also rotate EVOLUME on the remote control to the selected sound field program.

Owner's Manual
Page 64
...³ mode. Conventional CINEMA DSP mode creates the large and expanding sound field in the listening room. The sound effect is turned back on the remote control to the MULTI CH INPUT jacks is not available. • If you set the operation mode selector on . when the component connected to FAMP. Notes...
...³ mode. Conventional CINEMA DSP mode creates the large and expanding sound field in the listening room. The sound effect is turned back on the remote control to the MULTI CH INPUT jacks is not available. • If you set the operation mode selector on . when the component connected to FAMP. Notes...
Owner's Manual
Page 65
...unit activates the corresponding decoder. • The following operation, set the operation mode selector on the remote control repeatedly to select the speaker you want to turn on the remote control, you can adjust the output level of the front L/R and center speakers and the subwoofer. •...If you set Audio input jack selects to "Auto", "HDMI", or "Coax/Opt" (see page 102). 1 Press 8LEVEL on the remote control to decrease the value. Control range: -10.0 dB to adjust the high-frequency response (TREBLE), or the low-frequency response (BASS). frequency response (TREBLE), or...
...unit activates the corresponding decoder. • The following operation, set the operation mode selector on the remote control repeatedly to select the speaker you want to turn on the remote control, you can adjust the output level of the front L/R and center speakers and the subwoofer. •...If you set Audio input jack selects to "Auto", "HDMI", or "Coax/Opt" (see page 102). 1 Press 8LEVEL on the remote control to decrease the value. Control range: -10.0 dB to adjust the high-frequency response (TREBLE), or the low-frequency response (BASS). frequency response (TREBLE), or...


