Owners Manual
Page 3
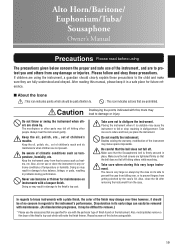
... or humidity. Take care as to key balance, linkage, or pads, resulting in a safe place for maintenance on instruments with a plate finish, the color of the instrument, and are specified for use with maintenance. (As discoloration progresses, it in problems during performance. Make sure that are to damage or injury...found on its early stage can easily be removed with the particular type of no concern in its side to the instrument's performance. The case is very large so always lay the case on the instrument. Also, close by the case's lid. Discoloration in regards ...
... or humidity. Take care as to key balance, linkage, or pads, resulting in a safe place for maintenance on instruments with a plate finish, the color of the instrument, and are specified for use with maintenance. (As discoloration progresses, it in problems during performance. Make sure that are to damage or injury...found on its early stage can easily be removed with the particular type of no concern in its side to the instrument's performance. The case is very large so always lay the case on the instrument. Also, close by the case's lid. Discoloration in regards ...
Owners Manual
Page 4
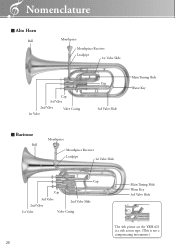
Nomenclature ■ Alto Horn Bell Mouthpiece Mouthpiece Receiver Leadpipe 1st Valve Slide Cap 3rd Valve 2nd Valve 1st Valve Valve Casing Main Tuning Slide Cap Water Key 3rd Valve Slide ■ Baritone Bell Mouthpiece Mouthpiece Receiver Leadpipe 1st Valve Slide Cap Cap 3rd Valve 2nd Valve 2nd Valve Slide 1st Valve Valve Casing 20 Main Tuning Slide Water Key 3rd Valve Slide The 4th piston on the YBH-621 is a side action type. (This is not a compensating instrument.)
Nomenclature ■ Alto Horn Bell Mouthpiece Mouthpiece Receiver Leadpipe 1st Valve Slide Cap 3rd Valve 2nd Valve 1st Valve Valve Casing Main Tuning Slide Cap Water Key 3rd Valve Slide ■ Baritone Bell Mouthpiece Mouthpiece Receiver Leadpipe 1st Valve Slide Cap Cap 3rd Valve 2nd Valve 2nd Valve Slide 1st Valve Valve Casing 20 Main Tuning Slide Water Key 3rd Valve Slide The 4th piston on the YBH-621 is a side action type. (This is not a compensating instrument.)
Owners Manual
Page 5
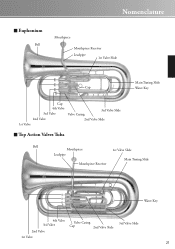
Nomenclature ■ Euphonium Bell Mouthpiece Mouthpiece Receiver Leadpipe 1st Valve Slide Main Tuning Slide Cap Water Key Cap 4th Valve 3rd Valve 2nd Valve 1st Valve Valve Casing 3rd Valve Slide 2nd Valve Slide ■ Top Action Valves Tuba Bell Mouthpiece 1st Valve Slide Leadpipe Main Tuning Slide Mouthpiece Receiver Water Key 4th Valve 3rd Valve 2nd Valve Valve Casing Cap 2nd Valve Slide 3rd Valve Slide 1st Valve 21
Nomenclature ■ Euphonium Bell Mouthpiece Mouthpiece Receiver Leadpipe 1st Valve Slide Main Tuning Slide Cap Water Key Cap 4th Valve 3rd Valve 2nd Valve 1st Valve Valve Casing 3rd Valve Slide 2nd Valve Slide ■ Top Action Valves Tuba Bell Mouthpiece 1st Valve Slide Leadpipe Main Tuning Slide Mouthpiece Receiver Water Key 4th Valve 3rd Valve 2nd Valve Valve Casing Cap 2nd Valve Slide 3rd Valve Slide 1st Valve 21

Owners Manual
Page 6
Nomenclature ■ Rotary Tuba 4th Valve 3rd Valve Mouthpiece Bell Main Tuning Slide 2nd Valve 1st Valve Leadpipe 4th Valve Slide Water Key 1st Rotary Valve 2nd Rotary Valve 3rd Rotary Valve 4th Rotary Valve 1st Valve Slide 2nd Valve Slide ■ Front Action Valves Tuba Bell Mouthpiece Leadpipe 5th Valve Extension 5th Valve Slide Water Key Main Tuning Slide 1st Valve Slide 3rd Valve Slide 5th Rotary Valve 1st Valve 2nd Valve 3rd Valve 4th Valve * Refer to page 27 for 5th valve extension pitches. 22
Nomenclature ■ Rotary Tuba 4th Valve 3rd Valve Mouthpiece Bell Main Tuning Slide 2nd Valve 1st Valve Leadpipe 4th Valve Slide Water Key 1st Rotary Valve 2nd Rotary Valve 3rd Rotary Valve 4th Rotary Valve 1st Valve Slide 2nd Valve Slide ■ Front Action Valves Tuba Bell Mouthpiece Leadpipe 5th Valve Extension 5th Valve Slide Water Key Main Tuning Slide 1st Valve Slide 3rd Valve Slide 5th Rotary Valve 1st Valve 2nd Valve 3rd Valve 4th Valve * Refer to page 27 for 5th valve extension pitches. 22

Owners Manual
Page 7
■ Sousaphone Nomenclature Bell 1st Valve Slide Main Tuning Slide Water Key 3rd Valve Slide ■ Marching Tuba Main Tuning Slide 1st Valve Slide 2nd Valve Slide Mouthpiece Bit Leadpipe 1st Valve 2nd Valve 3rd Valve Cap Water Key 1st Valve 2nd Valve 3rd Valve Slide Mouthpiece 3rd Valve Leadpipe * Specifications and/or design may change for reasons of improvement without notice. 23
■ Sousaphone Nomenclature Bell 1st Valve Slide Main Tuning Slide Water Key 3rd Valve Slide ■ Marching Tuba Main Tuning Slide 1st Valve Slide 2nd Valve Slide Mouthpiece Bit Leadpipe 1st Valve 2nd Valve 3rd Valve Cap Water Key 1st Valve 2nd Valve 3rd Valve Slide Mouthpiece 3rd Valve Leadpipe * Specifications and/or design may change for reasons of improvement without notice. 23
Owners Manual
Page 8
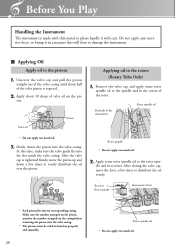
... Slowly return the piston into the slot inside the valve casing. At this time, make sure the valve guide fits into the valve casing. Apply some rotor spindle oil to the spindle and...will dent or damage the instrument. ■ Applying Oil Apply oil to function properly and smoothly. 24 Rotor spindle oil * Do not apply too much oil. 2. Receiver Rotor spindle Instrument's front * Each piston fits... not apply too much oil. ton. Backside of the rotor. Make sure the number stamped on the piston matches the number stamped on the pis- Unscrew the valve cap and pull the ...
... Slowly return the piston into the slot inside the valve casing. At this time, make sure the valve guide fits into the valve casing. Apply some rotor spindle oil to the spindle and...will dent or damage the instrument. ■ Applying Oil Apply oil to function properly and smoothly. 24 Rotor spindle oil * Do not apply too much oil. 2. Receiver Rotor spindle Instrument's front * Each piston fits... not apply too much oil. ton. Backside of the rotor. Make sure the number stamped on the piston matches the number stamped on the pis- Unscrew the valve cap and pull the ...
Owners Manual
Page 9
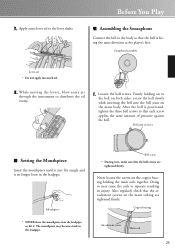
Apply some air through the instrument to the lever shafts. Bell joint receiver ■ Setting the Mouthpiece Insert the mouthpiece until it . Loosen the ... the bell on the main tubing are tightened firmly. Before You Play ■ Assembling the Sousaphone Connect the bell to separate resulting in the leadpipe. Completed assembly Lever oil * Do not apply too much oil. 4. Doing ... each screw applies the same amount of pressure against the bell. Bell screw * During rests, make sure that the attachment screws on both sides, rotate the bell slowly while inserting the bell into...
Apply some air through the instrument to the lever shafts. Bell joint receiver ■ Setting the Mouthpiece Insert the mouthpiece until it . Loosen the ... the bell on the main tubing are tightened firmly. Before You Play ■ Assembling the Sousaphone Connect the bell to separate resulting in the leadpipe. Completed assembly Lever oil * Do not apply too much oil. 4. Doing ... each screw applies the same amount of pressure against the bell. Bell screw * During rests, make sure that the attachment screws on both sides, rotate the bell slowly while inserting the bell into...
Owners Manual
Page 10
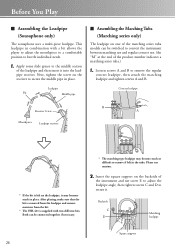
...number indicates a marching series tuba.) 1. After playing, make sure that the bit is removed from the leadpipe and remove moisture from the bit. * The YSH-411 is left on one of the marching series tuba models can be switched to the middle section of the instrument and use... support 26 Next, tighten the screw on the backside of the leadpipe and then insert it may become stuck in the tuba. Before You Play ■ Assembling the Leadpipe (Sousaphone only) The sousaphone uses a multi-piece leadpipe. Both can be connected together if necessary. * The marching type ...
...number indicates a marching series tuba.) 1. After playing, make sure that the bit is removed from the leadpipe and remove moisture from the bit. * The YSH-411 is left on one of the marching series tuba models can be switched to the middle section of the instrument and use... support 26 Next, tighten the screw on the backside of the leadpipe and then insert it may become stuck in the tuba. Before You Play ■ Assembling the Leadpipe (Sousaphone only) The sousaphone uses a multi-piece leadpipe. Both can be connected together if necessary. * The marching type ...
Owners Manual
Page 11
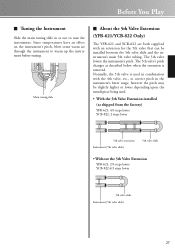
... instrument's pitch. The 5th valve's pitch changes as described below when the extension is used in combination with an extension for the 5th valve that can be slightly higher or lower depending upon the mouthpiece being used. • With the 5th Valve Extension installed (as shipped from the factory)...-822 are both supplied with the 4th valve, etc., to correct pitch in the instrument's lower range, however the pitch may be installed between the 5th valve slide and the instrument's main 5th valve tubing. Before You Play ■ Tuning the Instrument Slide the main tuning slide in or out...
... instrument's pitch. The 5th valve's pitch changes as described below when the extension is used in combination with an extension for the 5th valve that can be slightly higher or lower depending upon the mouthpiece being used. • With the 5th Valve Extension installed (as shipped from the factory)...-822 are both supplied with the 4th valve, etc., to correct pitch in the instrument's lower range, however the pitch may be installed between the 5th valve slide and the instrument's main 5th valve tubing. Before You Play ■ Tuning the Instrument Slide the main tuning slide in or out...
Owners Manual
Page 12
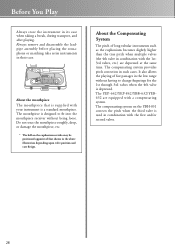
... depressed at the same time. About the Compensating System The pitch of that is supplied with the first and/or second valves. 28 About the mouthpiece The mouthpiece that shown in combination with your instrument is depressed. Before You Play Always store the instrument in such cases. Always remove and disassemble the leadpipe assembly before placing the...
... depressed at the same time. About the Compensating System The pitch of that is supplied with the first and/or second valves. 28 About the mouthpiece The mouthpiece that shown in combination with your instrument is depressed. Before You Play Always store the instrument in such cases. Always remove and disassemble the leadpipe assembly before placing the...

Owners Manual
Page 13
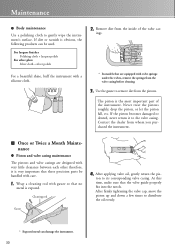
Maintenance ■ After Playing After playing the instrument, make sure that corresponds to the valve slide you want to clean, and remove the slide. ● Oil the pistons As done before playing the instrument, apply some valve oil to the pistons and move them up and down a few times. (See page 24) &#... slide it to the left in poor piston function or damage to remove. Remove moisture from the water key. ● Water Pot Maintenance (YEP-842 Euphonium only) 1. Slide the water pot to the left or right to release, then slide it using the procedure described below. ● Valve slide ...
Maintenance ■ After Playing After playing the instrument, make sure that corresponds to the valve slide you want to clean, and remove the slide. ● Oil the pistons As done before playing the instrument, apply some valve oil to the pistons and move them up and down a few times. (See page 24) &#... slide it to the left in poor piston function or damage to remove. Remove moisture from the water key. ● Water Pot Maintenance (YEP-842 Euphonium only) 1. Slide the water pot to the left or right to release, then slide it using the procedure described below. ● Valve slide ...
Owners Manual
Page 14
... cloth + lacquer polish For silver plate Silver cloth + silver polish For a beautiful shine, buff the instrument with gauze so that these precision parts be used. If the piston becomes damaged or dented, never return it is very important that no metal is exposed... maintenance Use a polishing cloth to gently wipe the instrument's surface. The piston is obvious, the following products can damage the instrument. 30 Contact the dealer from the valve casing before cleaning. 3. ings. * In models that the valve guide properly fits into the notch. At this time, make sure...
... cloth + lacquer polish For silver plate Silver cloth + silver polish For a beautiful shine, buff the instrument with gauze so that these precision parts be used. If the piston becomes damaged or dented, never return it is very important that no metal is exposed... maintenance Use a polishing cloth to gently wipe the instrument's surface. The piston is obvious, the following products can damage the instrument. 30 Contact the dealer from the valve casing before cleaning. 3. ings. * In models that the valve guide properly fits into the notch. At this time, make sure...
Owners Manual
Page 15
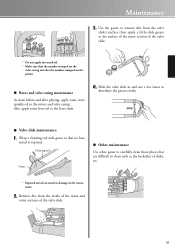
... section of the valve slide. * Do not apply too much oil. * Make sure that the number stamped on the valve casing matches the number stamped on the piston. ● Rotor and valve casing maintenance As done before and after playing, apply some lever oil to clean such as the backsides of the valve... slide. 31 Wrap a cleaning rod with gauze so that are difficult to the lever shaft. 4. Use the gauze to remove dirt from the inside of the inner and outer sections of slides, etc. * Exposed metal can result in and out a few times to the instrument. 2.
... section of the valve slide. * Do not apply too much oil. * Make sure that the number stamped on the valve casing matches the number stamped on the piston. ● Rotor and valve casing maintenance As done before and after playing, apply some lever oil to clean such as the backsides of the valve... slide. 31 Wrap a cleaning rod with gauze so that are difficult to the lever shaft. 4. Use the gauze to remove dirt from the inside of the inner and outer sections of slides, etc. * Exposed metal can result in and out a few times to the instrument. 2.

Owners Manual
Page 16
...the brass soap water solution. After cleaning the instrument, use the brush to 40° C) and 1 part brass soap. Make a brass soap water solution. Before putting the instrument into the soap water solution, remove the pistons, valve casing parts, and slide valves. 2. Never dismantle the ...Maintenance ■ Twice Yearly Maintenance ● Cleaning the instrument 1. Prepare a brass soap water solution using between 10 to 15 parts warm water (30° C to clean the throat of the instrument's pipes. Also, when rinsing the pipes with water, run through tuning slides in the brass...
...the brass soap water solution. After cleaning the instrument, use the brush to 40° C) and 1 part brass soap. Make a brass soap water solution. Before putting the instrument into the soap water solution, remove the pistons, valve casing parts, and slide valves. 2. Never dismantle the ...Maintenance ■ Twice Yearly Maintenance ● Cleaning the instrument 1. Prepare a brass soap water solution using between 10 to 15 parts warm water (30° C to clean the throat of the instrument's pipes. Also, when rinsing the pipes with water, run through tuning slides in the brass...
Owners Manual
Page 17
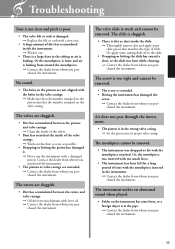
... matches the number stamped on the instrument has come loose, or a foreign object is corroded. • Hitting the instrument has damaged the screw. ➞ Contact the dealer from whom you purchased the instrument. Or, the mouthpiece was dropped or hit with a new one. • A large amount of slide. Troubleshooting Tone is not clear and pitch is poor...
... matches the number stamped on the instrument has come loose, or a foreign object is corroded. • Hitting the instrument has damaged the screw. ➞ Contact the dealer from whom you purchased the instrument. Or, the mouthpiece was dropped or hit with a new one. • A large amount of slide. Troubleshooting Tone is not clear and pitch is poor...
Owners Manual
Page 18
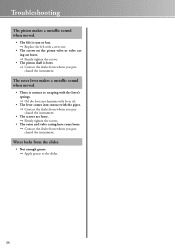
... contact with the pipes. ➞ Contact the dealer from whom you purchased the instrument. • The screws are loose. ➞ Firmly tighten the screws. • The piston shaft is torn or lost. ➞ Replace the felt with a new one. • The screws on the piston valve... casing have come loose. ➞ Contact the dealer from whom you purchased the instrument. Water leaks from the slides. • Not enough grease. ➞ Apply grease to the slides. 34 Troubleshooting The piston makes a metallic sound when moved. • The felt is bent. ➞ Contact the dealer from...
... contact with the pipes. ➞ Contact the dealer from whom you purchased the instrument. • The screws are loose. ➞ Firmly tighten the screws. • The piston shaft is torn or lost. ➞ Replace the felt with a new one. • The screws on the piston valve... casing have come loose. ➞ Contact the dealer from whom you purchased the instrument. Water leaks from the slides. • Not enough grease. ➞ Apply grease to the slides. 34 Troubleshooting The piston makes a metallic sound when moved. • The felt is bent. ➞ Contact the dealer from...

Owners Manual
Page 20
Fingering Chart/Grifftabelle/ Denotes alternate fingerings. ★ ※ Kennzeichnet alternative Griffe. ★ ※ Autres doigtés de remplacement. ■ Alto Horn ■ Althorn in Eb ■ Alto ■ Trompa alto 3 21 Baritone/Euphonium ■ Bariton/Euphonium ■ Baryton/Euphonium ■ Barítono/Eufonio in C 321 4 130
Fingering Chart/Grifftabelle/ Denotes alternate fingerings. ★ ※ Kennzeichnet alternative Griffe. ★ ※ Autres doigtés de remplacement. ■ Alto Horn ■ Althorn in Eb ■ Alto ■ Trompa alto 3 21 Baritone/Euphonium ■ Bariton/Euphonium ■ Baryton/Euphonium ■ Barítono/Eufonio in C 321 4 130

Owners Manual
Page 24
This document is printed on chlorine free (ECF) paper with soy ink. Auf Umweltpapier mit Sojatinte gedruckt. Ce document a été imprimé sur du papier non blanchi au chlore avec de l'encre d'huile de soja. Este documento se ha impreso en papel sin cloro alguno, con tinta de soja ECF ECF ECF ECF 2500856 1308POCP-C0 Printed in Japan
This document is printed on chlorine free (ECF) paper with soy ink. Auf Umweltpapier mit Sojatinte gedruckt. Ce document a été imprimé sur du papier non blanchi au chlore avec de l'encre d'huile de soja. Este documento se ha impreso en papel sin cloro alguno, con tinta de soja ECF ECF ECF ECF 2500856 1308POCP-C0 Printed in Japan


