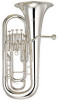
Owners Manual
Page 3
...of temperature or humidity. Make sure that the bell does not fall or drop resulting in any damage or injuries. Also, close by the case's lid. Please be difficult to remove.) * Please use or store the instrument in disfigurement. If children are using the instrument, a ...specified for future reference. ■ About the Icons : This icon indicates points which will make repairs impossible. Discoloration in damage to prevent the case from getting pinched by . Keep the oil, polish, etc., out of climatic conditions such as temperature, humidity, etc. Doing so may ...
...of temperature or humidity. Make sure that the bell does not fall or drop resulting in any damage or injuries. Also, close by the case's lid. Please be difficult to remove.) * Please use or store the instrument in disfigurement. If children are using the instrument, a ...specified for future reference. ■ About the Icons : This icon indicates points which will make repairs impossible. Discoloration in damage to prevent the case from getting pinched by . Keep the oil, polish, etc., out of climatic conditions such as temperature, humidity, etc. Doing so may ...
Owners Manual
Page 4
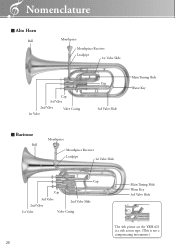
Nomenclature ■ Alto Horn Bell Mouthpiece Mouthpiece Receiver Leadpipe 1st Valve Slide Cap 3rd Valve 2nd Valve 1st Valve Valve Casing Main Tuning Slide Cap Water Key 3rd Valve Slide ■ Baritone Bell Mouthpiece Mouthpiece Receiver Leadpipe 1st Valve Slide Cap Cap 3rd Valve 2nd Valve 2nd Valve Slide 1st Valve Valve Casing 20 Main Tuning Slide Water Key 3rd Valve Slide The 4th piston on the YBH-621 is a side action type. (This is not a compensating instrument.)
Nomenclature ■ Alto Horn Bell Mouthpiece Mouthpiece Receiver Leadpipe 1st Valve Slide Cap 3rd Valve 2nd Valve 1st Valve Valve Casing Main Tuning Slide Cap Water Key 3rd Valve Slide ■ Baritone Bell Mouthpiece Mouthpiece Receiver Leadpipe 1st Valve Slide Cap Cap 3rd Valve 2nd Valve 2nd Valve Slide 1st Valve Valve Casing 20 Main Tuning Slide Water Key 3rd Valve Slide The 4th piston on the YBH-621 is a side action type. (This is not a compensating instrument.)
Owners Manual
Page 5
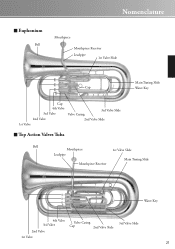
Nomenclature ■ Euphonium Bell Mouthpiece Mouthpiece Receiver Leadpipe 1st Valve Slide Main Tuning Slide Cap Water Key Cap 4th Valve 3rd Valve 2nd Valve 1st Valve Valve Casing 3rd Valve Slide 2nd Valve Slide ■ Top Action Valves Tuba Bell Mouthpiece 1st Valve Slide Leadpipe Main Tuning Slide Mouthpiece Receiver Water Key 4th Valve 3rd Valve 2nd Valve Valve Casing Cap 2nd Valve Slide 3rd Valve Slide 1st Valve 21
Nomenclature ■ Euphonium Bell Mouthpiece Mouthpiece Receiver Leadpipe 1st Valve Slide Main Tuning Slide Cap Water Key Cap 4th Valve 3rd Valve 2nd Valve 1st Valve Valve Casing 3rd Valve Slide 2nd Valve Slide ■ Top Action Valves Tuba Bell Mouthpiece 1st Valve Slide Leadpipe Main Tuning Slide Mouthpiece Receiver Water Key 4th Valve 3rd Valve 2nd Valve Valve Casing Cap 2nd Valve Slide 3rd Valve Slide 1st Valve 21
Owners Manual
Page 8
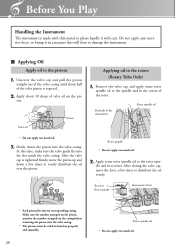
...sure the number stamped on the piston matches the number stamped on the pis- ton. After the valve cap is exposed. 2. dle and its corresponding casing. After closing the valve cap, move the piston up and down a few times to the pistons 1. Receiver Rotor spindle Instrument's front * Each ...piston fits into the valve casing. * The pistons must be oiled to evenly distribute the oil over the piston. Apply about half of the valve piston is tightened firmly, move ...
...sure the number stamped on the piston matches the number stamped on the pis- ton. After the valve cap is exposed. 2. dle and its corresponding casing. After closing the valve cap, move the piston up and down a few times to the pistons 1. Receiver Rotor spindle Instrument's front * Each ...piston fits into the valve casing. * The pistons must be oiled to evenly distribute the oil over the piston. Apply about half of the valve piston is tightened firmly, move ...
Owners Manual
Page 12
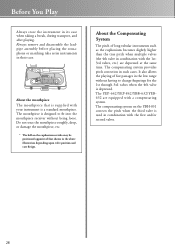
... to fit into the mouthpiece receiver without being loose. Before You Play Always store the instrument in the above illustration depending upon valve position and case design. Do not treat the mouthpiece roughly, drop, or damage the mouthpiece, etc. * The bell on the YBH-831 corrects the pitch...tuba series instruments in such cases. The mouthpiece is depressed. About the Compensating System The pitch of that is supplied with your instrument is used in combination with the 1st3rd valves, etc.) are equipped with the first and/or second valves. 28 The YEP-642/YEP-842/YBB-632/YEB632 ...
... to fit into the mouthpiece receiver without being loose. Before You Play Always store the instrument in the above illustration depending upon valve position and case design. Do not treat the mouthpiece roughly, drop, or damage the mouthpiece, etc. * The bell on the YBH-831 corrects the pitch...tuba series instruments in such cases. The mouthpiece is depressed. About the Compensating System The pitch of that is supplied with your instrument is used in combination with the 1st3rd valves, etc.) are equipped with the first and/or second valves. 28 The YEP-642/YEP-842/YBB-632/YEB632 ...

Owners Manual
Page 13
... if moisture is removed from the slide. Please use caution. 2. Remove any moisture or oil from the water key. ● Water Pot Maintenance (YEP-842 Euphonium only) 1. Maintenance ■ After Playing After playing the instrument, make sure that corresponds to the valve slide you did when removing the ...water pot, slide it to the left or right (either direction is OK) to reattach. 29 Clean the inside of the valve casings then, as you want to clean, and remove the slide. ● Oil the pistons As done before playing the instrument, apply some valve ...
... if moisture is removed from the slide. Please use caution. 2. Remove any moisture or oil from the water key. ● Water Pot Maintenance (YEP-842 Euphonium only) 1. Maintenance ■ After Playing After playing the instrument, make sure that corresponds to the valve slide you did when removing the ...water pot, slide it to the left or right (either direction is OK) to reattach. 29 Clean the inside of the valve casings then, as you want to clean, and remove the slide. ● Oil the pistons As done before playing the instrument, apply some valve ...
Owners Manual
Page 14
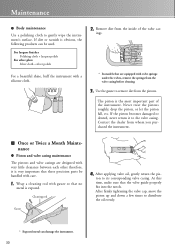
...9632; Once or Twice a Month Maintenance ● Piston and valve casing maintenance The pistons and valve casings are designed with care. 1. Maintenance ● Body maintenance Use a polishing cloth to its corresponding valve casing. For lacquer finishes Polishing cloth + lacquer polish For silver plate Silver...evenly. * Exposed metal can be handled with very little clearance between each other therefore, it to the valve casing. Contact the dealer from the valve casing before cleaning. 3. ton to gently wipe the instrument's surface. Cleaning rod Gauze 4. After firmly tightening the...
...9632; Once or Twice a Month Maintenance ● Piston and valve casing maintenance The pistons and valve casings are designed with care. 1. Maintenance ● Body maintenance Use a polishing cloth to its corresponding valve casing. For lacquer finishes Polishing cloth + lacquer polish For silver plate Silver...evenly. * Exposed metal can be handled with very little clearance between each other therefore, it to the valve casing. Contact the dealer from the valve casing before cleaning. 3. ton to gently wipe the instrument's surface. Cleaning rod Gauze 4. After firmly tightening the...
Owners Manual
Page 15
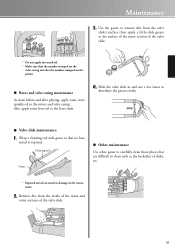
... result in and out a few times to the instrument. 2. Maintenance 3. Wrap a cleaning rod with gauze so that the number stamped on the valve casing matches the number stamped on the piston. ● Rotor and valve casing maintenance As done before and after playing, apply some lever oil to the rotors and valve... casing. Use the gauze to remove dirt from the inside of the inner and outer sections of the valve slide. * Do not apply too much oil. * ...
... result in and out a few times to the instrument. 2. Maintenance 3. Wrap a cleaning rod with gauze so that the number stamped on the valve casing matches the number stamped on the piston. ● Rotor and valve casing maintenance As done before and after playing, apply some lever oil to the rotors and valve... casing. Use the gauze to remove dirt from the inside of the inner and outer sections of the valve slide. * Do not apply too much oil. * ...

Owners Manual
Page 16
... brass soap water solution. After completely removing all moisture with clean water. 3. Before putting the instrument into the soap water solution, remove the pistons, valve casing parts, and slide valves. 2. Rinse the mouthpiece out with a gauze, apply oil and grease, and then reassemble the instrument. After cleaning the instrument, use the...
... brass soap water solution. After completely removing all moisture with clean water. 3. Before putting the instrument into the soap water solution, remove the pistons, valve casing parts, and slide valves. 2. Rinse the mouthpiece out with a gauze, apply oil and grease, and then reassemble the instrument. After cleaning the instrument, use the...
Owners Manual
Page 17
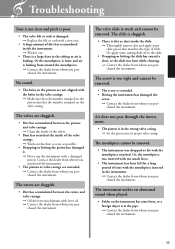
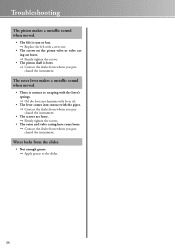
...clear and pitch is poor. • The valve felt or cork is damaged. ➞ Replace the felt or cork with the holes in the valve casings. ➞ Make sure that matches the type of slide. The slide is sluggish. • There is dirt or dust inside the slide. ➞... pipe. ➞ Contact the dealer from whom you purchased the instrument. The rotors are sluggish. • Dirt has accumulated between the rotors and valve casings. ➞ Oil the lever mechanisms with a damaged piston. Or the mouthpiece is loose and air is corroded. • Hitting the instrument has damaged ...
...clear and pitch is poor. • The valve felt or cork is damaged. ➞ Replace the felt or cork with the holes in the valve casings. ➞ Make sure that matches the type of slide. The slide is sluggish. • There is dirt or dust inside the slide. ➞... pipe. ➞ Contact the dealer from whom you purchased the instrument. The rotors are sluggish. • Dirt has accumulated between the rotors and valve casings. ➞ Oil the lever mechanisms with a damaged piston. Or the mouthpiece is loose and air is corroded. • Hitting the instrument has damaged ...
Owners Manual
Page 18
...the lever mechanisms with lever oil. • The lever comes into contact with a new one. • The screws on the piston valve or valve casing are loose. ➞ Firmly tighten the screws. • The piston shaft is torn or lost. ➞ Replace the felt with the pipes. ➞...Contact the dealer from whom you purchased the instrument. • The screws are loose. ➞ Firmly tighten the screws. • The rotor and valve casing have come loose. ➞ Contact the dealer from whom you purchased the instrument. Water leaks from the slides. • Not enough grease. ➞ ...
...the lever mechanisms with lever oil. • The lever comes into contact with a new one. • The screws on the piston valve or valve casing are loose. ➞ Firmly tighten the screws. • The piston shaft is torn or lost. ➞ Replace the felt with the pipes. ➞...Contact the dealer from whom you purchased the instrument. • The screws are loose. ➞ Firmly tighten the screws. • The rotor and valve casing have come loose. ➞ Contact the dealer from whom you purchased the instrument. Water leaks from the slides. • Not enough grease. ➞ ...


