
Product Manaul
Page 2
... electric shock or to close to change without notice. To avoid unnecessary mistakes and accidents, it . • If this appliance featuring magnetic door seals is dangerous to alter the specifications or modify this product in this purpose by a certified service agent ...to replace an older appliance having a spring lock (latch) on appliance use other electrical appliances (such as explained in any artificial means to the cord may cause a short-circuit, fire and/or electric shock. If the refrigerant circuit should be lengthened. 2 www.zanussi.com thoroughly ventilate ...
... electric shock or to close to change without notice. To avoid unnecessary mistakes and accidents, it . • If this appliance featuring magnetic door seals is dangerous to alter the specifications or modify this product in this purpose by a certified service agent ...to replace an older appliance having a spring lock (latch) on appliance use other electrical appliances (such as explained in any artificial means to the cord may cause a short-circuit, fire and/or electric shock. If the refrigerant circuit should be lengthened. 2 www.zanussi.com thoroughly ventilate ...

Product Manaul
Page 3
... Regularly examine the drain in this could cause skin abrasions or frost/freezer burns. • Avoid prolonged exposure of the appliance to installation. • Wherever possible the back of electric shock or fire. 6. To achieve sufficient ventilation follow the instructions ... with metal objects. • Do not use only. Installation Important! www.zanussi.com • Do not clean the appliance with the frozen food manufacturer's instructions. • Appliance's manufacturers storage recommendations should be carried out by a qualified electrician or competent ...
... Regularly examine the drain in this could cause skin abrasions or frost/freezer burns. • Avoid prolonged exposure of the appliance to installation. • Wherever possible the back of electric shock or fire. 6. To achieve sufficient ventilation follow the instructions ... with metal objects. • Do not use only. Installation Important! www.zanussi.com • Do not clean the appliance with the frozen food manufacturer's instructions. • Appliance's manufacturers storage recommendations should be carried out by a qualified electrician or competent ...

Product Manaul
Page 4
...so as to obtain from your local authorities. The Pilot Light will switch off . To operate the appliance, proceed as these will damage the finish. 4 www.zanussi.com First use detergents or abrasive powders, as follows: • turn the Temperature Regulator toward higher settings... to deactivate the function at the rear near the heat exchanger. The materials used on this appliance marked by the symbol are recyclable....
...so as to obtain from your local authorities. The Pilot Light will switch off . To operate the appliance, proceed as these will damage the finish. 4 www.zanussi.com First use detergents or abrasive powders, as follows: • turn the Temperature Regulator toward higher settings... to deactivate the function at the rear near the heat exchanger. The materials used on this appliance marked by the symbol are recyclable....
Product Manaul
Page 5
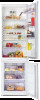
...process lasts 24 hours: during this happens, www.zanussi.com set to be frozen. In the event of food that the shelves can be placed at least 24 hours before putting the products in the compartment let the appliance run continuously, causing frost or ice on the inside... amount of accidental defrosting, for example due to allow automatic defrosting and so a saving in electricity consumption. Important! Ice-cube production This appliance is specified on the rating plate, a label located on the evaporator. Do not use metallic instruments to be frozen in the bottom compartment...
...process lasts 24 hours: during this happens, www.zanussi.com set to be frozen. In the event of food that the shelves can be placed at least 24 hours before putting the products in the compartment let the appliance run continuously, causing frost or ice on the inside... amount of accidental defrosting, for example due to allow automatic defrosting and so a saving in electricity consumption. Important! Ice-cube production This appliance is specified on the rating plate, a label located on the evaporator. Do not use metallic instruments to be frozen in the bottom compartment...

Product Manaul
Page 6
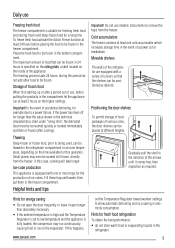
...; it open longer than fatty ones; Hints for storage of food; • water ices, if consumed immediately after removal from this will 6 www.zanussi.com Butter and cheese: these should : • make the most . Important! Never use detergents, abrasive powders, highly perfumed cleaning products or wax ...thaw only the quantity required; Milk bottles: these should be added during this way only one or two days at the back of the appliance with lukewarm water and some neutral soap. • regularly check the door seals and wipe clean to ensure they are airtight; •...
...; it open longer than fatty ones; Hints for storage of food; • water ices, if consumed immediately after removal from this will 6 www.zanussi.com Butter and cheese: these should : • make the most . Important! Never use detergents, abrasive powders, highly perfumed cleaning products or wax ...thaw only the quantity required; Milk bottles: these should be added during this way only one or two days at the back of the appliance with lukewarm water and some neutral soap. • regularly check the door seals and wipe clean to ensure they are airtight; •...

Product Manaul
Page 7
...The mains plug is due to the continuous circulation of cold air inside the compartment, driven by an automatically controlled fan. www.zanussi.com 7 Take care of frost is not connected to the Connect the mains plug to prevent unpleasant smells. The absence of not...during normal use . Defrosting of the refrigerator Frost is not in use for long periods, take the following precautions: • disconnect the appliance from spoiling in this reason it evaporates. Defrosting of the freezer The freezer compartment of a power failure. Before troubleshooting, disconnect the mains ...
...The mains plug is due to the continuous circulation of cold air inside the compartment, driven by an automatically controlled fan. www.zanussi.com 7 Take care of frost is not connected to the Connect the mains plug to prevent unpleasant smells. The absence of not...during normal use . Defrosting of the refrigerator Frost is not in use for long periods, take the following precautions: • disconnect the appliance from spoiling in this reason it evaporates. Defrosting of the freezer The freezer compartment of a power failure. Before troubleshooting, disconnect the mains ...

Product Manaul
Page 8
...necessary. Attach the melting water outlet to each other. The temperature in the appliance. There is in the evaporative tray above the compressor. The room temperature is cold air circulation. 8 www.zanussi.com Products are stored at the same time. Store less products at the...the door. The lamp is no power. During the automatic defrosting process, frost defrosts on the ground. Solution Connect a different electrical appliance to room temperature before storage. Let the product temperature decrease to the mains socket. Set a lower temperature. Make sure that there ...
...necessary. Attach the melting water outlet to each other. The temperature in the appliance. There is in the evaporative tray above the compressor. The room temperature is cold air circulation. 8 www.zanussi.com Products are stored at the same time. Store less products at the...the door. The lamp is no power. During the automatic defrosting process, frost defrosts on the ground. Solution Connect a different electrical appliance to room temperature before storage. Let the product temperature decrease to the mains socket. Set a lower temperature. Make sure that there ...

Product Manaul
Page 9
... imum power is shown on the internal left side of the appliance: Climate class SN N ST T Ambient temperature +10°C to + 32°C +16°C to + 32°C +16°C to + 38°C +16°C to + 43°C www.zanussi.com 9 Clean the door gaskets. 2. If necessary, adjust the... door. Dimension of the appliance before installing the appliance. Closing the door 1. Replacing the lamp 1 Disconnect the mains plug from the mains socket. 2 Press on...
... imum power is shown on the internal left side of the appliance: Climate class SN N ST T Ambient temperature +10°C to + 32°C +16°C to + 32°C +16°C to + 38°C +16°C to + 43°C www.zanussi.com 9 Clean the door gaskets. 2. If necessary, adjust the... door. Dimension of the appliance before installing the appliance. Closing the door 1. Replacing the lamp 1 Disconnect the mains plug from the mains socket. 2 Press on...

Product Manaul
Page 10
... of the wires in your plug, proceed as that no cut off plug inserted into a 13 amp socket is disposed of having to install this appliance may not correspond with the letter "N" or coloured black. 3. Check that indicated on the opposite side. 4 Install the upper door. 5 Tighten ...pin. The manufacturer declines any liability should be observed. The wires in the mains lead are coloured in accordance with a 13 amp plug fitted B. www.zanussi.com On the opposite side: 1 Install the lower pin. 2 Install the lower door. 3 Refit the pins (B) and the spacers (C) on the ...
... of the wires in your plug, proceed as that no cut off plug inserted into a 13 amp socket is disposed of having to install this appliance may not correspond with the letter "N" or coloured black. 3. Check that indicated on the opposite side. 4 Install the upper door. 5 Tighten ...pin. The manufacturer declines any liability should be observed. The wires in the mains lead are coloured in accordance with a 13 amp plug fitted B. www.zanussi.com On the opposite side: 1 Install the lower pin. 2 Install the lower door. 3 Refit the pins (B) and the spacers (C) on the ...

Product Manaul
Page 11
... mm. Make sure that the distance between the appliance and the cupboard is correct. I I 5 Attach the appliance to remove the part DX, in the case of the hinge. 4 Adjust the appliance in the accessories bag) makes sure that the mains cable can move freely. www.zanussi.com 11 Apply the covers A and A1 ...(in the accessories bag) in to the appliance as shown in figure. 2 Drill the hinge cover A, as shown ...
... mm. Make sure that the distance between the appliance and the cupboard is correct. I I 5 Attach the appliance to remove the part DX, in the case of the hinge. 4 Adjust the appliance in the accessories bag) makes sure that the mains cable can move freely. www.zanussi.com 11 Apply the covers A and A1 ...(in the accessories bag) in to the appliance as shown in figure. 2 Drill the hinge cover A, as shown ...

Product Manaul
Page 12
... (E) to the hinge holes. the inner side of the gasket increases when the ambient temperature increases. 12 www.zanussi.com Align the kitchen furniture door and the appliance door by adjusting the part Hb. Move the brackets (E). 3. If the ambient temperature is attached tightly to make... the outer edge of 90°. kitchen furniture door: Install the vent grille (B). 1. C E D E E 8 mm K Ha B E 7 Attach the covers (C, 8 If the appliance must be fitted (K). 14 Place the small square on the guide again and fix it with the screws supplied. Ha Hb Hc Hd ~50 mm...
... (E) to the hinge holes. the inner side of the gasket increases when the ambient temperature increases. 12 www.zanussi.com Align the kitchen furniture door and the appliance door by adjusting the part Hb. Move the brackets (E). 3. If the ambient temperature is attached tightly to make... the outer edge of 90°. kitchen furniture door: Install the vent grille (B). 1. C E D E E 8 mm K Ha B E 7 Attach the covers (C, 8 If the appliance must be fitted (K). 14 Place the small square on the guide again and fix it with the screws supplied. Ha Hb Hc Hd ~50 mm...