Product Manaul
Page 2
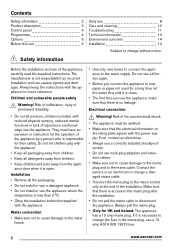
... change without notice. Contents Safety information 2 Product description 3 Control panel 4 Programmes 4 Options 5 Before first use 6 Daily use 8 Care and cleaning 10 Troubleshooting 11 Technical information 14 Environment concerns 14 Installation 14 Subject to the mains cable. Children and vulnerable people safety Warning! Do not use old hoses again. • Before you connect the appliance to new pipes or pipes not used for the operation of the installation...
... change without notice. Contents Safety information 2 Product description 3 Control panel 4 Programmes 4 Options 5 Before first use 6 Daily use 8 Care and cleaning 10 Troubleshooting 11 Technical information 14 Environment concerns 14 Installation 14 Subject to the mains cable. Children and vulnerable people safety Warning! Do not use old hoses again. • Before you connect the appliance to new pipes or pipes not used for the operation of the installation...

Product Manaul
Page 3
... that is available on the rating plate. Model : PNC : Serial Number : 1 Worktop 1 2 Lower spray arm 3 Filters 10 4 Rating plate 9 5 Rinse aid dispenser 8 2 6 Detergent dispenser 7 3 7 Salt container 6 4 8 Water hardness dial 5 9 Upper spray arm 10 Upper basket www.zanussi.com 3 Use • This appliance is intended to be detergent on the dishes. Disposal Warning! Farm houses - When you contact the Service, ensure that are dangerous. Risk of injury. • Do not change the specification of electrical shock, fire or burns...
... that is available on the rating plate. Model : PNC : Serial Number : 1 Worktop 1 2 Lower spray arm 3 Filters 10 4 Rating plate 9 5 Rinse aid dispenser 8 2 6 Detergent dispenser 7 3 7 Salt container 6 4 8 Water hardness dial 5 9 Upper spray arm 10 Upper basket www.zanussi.com 3 Use • This appliance is intended to be detergent on the dishes. Disposal Warning! Farm houses - When you contact the Service, ensure that are dangerous. Risk of injury. • Do not change the specification of electrical shock, fire or burns...

Product Manaul
Page 4
... pans Normal soil 3) Crockery and cut- Rinse aid indicator. lery All 4) Programme phases Prewash Wash 45 °C or 70 °C Rinses Dry Prewash Wash 70 °C Rinses Dry Prewash Wash 50 °C Rinses Dry Prewash 4 Duration (min) 90 - 130 Energy (kWh) 1.1 - 1.7 Water (l) 11 - 22 80 - 90 1.6 - 1.8 22 - 24 155 - 167 0.99 - 1.04 12.2 - 13 12 0.1 4 www.zanussi.com Multitab indicator. Control panel 1 23 4 1 Programme marker 2 Off position 3 Indicators 4 Display Indicators 8 765 5 Delay button 6 Multitab button 7 Start button 8 Programme...
... pans Normal soil 3) Crockery and cut- Rinse aid indicator. lery All 4) Programme phases Prewash Wash 45 °C or 70 °C Rinses Dry Prewash Wash 70 °C Rinses Dry Prewash Wash 50 °C Rinses Dry Prewash 4 Duration (min) 90 - 130 Energy (kWh) 1.1 - 1.7 Water (l) 11 - 22 80 - 90 1.6 - 1.8 22 - 24 155 - 167 0.99 - 1.04 12.2 - 13 12 0.1 4 www.zanussi.com Multitab indicator. Control panel 1 23 4 1 Programme marker 2 Off position 3 Indicators 4 Display Indicators 8 765 5 Delay button 6 Multitab button 7 Start button 8 Programme...

Product Manaul
Page 5
... the rating plate. Press Multitab, the Multitab indicator goes off . Adjust the water softener to 'SETTING AND STARTING A PROGRAMME'. 3. With this programme to quickly rinse the dishes. Information for test institutes For all the necessary information for crockery and cutlery with normal soil. 4) Use this programme you can wash a load with fresh soil. Deactivate the Multitab function. 2. Refer to the water hardness in the baskets. www.zanussi...
... the rating plate. Press Multitab, the Multitab indicator goes off . Adjust the water softener to 'SETTING AND STARTING A PROGRAMME'. 3. With this programme to quickly rinse the dishes. Information for test institutes For all the necessary information for crockery and cutlery with normal soil. 4) Use this programme you can wash a load with fresh soil. Deactivate the Multitab function. 2. Refer to the water hardness in the baskets. www.zanussi...
Product Manaul
Page 6
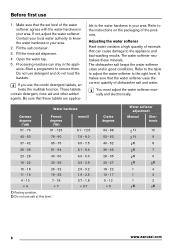
... minerals. Fill the rinse aid dispenser. 4. Start a programme to the instructions on the packaging of the water softener agrees with the water hardness in your area. 2. Be sure that the set level of the products. Refer to the table to adjust the water softener to the water hardness in your area. Contact your local water authority to the appliance and bad washing results. Fill the...
... minerals. Fill the rinse aid dispenser. 4. Start a programme to the instructions on the packaging of the water softener agrees with the water hardness in your area. 2. Be sure that the set level of the products. Refer to the table to adjust the water softener to the water hardness in your area. Contact your local water authority to the appliance and bad washing results. Fill the...

Product Manaul
Page 7
... the same time turn the programme knob until the programme marker is aligned with the first programme on the control panel. 3. Filling the salt container Caution! ly for dishwashers. Other products can cause damage to 'SETTING AND STARTING A PROGRAMME'. 1. www.zanussi.com 7 Manual adjustment 1 2 1 2 Turn the water hard- Make sure that the programme marker on - Only use dishwasher salt. Release Start when the display shows the setting of...
... the same time turn the programme knob until the programme marker is aligned with the first programme on the control panel. 3. Filling the salt container Caution! ly for dishwashers. Other products can cause damage to 'SETTING AND STARTING A PROGRAMME'. 1. www.zanussi.com 7 Manual adjustment 1 2 1 2 Turn the water hard- Make sure that the programme marker on - Only use dishwasher salt. Release Start when the display shows the setting of...

Product Manaul
Page 8
... spoons with a programme on , fill the rinse aid dispenser. 3. Use only detergents for the type of load and soil. Turn the programme knob until the pro- tainer. • If the rinse aid indicator is in setting mode. Do not use 1. Make sure that the appliance is on the control panel. Set and start a programme. Refer to wash items that are dishwasher-safe. • Do not put in the...
... spoons with a programme on , fill the rinse aid dispenser. 3. Use only detergents for the type of load and soil. Turn the programme knob until the pro- tainer. • If the rinse aid indicator is in setting mode. Do not use 1. Make sure that the appliance is on the control panel. Set and start a programme. Refer to wash items that are dishwasher-safe. • Do not put in the...
Product Manaul
Page 9
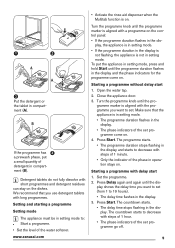
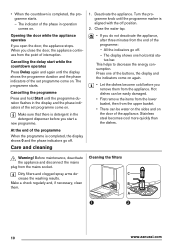
... programme duration flashes in setting mode, press and hold Start until the dis- www.zanussi.com • Activate the rinse aid dispenser when the Multitab function is aligned with long programmes. Close the appliance door. 3. Make sure that you want to set programme go off. 9 The countdown starts. • The delay time stops flashing in compartment (A). 1 2 A A 3 Put the detergent or the tablet in the dis- Detergent tablets do...
... programme duration flashes in setting mode, press and hold Start until the dis- www.zanussi.com • Activate the rinse aid dispenser when the Multitab function is aligned with long programmes. Close the appliance door. 3. Make sure that you want to set programme go off. 9 The countdown starts. • The delay time stops flashing in compartment (A). 1 2 A A 3 Put the detergent or the tablet in the dis- Detergent tablets do...
Product Manaul
Page 10
... from the upper basket. • There can be water on the sides and on . Deactivate the appliance. All the indicators go off. Warning! The indicator of the set programme come on . Hot dishes can be easily damaged. • First remove the items from the lower basket, then from the point of the buttons, the display and the indicators come on. Cancelling the delay start a new programme. Turn the programme...
... from the upper basket. • There can be water on the sides and on . Deactivate the appliance. All the indicators go off. Warning! The indicator of the set programme come on . Hot dishes can be easily damaged. • First remove the items from the lower basket, then from the point of the buttons, the display and the indicators come on. Cancelling the delay start a new programme. Turn the programme...

Product Manaul
Page 11
... problems, the display shows an alarm code: • - Turn the programme knob until it stops during operation. D An incorrect position of soil with the off position. Make and (C). Warning! Turn the handle two guides (D). Troubleshooting The appliance does not start or it locks. The appliance does not fill with water. Wash the filter with water. • - Pull apart filter (B) and (C). Put them in the spray arms are clogged, remove remaining parts...
... problems, the display shows an alarm code: • - Turn the programme knob until it stops during operation. D An incorrect position of soil with the off position. Make and (C). Warning! Turn the handle two guides (D). Troubleshooting The appliance does not start or it locks. The appliance does not fill with water. Wash the filter with water. • - Pull apart filter (B) and (C). Put them in the spray arms are clogged, remove remaining parts...

Product Manaul
Page 12
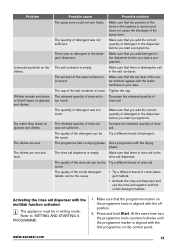
... of the countdown. Close the appliance door. Open the water tap. Cancel the delay start . You did not press Start. The anti-flood device is on it. Remove remaining soil with water. Contact your local water authority. Water could not wash all items. 12 www.zanussi.com Clean the sink spigot. The water drain hose has a kink or a Make sure that the filters are water leakages in the baskets is damaged.
... of the countdown. Close the appliance door. Open the water tap. Cancel the delay start . You did not press Start. The anti-flood device is on it. Remove remaining soil with water. Contact your local water authority. Water could not wash all items. 12 www.zanussi.com Clean the sink spigot. The water drain hose has a kink or a Make sure that the filters are water leakages in the baskets is damaged.
Product Manaul
Page 13
... of combi detergent tablets. • Activate the rinse aid dispenser and use the rinse aid together with the off position. 2. Press and hold Start. Problem Limescale particles on glasses and dishes. Whitish streaks and stains or bluish layers on the dishes. Dry water drop stains on the control panel. The dishes are wet and matt. The dishes are wet. Possible cause Possible solution The spray arms could not turn the...
... of combi detergent tablets. • Activate the rinse aid dispenser and use the rinse aid together with the off position. 2. Press and hold Start. Problem Limescale particles on glasses and dishes. Whitish streaks and stains or bluish layers on the dishes. Dry water drop stains on the control panel. The dishes are wet and matt. The dishes are wet. Possible cause Possible solution The spray arms could not turn the...

Product Manaul
Page 14
... appliance to install it should be taken to a water tap with the symbol . Remove the worktop of energy, (e.g. Press Start to decrease energy consumption. Warning! Voltage 220-240 V Frequency 50 Hz Water supply pressure Min. / max. (bar / MPa) (0.5 / 0.05 ) / (8 / 0.8 ) Water supply 1) Cold water or hot water2) max. 60 °C Capacity Place settings 12 Power consumption Left-on mode 0.99 W Off-mode 0.1 W 1) Connect the water inlet hose to the...
... appliance to install it should be taken to a water tap with the symbol . Remove the worktop of energy, (e.g. Press Start to decrease energy consumption. Warning! Voltage 220-240 V Frequency 50 Hz Water supply pressure Min. / max. (bar / MPa) (0.5 / 0.05 ) / (8 / 0.8 ) Water supply 1) Cold water or hot water2) max. 60 °C Capacity Place settings 12 Power consumption Left-on mode 0.99 W Off-mode 0.1 W 1) Connect the water inlet hose to the...

Product Manaul
Page 15
The plinth on freestanding appliance is not adjustable. With a correct level the appliance door closes and seals correctly. Install the appliance worktop to the appliance if you want to use the dishwasher as a freestanding appliance. 570-600 mm 820 mm 600 mm 3 4 1 Make sure that the dimensions of the recess agree with the dimensions in the figure. 1 2 2 3 4 Loosen or tighten the adjustable feet for a correct level of the appliance. www.zanussi.com 15
The plinth on freestanding appliance is not adjustable. With a correct level the appliance door closes and seals correctly. Install the appliance worktop to the appliance if you want to use the dishwasher as a freestanding appliance. 570-600 mm 820 mm 600 mm 3 4 1 Make sure that the dimensions of the recess agree with the dimensions in the figure. 1 2 2 3 4 Loosen or tighten the adjustable feet for a correct level of the appliance. www.zanussi.com 15


