Specification Sheet
Page 1
... last for easy cleaning • 2 stylish cast iron pan supports • Automatic integrated ignition • Safety gas cut off using thermocouples • Easy to cook your hob a professional finish. To activate the cooking zones, simply press the temperature knob down and turn. Easily place and move everything around on the spacious hob, even when you need an extra burst of heat, the Powerful Wok burner is designed...
... last for easy cleaning • 2 stylish cast iron pan supports • Automatic integrated ignition • Safety gas cut off using thermocouples • Easy to cook your hob a professional finish. To activate the cooking zones, simply press the temperature knob down and turn. Easily place and move everything around on the spacious hob, even when you need an extra burst of heat, the Powerful Wok burner is designed...

Specification Sheet
Page 2
Power/Diameter Right rear - Product Specification Hobs Dimensions Aperture dimensions HxWxD in Gas Hob 60 cm ZGH66424XX Power/Diameter Gas supply: natural gas Gas replacement Gas replacement Residual heat indicator Led Colour ProdPartCode 595x510 40x560x480 9000 1.1 Thermocouple 4000W/128mm 2000W/70mm 1000W/54mm 2000W/70mm G20 (2H) 20 mbar G30/G31 (3+) 28-30/37 mbar, With Additional Injectors No No No All Open Series 40 Slim line Built-in mm Max power gas, W Cord Length Hob safety Dial Rear - Power/Diameter Right front -
Power/Diameter Right rear - Product Specification Hobs Dimensions Aperture dimensions HxWxD in Gas Hob 60 cm ZGH66424XX Power/Diameter Gas supply: natural gas Gas replacement Gas replacement Residual heat indicator Led Colour ProdPartCode 595x510 40x560x480 9000 1.1 Thermocouple 4000W/128mm 2000W/70mm 1000W/54mm 2000W/70mm G20 (2H) 20 mbar G30/G31 (3+) 28-30/37 mbar, With Additional Injectors No No No All Open Series 40 Slim line Built-in mm Max power gas, W Cord Length Hob safety Dial Rear - Power/Diameter Right front -

User Manual
Page 2
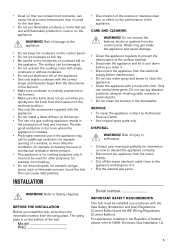
... dispose of the appliance without supervision. Accessible parts are the result of the appliance, carefully read the supplied instructions. The manufacturer is not responsible for future reference. GENERAL SAFETY • WARNING: The appliance and its accessible parts become hot during use of incorrect installation or usage. Care should be taken to avoid touching heating elements. • Do not operate the appliance...
... dispose of the appliance without supervision. Accessible parts are the result of the appliance, carefully read the supplied instructions. The manufacturer is not responsible for future reference. GENERAL SAFETY • WARNING: The appliance and its accessible parts become hot during use of incorrect installation or usage. Care should be taken to avoid touching heating elements. • Do not operate the appliance...
User Manual
Page 3
... installation instructions supplied with the appliance. • Keep the minimum distance from steam and moisture. 3 with water, but switch off the appliance and then cover flame e.g. Complete disconnection in the appliance. The use of fire: Do not store items on the cooking surfaces. • Metallic objects such as suitable or hob guards incorporated in compliance with a contact gap is directly connected...
... installation instructions supplied with the appliance. • Keep the minimum distance from steam and moisture. 3 with water, but switch off the appliance and then cover flame e.g. Complete disconnection in the appliance. The use of fire: Do not store items on the cooking surfaces. • Metallic objects such as suitable or hob guards incorporated in compliance with a contact gap is directly connected...
User Manual
Page 4
... mains plug (if applicable) or to install a non-combustible separation panel under a window. Keep flames or heated objects away from the mains at the end of the appliance are compatible. • Make sure that the local distribution conditions (nature of the gas and gas pressure) and the adjustment of the installation. Make sure that the ventilation openings are compatible with the electrical ratings...
... mains plug (if applicable) or to install a non-combustible separation panel under a window. Keep flames or heated objects away from the mains at the end of the appliance are compatible. • Make sure that the local distribution conditions (nature of the gas and gas pressure) and the adjustment of the installation. Make sure that the ventilation openings are compatible with the electrical ratings...
User Manual
Page 5
... positioned on the burners. • Make sure the flame does not go out when you clean it. • Disconnect the appliance from the electrical supply before you quickly turn the knob from the maximum to the minimum position. • Use only the accessories supplied with the appliance. • Do not install a flame diffuser on the burner. • The use of a gas cooking appliance results in...
... positioned on the burners. • Make sure the flame does not go out when you clean it. • Disconnect the appliance from the electrical supply before you quickly turn the knob from the maximum to the minimum position. • Use only the accessories supplied with the appliance. • Do not install a flame diffuser on the burner. • The use of a gas cooking appliance results in...

User Manual
Page 6
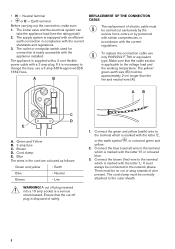
...! Rigid connection: Carry out connection by a GAS SAFE REGISTER installer. With a socket spanner 7 remove the injectors and replace them with nut B. Provision for Electrical Installations. If there are other safety instructions incorporated in the Republic of 100 cm² is required. Location The hob may be located in the same room, B.S. 5440 Part 2 Current Edition, should be carried out by using excessive force. Domestic Gas Installation...
...! Rigid connection: Carry out connection by a GAS SAFE REGISTER installer. With a socket spanner 7 remove the injectors and replace them with nut B. Provision for Electrical Installations. If there are other safety instructions incorporated in the Republic of 100 cm² is required. Location The hob may be located in the same room, B.S. 5440 Part 2 Current Edition, should be carried out by using excessive force. Domestic Gas Installation...

User Manual
Page 7
.... your own safety the installation must fit an applicable pressure adjuster on the gas supply pipe. 4. Make sure the flame does not go out when you quickly turn for the new type of more than 90° C. The hob has a terminal block which is a risk of a turn the knob from the necessary pressure, you change: • from natural gas G20 20 mbar to liquid...
.... your own safety the installation must fit an applicable pressure adjuster on the gas supply pipe. 4. Make sure the flame does not go out when you quickly turn for the new type of more than 90° C. The hob has a terminal block which is a risk of a turn the knob from the necessary pressure, you change: • from natural gas G20 20 mbar to liquid...
User Manual
Page 8
The outlet or omnipolar switch used for connection is easily accessible with the current standards and regulations 3. To replace the connection cable use a 3 amp ASTA-approved (BS 1362) fuse. The yellow/ green earth wire (B) must be approximately 2 cm longer than the live ) wire to the terminal which is equipped with an efficient earth connection in compliance with the appliance installed. Neutral Brown - • N - The...
The outlet or omnipolar switch used for connection is easily accessible with the current standards and regulations 3. To replace the connection cable use a 3 amp ASTA-approved (BS 1362) fuse. The yellow/ green earth wire (B) must be approximately 2 cm longer than the live ) wire to the terminal which is equipped with an efficient earth connection in compliance with the appliance installed. Neutral Brown - • N - The...

User Manual
Page 9
ASSEMBLY 1. If a furniture unit is installed at a distance of 400 mm above the hob, there must be a minimum safety distance of 50 mm to the left or right from the edge of the hob. 5. 6. 2. 3. 7. min. 600 mm min. 100 mm min. 55 mm min. 650 mm 30 mm 480+02 mm 560+02 mm 8. 4. 400 mm 50 mm A A) supplied bracket 9
ASSEMBLY 1. If a furniture unit is installed at a distance of 400 mm above the hob, there must be a minimum safety distance of 50 mm to the left or right from the edge of the hob. 5. 6. 2. 3. 7. min. 600 mm min. 100 mm min. 55 mm min. 650 mm 30 mm 480+02 mm 560+02 mm 8. 4. 400 mm 50 mm A A) supplied bracket 9

User Manual
Page 10
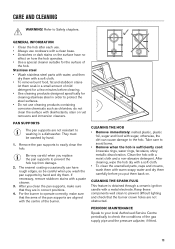
... door or drawer A. 9. min 6 mm PRODUCT DESCRIPTION COOKING SURFACE LAYOUT 1 2 3 4 1 Semi-rapid burner 2 Multi Crown burner 3 Auxiliary burner 4 Control knobs 10 A min 30 mm B min 5 mm (max 150 mm) 60 mm CAUTION! Removable panel B. Space for connections Kitchen unit with oven The electrical connection of the hob and the oven must be installed separately for safety reasons and to remove and let an easy access in case...
... door or drawer A. 9. min 6 mm PRODUCT DESCRIPTION COOKING SURFACE LAYOUT 1 2 3 4 1 Semi-rapid burner 2 Multi Crown burner 3 Auxiliary burner 4 Control knobs 10 A min 30 mm B min 5 mm (max 150 mm) 60 mm CAUTION! Removable panel B. Space for connections Kitchen unit with oven The electrical connection of the hob and the oven must be installed separately for safety reasons and to remove and let an easy access in case...

User Manual
Page 11
... position Symbol Description minimum gas supply DAILY USE ignition position / maximum gas supply WARNING! If the burner does not light after 15 seconds, release the control knob, turn it is interrupted. 3. WARNING! CONTROL KNOB Symbol Description no gas supply / off position and try to light the burner again after it counterclockwise to Safety chapters. Burner cap B. If not, the gas supply is regular. Adjust the flame after minimum 1 minute. This lets...
... position Symbol Description minimum gas supply DAILY USE ignition position / maximum gas supply WARNING! If the burner does not light after 15 seconds, release the control knob, turn it is interrupted. 3. WARNING! CONTROL KNOB Symbol Description no gas supply / off position and try to light the burner again after it counterclockwise to Safety chapters. Burner cap B. If not, the gas supply is regular. Adjust the flame after minimum 1 minute. This lets...
User Manual
Page 12
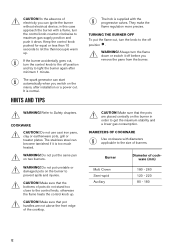
... a lower gas consumption. COOKWARE CAUTION! The hob is normal. DIAMETERS OF COOKWARE Use cookware with diameters applicable to Safety chapters. In the absence of electricity you remove the pans from the burner. If the burner accidentally goes out, turn the control knob counter-clockwise to prevent spills and injuries. It is supplied with a flame, turn the control knob to the control knob, otherwise the flame heats the control knob up . WARNING...
... a lower gas consumption. COOKWARE CAUTION! The hob is normal. DIAMETERS OF COOKWARE Use cookware with diameters applicable to Safety chapters. In the absence of electricity you remove the pans from the burner. If the burner accidentally goes out, turn the control knob counter-clockwise to prevent spills and injuries. It is supplied with a flame, turn the control knob to the control knob, otherwise the flame heats the control knob up . WARNING...
User Manual
Page 13
... to easily clean the hob. After you replace the pan supports to prevent difficult lighting and check that the arms of the gas supply pipe and the pressure adjuster, if fitted. 13 PERIODIC MAINTENANCE Speak to your local Authorised Service Centre periodically to avoid burns. • Remove when the hob is obtained through a ceramic ignition candle with a paste cleaner. 3. Stainless steel • Wash stainless steel parts with...
... to easily clean the hob. After you replace the pan supports to prevent difficult lighting and check that the arms of the gas supply pipe and the pressure adjuster, if fitted. 13 PERIODIC MAINTENANCE Speak to your local Authorised Service Centre periodically to avoid burns. • Remove when the hob is obtained through a ceramic ignition candle with a paste cleaner. 3. Stainless steel • Wash stainless steel parts with...

User Manual
Page 14
... burner cap and crown correctly. The instructions about the Service Centre and conditions of guarantee are placed incorrectly. TROUBLESHOOTING WARNING! Burner cap and crown are in the guarantee booklet. 14 Check if the hob is not heated up sufficiently. After lightning the flame, keep the knob pushed for equal or less than 10 seconds. Thermocouple is correctly connected to activate the spark...
... burner cap and crown correctly. The instructions about the Service Centre and conditions of guarantee are placed incorrectly. TROUBLESHOOTING WARNING! Burner cap and crown are in the guarantee booklet. 14 Check if the hob is not heated up sufficiently. After lightning the flame, keep the knob pushed for equal or less than 10 seconds. Thermocouple is correctly connected to activate the spark...
User Manual
Page 15
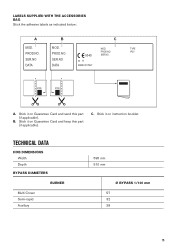
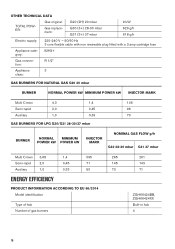
MOD. TECHNICAL DATA HOB DIMENSIONS Width Depth BYPASS DIAMETERS BURNER Multi Crown Semi-rapid Auxiliary 595 mm 510 mm Ø BYPASS 1/100 mm 57 32 28 15 MOD. IP20 SER.NO SER.NO 03 IT DATA DATA MADE IN ITALY A. Stick it on Guarantee Card and keep this part (if applicable). PROD.NO. 0049 PROD.NO. LABELS SUPPLIED WITH THE ACCESSORIES BAG Stick the adhesive labels as indicated below: A B C MOD. SER.NO. Stick it on instruction booklet. Stick it on Guarantee Card and send this part (if applicable). TYPE PROD.NO. B. C.
MOD. TECHNICAL DATA HOB DIMENSIONS Width Depth BYPASS DIAMETERS BURNER Multi Crown Semi-rapid Auxiliary 595 mm 510 mm Ø BYPASS 1/100 mm 57 32 28 15 MOD. IP20 SER.NO SER.NO 03 IT DATA DATA MADE IN ITALY A. Stick it on Guarantee Card and keep this part (if applicable). PROD.NO. 0049 PROD.NO. LABELS SUPPLIED WITH THE ACCESSORIES BAG Stick the adhesive labels as indicated below: A B C MOD. SER.NO. Stick it on instruction booklet. Stick it on Guarantee Card and send this part (if applicable). TYPE PROD.NO. B. C.
User Manual
Page 16
OTHER TECHNICAL DATA TOTAL POWER: Gas original: Gas replacement: G20 (2H) 20 mbar G30 (3+) 28-30 mbar G31 (3+) 37 mbar 9 kW 629 g/h 618 g/h Electric supply: 220-240 V ~ 50/60 Hz 3 core flexible cable with non rewireable plug fitted with a 3 amp cartridge fuse Appliance category: II2H3+ Gas connection: R 1/2" Appliance 3 class: GAS BURNERS FOR NATURAL GAS G20 20 mbar BURNER NORMAL POWER kW MINIMUM POWER kW INJECTOR MARK Multi Crown 4,0 1,4 146...
OTHER TECHNICAL DATA TOTAL POWER: Gas original: Gas replacement: G20 (2H) 20 mbar G30 (3+) 28-30 mbar G31 (3+) 37 mbar 9 kW 629 g/h 618 g/h Electric supply: 220-240 V ~ 50/60 Hz 3 core flexible cable with non rewireable plug fitted with a 3 amp cartridge fuse Appliance category: II2H3+ Gas connection: R 1/2" Appliance 3 class: GAS BURNERS FOR NATURAL GAS G20 20 mbar BURNER NORMAL POWER kW MINIMUM POWER kW INJECTOR MARK Multi Crown 4,0 1,4 146...
User Manual
Page 17
..., turn down the flame to the size of electrical and electronic appliances. Return the product to its user manual. Multi crown Right front - Refer to your local recycling facility or contact your municipal office. 17 * Auxiliary 54.5% 58.1% 59.7% not applicable 57.4% EN 30-2-1: Domestic cooking appliances burning gas - Do not dispose of energy - Energy efficiency per gas burner (EE gas burner...
..., turn down the flame to the size of electrical and electronic appliances. Return the product to its user manual. Multi crown Right front - Refer to your local recycling facility or contact your municipal office. 17 * Auxiliary 54.5% 58.1% 59.7% not applicable 57.4% EN 30-2-1: Domestic cooking appliances burning gas - Do not dispose of energy - Energy efficiency per gas burner (EE gas burner...

Product information sheet
Page 1
Attribute Name Model Denomination Type of hob Number of gas burners Energy efficiency per gas burner Energy efficiency for the gas hob Position Symbol Value Unit ZGH66424XX 949640611 Built-In Hob Right Front - Auxiliary EEgas burner N/A % Burner EEgas hob ,0 %
Attribute Name Model Denomination Type of hob Number of gas burners Energy efficiency per gas burner Energy efficiency for the gas hob Position Symbol Value Unit ZGH66424XX 949640611 Built-In Hob Right Front - Auxiliary EEgas burner N/A % Burner EEgas hob ,0 %


